


Here beginneth the promised long and short stitch shading lessons. These will appear as regular posts on Needle ‘n Thread over the next several weeks. Even if you aren’t inclined to learn long and short stitch, I still hope you find these little tutorials interesting, informative, and helpful for whatever hand embroidery technique you prefer. Of course, I’ll still be adding regular content to Needle ‘n Thread between the lessons. The lessons will be spaced out, with at least one a week, and not more than two. Here we go, then, with Lesson 1.
You already know that, before you launch into most embroidery projects, you have to do some preliminary work. Today’s lesson covers the preliminaries.
Lesson 1: Getting Started
Objectives
1. to gather & organize materials
2. to transfer the design
3. to frame (or hoop) up the fabric for stitching.
Materials
1. Fabric: high count cotton (muslin, calico) in solid color (white, natural): 12″ x 12″ square.
2. Transfer tool (your choice): #2 pencil, water-soluble fabric marker, micron art pen (.005), iron-on pencil, or dressmaker’s carbon, whichever method of transfer you prefer. I’m using a #2 mechanical pencil. I use mechanical pencils because they’re consistently sharp.
3. Scotch tape
4. Pair of 10″ stretcher bars OR a decent embroidery hoop (4″ or 6″ will work well)
5. Iron and ironing board
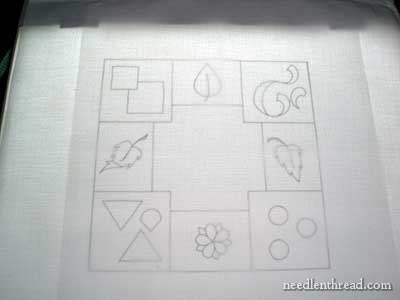
6. Pattern (below)
7. #9 or #10 crewel needles (I will use size 10)
8. Small, sharp scissors
9. Embroidery threads: DMC stranded cotton in the following colors, arranged numerically below for easy shopping. You’ll find them grouped by design element further along in the lesson.
158, 159, 160, 161, 223, 225, 347, 349, 351, 353, 469, 471, 472, 613, 745, 814, 3011, 3012, 3013, 3052, 3855, Ecru
10. Pencil for marking stitch direction as you progress (if you don’t use a regular pencil for transferring your design)
11. Good lighting! If you don’t have a light specifically for your needlework or crafts, I suggest a very sunny window or porch, or as bright a light inside as you can manage.
Procedure
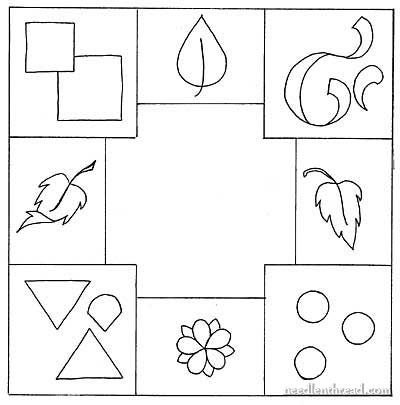
1. Print this PDF of the Long and Short Stitch Lessons Pattern. It should print as approximately a 7″ square. The pattern is designed so that you can work the whole piece or you can work each individual element separately on scrap fabric. If you are stitching each element individually on scrap fabric, you can skip the next step.
2. Cut a 12″ square of fabric and stitch the edges with a zig-zag stitch on your sewing machine to keep the edges from fraying. Alternately, you can hand stitch around the edges with a whip stitch. (This is a normal step in setting up a project, but on this project, I admit that I skipped stitching the edges!)
3. Iron your fabric well. You can use starch if you wish. It doesn’t make any difference in the stitching (as long as there’s no flaking on the fabric), and it will rinse out at the end. You want your fabric smooth and wrinkle-free.
4. Choose your favorite method for transferring a design onto fabric. You will find several methods discussed under Tips and Tricks for Hand Embroidery here on Needle ‘n Thread. For this type of embroidery, I’m using a light box and a pencil.
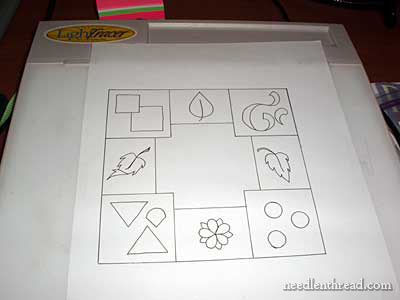
First, tape your pattern to your light box. A sunny window will give you the same results as a light box, if you don’t have one.
Center your fabric over the pattern and align the lines (as much as possible) with the grain of the fabric. You don’t want to be stitching on the bias! Tape your fabric to the light box, too. I eye-balled the center of the fabric, but if you want to be more precise, you can finger-fold the fabric in half lightly, horizontally and vertically, so you can see where the center of the fabric is.

Using a #2 pencil, trace the design. Use a straight-edge (ruler or what-have-you) for the lines. Don’t “stroke” as you trace. Try to trace with one smooth, constant line.
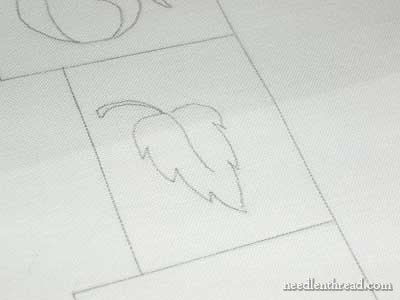
Notice that the lines aren’t hairy or sketchy.
5. Now you’re ready to frame up your fabric, if you’re using stretcher bars. If you’re using a hoop, you don’t need to hoop the fabric up until you’re ready to start stitching.
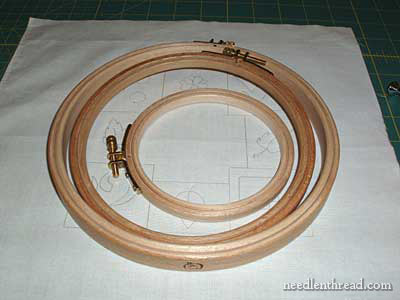
A 4″ hoop will fit individual design elements. You can use anywhere from a 4″ – 6″ hoop. If you can’t find a Really Good Hoop, that’s ok. Use a plastic Susan Bates-type hoop – it will work fine for this project. Just be sure to tighten the hoop and your fabric often.
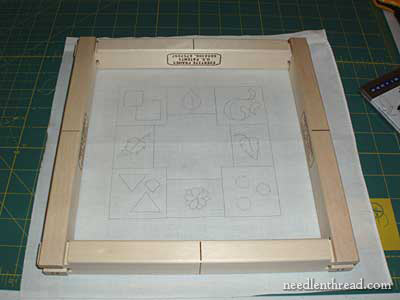
I’ll be using stretcher bar frames – specifically, Evertite stretcher bars. If you’re using stretcher bars, a 10″ square will work. But, if you’re not familiar with all these tools and gadgets, just use a simple hoop – you’ll be fine!
6. Gather your threads and organize them according to your favorite method. You can separate them for each element, so that you only have to have the necessary threads out at one time.
Element 1 (Boxes) and Element 3 (Circles): 814, 347, 349, 351, 353, 3855, 745, & Ecru
Element 2 (Triangles) and Element 4 (Ribbon Swirly): 158, 159, 160, 161
Leaves: 469, 471, 472, 613, 3011, 3012, 3013, 3052
Little Flower: Ecru, 223, 225
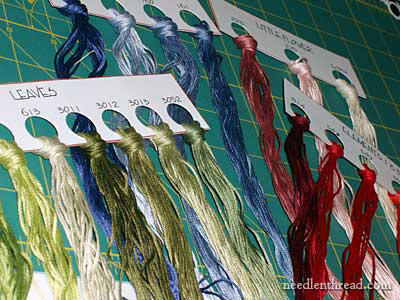
If you want to use thread cards for organization, you can print the threads cards, already numbered. The directions for using the cards have already been discussed here on Needle ‘n Thread, and the link is provided below, too.
Long and Short Stitch Thread Cards (PDF)
Directions for Organizing Threads using Thread Cards
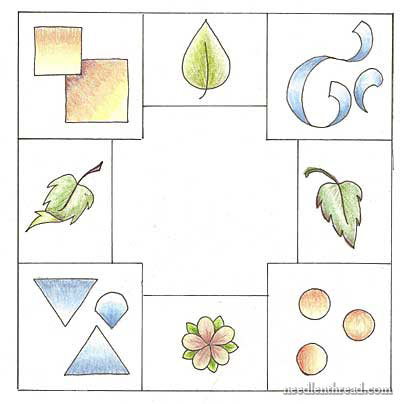
7. Take a look at the colored design, below. I colored it with prismacolors. The color isn’t 100% accurate – I’ve made some adjustments while stitching – but at least it gave me a sense of what c
olors I wanted to use, and the general direction of the shading. To get a sense of shading, try coloring your pattern yourself, if you have colored pencils on hand. You don’t have to do this, of course, but it will help familiarize you with the direction we’re going in. I think it’s always a good idea to at least try to color a shaded design yourself, if possible, to get the feel for the shading.
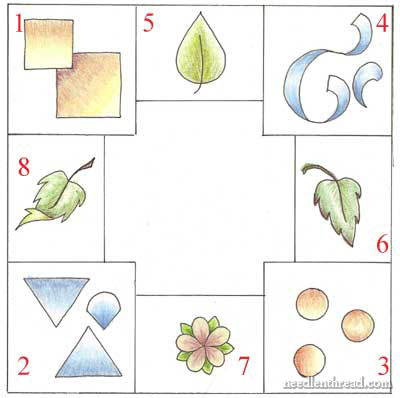
Order of Stitching the Project
The elements of the project will be stitched in a specific sequence, as indicated in the picture below.
Summary of Print Materials
Here’s a summary of all the printed material for Lesson One. They’re all PDF documents. The lesson itself is available as well. There are no pictures included in it – just straight text – but if you want to print it and read through it at your convenience, you may.
L&S; Project Pattern
L&S; Colored Pattern
Thread Cards
L&S; Lesson One: Getting Started (including materials list) (a luxury – this may not always happen, but I’ll definitely try!)
Conclusion
I’m not covering any stitching in Lesson One, in order to give those of you following these tutorials the weekend to gather supplies and set up your project.
If you have any questions, don’t hesitate to leave a comment below. Any questions directly related to the lessons can be left in the comment section on Needle ‘n Thread, below this article, so that others will learn from any ensuing discussion or clarifications, too.
If you’re on board for these lessons and want to make sure you don’t miss any, feel free to sign up for my daily newsletter. You’ll find the sign-up box near the top of the page, in the right-hand column. You’ll receive each day’s post in your inbox, on the day that it’s posted. Also, it’ll give you a more printer-friendly version, if you intend to print out the tutorials.
Don’t hesitate to let me know if you have any questions, suggestions, difficulties, etc.!
Move On To Lesson Two: Basic Long and Short Stitch with Video Tutorials
WOW! Absolutely complete lesson dear Mary, like always you do!!!
Thanks so much!
Hugs 🙂
Maria del Valle
Thanks for the detailed instructions. You have really put in a lot of effort and I just want you to know that it is appreciated
Am I the first to comment *grin*. Thanks a lot for the lessons,Mary. One question – what is a grain and what is a bias?
I've tried twice to print the colored diagram in color, but it won't print in color. Would you mind looking at it at your end? I'll try again later.
Thanks,
karen
What a clearly planned and neatly organized tutorial. I wonder how you get time and patience to do this. Appreciate your efforts.
Hi, all – Thanks, glad you like the tutorials so far…
Karen, It prints in color from my end. Check "properties" on your print screen (go to "file" then "print" then, when you get the pop up menu for your printer, make sure you have color selected in the properties). Hope that works.
Deepa – by grain, I mean along the weave of the fabric – try to line the pattern up parallel to the weave of the fabric. Bias is the diagonal of the fabric, and it's generally stretchy.
MC
Thank you for sharing these lessons.
My long and short stitching has never been up to par. I will definitely be following along with your tutorials.
Hi Mary, I am looking so forward to this tutorial. I treated myself to a new hoop and bought all the dmc colours. Today I am gong to try and get everything set up and ready to go. Over the years I have done lots of embroidery work, but I have never been able to perfect long and short. This time I will master it.
Karen
Whoops – fixed the character problem (from cutting and pasting from Word!) Thanks, Margaret!
Won`t the lead from the pencil transfer to the threads as you embroider, making them look 'grubby'?
Hi, MJ –
No, I've never had a problem with that. I wouldn't use anything softer than a #2 lead, and I'd avoid building up the lead by using heavy brush strokes to trace. But, anyway, no, it doesn't usually cause a problem when I work this type of project: colored threads, shading, on muslin.
With whitework on linen, using white threads, yes – it tends to make the threads grubby!! I've made that mistake before!
(By the way, Tanja Berlin's L&S-stitch; kits come with the design already transferred – she uses a regular pencil on muslin, too… just some extra assurance, there!)
Good question! Thanks!
MC
Hi Mary
I've just rediscovered hand embroidery and I'm looking forward to working this project. I'm having a heck of a time finding Crewel embroidery needles locally (USA). Do they have another name sometimes? Justine
Wow. Well done! Now for my pesky questions…
Can you use something like FrayCheck to do the edges on embroidery? (Not having a sewing machine that will do zigzag and being an impatient type…)
What makes a muslin or calico 'high count'–on a practical level, are we just looking for a fairly finely-woven fabric?
I think we got all my others… 🙂
Thank you for this tutorial! I bought some good muslin and all the colors, including ecru. I know I probably have them in my stash, but there is something about taking them all out of the bag and looking at the smooth, unused skeins. I'm weird, huh? LOL
I just bought the scroll frame for the system 4, so I may try it for this project. I'm ready!
THANK YOU!
Glad you're all getting set up and are eager to do this! I hope I can measure up to your expectations!
Pam – Yes, you're right, you're looking for a good muslin with a fine weave. Not a "sheer" fabric, but just a good sturdy cotton, like a quilting-weight fabric. Some are a lower thread count than others (think: $2/yard Walmart muslins), and they're rather flimsy – but you know, they'd work. You just want a ground fabric. Kona cotton works great, as does Southern Belle muslin (which has a 220 thread count – it's perfect for this kind of work, I think). But, whatever you have on hand will probably be just fine.
For my fabric, I actually used part of a cotton pillow case that I bought as a blank to embroider a design on. I tried an iron-on transfer and ended up ruining it, so I cut the cotton up to use for different projects.
For needles, we often just call them "embroidery needles." They have a longer eye and are sharp. At a regular sewing store in the US – or craft store with a needlework section – you probably won't find a pack of #10, but what you will find, most likely, is a variety pack of embroidery needles in sizes 3 – 9. That'll work. Just use the 9 (smallest one in there).
Hope that helps!
MC
Thank you for sharing this it is something I have tried many times, hoping for more success this time. I have noticed a small discrepancy in the list under materials it says 754 and on the list under elements 1 and 3 it says 745.
I'm excited to get started on this project. I'm generally not a DMC user so I'm waiting until next weekend to buy the thread as it will be on sale. But I'm hoping to get the pattern traced and everything else ready this week.
I have one additional item to add to the project list: two plastic sleeves: one for holding the printed directions and one for holding the color printout. That way I won't mess up the papers.
Thank you, Pat! Wow. I need to correct that. The number is 745. I hope that's not in the printed list or the materials list from the other day!
Aaaaaagh.
MC
Mary thanks so much. I've bought an additional "Long and Short Stitch" book that you had recommended awhile back but it just seemed to overwhelm me. I'm so looking forward to working with you on this "bit by bit" approach which even my 70 year old brain can grasp. Thanks so much again for addressing this facet of needlework that I"m really poor at. JudyinPittsburgh
Some of my fellow EGA chapter members are going to do this project. If you are in the San Diego area and would like to join us we'd love to have you! I have a fair amount of experience in soft shading and am happy to be a resource to help others.
Our chapter is called: Muchas Manos de San Diego (http://www.muchasmanos.org/)
We hold regular meetings as well as informal chat and stitch sessions on most Mondays. You can check the calendar for our meeting details.
This is going to be a fun and worthwhile project. If you need help or encouragement please come see us!
Mary thank you so much for this wonderful detailed lesson it us a great help to me to see the organization as well…
What is a "mechanical pencil"? Something like a "propelling pencil"?
thank you for all this work!
Hi, Meri –
Yes, a mechanical pencil is the kind you click, and it feeds out the little stick of lead.
I didn't realize that blue was so hard to come by. I picked it up at Hobby Lobby…
Any color of blue will do, I suppose – or you can use purples or pinks or … whatever you wish. Just as long as there are four shades of the color available (well, you could get away with three…)
MC
I am looking forward to this! Something new and fun to try. Thanks so much:) Your directions are great and so clearly written.
Eileen
You do such a wonderful job of presenting the material that you are tempting me back to embroidery – a craft that I have neglected for many years. The first lesson is beautifully organized. I am looking forward to this. Thank you.
many thanks Mary for this very detailed explanations .
Michèle
OH !!! How exciting … Thanks soooo much for taking the time to make this tutorial !!! How kind and generous of you !!! I definitely need to set some time aside to learn this long and short technique !!!
(I didn't have success with the cutwork … I guess because I was trying to use shortcuts.)
Thanks Again !!!
Thank, Perhaps, it's un little difficult for me, ( I speak a little english only)
I am so glad I have found this website! 🙂 🙂 Your instruction are great because they are simple to read especially because I am new to this type of embroidery.
Keep it up! 🙂 🙂
Many, many thanks. I really needed those lessons.
Thank you for your generosity, and I congratulate for your excellent teaching, which even surpasses the different languages.
A hug from Brazil
Didi
A friend sent me the link to this site and I am so very impressed. I have not yet put hand to needle but you make it look very inviting.
Thank you
Gaye
Hi, Gaye! Well, I’m glad you stopped in! Now it’s just a matter of getting you to pick up a needle, right?!? Well, if you do decide to take it up any time soon and have any questions, you’re always welcome to drop me a line! Thanks for your note! ~Mary
Hi
I’ve just discovered this site – it is brilliant. You are so generous to share all of this. Thank you so much.
Kirsten
amei seu trabalho emaravilhoso parabens sou brasileira e faco croche com barbantes parabens pelo seu trabalho vc e uma profisional exelente………….ps:n sei ingles consegui ler tudo pelo google amei
HI,Mary: I am a member of our local needleworker’s guild, and they have requested that i teach a lesson on threadpainting in the early new year. This is one of my favourite techniques to do myself, but my teaching experience is extremely limited…and i am self-taught (but quite experienced). In researching for possible subjects/projects to teach, i discovered your site, and your wonderful tutorial. Would it be acceptable for me to use your tutorial as the basis for my lessons? (i will, of course, give all the credit to you, and your site) Thank you for your site, and the time you have put into developing it. Amanda
I am just blown away by your website. I have been following it for a couple of months now and there is definitely no other like it! Everything is explained in such detail that it makes it easy for my 70+ brain to absorb it. Thank you so much for all the time you put into making it so easy for so many.
So glad you enjoy Needle ‘n Thread, Barbara! 🙂 ~Mary
Hi Mary,
I don’t have access to a light box or window for easy tracing…but I recently read a blog post (http://wildolive.blogspot.com/2013/09/how-to-transfer-embroidery-pattern-onto.html) about getting a sheet of pressure-sensitive and water soluble interfacing like the Pellon Stick n Washaway; printing the design on that, stitching, then immersing the design in water until the interfacing melts away.
Would that be an okay way to accomplish the design transfer for this project?
sorry, I obviously mean you should apply it to the fabric before stitching…
Hi, Jonelle – I probably wouldn’t use sticky solvy or transfer-eze (they’re both printable, stick-on water-soluble interfacing) for this type of long and short stitch shading. While I think it’s a great solution for line stitching and lightly filled elements, the extra thickness of the interfacing (which goes away when soaked) doesn’t really give the best results for more densely stitched fillings like long & short stitch. I’d just trace the pattern with a pencil straight onto the fabric. If you can’t trace it, print the pattern and trace the back of it with a pencil, and then lay it down on the fabric, pin or tape it in place to make sure it doesn’t shift, and then use a ball point pen and trace over the lines on the front. This is like using a carbon or transfer paper, without the carbon or transfer paper.
I am getting my supplies together to start your Long and Short Stitch Tutorial. I read that we will be using just one thread of DMC floss and a #9 crewel needle. My #9 crewel needle is so much smaller than yours looks like that I can hardly thread it. Is this right? Or is yours larger because of the tutorial? I do not want to go any further on my project in case I am wrong. Thanks, Mary
Hi, Barbara – the needle looks large because of the close up nature of the photos. However, if you want, you can use anything up to a #7 crewel, if you find the #9 too small for you. Remember that all the embroidery in the long & short stitch tutorials is done with 1 strand of floss, so a #9 is a good size when stitching with one strand. If you need a larger needle, though, try a #7 or 8. Anything larger than a 7 would be too large. Hope that helps!
P.S. As always, I love, love your website. You put so much work into your articles and you have so much
obvious love for embroidery that it comes through to all of us that read your tutorials. Keep up the good work.
Me encanta, gracias
Dear Mary, I know this is an old post, but this project is amazing, and I will start it tomorrow. I hope you read this and I hope that you could kindly answer. I would appreciate it a lot!
You write that one should transfer the pattern on to the fabric, which for me is not a problem at all – it is very easy with a lightbox. I did that, BUT when I tried to put the fabric in the hoop, all the lines of the boxes were completely out of shape.
I tried to be very very careful, but when the line was straight on one side, it got weird on the other side. I know that the tension on the fabric should be good, and the fabric shouldn’t be too loose. But it seems impossible to frame it without getting the lines of the boxes looking out of shape (the other motifs looked ok).
I looked for a post where you probably mentioned it before, because I don’t want to bother you with questions you got probably a hundred times, but I couldn’t find anything.
PLEASE could you help me? Is there a post which addresses this problem, or could you give me any tips or advice what to do?
Also – I want to say thank you for your wonderful site – it is a precious treasure!
Much love! xo
Hi, Sophia – This often happens when working with a hoop on a pattern with straight lines. The best thing to use is actually a frame – I used stretcher bar frames on this. But if you don’t have a frame, I’d probably use a smaller hoop and do all the individual motifs first, and then move the hoop around to do the lines. You just have to make sure your tension is not too tight on your stitches (you don’t want them pulling the fabric, just lying on top of the fabric), and then, when the project is complete, damp stretch and block it. There’s a tutorial for that here: https://needlenthread.wpengine.com/2012/07/damp-stretching-blocking-embroidery.html
Thank you so much dear Mary! Your answer is very helpful, I appreciate it a lot! You hooked me on stretcher bar frames, I will definitely get some. I learn so much from you, thank you for your time and effort!
Me encantaría aprender a bordar como Ustedes lo hacen, tengo nociones pero nunca como ustedes, me encantaría igualmente contarme como una amiga más de Bogotá,Colombia, soy una persona mayor y bordar es una pasión que me ayuda mucho. gracias
Thank you! The tutorials are a great help!☺
This is a question….When doing the long and short stitch is there a “ rule of thumb” for how wide each row should be. Say you have an area that is several inches long, would the first row be a quarter of the total space, a third etc? With subsequent rows increasingly/proportionately wider?
Thanks,
Alice
Hiya, I was wondering if this project could be done using crewel wool? I would love to learn crewel embroidery but I’m a bit of a nervous ninny and need step by step instructions. I have plenty of kits but I’m too afraid to try them in case I ruin them would love to try a small crewel project first.
It can be done using crewel wool, but the scale of the project is a bit small for crewel. You’ll certainly need a lot fewer stitches to fill in any of the elements! But sure, it definitely can be done with crewel. Maybe enlarge it about 20% when you print the design – it might work better for crewel if it’s a little larger.
Researching instead of stitching. Not a good RA day.
I notice that this little teaching pattern isn’t listed with your other free patterns.
Do you maintain a list of little teaching patterns like this?
Thaks!