


Moving along in the Long and Short Stitch Shading Lessons series, we’ve arrived at Lesson 8, which is a very simple flower.
If you’re just joining in on this series of lessons on long and short stitch, you can “catch up” by checking out the index of long and short stitch shading lessons, where you’ll find links to each lesson so far.
The lessons are arranged incrementally, going from basic filling with long and short stitch to filling more complex shapes. The entire series is for beginners in this embroidery technique, and once you’ve worked your way through it, I’m hoping that you’ll have a bit more confidence in using long and short stitch as a filling technique in your embroidery projects.
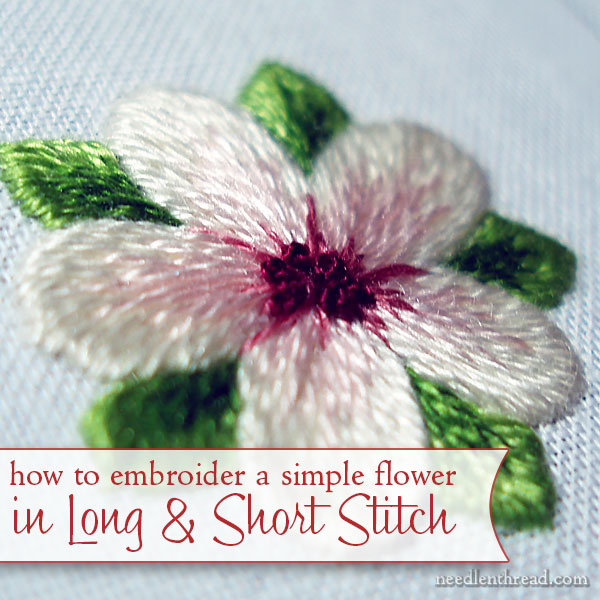
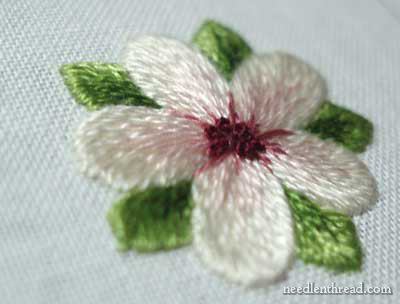
For Lesson 8, we’ll be working on the small flower located in the center of the base of the sampler. Note that the point is not necessarily to achieve a “dimensional” effect – this is a simple, flat flower – but once you’ve stitched it, you should have no trouble translating the lesson into more challenging flowers.
For your materials, you’ll need the sampler in a hoop or frame, scissors, #9 or #10 crewel needles (embroidery needles), and the following colors of DMC stranded embroidery floss: 471 (medium green), 469 (dark green), Ecru, 225 (light pink), 223 (dark rose), and 814 (dark burgundy).
As in the previous lessons, the stitching is done with one strand.
Most of the procedures in this lesson do not need to be explained in thorough detail, as you have already experienced them in the previous lessons. Also, the flower is a series of five repeats, so the lesson will only focus in detail on creating one petal and one leaf, although you will see photos of the flower develop.
NOTE: There are different ways to approach stitching something like this. I went one petal at a time, in order to show you a complete petal. You can also stitch each layer of the all the petals at one time, progressing from the outside of all the petals, to the middle layer of color in all the petals, and finally to the inside tip of all the petals. Following such an approach may help you on two accounts: 1. it may save you time by not having to change back and forth to different colors of threads; 2. it may help you keep your layers of color shading uniform as you move from one petal to the next.
Procedure:
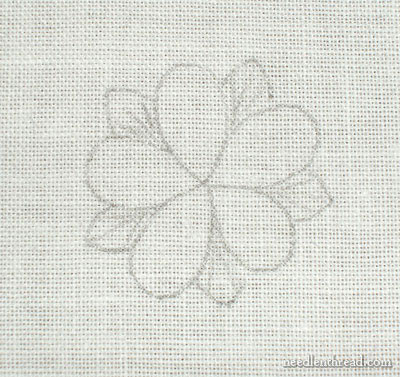
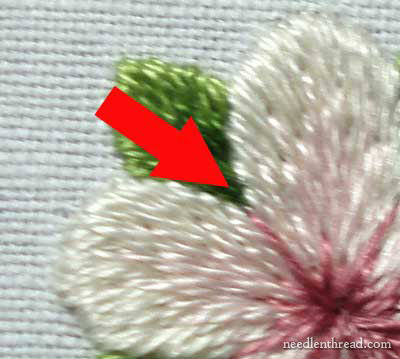
The first parts of the flower that will be stitched are the little leaves that jut out between the petals. Feel free to draw your stitch directions inside these little leaves. Your stitches should point towards the “growth point” of the little leaves, which will be the center point where the flower petal lines merge together.
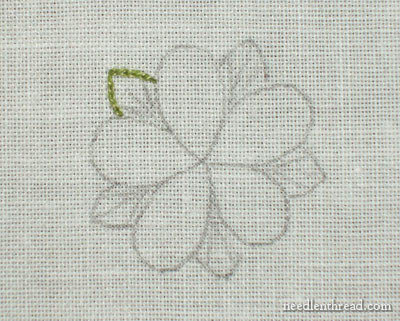
Using one strand of 471 (medium green), split stitch around the outside of the leaf.
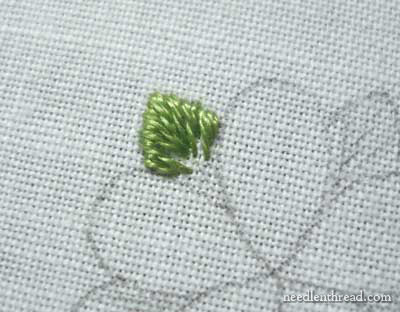
Beginning in the middle of the leaf (the tip), over the split stitch line, fill the leaf in color 471, stitching long and short stitches from the center to one edge, then from the center to the opposite edge of the leaf. This is the same long and short stitch technique we have been using all along.
Your stitches should fill most of the leaf, leaving only a bit in the center and down at the tip empty.
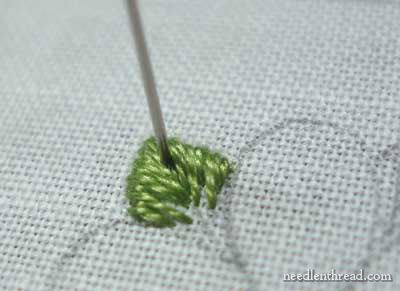
Switch to 469 (dark green), and, coming up into the first layer of medium green, fill the rest of the leaf with the dark green.
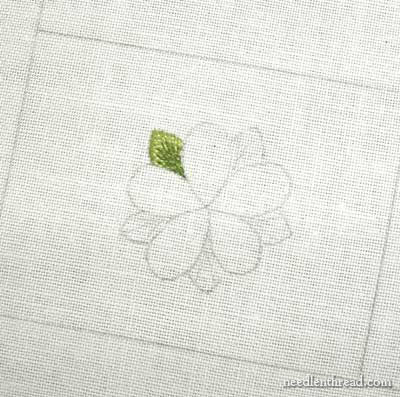
The first leaf will look something like this. Following the same procedure, finish all five leaves.
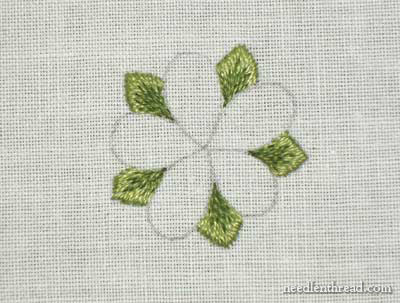
The leaves are relatively tiny, so it won’t take too long to stitch them all.
A note here about beginning with the leaves. In this type of needlepainting, it is common to begin with the part of the design that is farthest away from you or that is tucked behind other parts of the design. While some books and some designers don’t always insist on this point, I think it does help to achieve a more dimensional and realistic effect in needlepainting, to start with the parts of the design that are farther away and behind other parts of the design. In this way, the “painting” seems to build up, one layer on the next.
In this little design of this flat and simple flower, it probably does not make that much of a difference, but as you progress to more complex designs, it will make a difference! Especially with elements like hair, feathers, animal fur, etc., it is important to work the layers from the farthermost layer to the closest layer, in relation to viewer.
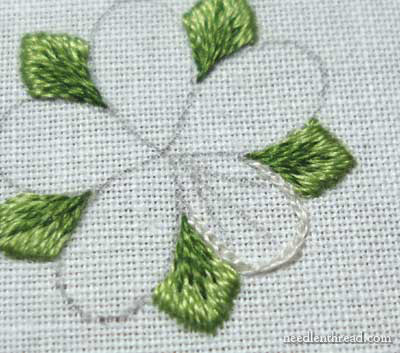
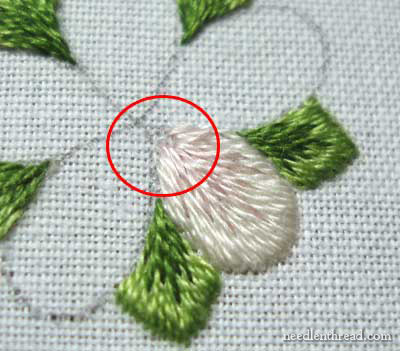
For the petals, begin with Ecru and split stitch a line from the inside tip of the green leaf, around the top of the petal, to the inside tip of the next green leaf. Essentially, you are stitching only the arch of the petal, not the area where the petals are touching.
Draw in your stitch direction as shown above. Your stitches will slant towards the inside tip of the petal.

Following the same techniques learned before and still using Ecru, begin in the middle of the arch of the petal, and work the long and short stitch from the middle to one side, then from the middle to the other side of the petal. You will fill up most of the petal – about two-thirds the length of the petal, leaving only about a one-third arch area empty.
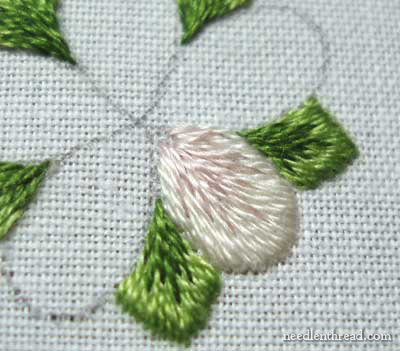
Switch to the light pink thread (225), and fill in practically all of the remaining petal, fanning your stitches out in the same fashion you learned in previous lessons.
Leave a tiny bit of space just at the tip of the petal.
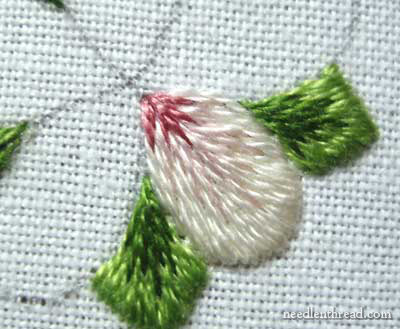
Switching now to the dark rose (223), work in a few small fanned stitches right at the tip of the petal. It’s easy to work one in the center and one at each side, then to add a tiny stitch in the spaces between – five stitches in all.
Continue to fill the petals in the same manner. Remember that you do not have to end every thread. When you’re finished with a color but still have plenty of thread left, bring your threaded needle to the front of the fabric, away from your stitching area. You can then pick up the color on the next part of the design, when needed.
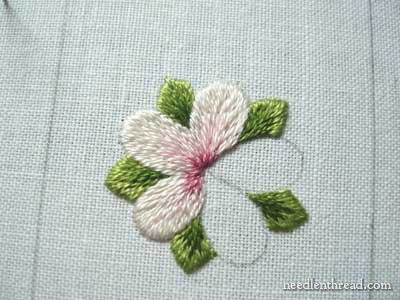
Continue working your way around the little flower…
… until all the petals are filled.
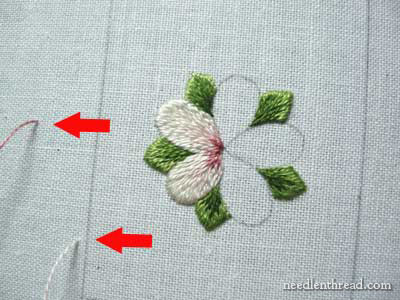
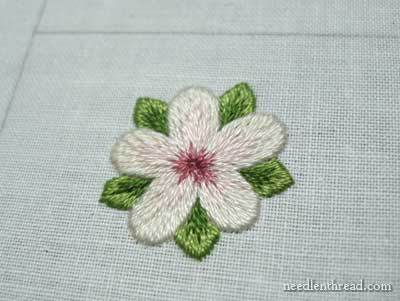
Now, using dark rose (223), stitch one long stitch, bringing your needle up at the inside tip of each green leaf, and taking it down in the center of the flower. The stitch should lie in between each petal. This will help distinguish the individual petals.
Now, you can switch to dark burgundy (814) and work a few random French knots in the center of the flower. If you want to use a different color – like yellow – feel free to do so! The darker yellow (3855) might look better than this dark burgundy.
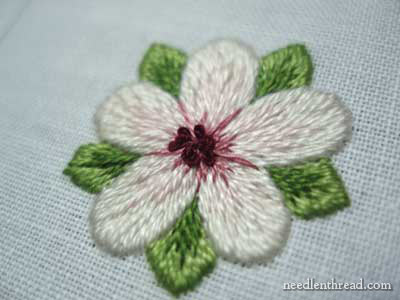
It was hard to get a good shot of the flower with the French knots.
Here’s a shot of the sampler up to this point! And only one more lesson to go!
Enjoy stitching your little flower, and next week, we’ll tackle the final leaf.
Here’s the PDF version of Lesson 8:
Long and Short Stitch Shading: Lesson 8, a Simple Flower
As always, feel free to leave a comment down below if you have any questions about this lesson!
Looking for inspiration & information on hand embroidery?
There are all kinds of reasons to sign up for the Needle ‘n Thread daily newsletter! Check them out and sign up today!
This little flower is really lovely, Mary. I have done a little long and short in other projects so I have only been following mentally instead of stitching along.
I am very interested in next week's leaf. I have a fall design I sketched off and feel as though I am in over my head. My favorite leaf is shaped very much like the one in Lesson 9 and I keep wondering if I have the ability to do it right. I look forward to the final lesson.
That looks lovely! I'm working on the sampler, but haven't even finished the first element yet… must find time! It'll still be here when I do get to it. 🙂 Thanks so much for putting this together for us.
Mary thank you sooo much for taking the time to share your knowledge with us. I just finished Element 1a and need to start 1b soon, slowly and steady but will get to the end !
wow. it looks so lovely. you tutorials are great and very easy to do with your clear instructions.
thanks for taking these to us.
cheers~
Thanks Mary. I'm so far behind but I have everything printed out so it will be ready when I am. Thank you so much for the detailed instruction. It is so helpful.
It's done, Mary. It isn't perfect but I like it.
Your stitches are so perfect! It always seems so easy…
Thanks for sharing your time and knowledge with us all!
how many strands of thread should be used for this leaf and flower.cotton strands or silk thread. india asks
All the shading in this series is worked with one strand of cotton thread…
I missed the instructions on how many strands of thread to use for the normal stitching on a leaf or a flower. Please let me know.
What I would like to know is where you put split stitching and where you don’t? I ran into trouble with a ‘door’ shape that is curved at the top but straight at all the sides. I outlined all of it. I don’t think I should have done as it made things rather tricky and I had to take out the stitches. Am I right in thinking I should have just outlined the curved bit? I will go and have a practice before I start on my piece again.
I am not wanting to do shading yet, just get the basics of long and short stitch use in a single colour. Shaping is the hard bit. The information isn’t anywhere in books that I can find and so sparse on-line! Even how to do long and short stitch is not the same in books as on-line. There is a lot of discrepancy that makes it really hard to know what should be done. (Things like whether or not you come up into a stitch or down into it, if you split the stitches or not, if the stitches should be even in size or not as it seems all are done, with no reasons for choices and in some cases telling us we MUST do it THIS way but not saying why). It is all very contradictory. Someone should write a book about it and not one about needle painting as such which I know has been done and not what I am after. Long and short stitch is used in many other instances. Seeing as you really are the shining light on the web, about embroidery, has no one asked you to put all you know in a book? They should. We could do with one that’s for sure.
Hi, Sarah –
I’m assuming you have a door with a kind of half curve at the top? Straight down the sides? Try outlining the too curve only, and make all your stitches vertical, from the curve all the way down. It helps to draw straight lines with a pencil inside your shape, to guide yourself in making the stitches vertical. Basically, you’ll be doing the same thing as the box in the long and short stitch lessons here, but the top of the box wil be a curve. Don’t shape the curve. This is known as “tapestry shading” and is only different from needle painting in that it does not conform to the shape of curves, or try to follow any natural growth points, like you would find in flowers, birds, and so forth.
No book yet, I’m afraid – time, you know!
MC
Mary, could you help me please?
Im a real fan of your work.
I have been working the shade embroidery but now I can see I was wrong starting by the center of the work… but I would like to know why my work looks better behind ….only when I embroider with 1 thread looks better
Thanks Mary.
Hi Mary, I have been doing some long and short stitch too and your answer to Sarah is what I did and wasn’t sure about. From your videos I know that you start in centre and work one side and then the other but can you work second row from side that you finish on back to centre or does this cause a problem? So good of you to be willing to help beginners like myself.
MARY,
GOOD AFTERNOON!
HOW TO WIRE LINE MOULINE 6 WIRES SHOULD DMC EMBROIDERY POINT LONG AND SHORT. IN MY COUNTRY THERE LINES YOU IN YOUR EMBROIDERY USA. HOPE RESPONSE
ENGRACIA
Its very beautiful
Hola:
Gracias por la explicación. Ahora tengo una idea más clara del punto matiz o largo y corto. Nuevamente muchas gracias.
Saludos y parabienes.
Elisa
merci pour cette meilleure leçon de broderie
Can you send me the design and picture. My design didn’t turn out as good as your design. I love your work and can only wish I can learn your technique. Thank you. Rehana Baluch. Laguna Woods Ca
I just started embroidery and this site is very helpful, just wanted to say thanks!
Glad you enjoy it, Vivian!
You are so generous in teaching embroidery this way and I am glad that I came upon these lessons. You are a great teacher . May God bless you immensely . I gained a good knowledge of the stitches long and short from your
lessons. I am 69 years old and love to learn embroidery which I could not learn during my younger days. I thank you from the bottom of my heart for your generosity.
Thank you so very much. This is beautiful and I appreciate your posting these lessons on shading!
Is there supposed to be more than one row of stitches using the Ecru on the petals? My flower does not seem to have the plump look of yours.
No. I worked a split stitch outline underneath them, but no other padding and only one row of stitches, but those stitches are close together. Make sure you carry your stitches fairly deep into the petal, too, and work them so they really cover the area, but without overlapping.
Thank you for your reply. I made a second flower, using only one strand this time and more dense. It did improve. I think I have to go even more dense, especially with the light pink, it completely disappeared. I’m hoping this is something I will improve on with practice. Thank you again for the wonderful tutorial.
Fantastic, learned so much from this. So well explained, thank you so much. I’m looking forward to starting a gift for my sister and feel so much more confident, small atemps in th past have left me with disappointing results.