


Using lettering and text in hand embroidery can be a great way to make personalized needlework items. But sometimes it’s difficult to know what types of stitches, threads, and stitching techniques to use when writing with your needle and thread. In this series of tutorials, we’ll look at stitches and threads suitable for embroidered lettering, along with little tips and tricks for producing neat embroidered writing.
If you want to follow along with this series of hand embroidery tutorials, you’re welcome to join me!
You can choose whatever text you wish. The idea here is to learn techniques and to get the feel of stitching lettering, so really, any text will work. If you are the type of person who likes to create “samplers” that can be used for decorative purposes, I suggest picking a quote, short poem, saying, Bible verse or something of that nature that you like, and setting it up in an attractive way using a variety of writing styles, so that you can practice using different stitching techniques and threads on the sampler.
For this series, I sat down with a piece of graph paper and pencil and wrote out a sentence using a variety of handwriting styles. Then, to expand the canvas a bit so that I have plenty of samples, I repeated words and filled out the space with lots of lettering.
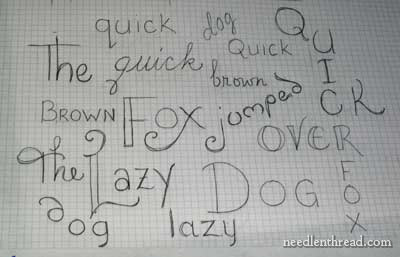
Because the sentence covers all the letters used in the alphabet, I chose “The quick brown fox jumped over the lazy dog.” Before I started writing out the letters, I determined the space I wanted to fill, using my hoop as a gauge. I’m working with a 10″ hoop to give plenty of room for the text, with extra room to work out some small tutorials on the side. You might want to work within a smaller space, and that’s just fine.
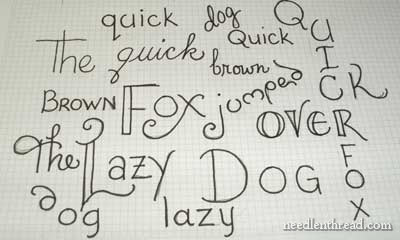
After writing out the text in pencil, I traced over it with a micron pen so that the lines were clear and dark. Fine tipped Sharpies or micron pens are essential tools in my tool box – perfect for this step in any embroidery project.
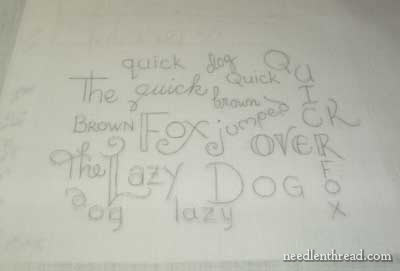
I’m using a piece of white linen for this project. It is a plain weave (not even-weave) medium weight linen with a relatively close weave. You’ll want to use a close-weave fabric – for practice, pretty much anything will do (though you’ll find a natural fabric like cotton or linen easiest to work on).
Because the linen is light enough and the lettering on the paper is dark enough, I didn’t need a window or light box to trace. I ironed the fabric smooth, laid it on top of the lettering, and traced the lettering onto the fabric with a regular pencil.
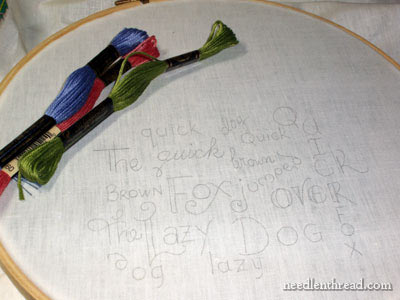
With the fabric hooped up, I picked out a few colors of DMC stranded cotton to start with. I’ll also be using pearl cotton and floche, and any other threads that come to mind during the series here.
If you plan to join along with the stitching, you’ll also want a variety of sizes of embroidery needles (crewel needles) in sizes 3 – 9 or 10. I’ll be using size 10 (for tiny text with one thread), size 8, size 5 and probably a size 3 for pearl cotton #5.
So, now I’m ready to stitch! I’ll begin with the word “The” (why not?) using a very basic stitch, with a focus on starting and ending threads and “traveling” with your threads so that they are invisible from the front.
Great tutorial and I hate to point it out but ther's no letter S! It should read 'The quick brown fox jumped over the slw lazy fox'. Sorry for being so anally retentive …..
We used this sentence when learning typewriting in the 60’s and for info, it should be “The quick brown fox JUMPS over the lazy dog.”
Can't wait to get started! Now only if my handwriting was neater…
As always, I'm excited to see this series come together! I'm sure there's loads of us who will benefit from this. Thanks in advance!
Mary, there no 's'…. it should be 'jumps' instead of 'jumped'. "S" is one of my harder letters to do, is why I bring it up. sorry… you already have it lettered out etc… 🙁
Oh dear. I knew I should've checked that.
I'll add an S, never fear!! Thanks for bringing it to my attention!!
MC
Mary, what a super great idea! Could you include a pdf of your words…it would save us the time of coming up with out own. You're the best…thanks so much for your continued willingness to share your talents!
Aaahhh!!! Just like coming to the end of a favorite tv show–it's a real cliffhanger, Mary! 🙂 Thank you for your (always) concise "set-up" information. Can't wait to see your stitches. Echoing what one of the posters above has already said, you are a jewel of a person to share your knowledge this way. It must surely take a great deal of your time. I am appreciative of that and very grateful for your website. It has become the FIRST site I check every single day–before the news, the weather, anything! Thank you, dear one.
Oh! Dear this is not what I want to do but really knead to, It a pain for me to sew hand writing I hope I can learn from you and get it right at last. I have seen Chickens do better then my attempts in the past.
Sorry, it’s NEED, need to do, not KNEAD; that means to knead bread!!
I enjoyed the long and short stitch lessons so much that I now have a book of Elizabethan embroidery and have started a larger project far beyond my experience. It started with detached buttonhole, so your video stitch lessons have been great. No time now for the lettering sampler, but I will eagerly read along and do send my thanks along with the rest of the stitching people.
Debbie S.
I really like your lettering…can we get a copy of your saying?
Another great tutorial Mary. I'm still working my way through the long and short tutorial so I can't start on this yet. But I will eventually. Thanks for this. You're the best!
Very nice project idea. I look forward to the outcome.
I agree with Figure5ingold and her sentiments of your sharing.
I look forward to following this tute.
I like your various styles of letters.
Aaaaaack! Sorry, folks – I didn't keep (or can't find – how's that for organization?) the paper I doodled the lettering on. I will "try" to make up another one, using the design on the fabric and get it up as soon as I can – but… it may be later next week before I have a chance!
Sorry about that! I didn't even think to scan it. And I'm sure I probably pitched it when I was cleaning up after setting up the project….
Best,
MC
This is going to be so helpful…thanks, Mary!
Great idea for a sampler and a tutorial. I really enjoy combining lettering with embroidery, and have done several commissioned pieces using quilting and embroidered names / sentiments. This one (framed or as a pillow) would make a lovely gift.
I don't know if you can change it now that you've written on your fabric, but all you need to do to get that S in there is change "jumped" to "jumps" and you've got all the letters.
Thanks for sharing your knowledge so freely, Mary! You do a great job of teaching. I LOVE your site!
annie
Mary,
I've not posted before, but love reading your inspirational and educational eletters.
For those of you who want a copy of Mary's Brown Fox lettering….just right click on the picture of the one she darkened with ink….save it to your computer….then print it of….I had to "shrink to fit", but it printed out beautifully, and Mary won't have to go to all the trouble of a PDF file for us.
I'm working on the L&S; tutorial right now and really learning alot. My goal…. a Trish Burr project!!!
Carol
Hi I have just read throught the ‘Hand Embroidery: Lettering & Text 1’ section.
I thought ‘what a great idea, but, when I came to do it my material was too thick to see the lettering.
Is there any other way of doing it?
Thanks
Hi, Jayne – Do you mean your fabric was too thick to trace the design? You could try taping the design to a sunny window and taping your fabric over the design, then tracing over it with the light behind it. Or you could use dressmaker’s carbon (available at fabric stores) and trace it that way. You could also “wing it” and write the design out yourself in your own handwriting, straight onto the fabric…. There’s also this post here: https://needlenthread.wpengine.com/2010/09/beginning-embroidery-design-transfer.html that goes into all kinds of different ways to transfer a design. Hope that helps! ~MC
Just wanted to say I loved the tutorial. Have been looking for ages for some starting points to do my own hand lettering – and finally found somewhere to start!
Trusted cross stitch is in the cupboard now!
Thank you for the time and effort it took to create this!
This is great! The only problem is the sentence is “The quick brown fox jumps over the lazy dog”, otherwise there’s no “s”!
I just needed to dust off my embroidery skills and your site is a wonderful resource! Thank you!
I am embroidering grand children’s names on Baptismal gowns and hadn’t “written” in thread in 26 years! Great site; easy to navigate and follow your well explained directions. Thanks again1
I think the phrase is:-
The quick brown fox jumps over the lazy dog.. not jumped…..
I love the beautiful handwriting you have to be able to write these words! But, my handwriting is kind of sub-par, and I’d never be able to make it look that nice. Do you have suggestions for how to print something off a computer that looks pretty like this? Thanks!
I am interested in learning how to hand embroider. I want to embroider my great grandson’s name on his new blanket (which is crocheted). I am adding an additional panel of fleece to match with (hopefully) his name on it. I have absolutely no experience with this. I tried using a worsted yarn directly on the blanket in a cross stitch but it was terrible and the yarn was fraying before I got finished. This time I am trying something else. I am using 3 strands of DMC & a satin stitch on the fleece with some kind of other work on it.
Ellen
I so love your work. I tried to subscribe but the computer bugs won’t accept my email address. Please add me if you can!!!
Hi, Barb – I added your address. You should receive a confirmation email, with a link in it, to confirm you subscription. You might have to check your spam filter, just in case. Welcome Aboard!
You have no ‘s’ but if you change ‘jumped’ to ‘jumps’, you will. I figured this out because I teach keyboarding…
Love you designs!
Best,
jonell
The absolute best instructional videos and text for all kinds of embroidery . Thank you!
Dear Mary,
Do you have a pattern for all letters of the alphabet for a SIMPLE cursive? I’ve bought your amazing alphabets on ebooks, but what about something simple? Thank you.
Thank you so much for this tutorial. I’m still new to hand embroidery and trying to make a wedding present for some friends – this is exactly the information I’ve been looking for.
But how did I not realise that the different sized needles were relevant and not just…I don’t know…sewer’s preference!? Oh well, you live; you learn.
Looking forward to reading the rest of the tutorials. Thanks again!
Do you have a pdf or book for the hand lettering tutorials? Thank you.
Not at this time, Karen. All the lessons for this particular “sampler” are available here on the website: https://needlenthread.wpengine.com/2009/10/hand-embroidery-lettering-and-text.html
how do I find the video tutorial that goes with “hand embroidery: lettering and text 1”? I used to be able to see that online.
thank you.
a second question.
When doing the stem stitch for letting, you mention that one should not change direction of the stitch. But, when going around a curve, shouldn’t the loop always be on the outside of the curve? For example, when doing the letter “S”, should one switch direction of the stitch to go with the different direction of the curve?
thank you
Hi, Katherine, the hand embroidery tutorials on lettering are not available as video lessons. They are step-by-step photo tutorials. Whenever there’s a video for stitch instructions, I’ve included the link in each tutorial.
No, the loop should not always be on the outside of the curve. Where the thread is in relation to the needle depends on the direction in which you are stitching. You don’t want to change the position of the needle in relation to the working thread, or you’ll get an obvious break in your line and you’ll lose the twisted, rope-like look of the stem stitch.
I know this is an old post, but did you ever share a downloadable pattern for this text sampler? Thank you!!
Hi, Tara, No, I never did put that together as a downloadable sampler. I have started to, but I always run into snags – it was hand done, pretty much spontaneously, so it needs a lot of adjusting to get it to look balanced. I’ll put it on my list!
You are missing the letter S. It should be Jumps not jumped to satisfy all the letters of the alphabet.
Yeah, I caught that after the first sentence – which is why I threw in the “s” on “dogs”… I got there in the end! LOL!