


This past weekend, I finished up a little project – some hand embroidered name cards for my nieces’ birthday gifts. After a little trial and error, and a wee bit of “I’m-in-a-hurry-and-am-going-to-pull-my-hair-out” frustration, they finished up fine and I was happy with the results.
About a month ago, I reviewed a book on embroidery on perforated cardstock. The book focuses more on the decorative, lacy look you can achieve by cutting the perforated cardstock a number of ways, but it also shows a variety of hand embroidery motifs (mostly in tent stitch or cross stitch) that can be worked on the perforated paper.
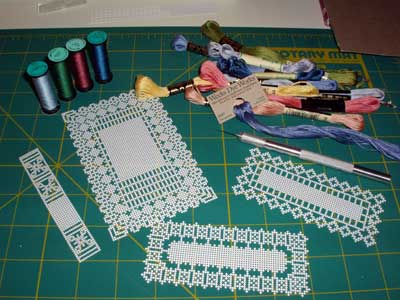
Working at night, I found out that this kind of paper-cutting can be addictive. I don’t suggest picking up your Xacto knife when you’re supposed to be heading to bed! Though I enjoyed the late (late) quiet evenings cutting away the cardstock and watching the patterns emerge, I paid for it the next morning…
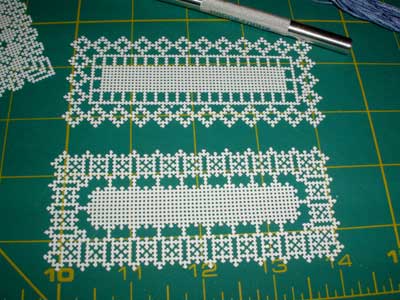
The first small pieces came out pretty well, so I decided to embroider my nieces’ names on these cards and use them for gift cards.
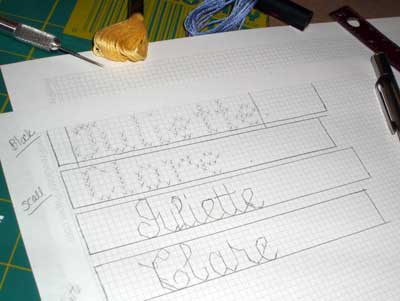
Before embroidering the names, I had to decide on how I wanted them to look. I charted the names in cross stitch and also in backstitch. At first, I thought it would be fun to try different stitches on the cardstock. Chain stitch would work, I figured, so, using the backstitch design, I set out to work chain stitch on the first card.
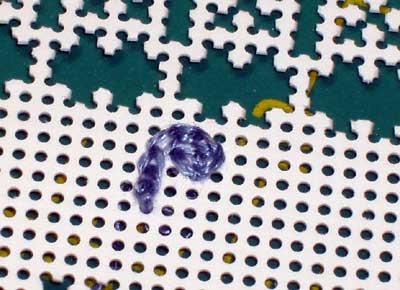
I got through the first letter (a capital C) and immediately began taking it out, without even photographing it. Half-way through the take-out, I realized I needed a picture. The chain stitch simply looked too heavy for the paper. I was working with two strands of floss, and didn’t like the look of the chain stitch At All. Switching to one strand of floss didn’t help – it didn’t show up well enough.
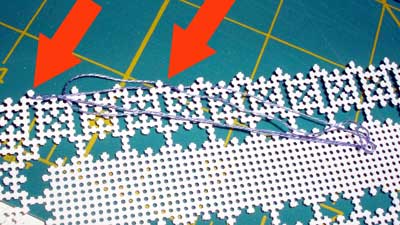
One major point of frustration while stitching these was the ability of the thread to snag up on the lacy points of the paper. I knew I had to be careful – I knew this would happen! But my gosh. It happened All The Time. And I swear I was being careful!
Part of my problem, too, was that I was racing the clock. It’s never good to work on a delicate project when you’re in a hurry!
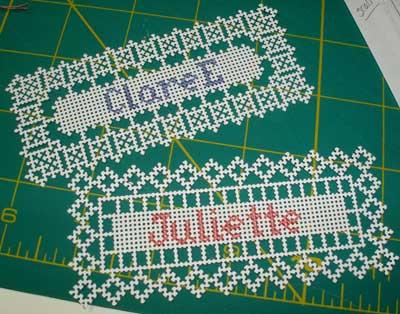
I ended up cross stitching the names, and was pleased enough with the results. Clare Elizabeth got a middle initial on hers for two reasons: 1. Her first name is short, and it didn’t cover much of the center card; 2. (and much more to the point!) I didn’t center her first name correctly, and there was no way on God’s good earth that I was going to take the whole thing out!
The cards are very light and lacy and pretty. They could be mounted on colored cardstock for a good effect, but I think the gals will appreciate the look of them like this. And since we’re talking a 20 and 21 year old, I’m not really worried about the cards being torn to shreds!
I like cutting the paper, but I’ve learned that it’s easier to stitch first and cut later, even though this requires very careful planning and counting.
These would make nice tags for Christmas gifts, for the Very Special people in your life. It’s a time-consuming way to go about making a gift tag, but again, for special people or special occasions, I think it would be a really nice touch!
If you’re interested in this technique, you can read my review of the book, Broderie et Dentelle sur Carton Perforé, where you’ll find purchasing information. This particular cardstock is 22 squares per inch, while most other perforated paper available for stitching is 14 squares per inch. Personally, I like the higher count. The book, by the way, is also available on Amazon France.
"crass stitching"? Oh Mary, Mary, Mary…*shakes head* You will catch some grief for that one! *big grin*
Seriously…the card is so pretty after you cut it! I love the look, but am wondering how much card I would go through before I got it right! I would be tempted to stitch first and cut second, afraid I would bend the edges up. But then, if I messed up the cutting, all that stitching for nought! It`s a dilemma!
Mary, you have the patience of a Saint! They are very pretty. I don't think I could cut away the paper without ruining it. Bull in a china shop, I am! LOL
Woops… thanks, mj. I corrected that one!
Thanks for the comments – believe it or not, I found the cutting part very relaxing. It's small and meticulous work, but one of those things that you can really get absorbed in.
Yep, in the future, I'm thinking if I do this again, I'll definitely stitch first and cut later….
MC
Hi, Mary,
Wow~ all of them looks for pretty~ And just wondering what size of Xacto knife you use to cut these perforated paper? Is knife size#11?
Judy H.
Mary cada dia añoro mas una traduccion,,, imposible ,que este igual en Español…
no puedo ver los anuncios '''
un gran abrazo
lidia
chile
Those cards are just stunning Mary, I hope the girls are the type to appreciate all your hard work. I think I'd like to try this too, I enjoyed doing the stitching on paper cards you showed in a previous post, and so did my kids stitching group. Just need to find a stockist in Sydney of the perforated cardstock. I guess I could try the worldwide web, VBG.
Thanks for showing something really different yet again,
Hooroo,
Christine in sunny Sydney Australia
Something I find useful when using perforated paper is to slip over the edges the slide thing (technical term) that comes on a clear report cover . I did look it up – it's called a grip binding bar.
Second try on leaving a comment. Apologies for any confusion if this duplicates.
I did a pile of stitched perforated paper placecards for a friend's wedding. Thankfully, it was a relatively small wedding, but there were still dozens to do. As a result I can recommend two working methods.
First is to stitch before you cut the paper. Fewer fragile areas to perturb in handling, fewer thread-snagging points in general.
The second is to make a shim. I used a manila folder. I cut it just ever so slightly larger than my perforated cards. I used the folder's own fold for one side, then carefully taped the two short sides closed, leaving the second long side open. Then I cut a window in the shim, so I could access the top and bottom of the to-be-stitched area. Once the shim was done I inserted my card, and with the edges protected by the cardboard folder, stitched away. Once the stitching was done I slipped the completed card out of my shim, and following precept #1 above, cut the lacy edges.
The cardboard folder protected my edges and kept them clean and unbent during the embroidery. It also protected my silk floss thread, keeping it from getting snagged or frayed on the cardboard.
Thank you so much for the excellent tip! Good ideas all around!!
MC
Beautiful cards Mary! And thank you everyone for all the hints.
And I've seen a few patterns where "crass" stitch would indeed be appropriate!
Hi Mary, this is great!
I came across this looking for hand-embroidery tips for the quilts I’m making for MY nieces, whose names are also Claire and Juliet! How funny!
Nice work =)