Here’s the first stitching instruction installment for hand embroidered lettering. Yesterday, I showed you the lettering sample I’ll be using for these tutorials, and how I set it up to start stitching. Today, the stitching begins…
The first sample of hand embroidered lettering is on the word “The” at the beginning of my sample sentence (“The quick brown fox jumped over the lazy dog”). I’m using two strands of DMC cotton and a #8 crewel needle, and the stitch I’m using is backstitch. Fabric and hoop were discussed in yesterday’s post.
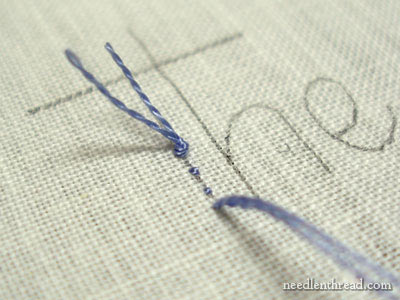
To begin stitching, I started at the base of the T. With knot in the thread, take your needle down into the fabric about a half an inch away from the base of the letter. Take two small straight stitchs in the fabric, towards your starting point and away from the knot, ending at the back of the fabric. Then, bring your needle up at the very base of the letter, so that you’re ready to travel up the line of the T, covering up the small stitches en route.
I’ve already posted a picture tutorial on beginning your embroidery threads in this manner, if you want to take a look at this technique in detail.
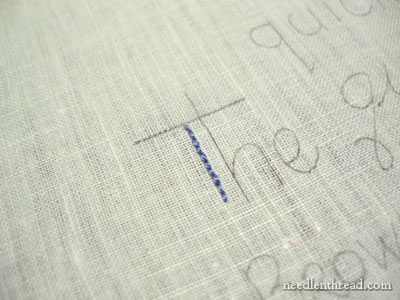
Using small stitches evenly spaced, I’m embroidering the base of the T with backstitch. I stitched all the way to the top of the line.
Now, at this point, if you were hand writing, you would probably pick up your pen and take it to the far left of the top line on the T, put the pen down, and draw a straight line to cross the T.
However, we’re not going to do that here. Our last backstitch ended a whole stitch length below the cross line. If we were to take our thread to the left side of the cross line on the T, we’d end up trailing a thread across the back of the embroidery, where it could be seen.
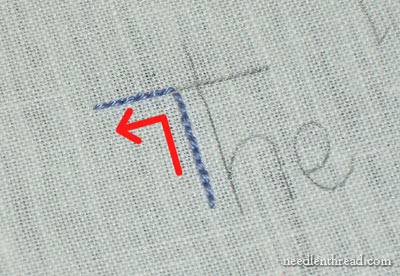
Instead, I started my next stitch on the cross line right in the middle of the line and worked the backstitch all the way to the left end of the cross line.
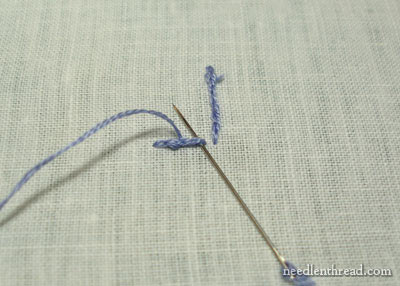
To return to the center and finish the right side of the cross line, turn your work over. Wrap your working thread around the back of the stitches by “whip stitching” around the back of the stitches. You’ll only need to whip the back of the stitches about twice to return you to the center of the cross line.
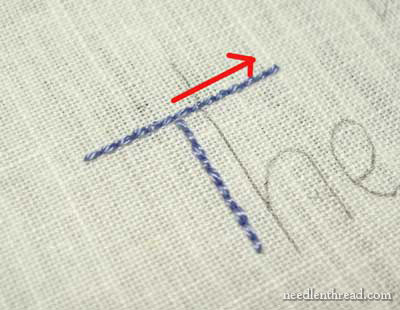
Finish backstitching the cross line all the way to the right. The next step is to return to where the H crosses the cross line of the T.
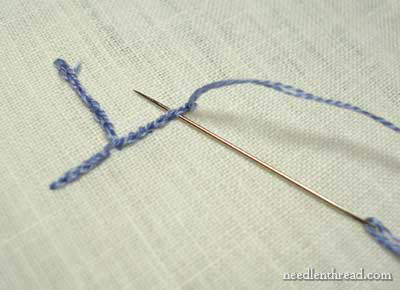
To do this, turn your work over and whip stitch around the back of the stitches, to the point where the H crosses the cross line on the T.
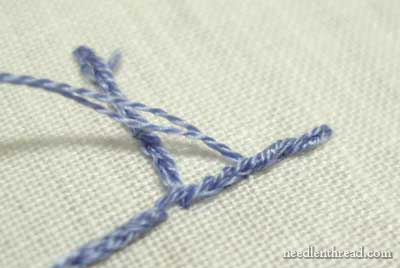
You’ll only need to whip around the backs of the stitches once or twice – and make sure you don’t pick up any fabric! Just take your needle underneath the threads, wrapping them.
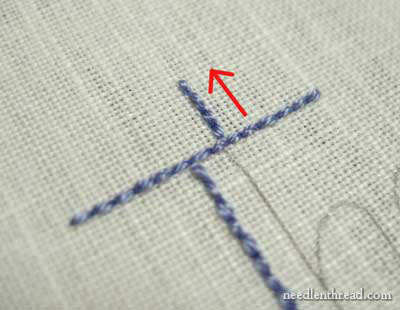
I’m working the top of the H that extends above the cross line on the T. This way, I don’t have to travel back up here later to finish the H. It’s important to look ahead when you’re embroidering text, to see the easiest (and “cleanest”) path to follow for your stitches. In this case, stitching this little stem here will get it out of the way. Then, I can move back down and do the rest of the H.
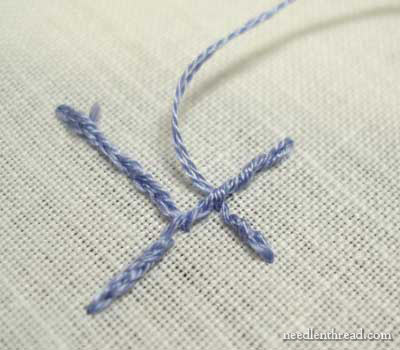
Once you get to the top of the H, turn your work over and “travel” your threads back down the back of the stitches by whipping them as you did above.
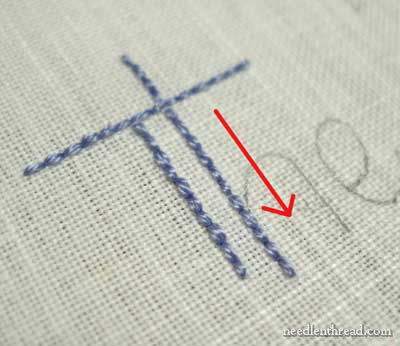
Continue backstitching down the downstroke on the H. If you were hand writing, once you reached the end of the downstroke, it is likely that you would not lift your pencil or pen to bring it back up to the bump on the H. However, when embroidering text, you don’t want to double different parts of your lines – they’d end up looking bulky.
So, just as you traveled your threads on the back before, now you’ll turn over your work and wrap the back of the stitches up the point where the bump on the H begins.
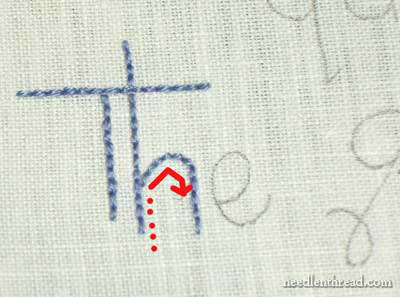
The “traveling” on the back (by wrapping your thread around the backs of your stitches) is indicated by the dotted line here. When you travel to the right place, come to the front of your fabric and backstitch the bump of the H.
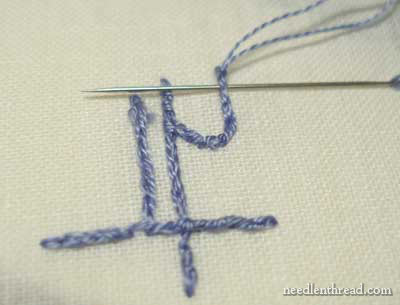
When you finish the H, turn your work over, and wrap the working thread around the stitches on the back. Cut the working thread.
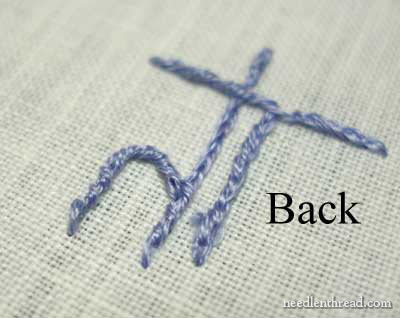
This is what the back of your embroidery will look like about now. The E in “The” is separate from the other two letters, so I’m not going to travel my thread from the H to the E. The most obvious reason for this is that the thread will be seen from the front, through the white linen. Even using white thread with white fabric, your thread would be seen. And even if you were using DARK fabric with a light thread, carrying your thread across an empty space could still be visible, because the thread can form a small ridge in the fabric, especially once the fabric softens with time. Even though it is (admittedly) a pain in the neck to constantly be changing threads, it is best to get into the habit of changing them rather than carrying them across open spaces. If it’s a habit, it won’t seem like such a big deal when you have to start and stop often.
If it really bothers you to start and stop your threads often, when working up your text, consider arranging it so that each letter in every word touches. Then you can travel your threads on the back by wrapping them through the bac
k of your stitches, and you won’t have to start and stop for individual letters.
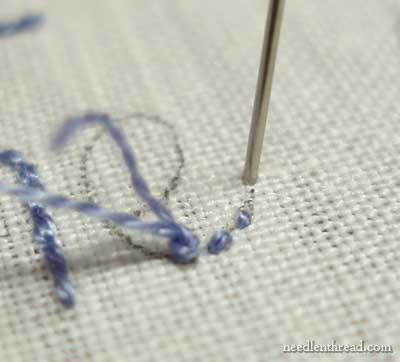
Begin the next thread the same way the first thread was begun, by a series of tiny stitches that will be covered up with the backstitch.
Considering the E, I decided to start from the base and work up around the loop, rather than starting at the inside of the loop and working down to the base. My reason for this was that I wanted a neat join, where the loop and the back of the E met, and I figured I could achieve that better by stitching the back of the E first, and then meeting the back after traveling into the loop.
You see, then, that it’s a good idea to think ahead along the path that you want to stitch. Notice where the various parts of the letter meet.
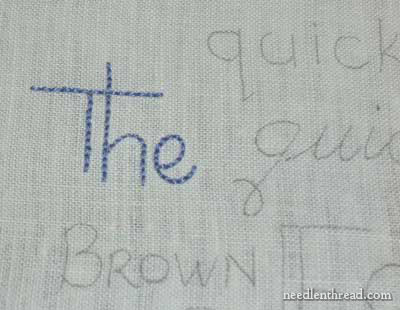
When the E is finished, turn the work over and run your working thread under the backs of the stitches, then snip the thread.
And there is the end of the first word, stitched in a simple backstitch, which works well for this style of lettering. Though there are some curves in the lettering, there are not many tight curves, so the backstitch looks smooth and not too blocky with the simple printed lettering.
Next up, we’ll work cursive in stem stitch.
Hope you enjoyed the tutorial and that there was a little tip or two that was helpful for you!
Other Posts on Hand Embroidered Lettering
Hand Embroidery: Lettering and Text 1 – setting up the sampler


Thank you very much for this tutorial.
I always tried to embroider letters the way I write them, and they always looked ugly.
Okay, Mary, I'm about to die of envy here…HOW do you get that backstitch to look so smooth and uniform even around curves?!?!!???
That's always been one of my big bugaboos…
Thank you so much! I am excited to embroider again – I'll be following your tutorials with avid eyes!!
I can't figure out how the little anchoring straight stitches don't mess with the regularity of your beautiful backstitching. I'm going to practice. Thanks for another valuable lesson, Mary. I always learn. Looking forward to the next.
I love your solution for not "trailing" you threads on the backside that might show. I have one question, though. This would work with back stitch and other stitches that look the same from any direction it is stitched, but will you be showing how to do this for directional stitches like chain stitch? I'm probably jumping ahead…sorry….just wondering. Thanks again for the tutorials. As you can see….they definately are needed.
Thanks, all. Glad there's an interest in these tutorials!
Yep, I'll cover that, Sher. It's not that much different, actually…. but yes, chain stitch is on the list!
MC
Thanks for the tutorial Mary!
I love the nice clear close-up photos you take – do you have (or have already done) any tips on that? I do have a macro setting, but I think I need some pointers on lighting, etc.
I find I am fine on the straight but I have problems on the curves. they look to blocky, I'm thinking I should make the stitch's smaller?
Yes, especially if your letters are relatively small. But with backstitch, I find it's best to gauge the size of your stitches before you start stitching. Smaller stitches round a curve better, so try making all your stitches a bit smaller, even those on the straight parts of the letter.
Hope that helps!
MC
Mary, you have made me want to embroidery again. You do such beautiful work.
I love your site. I found it by accident a few weeks back, signed up for your newsletter and have started going through some of your tutorials. I hope you dont mind but I made a copy of your lettering and am using some of them on a baby quilt or sampler I am going to start on. I will send a photo once I have completed the poem "Babies Don't Keep". Your hard work is much appreciated. Liz
Hi Mary,
I have learned SO very much from your site!! I can’t even begin to tell you. I’m not a beginner but certainly not advanced. I like trying lots of different types of ‘fiber art’ (although, admittedly cross-stitch, not my favorite either!) I have recently enjoyed doing the simple, pre-packaged stamped pillowcases (as gifts mostly) But I am really concerned, ok, embarrassed, about the back of my work. How do you put in a random color french knot without carrying threads everywhere? I also think I am so concerned that the thread will come undone (because they are pillowcases and will be put in the washer and dryer, I’m sure) that I over do it when I start and stop the stitches. Any suggestions???
I can’t thank you enough for sharing your knowledge with us!!
Abundant Blessings,
Sandi
Hi, Sandi! Thanks for your comment and your question. Well, I think the best way to explain to you how to start and end your thread for an isolated knot is to direct you to the bullion rose bud tutorial on the video page. The way I start the bullions there is the best way to anchor your thread for an individual French knot, I think. You take two tiny anchor stitches in the fabric, perpendicular to each other and picking up just a thread of the fabric, really (as little of the fabric as you can get away with), and then you form your knot on top of that. It can be a little fiddly, but it’s better than traveling a distance between the knots! Hope that helps! ~MC
Hi, I am fairly new to your site and I am just gobbling it up! I don’t know anyone who does hand embroidery and I have been just using books from the library. Thank you Mary for the time you have put into this website. I am treating this lettering tutorial as a class and am doing my “homework” so far daily. I am so excited I am finally learning how to do this! None of the books I have read talk about starting,stopping and traveling etc. Now I know why I haven’t been so successful.
Hi,
Just want to add another thank you for taking the time to educate us with these wonderful tutorials! I consider myself to be an intermediate to advanced embroiderer. But, for the life of me, I have never been good at stitching letters! I am so happy during my search for help on this that I found your site. Just goes to show that no matter how long one has been doing something, there is always more to learn and room for improvement!
Regards,
Kan
I’m having trouble navigating your site. It would be nice to have a link to the “next” portion of the tutorial you referred to. I see one goes to two, but not where you talk about the stem stitches. I feel like this post leads to more but it’s hard to find where.
Hi, Samantha – I’m pretty sure there’s a link to the index of all the articles in this series, at the end of each article. You’ll find all the articles listed in that index, with a description of what’s in each article. This is the link, in case you’re having a hard time finding it: https://needlenthread.wpengine.com/2009/10/hand-embroidery-lettering-and-text.html MC
Mary
I have learned so many things from u’r pages. Today I want to show u the letter I have embroidered using back stitch. Here it is:
http://shamiatcraft.blogspot.in/2012/10/little-ones-dress-with-touch-of-my.html
Have a look.
Hello – I read your article on letter stitching with interest and found it very useful. I would like to point out though that the sentence you were embroidering should read “The quick brown fox jumpS over the lazy dog” – if you use jumped then you do not have an S in your sentence. Just thought I’d mention it as many years ago I had to type this sentence many times when learning to touch type!!
Hi, Elizabeth – that’s right. That’s why I adjusted it to “dogs” towards the end of the sampler. I mentioned that in one of the articles. Thanks for pointing it out!
I wanted to add my thanks for these wonderful tuts. I’m attempting my first embroidery project– family names on stockings. Your work is beautiful and your instruction is encouraging. Thank you for sharing your knowledge and artistry!
HI!! Thank you for this wonderful info. When I was young I loved to cross-stitch. I did not have a clue then what I was doing, and the back of my work would have made a blind woman cringe. However, I recently decided I wanted to cross-stitch again!
My question to you is, when you start your new letter with the series of stitches what do you do with that small knot in the front of your cross-stitch? Are you suppose to cut it when you come back up and meet the knot? Or do you just do your backstitch over it and it covers it?
Thank you for you time!
Hi, Kendra – you cut it off, assuming you’ve stitch over the thread on the back. I think that’s what you’re asking? It can just be snipped away!