


Good morning and welcome to Tuesday in Kansas – a little later start to the week than intended, but here we are.
Today, we’re going to move forward on Garden Swirl, our current stitch-along on Needle ‘n Thread. We’re almost finished with the embroidery. It’s a little project and it goes pretty quickly, but the nice thing about a stitch-along is that you can work it at your own pace.
If you’re not quite caught up, that’s ok! You’ll find all the lessons for this project listed here in the Garden Swirl Project Index, so that you can catch up at your leisure.
If you are a member of the Needle ‘n Thread community on Patreon, you have already received these instructions in PDF format, for easy download and printing. You have everything you need right now to finish the embroidery on the project.
If you would like a materials kit for Garden Swirl – with the design pre-transferred for you on beautiful, fine white linen twill – you can find those kits available here.
If you would like a decorative box for mounting Garden Swirl (along with the finishing supplies for mounting in the box lid), you’ll find those available here.

Today, we’re going to finish the last of the single flowers on Garden Swirl, work all the flower centers, and add the small scattered purple “buds” found here and there around the design.

First, this flower. This is the small five-petaled flower on the inside of the swirl, and it is worked in that same modified long-and-short stitch / satin stitch approach that we used on the smaller five-petaled coral flowers last week in the Part 3.
Use two strands of the light purple (210) for this, and follow the same procedure for “sneaking in” any shorter stitches you might need to fill in between the satin stitch, in order to make sure the petal is full.
As usual, try to keep your stitches smooth. I find it very helpful to use a laying tool with this type of stitch, when using two more more strands of floss. The idea is to keep your thread from twisting too much, or the surface of the finished petals will look rough.

When you’re finished stitching the light purple petals, switch to one strand of 3746 and work in the fanned-out “shading” at the base of each petal. Remember to fan these stitches.
On this particular flower, you only need about three stitches per petal.
In addition to the dark stitches on the inside of the petal, I added very small straight stitches in a “V” shape at the notch at the outer top of each petal, just to define the notch. This is optional, but it does help define the notch at the outer top of each petal.
Then, you’ll switch to one strand of 725 and, between each of the dark stitches, work a very small yellow straight stitch, following the same angle as the dark stitches, to give a touch of yellow to the base of each petal.
Remember to come UP inside the previous stitches, splitting them, and to take your needle DOWN at the base of each petal.
Using the same yellow thread, fill the center of the flower with small French knots worked close together.
To achieve a nice round center, it is helpful to embroider the French knots along the circle of the design line and then fill the center further as needed.
You can find a tutorial for French knots here.

And since we are now filling centers, let’s go ahead and do them all!
The small five-petaled coral flower above has a yellow satin stitched center. Use two strands of yellow in the needle and begin in the center, stitching out to the side of the circular shape, and then go back to the other side of center and stitch out to the other side.
You can find a good tutorial on creating satin stitch dots here. You do not need to outline the dot on this flower or even pad it – although you could add one layer of padding if you wish (perpendicular to the top satin stitch layer).
You won’t need more than four or five stitches to fill your satin stitch center on this flower.
Going over to the first large flower that we stitched in this lesson here, the center is embroidered in larger French knots, using three strands of 725.
Again, it is helpful to stitch the French knots along the circle design line and then to fill in the middle. This will help you achieve a nice round center.

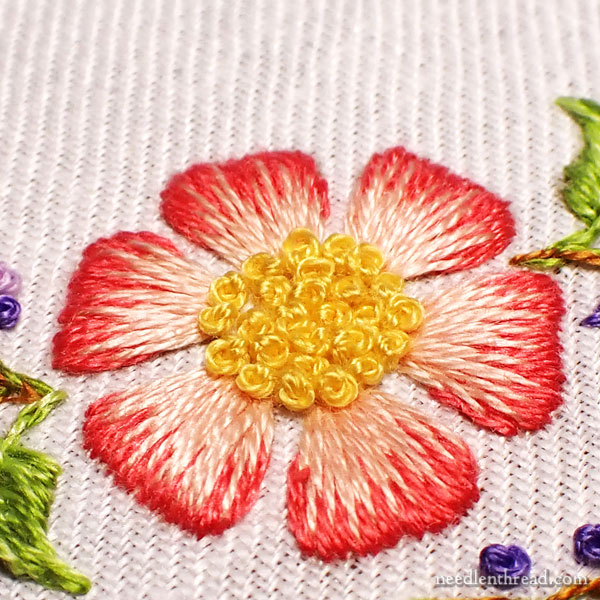
The large dark coral and yellow flower has a different center altogether.
For the center of this flower, I used one strand of 725 and worked a very fine stem stitch line along the design line (the circle). You can find a tutorial for stem stitch here. You can find a tutorial for stem stitch in a circle here.

Then, using the same single strand of yellow, I worked tiny straight stitches (seed stitch) in random directions to fill up the middle of the circle. Leave a tiny bit of space around each stitch, to give the center a nice airy, light look.
Just try to be as random as you can with the stitch direction – but you don’t have to stress out about it. It’s a small space, the stitches are small, and so it’s just a matter of scattering in the yellow.
And finally, we’ll stitch up the scattered little purple “buds” that are grouped here and there along the vine.
Use two strands of thread in the needle, either 210 or 3746. Start with one of the colors, and work French knots on the design where there are tiny dots at the tips of the small branches coming off the vine. Do all the light purple dots you want, and then go back and do all the dark purple dots.
You’ll carry the thread from stitch to stitch on the back of the fabric within each area where the small clusters are.
If you end up having to carry your thread any distance across to another tiny cluster within the area you’re working, it’s best to turn your work over and run the thread underneath your previous stitches (for the branches, for example).
Remember, you don’t want to carry any dark threads across any blank white fabric space. It’s always best to turn your work over, run the thread under the stitches that are there, to keep it from traveling across a blank area of the design, to get to your next French knot – if you need to!
And that, my friends, brings us a few steps closer to the end of the embroidery!
In the next installment, we’ll stitch the larger yellow and coral buds and the ladybugs – and we’ll be finished!
Don’t forget, you can find the Garden Swirl Project Index here!
And kits and boxes are available in the shop!
Hope your week’s going great so far!
That purple posy whacked me big time.
I have to stitch one before I die of envy!