


A couple weeks ago, we looked at how to join up a circle when working chain stitch. Today, here’s a similar tip for stem stitch.
The idea here is how to join up with a line of stem stitch “from the rear” – that is, when you’re stitching towards another bit of already-stitched stem stitch, whether it’s a circle or any other shape, and you want to make a seamless join in the stitching.
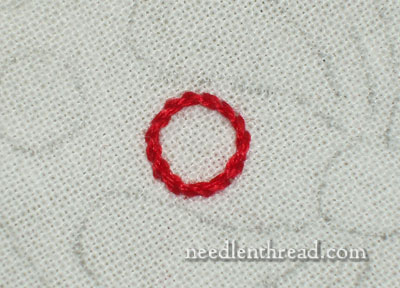
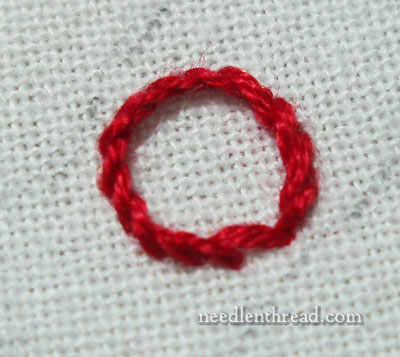
I admit, it isn’t the most beautiful circle in the world, but it serves to demonstrate the point!
So let’s stitch a circle in stem stitch and see how to join the ends seamlessly. First, you’ll want to start your thread the same way we did when discussing the chain stitch circle, using tiny anchor stitches on the line (your stitches will cover them up).
Remember! Stem stitch, for right-handed stitchers, is worked from left to right, with the working thread kept below the needle. For left-handed stitchers, stem stitch is worked from right to left, with the working thread kept above the needle. If you reverse the location of the working thread, you’ll end up with outline stitch, which is a slightly different-looking stitch. (This whole scenario changes if you’re working with z-twisted threads, but since most common embroidery flosses – especially cotton – are s-twisted, we won’t go into that right now!)
Because I’m right-handed, I’m working my way from left to right around the circle, turning my hoop as I go. The working thread is looped down on my fabric, so that it stays below the needle.
While working around a small circle, keep your stitches relatively small. If you’re working in the correct direction, then each stitch will help hold the previous stitch in the curve, but you still don’t want the stitches to be too long, otherwise they will flatten across the curve and look sloppy. I’d say stick with about 1/4″ length – half of that 1/4″ will the the overlap on the previous stitch, so really you’re only moving forward about an 1/8″ of an inch with each stitch.
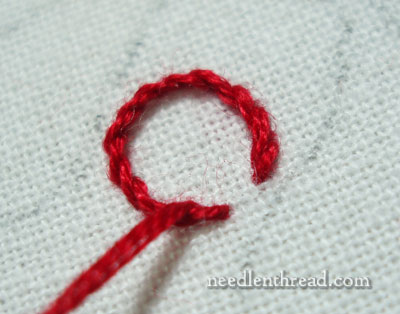
I’m coming up to the end of the circle here, and it looks like I should only have to take a stitch forward to meet the beginning of the circle.
So I’ll take that stitch, and go down in my fabric in the same hole where the first stitch in the circle started.
Well, the circle is “joined” – the line is stitched over – but is that the kind of join we want? Not really. You can see pretty clearly where the join is.
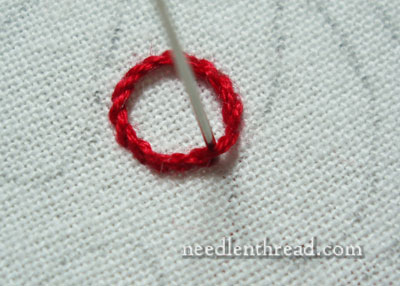
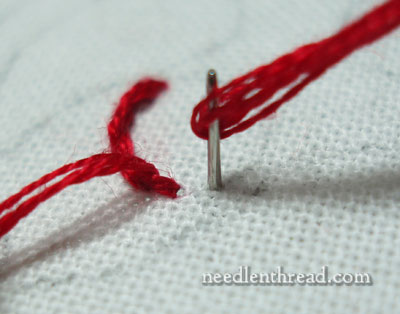
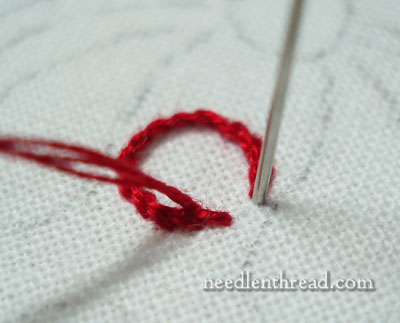
At this point, you need to take one more stitch. Bring your needle up above your last stitch, in the center, like you normally would for stem stitch.
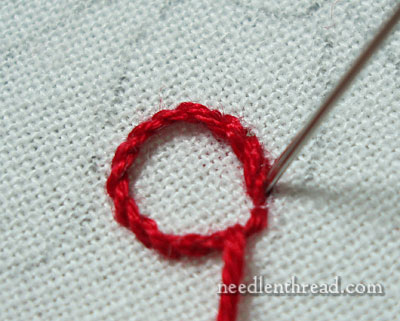
And then, for your final stitch, take the needle to the back, underneath the first stitch in the circle.
Now the join looks better, doesn’t it?
Remember, this isn’t just for circles – it’s for any shape where you need to meet up with a previously stitched line of stem stitch.
I hope this little tip is helpful! You can find more tips and tricks for hand embroidery under Tips and Techniques, where this one will be listed, too.
Be on the lookout for some new needle & thread-related stuff this week, and a return to some old Needle ‘n Thread related stuff! (I had a busy weekend!) Have a terrific Monday!
Mary,
Thank you for this SO very helpful method, and for the info on the length of stitches. Does this length of stitch apply equally when using wool thread? For example, as applied to crewel work?
Thanks so much for this tutorial !
One thing I’ve wondered. You stress moving the hoop as you work. Do you have hints for working stem stitch when working on a piece too large to move as you stitch — something on the largest slate frame Evan makes for instance — without slipping into doing outline for part of the work?
Hi, All – Thanks for your comments. Let’s see if I can answer some questions:
Kandy – aaaah. Good question. I have incorporated the answer into a new video on stem stitch, which I’ll be editing this week (I hope…). It’ll replace the old video, and I’ll let everyone know when it’s there. But in short, the easiest way to make sure you’ve got your thread in the right place in relation to the needle is to imagine the line (or curve, etc.) that you are currently stitching turned so that you would be stitching left to right if you could be. Does that make sense? Just think in terms of left-to-right stitching (for right-handers), and that should help you keep the working thread on the correct side of the needle.
Sharon – on larger pieces of crewel work, and using thicker threads (like wool), I’d make the stitch length a bit longer, but not a whole lot longer. It might take a wee bit of experimenting to get the stitch length just right, when switching to heavier threads.
~MC
Dear Marymentor:
Thanks so much for this bit of info. It’s the smallest details that when repeated can render either a beatiful piece of work, or something that just looks “clumsy”. (and I’ve been guilty of that !) Thanks again so much.
Judy in Pittsburgh
hola Mary” creo es una puntada que no puede faltar’aqui se conose como punto tallo
gracias
Hello, thanks for theese tips, details make all the difference! Do you have a reliable system for closing neatly a shisha stitch circle? Sometimes I manage allright, sometimes not. I have not yet figured out why!
hi mam
thank you for your wonderful class as well as sample works.you are doing a great job
Hi Mary,
‘Thanks for the video on stem stitch.I’ve done stem stitch for years and never thought about the position of the thread in terms of above or below but rather always on the outside of the curve, since most elements that stem stitch is used for are at least slightly curved. I believe this gives the same results and might be easier for left-handed stitchers.
Mary, darling Mary. I am sure you feel blessed with all the happiness and love in the world. I scoured through your blog many moons ago and am back to it. God bless you for so freely and lovingly share your tips and ideas and gifts with us. I’m disappointed by so many talented people who have umpteen restriction son their patterns, their techniques and mercenarily ask for my credit card details before they even consider speaking with me. You, my darling, are truly a treasure. God ever bless you and thank you for being my creative angel. I have a full time job I love, a husband, a 3 yr old and house chores but picking with a needle in the dead of the night when the world is asleep can make my day more worthwhile. Thank you and fondest love from India. I’d love to hear from you.
Hi, Natasha! Thanks so much for your kind comment! I’m so glad you find Needle ‘n Thread a good website and useful! And I hope it’s able to provide you with lots of inspiration for your night-time stitching! Best regards, Mary
love love loveeeeeeeeeeeeee ur tutorials!! they r soooo helpful!! n amazingly i was gonna do embroidery on my dress n didn’t know how to do a circle easily n yaayyy i found it !!
I ran headlong into having to embroider for the first time in my life (bought wrong thing online). I am doing 12 squares for baby quilts, and have thus far done four little animals without knowing what I was doing. I had seen your sight long before I began and boy did I remember the directions poorly. Although wrong, they really don’t look too bad, but they were awful to do. I came back here and am thrilled to see how I should be doing embroidery…much easier then my mess. Thank you Thank you!!!
I have been doing larger circles, actually vines with curley-q’s, embroidered on wool using two strands of DMC using stem stitch? The first time row and all looks good, row two seems ok. I went on to the third row and the center of the cirlce is now all saggy. I am pulling my stitches (much sadness) and starting over. Is there a way to tell if my stitches are too tight or the fabric is being pulled too tight in the frame? Any suggestions would be greatly appreciated.
Great video
A helpful technique, i must say!
Thank you..
Thank you! Your tutorials are very good. I really appreciate them!
Margie
Thank you so much, this is really helpful.
Very clear instructions and extremely helpful for an enthusiastic beginner.
Muy buenos videos para aprender estos lindos puntos. Asidua visitante de su página. Soy adulto mayor y me gusta mucho bordar. Saludos, felicitaciones por su página y gracias por la oportunidad de aprender a través de Uds
Thank you this is very helpful.
This did help me I was taking to long a stitch