


The satin stitch is one of my favorite filling stitches for small areas and narrow elements in embroidery. While it is absolutely a gorgeous stitch worked in silk, really, in any thread, it’s beautiful.
Perhaps the most difficult element to stitch well in satin stitch is a circle or larger dot. A wee tiny dot in satin stitch isn’t so difficult – it’s really just a matter of stitching two or three tiny stitches the same size and two slightly smaller stitches on each side of those, to give the look of a dot, without it actually being a perfect circle.
But those are wee tiny dots (an 1/8″ or smaller). But what about larger dots? Once you get the hang of them, they’re actually pretty easy! Here, I’d like to show you how I satin stitch larger dots or circular elements.
By larger dots, I’m talking about a circular area that’s anywhere from 1/4″ to 1/2″ or maybe slightly little larger. I don’t personally like satin stitching large things (anything over about an inch at its farthest points), because the larger the area, the more likely the stitches will loosen and look messy over time.
In this tutorial, I’m satin stitching the dots on each side of the pomegranate on the Wool Pomegranate Corners project.
Begin in the center of the dot with a waste knot, stitching about three tiny anchor stitches to hold the thread. Then cut off the waste knot.

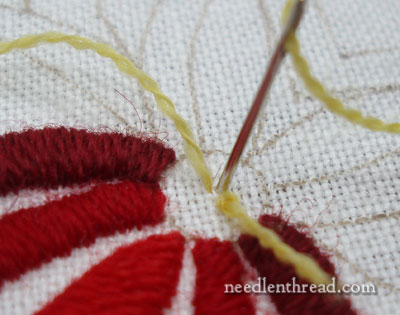
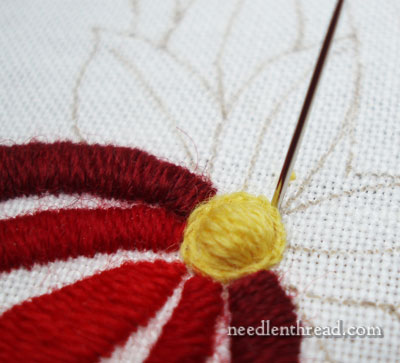
From the center anchor stitches, move to the outside edge and split stitch the outline of the dot.
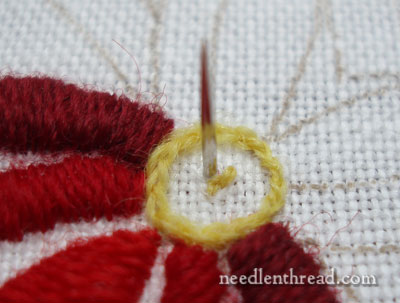
Once the outline is stitched, jump back into the center and work some satin stitches over the anchor stitches – just a small area of about three little satin stitches.

They don’t have to be perfect. After all, you’ll be covering them up – a LOT.

Then stitch some perpendicular satin stitches over the previous layer, filling up the middle of the dot a little more. Three stitches should still do it at this point.
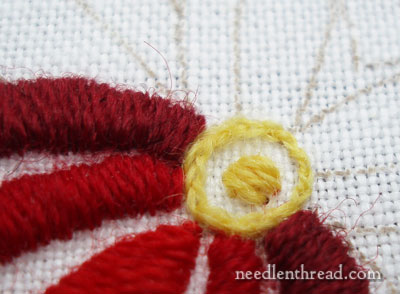
Then, on top of those and perpendicular to them, add another layer. Continue in this manner, adding one layer over the next and increasing the amount of stitches to make the layer, each layer perpendicular to the one before. Again, the stitches here don’t have to be perfect – the idea is to add enough padding to give the middle of your dot some lift. (You can read my post on satin stitch padding to see more closely how these padding stitches are worked, if you like.)
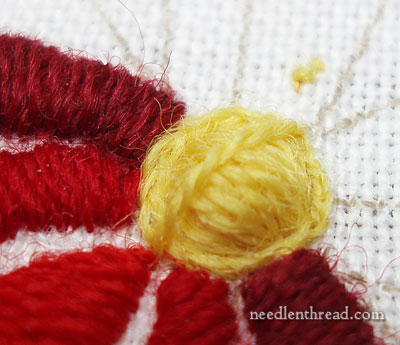
Keep going, keep going! And eventually, you will end up with the middle of your split stitch outline filled with padding that bulges up in a little mound. Now, it’s important to make sure that your last layer of padding (which will be just below your final layer of satin stitching) runs perpendicular to the direction of your top layer of satin stitching. Gauge this as you get close to filling up the whole inside of the dot.
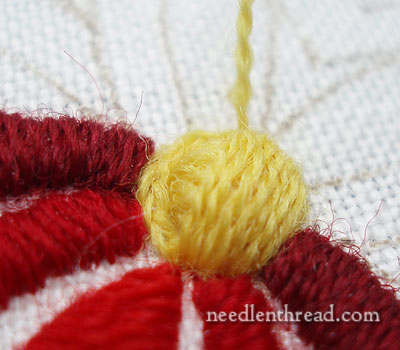
Once the inside is full, it’s time to start satin stitching the top layer. Switch your thread at this point to a fresh thread. The final product will look better if it is not stitched with a worn thread.
Bring your needle up just outside the split stitch outline, centered at the top or bottom edge of the circle.
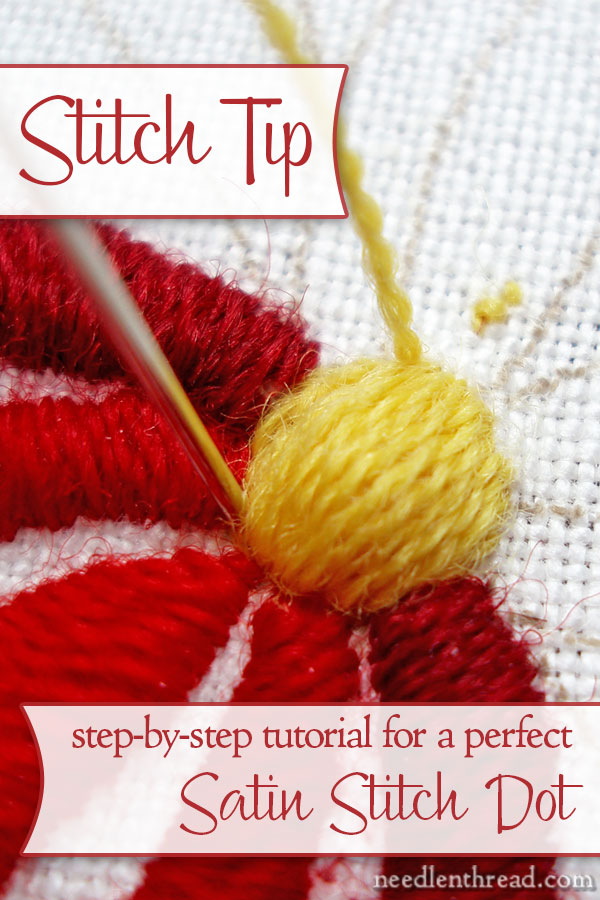
Take the needle down directly across from this, to make your first satin stitch. From this point, you will work from this center stitch outward toward one side of the dot, and then go back to the center, and work outward toward the other side.
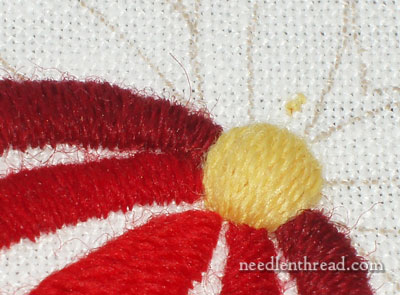
As you work towards the edge of the dot, the stitches will hug the padding, and you’ll notice on the right side of the dot in the photo above (the side that is satin stitched) that the last stitch is not that much shorter than the stitch next to it. Don’t work satin stitches all the way to the edge, but just far enough that the last stitch covers enough of the padding and makes the edge look round.
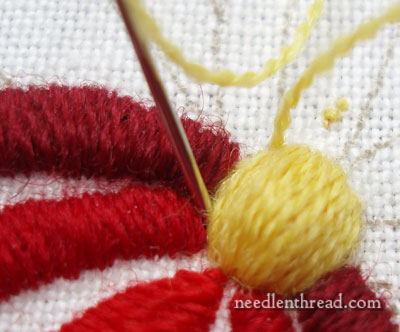
You can see in the photo above, as I take the last stitch on the left side of the dot, that the stitch itself is not that much shorter than those closer to the center of the dot. It’s the padding that is serving to round out the dot.
If you don’t want your dot to sit so high in the center, you can simply outline the dot in split stitch (which I think is really essential for a good satin stitched dot), pad with just one layer inside (or none) and stitch in the same manner, to the point where your last stitch covers the outline with its length, rather than trying to stitch smaller and smaller towards the edge (which will usually only result in a wacky kind of oblong, football shape).
If you were to diagram the stitch layout, it might look something like this:
The split stitch outline will help “finish” the circle. When the circle is padded (as in the photos in this tutorials), the threads are going to wrap around and hug that padding, to round out the shape. If the circle is not padded, but just outlined with split stitch, the split stitch outline underneath will finish rounding out the shape. This doesn’t mean that you want the split stitch to show – but you want the length of that last satin stitch to lie just on top of the split stitch curve. Sometimes, the very outside edge of the split stitch on the curve might peek out a little bit, but this is better than working satin stitches that decrease in size so much that the circle looks squat, or a point forms on the edge of the circle.
The finished dot will look plump and round, if padded, and will look flat and smooth, if not padded.

At an angle, you can see that the dot sits up above the surrounding stitched areas (which, incidentally, are also padded). It’s a nice round mound.
So there’s one way to achieve a nice, rounded satin stitched dot. What about you? How do you achieve a round satin stitch dot? Any stitching secrets you can share with the rest of us? Feel free to leave a comment!
I think that there is little that is more pleasing than a well stitched, satin-stitch dot. Yours are beautiful.
When building up the layers of padding, I prefer to lay the stitches rather than satin stitch. That way there is less bulk on the underside of the fabric.
When doing a well padded dot (or any toher shape) in silk embroidery, I do all be the final layer of padding in cotton.
I agree that the padding layers need not be as perfect as the final layer, but a little care making those smooth and even will result in a nicely shaped, smooth finish, as you have 🙂
Great tutorial.
Well this post just confirmed it; you are just plain super-duper, peachy-keen fabulous!
I’ve been embroidering since I was seven, and this is something I’ve never come across before. What a wonderful technique — and as usual, you explain it so well.
I truly appreciate the generous resources you give us in your blog — thank you for your constant inspiration.
A big “wave” from Cape Cod (I found some crocuses on Sunday, but we had snow squalls from off the ocean yesterday…)
Judith Ann
Good morning, ladies!
Hi, Judith Ann – I was raised in Massachusetts, and spent a couple summers at the Cape as a kid. I LOVE the area! But snow squalls just don’t sound so great right now. Crocuses, however, do! Glad you like the dot technique, but I realized when I read Carol-Anne’s comment that I missed a vital point!
Hi, Carol-Anne! Wooooops. I don’t use full stitches on the padding, either. I use laid stitches. I’ll have to follow up on that one, I suppose, with some other photos, to clarify. But, for those of you who read the comments, an explanation: instead of satin stitching the padding, when working the padding, come up right next to where you went down into the fabric for each padding stitch, instead of crossing the back of the area. This prevents bulk on the back – so you don’t end up with a round mound on the back, too….. Yikes. Kind of a vital point to have left it out, unless you want the build-up on the back for some reason. Thanks for the reminder!
Speaking of Carol-Anne’s comment and the use of cotton with silk, on larger designs that have a lot of satin stitch in them (like this stole), to save on silk, you can use a matching color in stranded cotton. When I first started the stole, I didn’t do this, but the cost of the silk thread finally persuaded me to find an alternative to padding with the same thread. So if you’re looking to conserve silk on larger projects that require quite a bit of padding, consider cotton as a padding thread.
~MC
thanks for this, I absolutely love the pomegranates and am super excited to see them developing! I’ve never worked in wool, but I just love the way this looks, and all the crazy stitches you worked on the crewel rooster. In fact with regards to not planning I found the entire series of posts on the rooster so educational– we got 5x the lessons by seeing what you thought worked and did not and also illustrating all those stitches in action.
Your tutorials on satin stitching have really changed the way I embroider! Just finished a tiny scroll-y exercise in silk and rayon using all your tutorials on satin stitching and monogramming, I’ll send you a pic when I get around to taking a photo.
Wow! I wish I would have known your technique years ago. Thank you for sharing it.
Great points, Mary, and great tutorial. Your instruction is the best.
For padding, I usually use white cotton, floche or floss will work, but I use Japanese padding cotton and lay it like you said. If I’m concerned that the color will show through silk, I put the last layer in silk. You can also stitch a lattice over the padding to hold it in place, make it firm, but it will be even, not mounded.
I agree about the length of stitches. In JE the hard and fast rule is that anything longer that 1 cm needs to be held down with something. You can even do a layer of knots on top of the mound. The satin stitch should be pretty snuggly done.
Now, a question. In JE we tend to do lots of diagonal rather than horizontal, but your stole looks to be all horizontal to the design. Does it make a difference? Thanks, AnneG in NC
How do I get nice round satin stitch dots? I never have yet, but then the last time I attempted any was before I found your tutorials. I’m sure my next ones will be a success.
This stitch looks easier to do than a long and short stitch on a small area. The long a nd short stitch doesn’t seem to work for me. I have small petals that weree supposed to be done in a long and short stitch but I think a satin stitch would be mush easier even if I raise tem as you do for the dircle.
carol
Love the tutorial. Will be giving this a try soon.
This week I have been dotting my ‘i’…. and my stem stitched corners and circles are looking a 100% better thanks to your wonderful Beginners Tutorials……
I am so glad you did this tutorial because I have never been able to get a decent looking satin stitch circle/dot, and yes, mine always looked oval and uneven. I so very much enjoy your instructional emails. Thank you for sharing your knowledge and expertise.
Another great tutorial! Now I know why my satin stitched circles always looked wonky!
I am particularly fascinated with your ecclesiastical works. I once tried to make a stole with a beautifully woven fabric that already had the symbols on it and it was such a headache! My question is, do you complete the items like stoles or do you just do the stitching and someone else completes the item?
Hi, Karen – It depends. On linens and so forth, I do all the finish work. But on the stoles and backs of chasubles and so forth, I do the stitching and pass it on to the vestment maker for the rest of the finishing. ~MC
Thank you for this wonderful tutorial!
Your dots are gorgeous! I love to learn new techniques and so much appreciate your sharing.
I will be trying this out shortly …
Your satin stitched dots are gorgeous Mary! I started embroidering when I was 4 yrs. old. Until I discovered your tutorial on the satin stitch, I had been doing it all wrong! I avoided any pattern with “fill ins” because I knew my satin stitches would look funky. I’m just now finishing a hand embroidered baby quilt top and thanks to you my dear, my satin stitched flowers look fantastic! (((Hugs)))
Hi Mary,
That was another excellent tutorial! One thing I’ve always wondered about both satin stitch and long & short stitch is why it’s important to start in the middle and go the edge, and then repeat for the other side. With padding I can imagine that the stitches will hug the mound better if it’s done that way. But on non-padded work- why not start from one side and work across? Do you know why?
Hi, Jennifer – actually, on both long and short stitch and satin stitch, whether padded or not, it’s best to start in the middle because that’s where you set down the direction of your stitches for the central part of the element you’re stitching. Also, as you move towards the edge, you can gauge the “finish” on the end (whether it’s rounded, squared, comes to a point, or what-have-you) better, to keep things even. The central part of an element is the part that normally occupies the most space, and really captures the eye – so by starting there, you can get your stitches lying in the right direction and evenly spaced and neat as they move towards the edge. Beginning the stitching in the center sort of “sets the stage” for the whole element. Hope that helps a little bit! ~MC
So, I finally discovered why the round things are ‘fat’!
Thanks,
Marva
Thank you, Mary, for your answer and thanks to AnneG who shared a wonderful resource website:
http://www.churchlinens.com.
I was unable to thank to AnneG directly, and I thought that perhaps someone else might find this site most helpful.
Dear Mary, Thank you for stating that to start a new thread on the last padding stitch. For some reason I always try to get the most out of woollen thread and it ends wispy & wan. Now I have been clearly told to start a new thread I won;t be so mean. Thanks to all the replies I am even learning more about other needlework. A simple technique brings a beautiful result. looking forward to seeing & learning more.
For a couple of years I had been wondering how one could possibly get perfect circles from sating stitch. Nothing I’d tried had worked.
Then last fall I did a pair of old 1970s Jiffy kits (thank you, eBay!) and discovered that they used padded satin stitch for circular areas. Worked great. These were small circles, about a centimeter across, and just doing satin stitch one way, then a second layer of satin stitch on top (perpendicular to the first) worked great. Basically it looked like some of the earlier steps of your tutorial above.
Now I know that I should add more layers for a bigger circle, especially to get a nice hemisphere effect as you have in yours. 🙂
Hi Mary,
As usual, love your posts – including the old ones that I dig through on occasion. I noticed this one is not included in the index you had for the pomegranate. I’m sorry that you weren’t able to finish it, since it looks like it will be beautiful – maybe one day, when you retire! Hah!
Thanks for your wonderful blog. It’s my absolute fav!
Carrie
I keep forgetting to mention this, Mrs. Corbet but thanks to this article I just completed my first set of satin stitched circles for yet another set stamped pillowcases I’m working on. When I get home from my vacation I’ll likely take pictures, and send them for the community pictures you requested, but I think you’ll find that like the other photos I sent the most charitable thing to be said about my stitching is that it is “mediocre” at best. (Blushing)
This is so helpful – thank you Mary!
I like your tutorials because they are very exhaustive and you reveal all the “secrets” – (not like many tutorials which only show embroidering methods partially). I use the same method as you but instead of split stitching around the border to begin with, if the dot is quite large, I place four stitches around the border (a square with the corners that do not touch) and then join the corners with further four stitches forming ad octagon. Surprisingly the octagon becomes a circle.
Also when I use Filo Ricamo DMC I do not pad so much the dot before placing the last set of stitches.
Thank you for a wonderful tutorial. I have struggled with satin stitch circles for so long. I am off to practise right now!!
merci pour ce joli point!
Wonderful work on your site! Thanks so much for the great tips. I’m just getting back to embroidery after a long period, and your articles are not only a marvelous refresher course, I’m also learning things I did not know, and will be a far better ‘broiderer for it.
Thanks Mary ~
My dots were coming out oval shaped. This tutorial will really help.
Godspeed,
mary
PS enjoying your latest book on Monograms… Of course I did my first letter, it was an “M”, but you might think it was for Mary… but alas, no, it was for “Mimi”, a much sweeter identity as grandmother name to my 4 grandbabies who are all under 5 years old 🙂
Mimi Mary 🙂
Hi, Mary – Glad the tutorial was helpful! I think M for “Mimi” is just a perfect way to use the monograms!
Olá mary, boa tarde
Sou amante desse ponto, principalmente em roupa de bebe.
Não consigo bordar círculo pequeno, mesmo com floche. Você
Pode me dar uma dica de como bordar poa em ponto satin?
Muito obrigada pela ajuda
Sou fã de seus trabalhos e pelo seu desprendimento em ajudar
As pessoas que amam bordado.
Abracos
Thank you for the tutorial! Whenever I do a padded satin stitch on a small circle, it tends to take an oval shape at the sides. How do I take care of that? Also, does padding in a particular type of stitch changes the look of the dot? For example can I use a plain straight stitches to pad them? I am doing a polka dot design where I want not so bulky but weighted circle shape.
Thank you so much for such clear and detailed instructions. I’ve been trying to get a neat satin stitch for some circles and your tips will really help, I’m sure.
Glad to hear it, Joan!! 🙂
You are such an amazing teacher!
Hi, Sally – very kind of you, but I must give the majority of credit to my very patient niece, Anna, who did much of the teaching!
Thank you Mary! Once again you’ve given me the best advice on what looks like a most basic stitch, but is tricky to do well. It’s so helpful to hear that you also can find it that way. Your tips and demonstrations have made it all that much clearer. Now to do it!
Hi Mary,
Thanks for your great tutorials on making perfect domed satin stitch circles. I’ve used the technique in my crewel work several times. The cherries I’ve made make a person hungry! The flowers centers come out so nicely, you learn in to learn if they’re scented.