


Continuing with the various ways you can start and end your threads in hand embroidery, this picture tutorial shows you how to use anchor stitches when embroidering a line. If you’re not familiar with this method of starting threads, you might find it a bit strange, but bear with me! Read through the tutorial, and you’ll see why it’s useful to know how to do this.
Using this technique for starting your threads only requires you to work from the front of the fabric. You don’t have to turn your fabric over to run your threads under anything, and you don’t have to keep a finger on the back of your threads to make sure you’re crossing over the thread on the back. This is straight-forward, front-of-the-work stuff. Knowing how to start a thread working solely from the front of your work – and still not using a knot – can be very handy…
This works best with a thicker line stitch. If you’re working a very fine stem stitch line, or a back stitch line, you might prefer a regular waste knot. Still, you’d be surprised how invisible you can make these anchor stitches, even on relatively fine lines.
I’m going to be stitching this line with the heavy chain stitch.
Method of Work
Begin by placing a knot near the end of your thread. Here, I’ve left a tail that’s unnecessarily long. You don’t have to have a long tail – the closer your knot is to the end of your thread, the less thread you use. However, you do want enough of a tail after the knot to be able to pull up on your thread before you cut it.
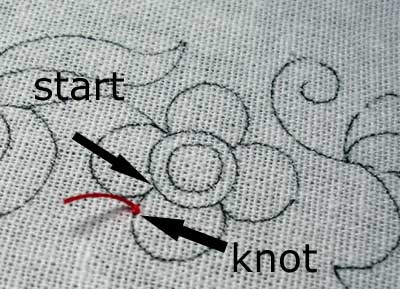
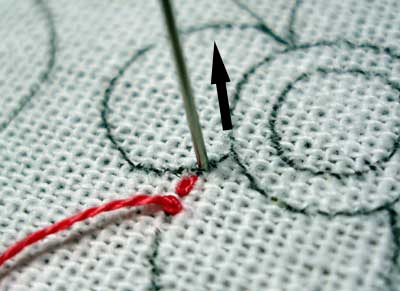
Within an inch (or even half an inch) of your starting point, take your needle from the front to the back of your work so that the knot is on the top of your work.
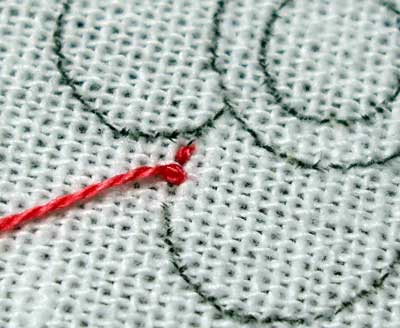
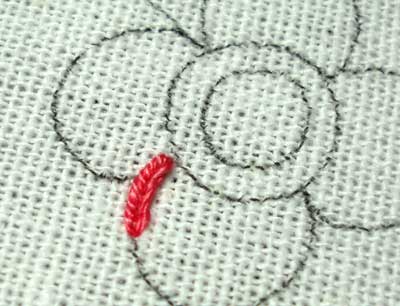
Between the knot and your starting point, take one tiny backstitch. Here, because this is a loosely woven fabric, I can easily take a stitch over one thread. In a fine, tightly woven fabric, you might pass over two threads. But you’re aiming for a relatively tiny back stitch, in any case – over one or two threads of the fabric, depending on the weave of the fabric.
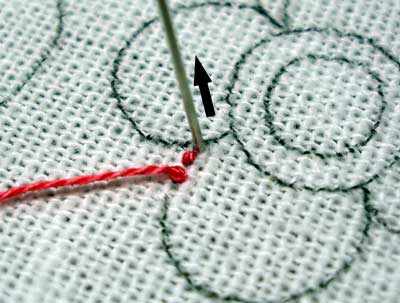
Working away from the knot and towards your starting point, bring your needle back up to the front of the work just on the other side of the tiny backstitch.
Now take your needle down into the middle of the backstitch, splitting it. As you pull this stitch, you want to apply enough tension to sink the stitch into the first backstitch. Don’t pull so hard that you distort your fabric or stitches – just enough to pull the second stitch well into the first.
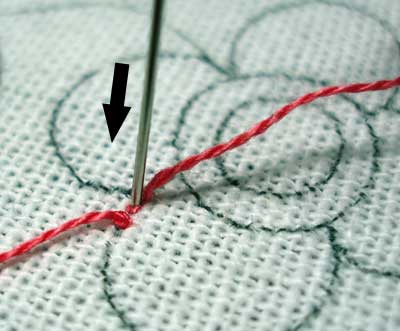
Still working away from the knot and towards your starting point, bring the needle back up to the front of your work, just on the other side of your second stitch…
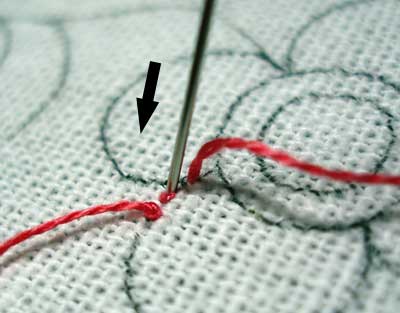
…and take it back down into the stitch before. Essentially, you’ve just made three split stitches, only you’re splitting your stitches from the top, rather than from underneath.

Pull that third stitch enough to bring it down into the second. Here, you can see it’s sitting up a bit.
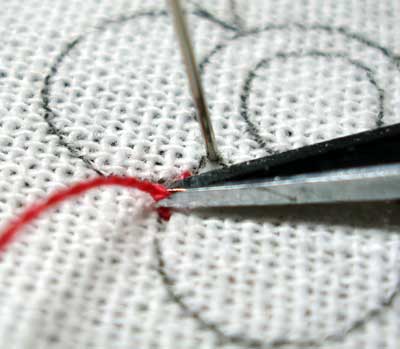
Pull up firmly on your thread tail, and snip off the knot, right above the fabric. The thread will boing down to the other side of your fabric.
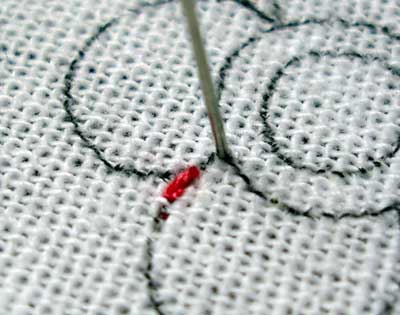
And now you’re ready to stitch. Looks bulky, doesn’t it? Hard to believe it can be covered and not noticeable…?
Here’s the beginning of that petal, worked in heavy chain, covering up those stitches. You’d be surprised, actually, how well these anchor stitches can be covered up with a line stitch, even line stitches finer than the heavy chain. I’ve used this method for regular stem stitch and the anchor stitches have been invisible.
Pros of Using Anchor Stitches on a Line
1. The technique doesn’t require much thread, so there’s very little waste.
2. You can work solely from the front of the fabric. This is especially handy when you’re working on a larger piece that’s a pain to turn over.
3. It’s fast – there’s no turning over, running under, or anything like that. You jump straight in to stitching.
Cons of Using Anchor Stites on a Line
1. On the very finest lines, they could be visible. But … you can make them fairly invisible with a little practice.
2. I can’t think of any other ones. Can you?
I use the method Mary details above almost exclusively for all my embroidery work. I use it for fine line stitches (stem, back, etc.) as well as wider stitches such as chain.
I have started trying a slight variation, however. I start a little farther away (down the line) from where I am going to be starting my actual stitching and I try to put the tiniest amount of thread on top of the fabric as possible (I like to challenge myself to see how little I can put on top–yeah, I’m weird!). I also put extra space between the two anchoring stitches. I have found that this works better for me on stem stitch, especially single lines that have nothing on either side where there’s no room for error.
I found I was having a problem when I had the two anchoring stitches close together and I would get a thicker stitch at the beginning of the stem stitched line. Additionally there was often competition for the place where the needle would go into the fabric.
I also try to anticipate where the stem stitch stitches are going to go and then place the anchor stitches in between these places so the stem stitches merely cover the anchor stitches instead of sharing ‘holes’ with them.
I hope this makes sense. I’ve been working on the spring flowers teacloth and there is a lot of stem stitch ‘out in the open’ so I’ve been getting lots of practise hiding my anchoring stitches.
I also do exactly like Margaret said…make several stitches and keep them small on top and spaced out. I also would like to add that I don’t start with a knot at all…. just the tiniest of tail on top that gets cut off as I approach it and have already done several stitches to anchor and cover the “leader” stitches as I call them.
Tess
Thanks, Margaret and Tess, for the input!
I, too, make smaller stitches farther apart for narrow lines – I prefer this method of starting a thread, since it’s worked solely from the top. It’s amazing how just a couple tiny stitches do the trick to anchor a thread – and it sure saves a lot of thread!
Thanks again!
MC
Thanks for all your precious tips!
I start my embroideries in two other different ways:
1. I insert the two tails of the thread in the needle hole, making a loop with the thread. I insert the needle into the fabric on the front, come up with the needle and thread leaving the loop on the front making a tiny stitch ; then I slip the needle into this loop making a "knot".
2. I pull one thread through the needle hole making one "leg" longer than the other. Insert the needle on the front under two threads of fabric and pull the thread almost to its tail (the long one), leaving just a tiny bit of it up. Now I have the needle and thread on the fabric.Then I create an "O" (a circle -taking the thread and needle up and down), insert the needle under the two previous threads of fabric (the same two I used to make the first stitch), from the bottom to the top, making a "cross", being sure that the previous stitch is couched behind the fabric. I then pull the needle through this circle making a knot.
Well, I hope you understood! I will try and make a video of both ways to show you.
aninhavergara@uol.com.br
Ana Vergara
Yikes! I’m working on Teresa Wentzler’s beautiful peacock in cross stitch, and with all the blended threads and frequent color changes, the back of my work is a mess! The only saving grace is that once the piece is framed, the back will (hopefully) never be seen again. But I’ll know it’s not right. Wish I’d understood these great starting/ending techniques before I began the piece. Better late than never, I’m going to start practicing them now. Thank you for your excellent instruction! For a visual learner like me it’s a life saver.
If you are doing just a few French knots in a design, how do you start and end the hreads for those?
How do you start and end the threads for a Lazy Daisy stitch design?
Carla
Hi Mary, wonderful tutorials. I am new to embroidery and have difficulty understanding the instructions. Should I read first, then practise. Would that make it easier for me? Any help would be very much appreciated.
You might practice as you read. When you find something that strikes your interest and you want to try, read about it, and practice it. That’s normally how I go about picking up something new. Hope that helps! ~MC
Mary,
Happy Saturday, and as always TY for your amazing top-notch site.
Any chance you will have a video tutorial for this anchor knot in the future? While the directions are great, I’m afraid I’m more of a video visual learner. I’m sure you have much more pressing projects however, if at any point in the future you are looking for video ideas…the various knots may be a great tutorial for some of us new stitchers and old pros alike. Learning new techniques are always welcome.
Thank you for helping this dog learn a bunch of new tricks.
V/r,
Tracie
I love your tutorials on YouTube but I can’t quite understand the written tutorials. Guess that’s how my brain is wired. The YouTube videos said in order to get more information about the stem stitch and your thread, you had to visit the site. I understand you want people to visit the site but for learners like me, who do better with the videos, it sure is frustrating.
I don’t understand why I need the knot at all. Why can’t I just back stitch & split stitch to anchor my stitching without a knot?
Hi, Nicole – you certainly can! If you start with the knot on top, though, you don’t have to hold the thread.
Thank you soUchiha for such a quick response!
I got it right at just a glance of reading am thankful to you
I did a huge amount of embroidery – mostly tablecloths – in my teens. They’re used regularly and are now fraying so I’m beginning another. BUT I’ve forgotten so much that I thought I knew (60 years ago … ) So I gave in and looked on-line, found your site and I think I’ll be coming again and again. Beginning the thread was the first problem I had so I fudged my way through, remembering that you mustn’t use a knot. Now I find that (apart from the knots, which will make things easier in the future) I’m using the same techniques. Huzzah! This tablecloth is large, it will take a long time to finish, I hope I see it out. Also, although I have masses of saved thread I decided to do the cloth (a flower design) in just black and white, with a touch of grey perhaps. What can I do with the rest of the garish colours? Perhaps use them for tablet weaving. I don’t do thatbut husband does. Thank you, another Mary.
I am soooooooooo happy to have discovered your tutorials, just wish I had years ago
however better late than never, I to always had issues with starting and ending threads now I know how to
do it correctly.
Again thank you so much for sharing
Yvonne
Thanks, Yvonne! I’m so glad they’ve been helpful for you! 🙂
In embroidery, making the back of the project look good:
Going from one object to another like object (say leaves) in the same color thread, would you start anew on the second object? Could you travel down threads on the back of the project until you are close enough to start the new leaf?
Ellen Crenson
It really depends on how far away the next element is, and whether or not there are other stitches in between that you can run the thread under on the back. You don’t long, loose threads on the back of the embroidery, because they can snag, and because sometimes, they can be seen from the front.
Thank you so much for this and the tutorial on splitting floss. I wish I had known this sixty years ago when I taught myself embroidery stitches. I think the internet is wonderful for sharing enlarged photographs like this.