


Day before yesterday, I showed you the Medallion project framed up on my new Millenium embroidery frame (which, as each day passes, I love more and more!). Yesterday, we looked at a built-in cover on the embroidery project, to protect it both during stitching sessions and outside stitching sessions. Today, I’ll show you what I did to ensure that my ground fabric (which is linen) and my lining fabric (which is muslin) don’t shift.
This is something you can do when you’re stitching through two layers of fabric. It’s not always a necessary step – on smaller projects, I rarely baste. But on larger projects that will be framed up for a while, and especially if there’s any chance that down the road I might remove it from the frame before it’s finished, it’s a good idea to do some simple basting to keep things from shifting.
If you’re a quilter, you know well that all those layers that you’re quilting through could shift during the actual quilting process, and to keep them from shifting, basting stitches (which are just long running stitches) keep all those layers in place. Once the quilting is done, the basting stitches come out.
Here, it’s the same concept.
The ground fabric for this project is Alabaster Angel, a “dower quality linen” from Legacy Linen. It’s a relatively high thread count linen, with 48 threads per inch. What I like about Legacy Linen is that the warp and weft threads are equally fat – they fill the ground and there are no thin spots, making it ideal for surface embroidery. It has a beautiful “hand” (it’s nice and smooth to the touch). Alabaster Angel takes heavy stitching with thicker threads or delicate stitching with fine threads superbly. It’s a nice weight for this type of surface embroidery and will support the stitching well. The linen ground, incidentally, will be completely covered with embroidery, so the linen itself will not be visible, but it’s still important to have a good linen behind the embroidery. It makes all the difference in the finished product.
Because the piece will be completely filled with stitching and some of that stitching will be fairly heavy goldwork, behind the linen there’s a layer of white, high thread count muslin to add further support.
As mentioned in the Millenium frame review, I framed up both the linen and the muslin lining at the same time. Now, I could have basted the fabric together before I put it on the frame, but I prefer to baste when both fabrics are on the frame and pulled to equal tension. You might have to check the fabrics a couple times as you go – check the top fabric and the lining fabric as you’re framing up, to make sure that they’re equally tensioned and straight before you baste them together.
Once I was satisfied they were, I could have just left it at that. They were both in the frame, both straight on the grain and pulled to equal tension, and as I stitched, both layers of fabric would have been joined together with no apparent need of basting.
But what if … what if I decided I needed to take the fabric off the frame for any reason? Sure, the areas already stitched would be stuck together, but the unstitched areas wouldn’t be. And when framing up again, if there was a shift in the layer of muslin, this could have an effect on the finished piece.
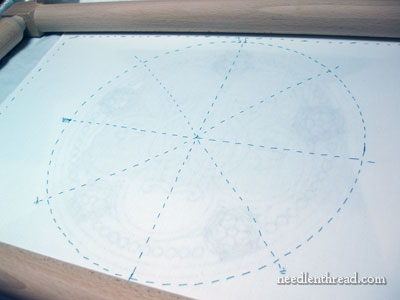
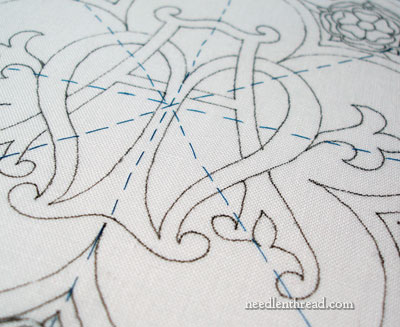
So, to make sure this doesn’t happen, I basted. Using regular sewing thread, and working from the top of the work (the photo above is of the back, so you can see the muslin and the basting layout), I basted about a half inch around the outside of the design, and then I stitched four lines across the diameter of the circle at more or less regular intervals, splitting the circle in fourths first, then splitting those fourths into half… kind of like cutting a pie.
As I reach any basting line at any point in the design, I will snip out only as much of the basting line as I need to, to be able to work that particular area.
I had to chuckle when Jen commented on yesterday’s post (about basting on a top layer of muslin to protect the stitching area), that the new frame certainly saved me frame-up time, but I’ve found reasons to baste, anyway! In a sense, it’s true. I think, because I didn’t have to spend any time getting the fabric onto the frame, I was much more relaxed and willing to spend time for these little extra steps that will definitely make a difference in the finished product – or, at the very least, they will go a long way towards prevention of future problems.
Now the project is really ready for stitching, and I’m rarin’ to go! So next time we visit this, we’ll look at progress on the silk and gold background. In the meantime, I have some other tidbits going on that we’ll delve into together – something involving silver and maybe suede (what was I thinking?), a little how-to for making your own transfer kit, and other delectable stuff.
See you tomorrow!
If you’d like access to all the tips and techniques discussed in the Medallion Project, including complete step-by-step coverage of the Tudor-Style Rose, conveniently collected in one document, interlinked, referenced, and indexed, why not add the Marian Medallion Project e-book to your library? It’s packed full of all kinds of embroidery tips for undertaking a project like this, all in a convenient electronic format for easy searching.
I believe in basting — ALWAYS!! It saves so much “ripping out” time later…. It is always time “well spent”…. NOW are you ready to stitch!! haha!
I also baste but instead of using regular thread. I use water soluble basting thread from a quilting store. It is great because it is clear so it will not show if I leave it in. If it does show, a cotton swab with water will dissolve it away. No worrying about shifting, no worries about snagging a thread on accident while unpicking the basting or sewing through my basting and having a hard time getting it back out.
I’m trying to learn about all of the linens you mention in the projects you do. Not having done any of this before, your site is SO helpful.
Would you mind commenting on the linen. You mention that this Medallion project is the Alabaster Angel, a “dower quality linen” from Legacy Linen. Is this a different linen from the first Marian Medallion that was on the slate frame where you mentioned Legacy Linen’s Ecclesiastical linen?
Thank you for this post on the basting! Once again, questions answered!
Hi, Carrie – I set up several test pieces (small pieces of fabrics to play around with techniques & threads to see if they’d work well together) using Alba Maxima. Either the Alba Maxima or the Alabaster Angel will work fine for this. I’m actually not sure if the original start was on Alba Maxima or Alabaster Angel – each would work fine for this. I’ll have to take the other start out and look at it more closely to know which I used! But I’m certain the restart is on Alabaster Angel. ~MC
This is a fascinating “thread” (ouch). I’m really enjoying it. But I am puzzled by a couple of things. (1) How do you know that the two layers are both on grain properly? I notice that your edges aren’t cut even, and it seems like it would be hard to eyeball the grain of both your fabric and the backing behind it. (2) How do you keep your fabrics on grain if you don’t baste them together, like a dress fabric and its underlining, so that you can treat them as one piece of fabric? I could easily see myself making a mess of framing them up and basting afterward. Yet your work looks gloriously precise!
Hi, Jackie – both pieces of fabric are cut on the grain of the fabric. With the linen, to achieve this, I cut along the threads of the fabric. If I make a mistake in cutting and cut across a thread, then I just remove threads along the edge until I’m down to a straight thread. Then I overlock stitch the edges on the sewing machine. With the muslin, I always tear along the grain, rather than cut. Then, I washed both pieces in hot & cold water (alternating) to shrink them up, and then I block them to dry most of the way, and finally, iron them. Then I overlocked the edge of the muslin, too. When I put them in the frame, I lined up the “grain” on the top and bottom of the fabrics (as I put them into the rollers). The fabrics are not exactly the same size (the rate of shrinkage between the linen and muslin was slightly different), so the muslin is a little shorter on the sides than the linen, but it was easy enough to eyeball the grain on both of them, lining up the top and bottom edges when preparing to put them in the frame. Hope that helps! ~MC
Great post Mary!!
Can you please expand on how one would go about checking that both fabrics are tensioned to the same degree? Is there a way to check if the tensioning is close, or is this just something you gauge through experience?
I just love this site and the fact that each and every time I come here, I learn wonderful new information!!
Hi, Saliba – I think it’s something you can pretty well tell. If one were looser than the other, it would be evident. ~MC
Thank you! That’s clear as a bell, and it answers so many questions.
Where do you purchase your Alabaster Linen? I found some on one site but it was not 48 count. I am assuming that alabaster is the color. Is that correct?
Thanks.
Louise B.
I’ve been reading and re-reading your posts and the comments by readers, but I’m still unclear about something: are both the linen and the muslin pulled taught within the grooves of the bars of the Millenium frame? If so, do the two fabrics still easily accommodate the dowel that one then slides into the bar? Or, is it just the linen that is pulled tight? If that is the case, does one baste the muslin onto the linen before tightening the framing bars or after?