


There is a real cover-up going on here. It’s perpetrated by me. And I did it on purpose.
Last time, when I started the Medallion Project, I started hastily. This time, I have started slowly and I’ve taken a little more care with the initial stages of the project. I don’t usually talk about my cover-up jobs with my embroidery projects, only because they always come after the fact: after I’ve taken photos, after I’ve done a round of stitching, after I’ve straightened everything up after a session. And frankly, I never really think about it.
When I straighten up from a stitching session, I always (always always always always – get the point?) cover my embroidery project. If it’s a large project on a frame, I lay a clean cloth over it (could be a piece of muslin, could be a clean pillow case, etc.). If it’s a small project in a frame, I’ll slip it into the bag I’m using with the project. If it’s on a hoop, I take it off the hoop and put it in my project bag. But the point is, it’s good to cover your work when you’re not working on it. Why? The reasons are somewhat obvious, I suppose – to reduce dust accumulation, to keep excess light off it, to ensure against something accidentally snagging on it – whatever. The idea is to protect it.
But it’s also a good idea to protect your work while you’re working on it.
On the Medallion project, I decided to build my cover cloth into the project. I’ll tell you why as I show you what I did.
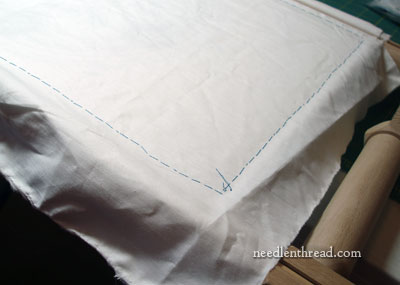
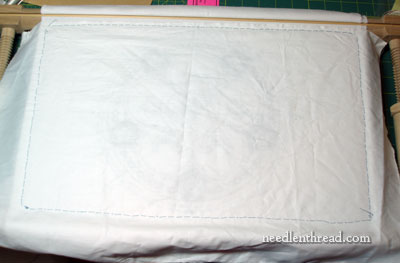
It’s very simple, really. I took a clean piece of white muslin and basted it over the whole piece in the frame.
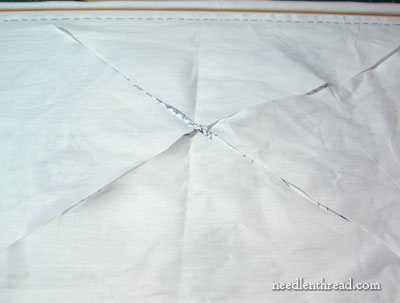
Then I cut an X in the middle of the muslin, over the whole design area.
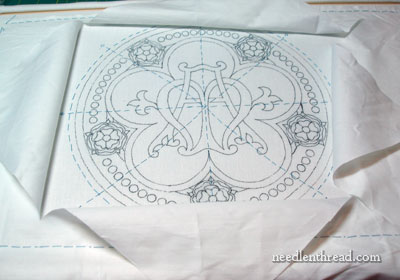
I can fold back all four portions of the X and see the whole piece…
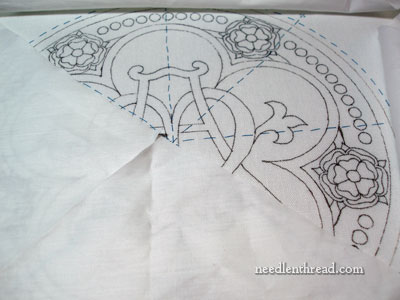
…or I can leave some portions folded down and some folded up, exposing only part of the piece.
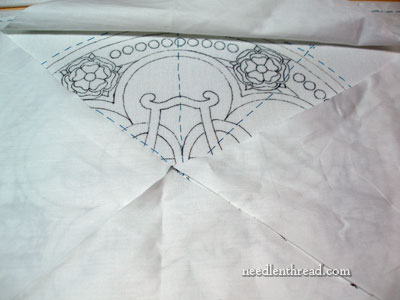
In fact, I can expose just a little portion of the piece at a time. This keeps the portions underneath the covered parts protected – it keeps me from rubbing my hands across the fabric or the stitches already there, and it keeps excess fuzz or dust off.
I know this isn’t a new concept, to keep a cloth or tissue paper over your work while you work on it. I don’t usually build my cover cloth into the project, though. I’ll generally just use a scrap of cloth and lay it over the part of the design where I’m not working, just to keep things covered and to keep my hands off the fabric. And at the end of the session, I’ll cover the whole thing and leave it.
So, why the built in cover job? I’m working with flat silk for the background behind the monogram. This is finicky stuff – easily snaggable, easily shiftable until it’s couched over with gold. I’m not going to take any risks with it. I’m working a small portion at a time, laying the silk, couching the gold, and as I work through the piece, I want to make sure the area worked is not exposed.
It’s easy to build a cover into your own project, and it does go a long way to protect it from the elements and the environment. If you’re working with a hoop, you can hoop up a piece of muslin along with your project and then cut the muslin to expose your stitching area. This is a great way to protect your work from dirt rings around the hoop area. For framed pieces, you can baste on your cloth like I did above, or just make sure you have a clean cloth or tissue paper handy while you stitch, to keep your work covered. The oils from your hands are subtle – but they are pretty much always there. Same with dust in the air, even if you don’t see it.
Cover-ups are sometimes a very good thing!
So how about you? Are you guilty of cover-ups? Do you protect your work as you stitch, or after you stitch, or both – and how do you do it? If you haven’t done so before now, are you going to start doing it? Or do you think I’m nuts and going overboard? That’s ok. I was called an embroidery geek the other day. I can handle that. So leave a comment below and feel free to be candid!
If you’d like access to all the tips and techniques discussed in the Medallion Project, including complete step-by-step coverage of the Tudor-Style Rose, conveniently collected in one document, interlinked, referenced, and indexed, why not add the Marian Medallion Project e-book to your library? It’s packed full of all kinds of embroidery tips for undertaking a project like this, all in a convenient electronic format for easy searching.
Hi Mary,
I had to laugh when I saw you’d basted on a cover. Not because it’s not a good idea- it’s an excellent idea! But because yesterday you were SO EXCITED about a frame that would allow you to get going without having to baste anything. Perhaps you felt incomplete without basting something? 😉
Speaking of the Millenium frame: I bet you could put your cover in the clamping mechanism too, and avoid even that small amount of basting.
As always, an informative column. Thanks again for what you do.
I normally don’t work with a hoop of any nature but I do keep my work covered as much as possible. My reason is the fact that we have two cats – ’nuff said!
Thanks for this! I’ll be hand quilting a quilt wall hangning that has kona white for the background and little hands on it for the local Library. Being paranoid about white quilting fabric I’ve been looking into ways to keep it covered as I work without taking on a whole new project to protect it. This way is simple and fast!
I usually use stretcher bars for all my stitching, and after I mount the fabric, I lay a clean piece of plastic over it, usually a clean plastic garbage bag. (They come in lots of sizes and are cheap.) I cut it to open it up flat and attach that to the frame and then cut out the area around the stitching on 3 sides so it can be folded up and out of the way. It hangs down and protects the stitching area when you are done working on it. I reinforce the area where the plastic is folded back with tape so it doesn’t keep ripping. Depending on the size of your piece, you may get more than one protector out of a garbage bag. Warning: don’t try to be “green” and re-use plastic shopping bags such as the ones you get from the grocery store. If they have any printing on them, the ink will come off on your hands and/or stitching.
I use a cover cloth with a round circle cut out (about 6 inches in diameter). It’s out of cotton. I’m working on a rather ambitious crewel piece and I was afraid of abrading the stitched portions of the work and causing them to look like felt.
Great idea!
Nope, I have never done that before, but it is a great idea. I usually put my work away in my embroidery bag to keep the cat out of it, but if it sits for a while on the standing hoop it can still gather dust or if put away it can get snagged by other needles or accessories also in the bag. Covering the project with a pillowcase or bag would not only keep out the cat, but keep it from getting snagged before I get I finished. Thanks for the great idea.
You have SO many great ideas!! You keep all of us on our toes, for sure!!
Good morning Mary, You are very bright with this cover cut with a X. As a beginner in embroidery, I was taught the first time I started Japanese embroidery, to cover our work, also brush our teeth after eating or drinking,as it may result a piece of food on our work. Also a mask when you do have a cold. Now I am taking Bunka embroidery near my place and I was covering my work, and people start to follow my example. So your piece of material with an X Is very good for our work. I was using tracing paper to covered my work, but with your ideas it is better. I will adopted it.
Thanks Mary
What a great idea! Since you saved us so much time with the the frame set up, now we’ll have the time to be more careful with our work! I love it! I love to have projects turn out looking as professional as possible. This is a keeper of an idea.
Just curious – is there enough room on the sides for doing practice stitching if needed?
Wow – I love that idea! And I am stealing it and using it from now on!!
I am guilty of not covering up my work. To me it makes perfect sense to cover up the work. I have had many a project that ended up with rings from the hoop or dirt from my hands or the worst, spilled drink. I just learned a fabulous tip from this as well as others from your site. Thank you for teaching me something else very useful. And my friends used to call me “Monk” because I am so OCD about my sewing, knitting, and embroidery so you aren’t the only geek out there. 🙂 Pam
Hello Mary, You did it again!! the X cover up. What a great idea!!!!!!!!!!
Also, last week, the Needle Index book I ordered from Valley Quail, EGA chapter was in my mailbox. What a little gem!!! a perfect gift for my stitching friends.
Thank you twice. For all the silent thanks.
THANK YOU.
Monique
Hi Mary,
I’m currently working a burse on silk damask that I started at the Royal School of Needlework, UK, and when I framed it up they taught us to roll bumf sandwiched between acid free tissue paper to protect the work if you need to roll the slate frame. I use this ‘sandwich’, when I’ve finished for the day, to protect my work- folding it over and pinning it to the fabric. It works as a good cover, but on my next piece I’m definitely using your method! It’s an excellent idea. Thank you for sharing!
Love the idea! I was so excited about the frame you spoke about the other day. Looked at the website and have put it on my wish list! I do embroidery and saved a round tube that was quite sturdy, covered it with white 100% cotton, and when I’m finished I roll my project around the tube. It leaves no wrinkles, transports easy and doesn’t get crushed. I made a travel tote just to carry it in that holds supplies and even magazines, a book, and reading glasses. Your information is so wonderful. Thank you for sharing. gjt
Excellent suggestions. In Japanese Embroidery, we are taught to cover our work at all times. Exposing only the portion we are working on. We are told to rinse (if you cannot brush) our mouths after eating or drinking anything to remove any sugars or oils from our mouth and lips. Another way to avoid those ugly little spots that seem to just appear from nowhere, is to snip off the wet end of your thread if you have ‘licked’ it to thread it. It is also expected that if you are looking at someone else’s work, that you hold your hand over you mouth and nose so you do not breath moisture onto their piece.
WOW!! I must say that is some serious protection, but it occurs to me that it makes total sense and seeing that food always tends to reside in my mustache and beard, I will now make sure to wash my face as well as my hands before doing stitching work. Thanks for the great information.
Thank you, Mary.
This is such an excellent idea and like the others who are excited about it, I also plan to adopt it. I have put my stitching away in a pillow case, but random spots still seem to appear, despite my care.
I had learned about the idea of covering my work when I took a class on drawing with pastels, which are a smudgy, spreadable chalky art medium. I learned to work from the top of the paper downwards, so that we wouldn’t smudge the colors already laid down, and then to cover with paper over that.
I really like this particular method of covering embroidery. Different mediums call for different techniques. I think this is brilliant because I have really struggled to keep my embroidery clean, and in my opinion, it hasn’t been an especially successful struggle, with a dog that sheds, and sheds, and the dirt she tracks in, and the food that my children still seem to transport around the house despite the “Eat only at the kitchen table” rule.
Once again, you’ve outdone yourself with great advice. Thanks again, have a super day!
(And the Embroidery Geek moniker just means that your expertise is becoming more widely known. Your work is fantastic! Keep up the great work.)
Bonjour Mary,
Another fantastic idea from you. I used acid free paper to cover my work but your idea is even better.
A winner as usual.
France
I have just started using cling film (the stretchy plastic for wrapping food etc)I just wrap it around the frame and it sticks to itself, you can see through it and move it about the work. Look forward to seeing what your are going to do with the new start on this piece. Thanks for all the info and eye candy
Hello Mary
When stitching some areas won’t your hand be resting on the underside,
or protective side of the cover, then turned back to touch the stitching?
I am messy, and sometime need to launder the cover.
Rosie
Hi Mary, I have an A3 silk ribbon & surface embroidery to stitch which I thought too big for a cover but not now. I agree totally in coverng or packaging a project even the size of a large wool cashmere blanket; the border fly stitch in wool, one is ‘cut’ so waiting on a way to fix that one. If Solvy is used as the transfer then I cover the whole area with that.
Another way is the steering wheel cover which hopefully you’ll understand. Or I call it the shower cap. This is described in “Embroideries from an English Garden” by Carol Andrews on p69 & pictured p41. The wheel/hoop covers the whole hoop with its elasticised edges fits snugly as a fabric guard. (Fabric & other loose edges can be tucked in.)
Acid-free tissue paper is also mentioned. Mary, do you remember when “The Country Diaries of an English Lady” by Edith Holden were published many years ago. The current owner is the above Carol Andrews who uses the garden for her wonderful work.
Thank you for the recommendation of the Goldwork Embroidery book – I am learning a new language,
much Love
Susan
ps the Kookaburras are calling one another – the start of a new day,
I don’t see how you will stitch all the details in this pattern unless you are using an embroidery machine. I have only a straight stitch machine. Is this too intricate for this?
Hi Mary! I do use covers in my different works, most especially when working on my crazy quilts. After trial and error, my method is to first take a picture of the finished embroidery panel, so I can reference the finished area once it is covered. So my crazy quilts in progress have tissue papers sewn on over the finished areas. I also spread a large piece of tissue or very soft lightweight fabric over the whole quilt in progress, and as I have a hoop frame, I remove the work after stitching, and I gently roll up the covered work and keep it in a safe chest. Another bonus of the piecemeal covers is after the work is nearly finished, it is like christmas when I remove the coverings!
This is an exellent idea ,thank you for all your advise and demonstrations.sandra
I’m needlepointing mini Persian rugs on canvass, and I always throw a towel on top of my work, did not want to get the wool discolored or the white parts dirty.
Hi Mary!
What a concept…duh. I’m the one trying to figure out how to clean my project now that I am half way through it. I have never covered a piece or taken a piece out of the hoop at the end of the day before this project. I did put my piece on stretcher bars. But I am going to baste a piece of material to the top of my project tomorrow in an attempt to keep it from getting any dirtier. One thing I never thought about before is that my husband smokes and I think that is what is on my piece.
Thankyou for the sound advice and I love your site.
Hi Mary,
I agree about protecting the stitching area. I cover my projects with washed flour sack towels, white pillow cases or place smaller ones in a project bag.
If I am working on a scroll frame, I roll my project so the worked area is not exposed. I protect the stitched area by rolling it over a white terry cloth towel, so as not to crush the stitches.
If I use a hoop, it always comes off after a session. In a Q-snap, I don’t take the project out, but do relax the tension by rolling the clasp toward the center at the end of a session.
I have framed/finished lots of pieces for friends and it is hard to get a good result when the work &/or fabric is dirty and ring set. Thanks for bringing up this topic. With all the time we spend, it is sad to see it ruined with hand oils and other yuck.
Mary I always cover my work as I am working on it. I don’t have the neatest people in my house and some times there are spills and things. I also own a cat. Enough said.
G’day Mary,
Way to go! The X factor is beaut.
When I’m working on a piece I usually protect it from my hands but am guilty of leaving it to the elements between times, unless I know it will be some time before getting back to it. Living in an open coal mines area the dust isn’t good, to say the least. Don’t know why I’ve overlooked the cover up precaution. Thanks for the nudge, will always cover now.
Cheers, Kath.
Oh dear, now I do feel guilty. I’m busy working on huge cross stitch 1metre by 1 metre. Yes it IS that large. So large that I have had great difficulty finding a frame big enough. Yes I usually put my work away in a bag or something to protect it. However. at the moment my huge lap frame ( cobbled together with a real frame and two pieces of doweling because I couldn’t find a commercial frame large enough) is balanced on the top of my piano. No cover. So I feel guilty. Guess what, I am about to find something to use probably an old sheet but I will I promise.
I really enjoy reading your blog many thanks.
Hi Mary,
If i work with a round hoop i cover it with a shower cap and it seems to work quite nicely
Regards
Leonie
I always cover or bag between sessions, but not while working on them. But then, I’ve never worked such grand projects as you do, Mary. Silk and gold are still just eye candy for me. I’ve stayed with cotton flosses and crewel wool… so far.
For some projects, finding out a fiber will not hold up while you are working on it might be an advantage, instead of finding out after it’s finished. I’m thinking of items intended for pillows or boxes – things that will be handled, not so much for pictures or other strictly decorative items.
Hi Mary, I love your newsletter. It’s the most informative, helpful information about embroidery and all things related. Thank you.
The cover up: I took a class from Sandy Rodgers several years ago, and learned her method to keep work covered. This was a new thing to me, and I thank you for reminding me about it.
Sandy’s method was to use a thin-ish clear vinyl that you get from fabric stores. The stitchery piece we were working on was canvas stretched on stretcher bars, and we included the vinyl in the tacking on one side. To maintain coverage for areas we were not stitching on, we cut the vinyl in about four horizontal strips so that we could lift up one strip or another for particular stitching area. The beauty of using clear vinyl is that you can see what you’ve already done while stitching on another area.
Anyway, I’ve gotten out of the habit, and, thanks to your reminder, will start covering my work again.
Cathie
Hmmmm, interesting concept. I had not thought to cover my work but……I will now. Thanks,Mary.
Hi – I have another stupid question! I only started embroidery in the last 6 months so still learning. Why do you have to put muslin under your work? Doesn’t that mean you have to sew through both the linen and the muslin? Can the muslin be removed – sorry! I feel silly for asking but the suspense is killing me!
Thanks – Audrey
SOLD. I had to have one. I have sent for it. I have been looking for this kind of fraim for along time.
Couldn’t you put the cover under the little dowels too? It would save the baisting and if you put half at the top and half at the bottom you could flip it up and down when you wanted it out of the way. You might be able to put it under both and cut it just like your example.
What do you think?
When making draperies I ALWAYS cover my project to protect the fabric from dirt, dust, etc. Why then haven’t I thought to do the same with my embroidery projects? Gotta go, have to go and cover one of my embroidery pieces. Thanks for all your amazing tips…
Mary, That’s such a great idea! But already I just know I must do it differently, as I’m so clutzy and I’d surely slash my work underneath. So instead I will cut a larger piece of muslin (on my cutting board) into triangles. Then I’ll baste them onto the fabric so triangles overlap just a bit.
P.S. Your tips are so wonderful, you’ve been such a great help and teacher to me, just through your daily articles. Every day, I look forward to your messages. Bev
Genius! I will do this for future projects
Great Idea! I like the method for covering the project. I have tried keeping part of the project in a slip cover of some kind but never thought of tacking it to the fabric.
My biggest challenge is keeping the black lab hair off of things. I occasionally discover pieces of hair that were accidentally ‘stitched” in the project!
Great Idea!
I have to admit, it never occured to me to cover my work- since I have started my first bigger project an Angel- I still read all kind of sites forTtipps and Tricks and yours is one of my basic ones. Thank you soooo much for sharing all your knowledge and keep up the exellent work.
Thankfull greetings
A salutory tale – I normally use the excess silk or calico and flip back over my work; I also use the “free” hotel shower caps as a cover when leaving the work… So why did I not do it regularly to the lovely silk fan I was embroidering? Result the end the outer areas needed a clean-up – so whilst still in frame a gentle splash with a soap solution – clean work to frame up until I noticed that the cotton muslin underneath had colour runnin g into it. 100 hours work down the drain.
a little late, but I thought this might be useful. When stitching my japanese embroidery I use acid free tissue paper to cover areas of laid work. I cut or tear the tissue to size and with a very fine needle and a single silk couching thread, I stitch around the area to be covered. This is also useful for covering small or easily damaged areas. I also have two sheets of tissue twice the width of the frame and folded in half. This is sewn on to both edges of the fabric and can be folded in many ways to protect your work.
best wishes
jane kokoszko (west bridgford, notts, UK)
This is such a terrific idea. I’ve been working on a large Celtic knot project for over a year now and have been removing it from the frame whenever I know I won’t be working on it for a long period of time.
This idea is also great for projects designed as gifts. You can just flip it closed whenever the recipient is in the room and pick up another project.
Ok you are a wizard. Njam njam njam (this is what latvian say while eating something very, very tasty)