


Have you ever tried to hand embroider on knit fabric, only to end up with a puckered mess?
Knit is not exactly the best fabric in the world to use as a ground for hand embroidery, but there are times when knit fabric can’t be avoided for certain embroidery projects.
You want to add a little embroidered motif to a T-shirt? You have to stitch on knit! Baby goods – like onesies and receiving blankets – are often knit, so if you want to embellish them with a personal touch, you’ll want to know how to stitch on knit.
If you’re interested in embellishing knit fabrics with little bits of embroidery (or big bits!), then read on! I’ll share with you my recent adventures in embroidering ducks on baby goods, throwing in a few tips and observations along the way.
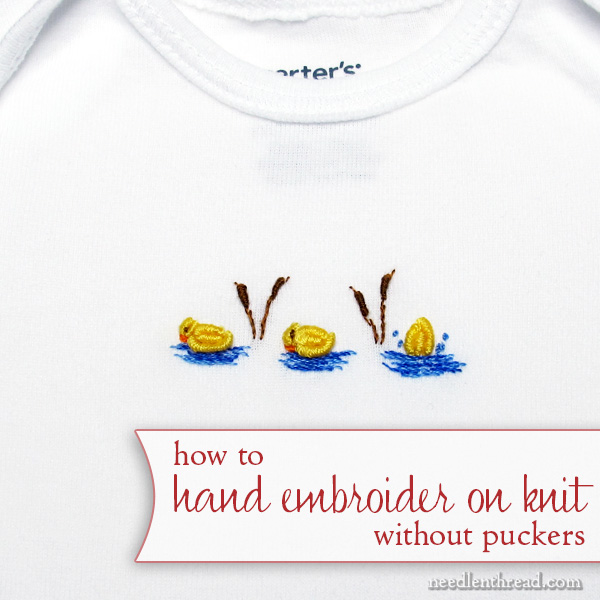
The design I’m embroidering in this article is the same duck design I showed you last week, which I worked up on a piece of linen, to see how it would go.
It was a lot easier on linen! And it took less time.
I won’t kid you into thinking that hand embroidery on knit is a breeze, because, at first, it isn’t. But once you get used to it – once you get the feel for the fabric you’re working on and how the needle and thread interact with the fabric – it becomes easier.
If you’re not used to embroidering on knit, it’s not unusual to feel frustrated at first, or worried that it’s not going to come out, or worried that you’re doing something wrong. Just keep going. If you mind a few tips along the way, you should end up with a passable end product – and the next time you do it, it’ll be significantly easier.
In short, don’t let the fabric intimidate you.
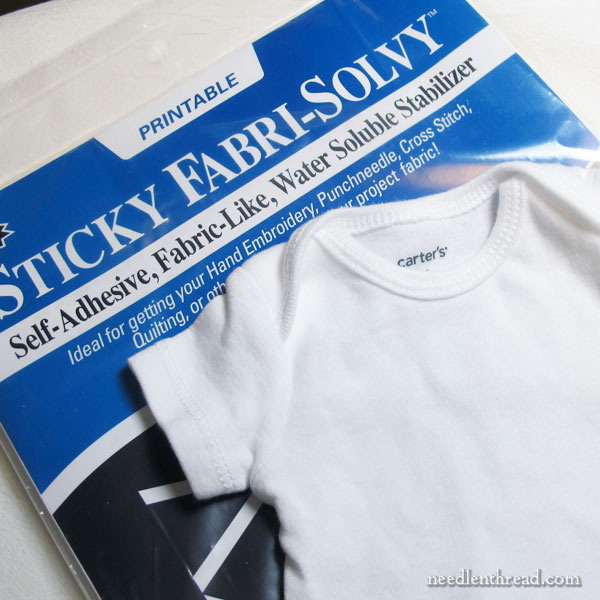
When you embroider on knit, a non-stretchy stabilizer is essential. I like to use Sticky Fabri-Solvy, though you can use other stabilizers on the back of the fabric.
Why Sticky Fabri-Solvy? It goes on the front of the fabric, you can print the design on it (eliminating the whole design transfer process), and at the end, it washes away and you never know it was even there.
Whatever stabilizer you decide to use, the point of the stabilizer is this: You want to keep the knit from stretching while you’re doing the embroidery. So choose a stabilizer that adheres to the fabric (either because you can iron it on or stick it on) that will keep the knit from stretching while you’re stitching on it.
Needle Emery
One thing that’s good to have on hand if you’re using this particular stabilizer (or even some iron-on stabilizers) is a needle emery. Sticky Fabri-Solvy is not supposed to gum up your needle while you stitch through it, but the fact is, it does. And this can be especially problematic when working on knits (which can adhere to the gummy needle and stretch away from the interfacing) and when working a stitch like a bullion knot, where a gummy needle will get stuck in the wraps.
Running your needle through the emery every now and then will make the process of stitching a lot easier.
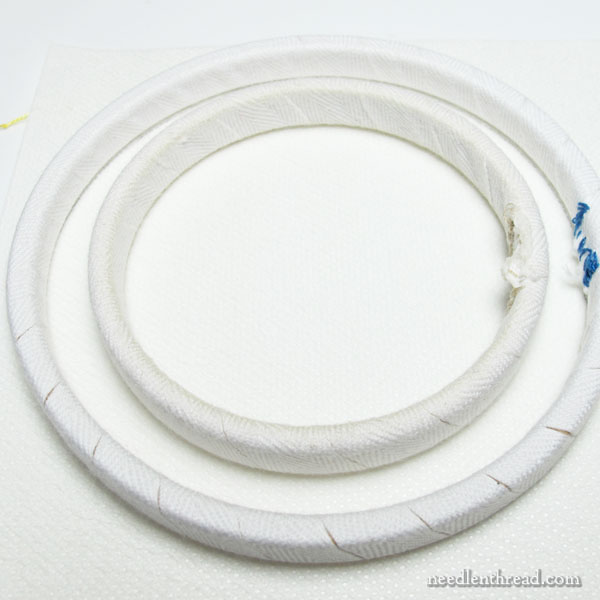
You’ll want a hoop that can accommodate your stitching space, more or less. If you don’t have to move your hoop around on the project, you’ll end up with a better end result.
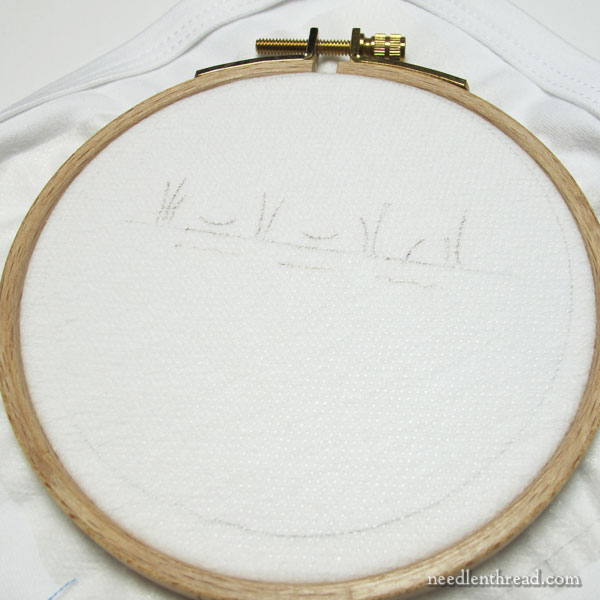
For the Carter’s onesie I’m stitching, I used a 3″ hoop (that’s the center hoop above). I used the 4″ hoop as a pattern guideline for the Solvy, because the stabilizer needs to extend beyond the hoop.
So, I drew a large circle on the front of the Solvy, using my 4″ hoop as a guide, and then I sketched my design in light pencil on the stabilizer.
You can print on the Sticky Fabri-Solvy, but my design is very basic:
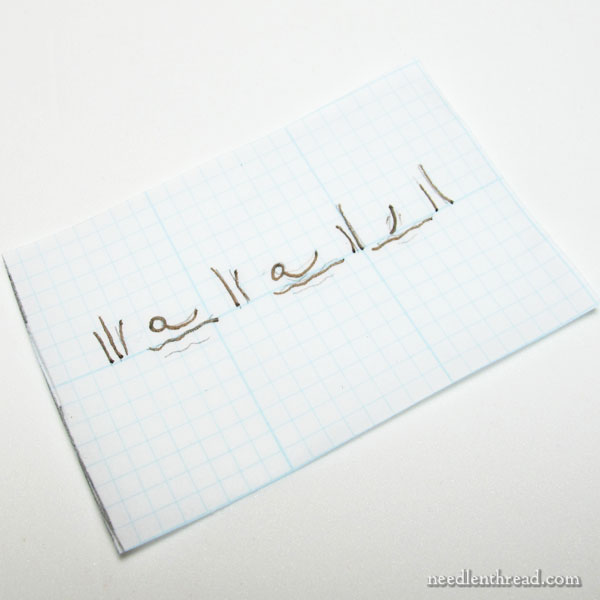
…so I didn’t bother printing the solvy. I just doodled it on.
Once the design was on the solvy, I cut out the large circle, centered the design on the onesie, peeled off the back of the stabilizer, and stuck it on the fabric.
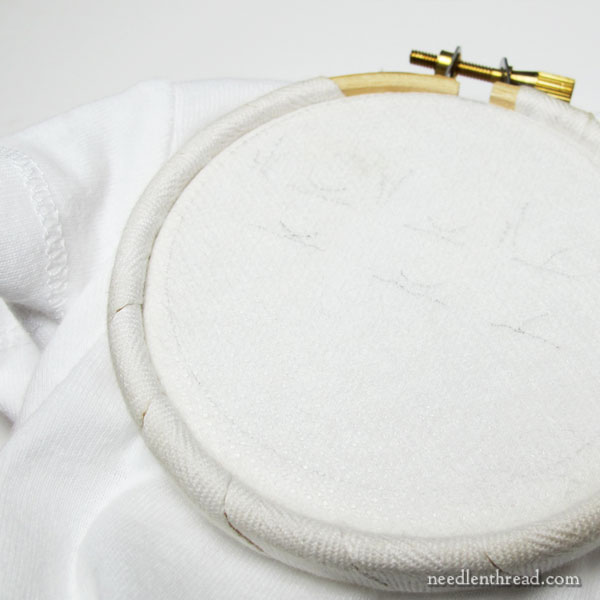
Then, I just hooped up the fabric with the stabilizer stuck to it, as normal, making sure the stabilizer extended beyond the edge of the hoop.
Now we’re ready to stitch!
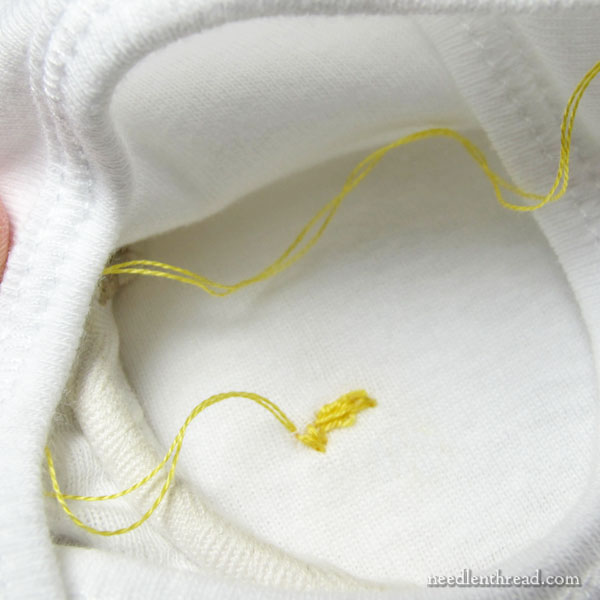
You have two access points on the onesie – the neck, which is microscopic, and the snaps between the legs, which are a long way away from the stitching area.
I accessed the hoop from the neck of the onesie, which doesn’t give a whole lot of space for manipulating long milliner needles. It also makes it difficult to start and end threads, especially in a 3″ hoop.
On a larger project – a T-shirt or a blanket, for example – this wouldn’t be a problem, but if you’re stitching on something tiny, you may find it really difficult to get inside the thing to end threads on the back.

Enter: the tapestry petit needle.
When it’s time to end a thread, I take my milliner needle (ideal for bullions) off the thread and switch to a tapestry petit, which is tiny, compared to the milliner needle.
Using the tapestry petit needle, I can access the backs of the stitches inside the small hoop, inside the small neck of the onesie, much more easily, and end my threads off by whipping around the backs of the thread and cinching.
Guffaw, guffaw, guffaw…chortle, chortle!
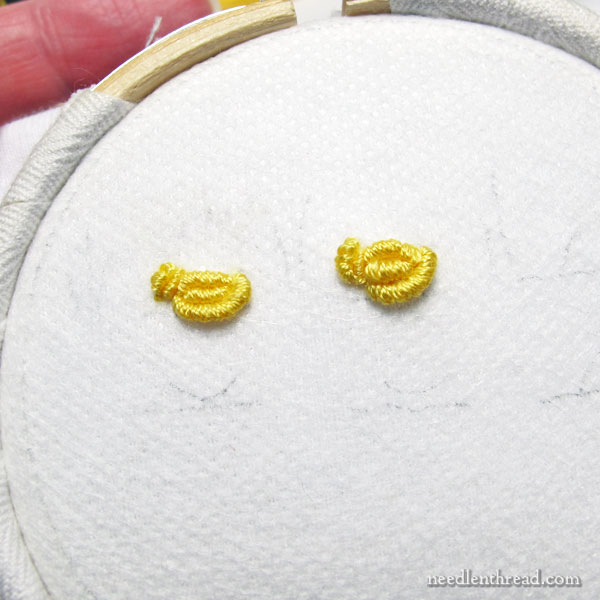
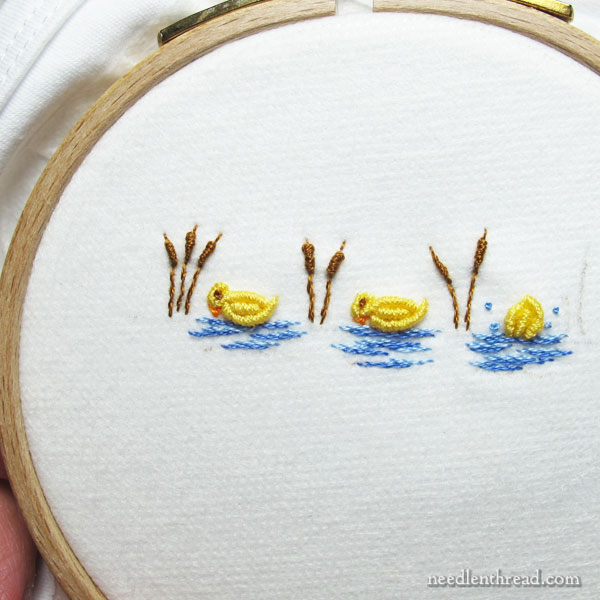
My first bullions on this project look like….like… (I don’t think I’m allowed to say it on here!)
They look pretty bad. The middle duck (on the right) was my first attempt. The duck on the left is slightly better.
Whenever I work bullion knots, it takes me a few knots to get into the swing of them. So for those of you who bemoan the supposed inaccessibility of the bullion, don’t worry about it! Just keep trying it – work a lot of them! – and eventually, they’ll start coming out right. When I sit down to stitch bullions, my first ones never look too red hot.
The right hand duck ended up a little plumper than intended. His face is squished, and the poor guy looks like he’s freezing cold!
But never fear! We haven’t stitched his environment yet!
Instead of picking him out, I decided to keep going.
Knit is not the most forgiving fabric in the world, when you make a mistake. It’s hard to pick stitches out of it, they can leave visible marks when removed, and it’s easy to break or snip the fabric threads if you pick up just one little stretchy thread while you’re snipping and pulling out stitches.
So, forward!!
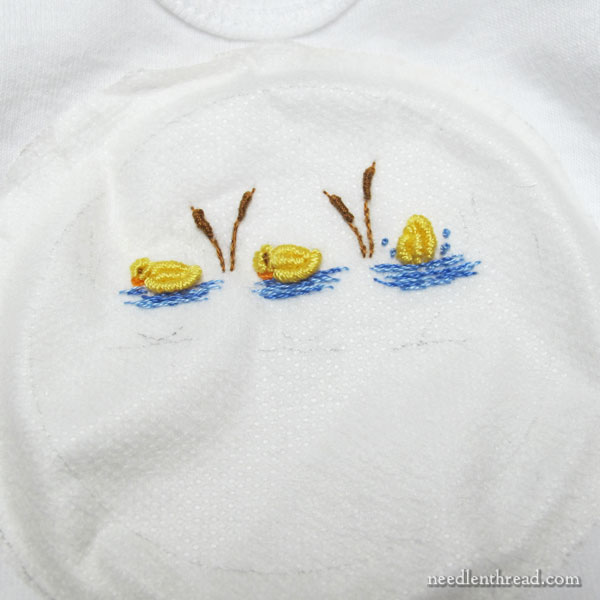
Here are the ducks, out of the hoop. You can definitely see the hoop ring there, and that’s further enhanced by the stabilizer.
How do you like that third perfectly perpinduckular fellow on the right? He’s a bit wonky, too!
That’s ok! Forward!
I took this onesie to the kitchen and left it in a bowl of water to soak, to remove the Solvy. While it was soaking, I went back to my workroom and set up the receiving blanket that’s going with this gift.
With the receiving blanket, I can use a larger hoop, and I don’t have to access the hoop through a little neck hole. Comparatively speaking, this will be a breeze!
Remember that the Solvy needs to extend beyond the hoop. You can see it sticking out around the hoop in the photo above.
And here they are, taking shape on the receiving blanket.
The cattails have a little pucker around them, even in the hoop – I’m not worried about that. Everything will relax once soaked.
The embroidery on the receiving blanket went much faster than the embroidery on the onesie, for two reasons: 1. I wasn’t accessing the back of the hoop through a tiny neck hole; and 2. I had developed that stitching rhythm you get, once you really get into a project. It makes a difference!
The onesie was in the dryer with a load of whites while I stitched this thing. I tossed it into the laundry with some whites, and put them through a regular wash and dryer cycle.
Remember, this is for a baby! It needs to be able to pass through the laundry relatively unscathed, so I wanted to test how the bullions and the design and the fabric would all hold up. Would it pucker? Would the bullions go all weird on me?
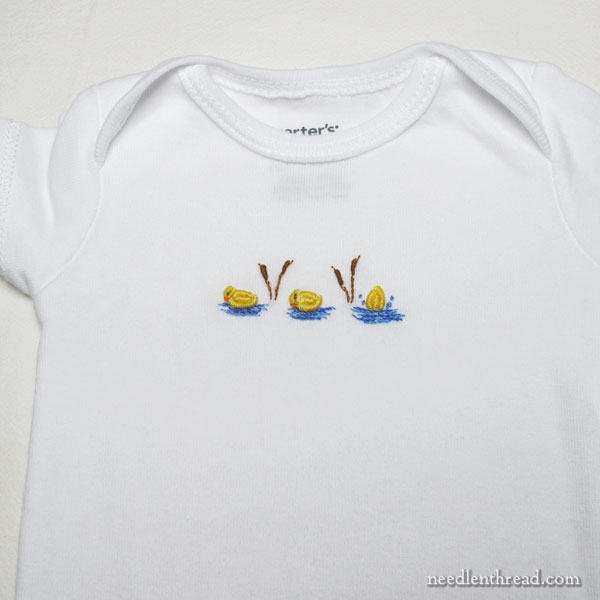
Guess what? It came out great! Even the middle duck doesn’t look too bizarre!
The Solvy did its job – no puckers in the knit – and the bullions held up the laundry just fine.
Tips for Hand Embroidery on Knit
Here are my tips for hand embroidering on knit, in a nutshell:
1. Use a stabilizer that adheres to the knit and keeps it from stretching.
2. Make sure the stabilizer extends beyond the edge of your hoop.
3. Keep a needle emery on hand, in case your needle gets gummy.
4. Be aware of what’s happening on the back of your fabric. Sometimes, the knit will separate from the interfacing as you push the needle through, especially if the needle has gotten gummy.
5. Be aware of what’s happening with the threads, too, just in case slip knots form on the back. If you’re embellishing a blanket or something similar, remember that the backs of the stitches will be exposed.
Now, go forth and embellish all your knit fabrics with hand embroidery! Kick that T-shirt up a notch! Why knot?
Questions? Comments? Suggestions? Have your say below!
Dear Mary
They are really pretty especially the perpinduckular (I love your use of language). I never would of thought it would be so difficult to embroider on knit fabric, but the finished onesie and blanket look beautiful and what a lovely personalised gift I’m sure it will be appreciated. I can see that the solvy does have it uses especially on difficult fabric like knit as shown above. Thanks so much for the instructions on how to use solvy and how to use it on knit fabric this is so useful I will definitely follow these instructions in future when using fabric like knit.
Regards Anita Simmance
The ducks are adorable, and I don’t think the middle duck looks like it’s freezing, it looks to me like it’s trying not to doze off. Which gives the group as a whole much more personality.
That was SO helpful. I also do hand applique on t-shirts and onesies and I’m never sure which stabilizer to use. Your daily newsletter is so well written and has great tips and inspiration.
Perpenduckular and Why knot? You must be in a punny sort of mood today! Thanks for these tips.
🙂
Mary,
Thanks for these tips. I have been asked to put my husband’s name on his VFW shirts and I have been so intimidated by the fabric that I just left them on the work pile for the last 6 weeks. I thought about doing it by machine, but the shirts were pre-made and that had its own set of issues and it was only three letters so how hard could it be? Now I can see how to print his name on the computer and then stitch through the topper. I may even stabilize the back with a piece of cut-away as well since one shirt is nylon and very stretchy. I’ll let ou know how it turns out!
Spandex and Lycra type shirts that are meant to stretch while they’re on (they’re smaller than the body going into them, and they stretch over it….) would be handled differently. I’m thinking of shiny leotards and things like that, or biker shorts, gymnastics suits and the like. If the shirt is like that, and is meant to be worn stretched, you probably wouldn’t handle it the same way, because then your stitching would stretch. I’ve not actually worked on that type of fabric, so I’m not certain what kind of stabilizer you’d use, but I’m guessing it would have to be a slightly stretchy stabilizer, and you’d have to put a little stretch on the fabric when you hoop it. So if it’s fabric like that, you might keep that in mind. But if it isn’t supposed to stretch over the body inside it, then this method should work fine.
Just Ducky–thanks Mary!
For some reason, today’s post didn’t come in my inbox this morning. Tried to sign up again, but a message came up saying I was already signed up. Just letting you know
Hi, Beth –
Thanks for letting me know! I noticed that it didn’t go out, too, so, on checking into it, it seems there was a server glitch, and it will go out as soon as the server problem is taken care of. Unfortunately, some people may end up getting it twice (!)
Do you cover the back of the stitching with something to prevent it from scratching or irritating the baby’s sensitive skin? Should a larger project on a T-shirt be covered? What would you recommend for that?
The only thing on the back of the onesie is cotton thread, which is the same thing the onesie is made out of. There’s no reason to cover it. Interfacing would be scratchier… I’m not sure what you mean by covered on a T-shirt? Do you mean there should be interfacing on the back? In any case, you can just use the fabri-solve on the front of the t-shirt, in the same way. If the design is bigger than 8.5″ x 11″, you can use a different type of stabilizer, like an iron-on, water soluble stabilizer. As long as it adheres to the knit to keep it from stretching, and is large enough to go beyond the size of the hoop, it should be fine.
I would use on the back a iron on tricot knit stabilizer. I use this on ready made goods where the embroidery is scratchy.
Mary, Your work is beautiful, as usual!
Thank you for this article as I’ve struggled unsuccessfully with onesies. I didn’t catch the stabilizer with the ring. I have been attempting thread painting figures on pre-made bibs of stretch terry and matching onesies for gifts. Now I can go back and do better with at least a chance of some success. My early attempts were…interesting (for that read not fit for public viewing). Every project is a learning experience!
The ducks are adorable. It’s been a long time since I have embroidered on baby clothes, but I do remember hooping with the smaller portion of the hoop on top so that I could access the back easier.
Oh, Diane, that’s a very good idea! I never thought of that! Thanks!!
Mary,
Please help, I am not getting you e Mail like I get every day.
I did not get one today, only.
Terry
Hi, Terry! There was a server problem today, so I’m afraid it didn’t go out. It’ll go out as soon as the server problem is fixed – hopefully, by tomorrow, and hopefully, folks won’t get two of the same one. Fingers crossed. Thanks for asking, but nothing to worry about on your end….
I hadn’t thought about how to embroider on leotards or skaters costumes. Leave it to me to stump the teacher. Fortunately the shirts are just polo shirts with stretchy fabric. They are plenty big so to get Rod in the corner above the VFW patch shouldn’t be that hard. I think if I had to put embroidery on something like biker shorts or leotards, I would be tempted to make an applique out of the embroidery and then applique it to the garment, but that would also take some of the stretch out of the garment and change the style slightly. Maybe I will have to try it and see what happens on a scrap, but I would think stabilizing it on both sides would take the stretch out and then it would stretch around the embroidery and be stiff so not to distort it. I have some old stretchy workout clothes that I can use. I’ll try it a couple of ways and see what happens. I’ll keep you posted.
Where is the goose? (you know — duck, duck, goose)
JK — love the little duckies, Mary. They are so sweet.
LOL! Now, there’s a fun idea!
This is so cute! I just love the little diving ducky. I always wondered how to put a knit fabric in a hoop without stretching it out – these are great tips!
Also, I’ve been plotting to make some leotards for ballet, so if you ever decide to try a little embellishment on spandex-type material, I’d love some tips!
So cute!
Hello Mary,
Your ducks are lovely! My problem is related, but originates from a sewing, not embroidery project. Your project reminded me that I’ve embroidered on knit fabric before, but with a ball-point crewel needle.
I wonder if you know whatever happened to those ball-point needles? I know you can still get them for sewing machines and I still have a few hand-stitching ones bought many, many years ago. Very recently I made a top from a very very stretchy Italian knit fabric; I tried to machine the tiny hem, but my machining skills were not up to it and it kept stretching out of shape. I ended up finding the ball-point needles and herringboned the rolled hem (which, on a long swing top, took forever!).
I wondered if a ball-point needle would help embroidering with stitches like stem, back etc which need multiple small “stabs”. And then I wondered if such hand-stitching needles are still available? They would be good for those knits which are so smooth and fine and difficult to penetrate. I’ve had a look at my local shops, with no success. I guess I will try on-line.
Off to practise my bullions – you’ve inspired me.
Thank you so much for this tutorial! I just stitched a couple of tiny baby dragons onto some onesies. The Sticky Fabri-Solvy worked beautifully, but it did gum up the needle while I worked. My end result is a cute embroidery that lays smooth and flat!
Mary,
I’m in 911 need of your expertise and experience please. I’m stitching on charters bibs. The nap killed my stitches (chain) on the last bib which just had a tear away regular stabilizer on the back – secured by the hoop.
I bought some adhesive solvy and did the pencil outline for my hoop and the sketch for the design (without even reading it on your site so I kind of feel like a million bucks that I did something the Master did without guidance, but that is a victory for another day as I’m in crisis mode now – hehe).
Now I’m not sure if the solvy will stick and be strong enough even with the solvy/hoop as the carter’s bibs are pretty weighty and the nap…oh that nap!
Should I just stick it on and hoop it up and go to town…or should I stabilize the back too?
Any advice on this would be greatly appreciated. Also if you have any needle type/size recommendations based on the type of stitch (chain), bib material and whatever your suggestions on the just front solvy or a rear stabilizer too, I would be most appreciative.
Also, how often should I expect my needle to get gummed up?
Thank you so much. I’m going to go take deep breaths and drink some tea to calm down. (Wee bit dramatic, I know.)
Hi, Tracie – The Solvy should help lift the stitches above the terry cloth nap, but it probably won’t eliminate the whole problem with the stitches sinking into the cloth a little bit. Still, it should look better than without it. There’s no reason to stabilize the back of the embroidery, unless you just want to. Normally, hand embroidered items like this – with the back visible – aren’t stabilized, unless the ground fabric is too flimsy to support the stitches, which I don’t think is the case here. I can’t tell you how often the needle will gum. Apparently, that changes from person to person. Some stitchers say their needles never gum up with the stuff. I know mine does, but just a little bit, and when I find it annoying, I just run my needle in and out of my pincushion a few times, and that takes care of it for a while.
I have been reading your articles. I am so new at this that I have not bought anything yet but I’m so very excited to start. your articles have really got me going. I intend to go down tomorrow to buy a few things to try on an old blouse of mine! thank you so much. you’re very much appreciated with all your tips and comments!!! Nora
Dear Mary,
I had to write and tell you what a wonderful website you have. My daughter-in-law asked me to embroider monograms on some of my twin granddaughters dresses and though I had not done any embroidery for many years I found wonderful instructions and patterns on your website which gave me the confidence to do it. She recently asked if I could embroider monograms on some white sweaters for them and I was so relieved to find detailed instructions here on exactly how to do it.
Sincerely, Peggy Forester
Hi Mary-
These are so cute and great. This was such a useful read! I have a question hopefully you can help answer. Im looking to embroider on a vintage sweater with a tiny rib knit. The sweater is “dry clean only reduce moisture” so Im afraid I wont be able to soak it or use sticky solvy. Theres no content tag in the sweater but it seems like a poly-cotton possibly. Do you have any advice on what to use/ how to stabilize the fabric? Any thoughts would be so appreciated!!
Hi, Meredith – You might try a light leave-on stabilizer on the back of the knit, do the embroidery, and then trim away excess stabilizer from around the back of the embroidery. On the front, I’d use a light tear-away stabilizer, and then remove it all carefully once the embroidery is finished. This might require using tweezers and picking out all the stabilizer that’s visible. It really depends on the type of embroidery you’re doing. The only purpose of the stabilizer on the front would be to use it as a way to place your pattern, since transferring on that type of fabric is difficult. If you have another idea about how to transfer the pattern for stitching, then you could skip the stabilizer on the front altogether. But to give your stitches a place to grip on that type of knit, I’d probably keep a light stabilizer on the back and then trim away the excess.
Thank you! Now I can start working on a rather bland blue knit shirt that I would love to embellish! <3
What size milliner needle did you use for this please? Did you add interfacing to the back? Many thanks
No interfacing on the back. I’m not quite sure what size I used – probably a 7 or 5?
I have a question? Would your alphabet will ewe bee mine work on a towel?
Hi, Wanda – They work great on cotton towels (like flour sack towels), linen towels, or any towels with a woven surface. They wouldn’t really work on terry cloth, but on woven towels, they work great! I’ve stitched them on flour sack towels, on linen, on woven cotton, and on linen-cotton blends.
WOW! Love this so much. You’re so clever. So many great tips.
I was wondering if when you’re finished a onesie, do you stitch a backing fabric on the inside to stop the threads scratching??
Thanks so much for this helpful video! I do have one question though- what can I put on the back of the embroidery so the knots and threads don’t rub against baby’s skin?
Thanks in advance,
Marie
Hi, Marie – I usually use a knotless start when I embroider. You can see how to do so in this article: https://needlenthread.wpengine.com/2008/09/starting-your-thread-anchor-stitches-on.html
I’m new to your site and so grateful to have found it. Naturally, I came with a problem to solve: embroidering names or phrases close to the neckline of crew-neck knit t shirts and sweatshirts (but especially those dreadful thin t shirts!) It’s too close to the edge of the neckline to have the hoop clamped entirely onto the fabric. Because of that, the fabric behaves badly and I take stitches where I think they should be, only to see the completed stitch headed in a weird direction. I’m doing these at the request of granddaughters, who already have a specific t shirt in mind. Help?
Hi, Nancy – You might need a stabilizer behind it…? Normally, I don’t use stabilizers, but it might make a difference for you. Maybe try a very thin non-woven stabilizer on the back, that you can cut away close to the stitching once you’re finished.