


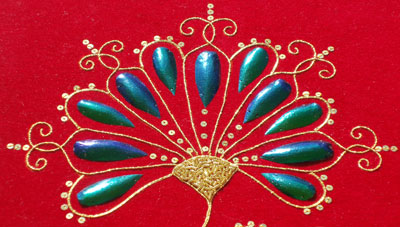
Here’s an update on my beetle wing and goldwork embroidery sample. In the photos here, I’ve started embellishing a bit. The more I look at it, the more it does look like a peacock on stick!
The tops of the “petals” of the main goldwork flower needed something. Digging through my scraps and such, I found a small bag of little spangles (or paillettes). I put these above the petals that don’t have the scrolly pattern at the top.
I took these photos outside, hoping that the color would be a little more “true to life.” I still can’t capture the look of the wings with the camera!
Paillettes (spangles) are often sewing onto a goldwork project using purl or another type of “bead” to hold down the spangle. If you use something in the center, like a bead, you don’t have to couch the spangle from both sides. You’ll see this up close in photos below. Close up, you do see the yellow thread holding down each side of the spangle, but from far away, it really isn’t that noticeable.
You’ll also often see spangles overlapping in a line, sewn down by purl worked in what almost looks like a stem stitch. This is called S-ing. I would have liked to overlap the spangles, but I had a limited supply. I counted them out and laid them on the piece, determining exactly how many I would need so I would be certain to have enough. I had two left over!
Here they are, up close. Just like you do when working with metal threads, you wax your thread when you attach spangles. I reeeallly wanted to overlap the spangles here and sew them down with S-sing. But oh well! Pacman, anyone?
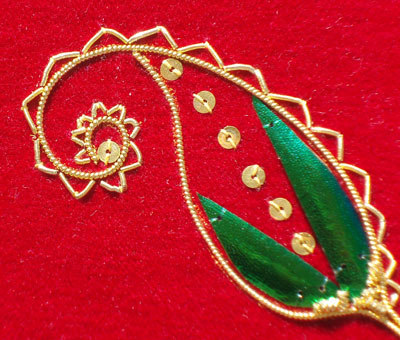
Here, you can see the spangles decorating the smaller flower. I’ll get back to this one below…
Just to show you the way the light plays on the wings – here, they ALL look blue!
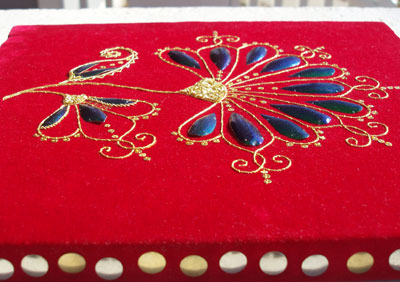
And from this side, the beetle wings look blue, too! The spangles, by the way, really gleam in the light. They are lovely with goldwork!
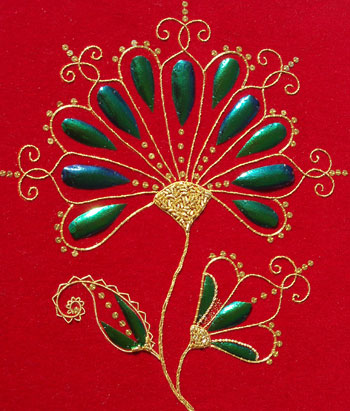
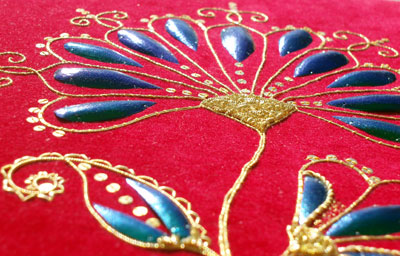
Here’s the whole thing from above – I think you can get a better idea of the blue and green hues in the alternating petals on the flower. Well, at least a little bit, anyway!

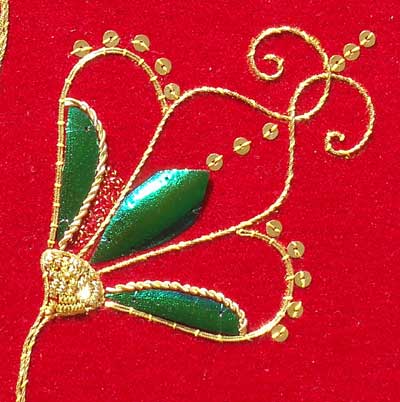
Back to this fellow, up-close. There are two things in this flower that are different (and unfinished!) First, around the two side beetle wings, I’ve worked some S-ing in purls, alternating smooth and rough purl. S-ing looks a lot like stem stitch. The difference is, you work from the top of the line, laying your first purl the length of the stitch. Then you come up into your fabric, half a stitch-length below the end of the first purl. Thread the next purl on your needle, and take your needle down at the half-way point of the previous purl, taking your needle underneath the first purl, on the stitch line. Pull through, firmly but not too firmly, so that the first purl curves. Mary Brown, in her book “Goldwork Embroidery Designs and Projects” gives an excellent instruction on S-ing.
Ok, back to that flower – you can see where my S-ing is far from perfect. Some of the purls cracked. This can happen when they are cut too long for the stitch you’re taking. You can avoid it by cutting your purls with more care! The other cause of the cracking (and this is the case here) is poking them with your needle while you’re stitching!! I was using a very long, thin beading needle (Mary Arden, #13), which I was unused to weilding. It went everywhere – mostly in the places I didn’t want it to go. I needed the smallest needle I had on hand, because I was using a rather small purl. A #12 sharp wouldn’t fit through the rough purl. I’m not sure what size purl it was, because I stupidly didn’t label the bag when I put away the scraps last time! Good lesson!
The other (unfinished) thing going on in this flower is some seeding with real gold Jap, size #1. It’s stitchable or couchable, very fine stuff. I cut small lengths and started trying it as a seeding stitch. It works “ok” although the more you work it through the fabric, the more you risk losing the gold off the core thread. Also, it’s probably not the best choice of stitch and thread on velveteen – the stitches tend to get lost in the pile. So I had work pretty carefully with it. I wanted something to add a bit of fill on the two side petals, without being at all bulky. I just wanted it to barely show, like a dusting of gold. So it’s working for that, but it takes a long time. It’s like having a shimmery layer of gold dust in there – a little sparkly, but not too much, with plenty of the red still showing.
Still a bit more to go on embellishing this, so I’m off to thread my needle again!
Very cool!!! I am enjoying your beetle wing adventure. Can’t wait for the next installment!
Mary, I have so enjoyed your step-by-step journey through your goldwork and beetle wing project. It is magnificent.
Thanks, Margaret and Jowynn! It’s been a fun project. I’m pretty much finished with it, except for a tiny little space on one petal. I’ll post the final picture soon… that is, unless I decide to keep going on the embelishment! But I need to finish it off, since I have other pressing projects with deadlines coming up!
Have you posted the final picture. I searched and couln’t find it. I just found your website today and was entranced with it all afternoon. It is wonderful!!!
Its really good, already planned to use this motif on my top.
Vidya
Thankyou so much for writing about using beetle wings! I’m hoping to use them in a project and this has been really helpful (and pretty).
Best wishes for you & your family . Have a nice day.Mina- Iran