


I don’t know about you, but when I finish a piece of embroidery, usually the last thing I want to do is the real “finish work” – that is, the framing or sewing or whatever it takes to bring the project to full completion. But once in a while, I do have to force myself to buckle down and actually DO something with the pieces I embroider. And once I’ve accomplished the finish work, I’m always glad I did!
With Christmas looming, I’ve been cramming in some simple frame jobs for gifts. So I thought I’d take you through the steps of a simple frame job for a piece of embroidery. It’s a long one with lots of photos, so grab your coffee…
First of all, you need to find frames. When you frame embroidery, if you decide to put the piece behind glass, you should plan on double matting or putting spacers in to keep the glass off the front of your work. Or, you can do like I did, and find frames that have a “shadow box” effect, where a space of half an inch or more is intentionally left between the glass and the object to be framed.
You can always choose to make the frame yourself, by the way, but this is a “simple” frame job, done in a relatively short amount of time!
After you’ve assembled all your supplies, the first thing to do is prepare the piece for framing. If you need to wash it, now’s the time to do that! How do you know if you need to wash your embroidery? If there are any obvious marks on it, if there has been an opportunity for dust build-up, if you weren’t particularly careful with clean hands while you worked (even if you can’t see specific marks, hand oil can show up over time!)… probably you should wash it. Certain types of thread are not conducive to washing in water – overdyed silks, etc., shouldn’t be just dunked into a bucket of water. But I used DMC on these projects, and it’s pretty color-fast, so I wasn’t worries about color running.
You can avoid having to wash a project by being super-careful with it, and by covering it with tissue or other cloth while you work, and only exposing the part you’re working on. But that’s a different story…
Prepare a bowl of lukewarm water and a little ivory liquid soap. I use a stainless steel bowl. I placed the embroidery piece in the water and moved it around, but I don’t squeeze it or rub it all over or anything like that. I just gently swish it in the bowl. If there’s a specific spot on fabric, I’ll treat it first, and I might rub that one spot on the fabric, but you’re not doing heavy-duty laundry here – just rinsing the piece.

After the gentle washing (I let it soak for 5 or 10 minutes), I rinse the piece thoroughly under running water. Don’t wring it – just let the water rinse over the work, until it runs clear and there’s no evidence of suds, and then a little longer for good measure. Turn it over, too – rinse front and back.
Then lay the piece face down on a clean towel, and gently press another towel on top of it to remove excess water.
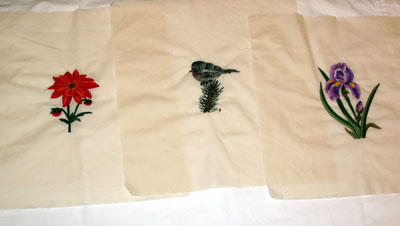
Once all three pieces were washed, I took them to my ironing board, where I already had a clean white pillow case ready. For ironing embroidery, I use a clean white pillow case folded in half, with a flannel pad inside the fold. The flannel pad is made of four layers of soft, thin flannel.
After hand blocking (that is, arranging the pieces by gently pulling them and squaring them up), I left the pieces on the ironing board to dry a little bit on their own.
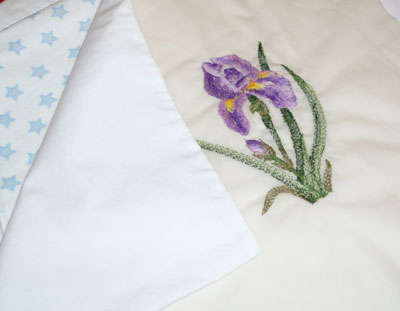
When I’m ready to iron, I iron the piece upside-down, with the right side on the pillow case with the flannel underneath it. This helps cushion the embroidery and keeps the stitches from getting flattened.
I iron the piece when it’s still damp. Iron it gently, not pushing on the iron to try to dry the thing and get every wrinkle out. Just gently iron, blocking the piece into a square as you go, and being very aware of the temperature of the iron and the fabric. I always lift the iron after moving in one direction – I don’t just go back-and-forth and back-and-forth with it. I move in one direction, lift, put it back down, move, lift, put it back down.
After ironing the piece from the back, I turn it over and look at the front. If there is any area on the front of the ground fabric that I want to iron, I do so carefully, without touching the stitches.
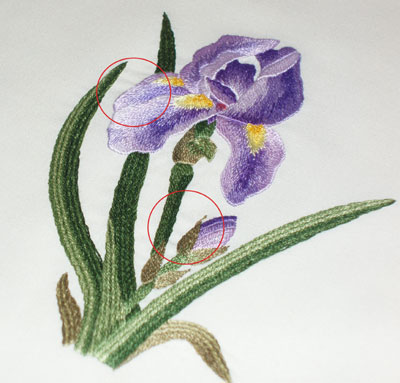
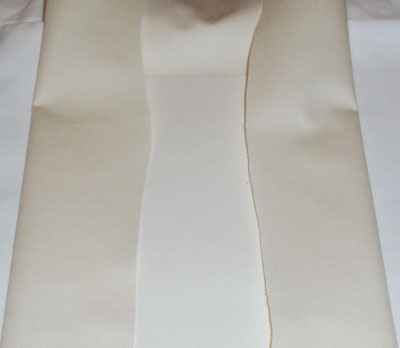
In the photo above, you can see two circled areas where there are wrinkles on the piece. This comes from faulty tension when I worked the piece. It could also come from the drying process of the fabric and the thread, but both were dry when I took the photo, and I suspected there would be some tension problems in these areas once the thing was off the embroidery frame and blocked.
Never fear – those slight wrinkles will be significantly (if not completely) reduced by the time the whole framing process is finished.
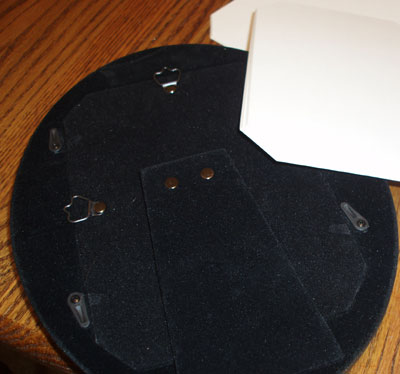
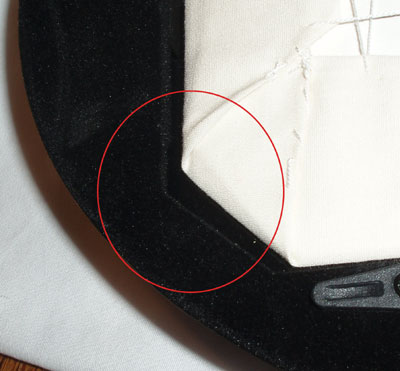
Now that the pieces are ironed and ready to frame, it’s time to give some attention to the frames. This is the back of the frame – notice the octagon-shaped back cover. The board on which the embroidery is mounted is the same shape. I used an acid-free white mat board and cut it to fit the inside of the frame; it’s a rectangle shape with the corners snipped off.
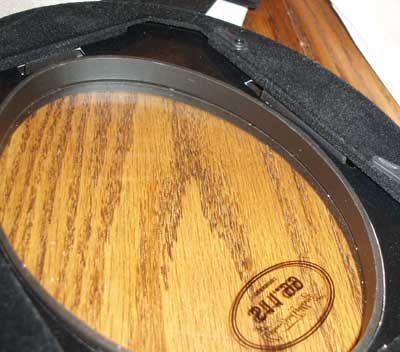
You can see here the space between the glass and the place where the embroidery will rest. It’s about half an inch. I admit, the frames are a bit cheap – that’s a plastic edge – but for 50% off 11.99, they were in my budget!
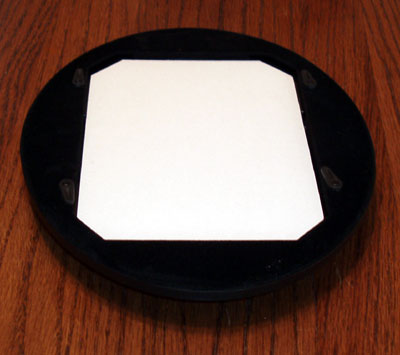
And here you can see clearly the shape of the mat board and how it fits in the opening.
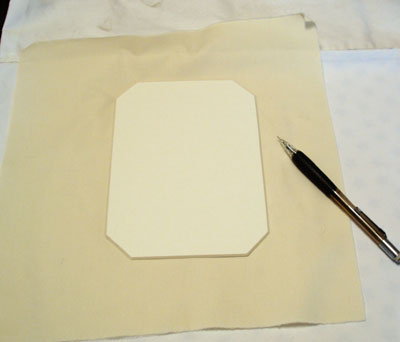
Position the embroidery over the mounting board, centering it carefully, then turn the embroidery over, placing it face down on your work surface. I use a pencil and lightly draw the position of the mounting board on the back of the embroidered piece. That way, if anything gets knocked or the work slides about, it’s no big deal.
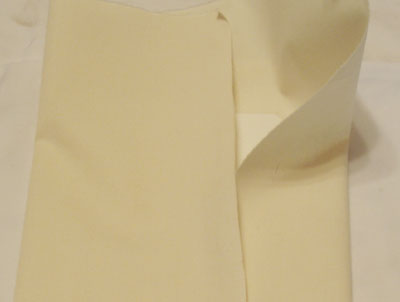
After folding the embroidery over the board (it’s inside there), I realized it needs to be trimmed. Since I marked the position of the mounting board, it’s easy enough just to trim off a couple inches.
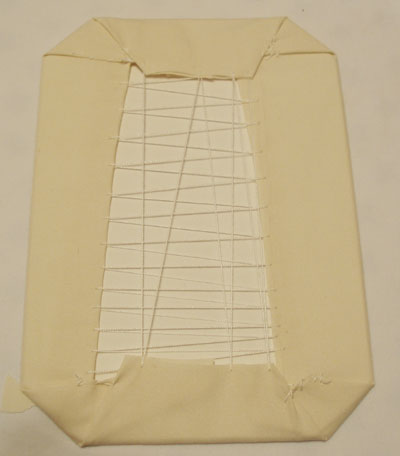
There. Remember that the front of the embroidery (the right side) is face down on my work surface. The mat board is positioned over the piece, and then the sides are wrapped around the mat board. There needs to be some spa
ce between the two sides of the fabric, as you can see here, because you’re going to lace them, and the lacing will supply tension.
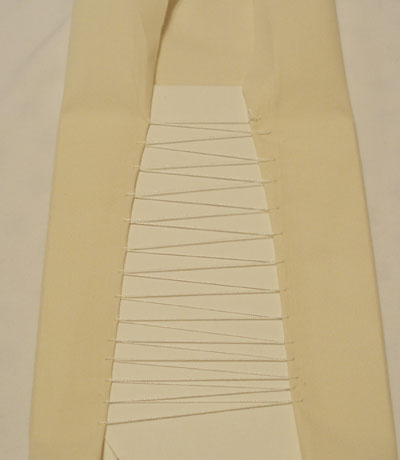
I used a #12 DMC cotton string (it comes in a ball, and is usually used for tatting or crochet) and a #7 crewel needle to do the lacing.
Make sure you cut a Long Length of string when you’re ready to start lacing. It’s no fun to stop, tie off, and start again. I used about a yard.
I folded the edges of the fabric and finger pressed them, then started lacing. This is done by catching the edge of the fabric (about an 1/8 of an inch or so in) and crossing back and forth between both sides.
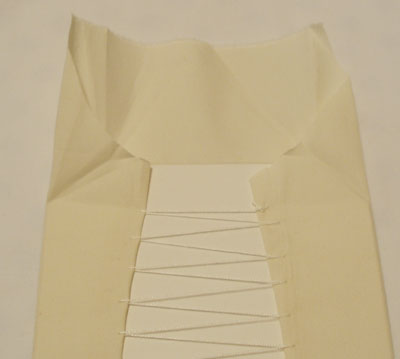
Because the mat board isn’t square, but rather the corners are cut off, I had to do some extra trimming, and I just sort of played that by ear. I didn’t want a lot of bulk on the back of the mat board.
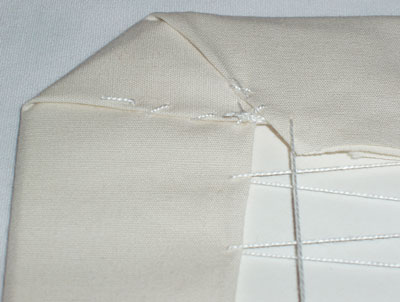
I folded the corners neatly, finger pressed, and tacked them down with a new length of #12 thread.
Then I folded the opposite ends down – not quite as neat as it could be – and laced them, pulling the lacing fairly tight as I worked. I was skimpy with the thread!! Learn from my mistake and make sure you start with a long enough length.
In any case, it still worked out fine.
Then, I put the mounted embroidery into the frame, and you’ll notice that there’s a bit of “wiggle room” here. I cut the mat smaller, since the fabric would take up some space, but it was a bit too small. This poses the problem that the piece might shift in the frame.
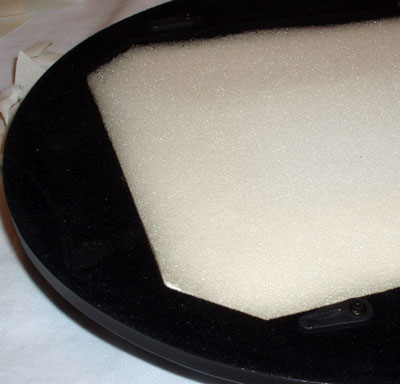
To remedy that, I cut a piece of foam to fit inside the back of the frame, to help hold everything in place.
The back of the frame was very well fitted, though, so everything was good and snug.
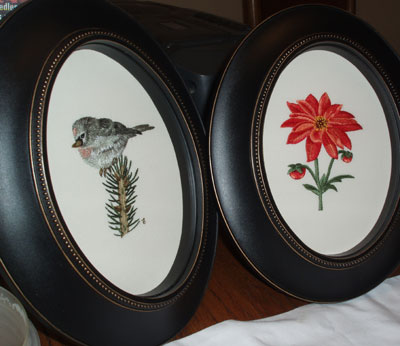
And here you see two framed up and ready to go.
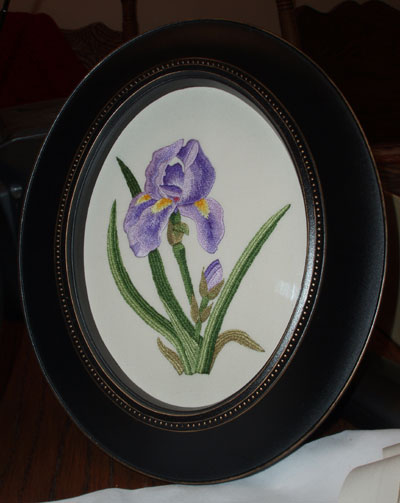
And here’s the iris – there’s only the slightest bit of puckering between the petal and leaf on the left. Most of the puckering that was there was really reduced by the tension provided in the mouting process. No one else seems to be able to see the puckers except me! But if you look close enough…
So that’s a simple framing job…
Hope it was helpful!
Mary,
You’re psychic.
I was looking at my book cover yesterday and noticed how filthy the background material (not the patterned brocade, but the big piece of plain muslim behind it than the embroidery is tacked onto) has become.
So washing instructions are highly useful.
Is there anything to add given I’ve used a lot of gold thread? Just DMC – not any real gold.
Being primarily a calligrapher, I’m *very* aware of how dirty even ‘clean’ hands are. I always wash my hands before starting work on a calligraphy piece, and if it involves more than a few hours of work, it *will* still end up with a slightly grey patina from hand oils.
One thing I do is make a paper mask and cover over the part of the work that I’m not currently working on. It often ends up in an L shape, or maybe even a large square with a smaller hole in the middle, just to expose that bit that I want.
I wonder if that would work – tacking over some muslim over finished/not yet to be worked parts? Would it affect the tension somehow? (It shouldn’t if the tension of the piece is tight). Or – given you can wash the piece afterwards (unlike calligraphy/illumination pieces!) it isn’t worth it. *musing*
Just for completeness of information (3 seconds after I posted that comment) I also wear white cotton gloves when working on a calligraphy/illumination piece.
But jeez- think what a bother they’d be working with needle and thread!
I’d avoid washing it, if possible. Put a piece of muslin over the front of the piece, in your hoop, and cut out an “x” in the middle, then fold back the parts necessary to be able to see the design. If your work is already mounted in a frame, tack the muslin loosely over it.
Alternately, you can use tissue paper.
You posted this some time ago, I see, but it’s a great tutorial! Thanks for all the photos. I’m off to the beach with my frame-intended embroidery projects now!
Thanks for the tutorial, it’s beautiful. I have a question. Do you just make a big ol knot at the end of your thread before you begin lacing? How exactly do you end the lacing if you only have the one strand and need to end lacing but still keep the tension and tightness?
I use a knot at the beginning of lacing, and at the end, I take several small stitches into the fabric to hold the thread, and tie off with a small knot.
can you please delete my previous comment from 8/7/2008? I managed to figure everything out 😉 thanks
I like the “rustic” look of wall hangings in an embroidery hoop (albeit a nicer one than just the raw wood one’s that are sold in craft stores to work with).
Do you have any advice for how to prepare a piece for hanging in something like that? Would I do a mat board and lacing the back, or some other procedure?
Thanks for your help,
Megan
hey Mary
this is the perfect utorial, i had seen this months and months ago… its fabu that i can come months and months later and still be able to use these.
fyi
i finally finished my bird( the pheonix)… not the greatest in my opinion..:(….. it has alot of puckering> i dont know why this happened… i used a 5 or 7" hoop and just moved it up ad i worked… hmmmmm… do u have any idea why that would have happened??? do you think if i apply lots of tension when i frame it tha this might go away?? welll im off to wash my fabric..lol
I have done a rather LARGE piece, a dress actually, should I frame it for a show or just let it go naturally?virginia48210@yahoo.com
Thank you for your simple to follow directions and great photos. Off to the frame store I go!
Thank you very much for this post. A woman I know gave me this web address as I am doing a large counted cross stitch (Happy Nappers) as a present for my sister, and had no idea how to finish it. I do have to make a couple of minor changes, as my father is going to be making the frame for it instead of me purchasing it.
Thanks again. Have a great day.
Cindy
We have a steel door, and my father used magnets (heavy ones) to apply my work to the door. He streached it gently out to remove puckers and left it hanging for several days before mounting. Worked like a charm.
Hi
I am about to start an A4 sized embroidery for my friends new baby. I was wondering how much extra material I should leave around the actual design for framing purposes?
Thanks!
Hi –
I'd leave at least two inches on each side (so add 4 inches to the length and 4 inches to the width).
Good luck!
MC
I have about 9 pieces I have to frame for an upcoming show – and I am SO grateful for this tutorial! About to dive into my first one. I haven't framed my work before, so this will be an adventure…
I just wanted to say THANK YOU for posting this technique. I've been embroidering for about 3 years, and never had framed my work before. I did a show last month, and framed about 9 20×20" pieces and 3 9×9" pieces, using your technique. It was so helpful, and I feel really took my work to the next proverbial level. Thanks again!
Thanks for the framing tips! In preparation for framing a piece of my own, I accidentally scorched the linen while ironing right in the middle of the piece (oh no!). Fortunately, I found a tip that may help your readers: take a small scrap of white cotton fabric, dip it in hydrogen peroxide, and lay it over the scorch. With the heat at a low setting, gently and lightly iron the area. I tested the peroxide on some scraps of floss I was using to make sure it wouldn’t run. This worked like a charm the scorch is COMPLETELY gone! 🙂
Dear Mary,
I used to embroider when I was a little girl, and I used to hate it, but since visiting your website, the bug of embroidering bit me. I have started a few projects, but I do not really see myself hanging embroidery pieces. I always think of embroidering as part of pillows, clothing or quilts. Do you do something else other than frame your pieces of embroidery? I see that you recommend embroidering in muslin for beginners. Maybe someday you can show us something a bit more modern like some geometric patterns for couch cushions and the like?
Best regards,
Viv
Thank you so much for this detailed explanation. My mother embroidered a beautiful piece for my baby’s room, but I wasn’t sure how to frame it…this helps a lot!
OOOOOOOOOH THANK YOU THANK YOU!!!
I was trying to remember how to do this so I could explain this to my Dad for when I finish the Persian Blossom.
Here’s the next question (can’t say it is a stupid one cause I am asking it lol)
How would ya lace the back to get the 45 mitered corners? I sux at that unless if it is wood working. 🙂
Thanks SO much; I have put many pcs of emb work in all kinds of frames over my 60+yrs of embroidering, BUT now I’ve finally finished a lg pc (16×20) of a doe & fawn for our oldest grandson…started 15 yrs ago (he’s now 26). I wondered how to “really’ frame it correctly; and wasn’t even aware that it should be washed! Thank you so much for your easy to understand & specific instructions.
Thank you SO MUCH for these wonderful instructions! I just finished my first piece of embroidery and am looking to frame it…this tutorial is beautiful and so helpful! Thank you!
Another very useful, detailed description to add to my knowledge about embroidery. Thank you for the reference to this “tip” today Mary. I will try it on my Butterflies and Flowers piece.
Thank you for this wonderful tutorial on how to finish a piece of embroidery for framing. I love the Iris. I like how you framed these perfectly, without a mat on the outside of the fabric between the frame and the embroidery. They look really pretty. I need a few more supplies and then I will try to lace and put into a frame, my first completed project. Thanks for the reference to this tutorial and for the great teaching Mary.
Very helpful, clear good photos. But I have a piece about 20X24 chinese silk ebroidery, has old deep creases, not much fabric to wrap around board , will be matted with linen lined mat. What’s the best way to remove creases and stretch onto foam board. thanks
Thanks so much for this helpful post! This is my first finished piece, so I didn’t know where to begin and what materials to use. Glad you made it a quick and simple job, too!
Thank you so much! I am wondering why you have to keep the glass off your work. Maybe to see the relief? I am not sure where to purchase spacers or what they even look like.
Thanks for a clear, helpful, procedure!
thank you…a really good do it yourself helper!
I’ve got a larger piece wondering how to stitch a border to keep it from fraying (22 count Aida)
like your website! mb
Thanks so much for the clear, concise “How To.” I’m ready to tackle my project with confidence!
Am I understanding this right: You put the pillowcase behind the piece, you lay the piece right-side down, and then you iron the back of the piece, nothing between the iron and the embroidery? I will have a heart attack to take an iron directly to my embroidery, even the backside!
Well, this is all cotton, Sheri, so ironing the back directly is no problem. Also, with linen and cotton threads, direct ironing on the back is no problem. You can always put a piece of cotton muslin or something similar between the iron and the back, if you’re wary.
To pad the ironing board, I generally use a pillow case folded in half, and I usually put one or two clean flour sack towels or layers of flannel underneath it for extra padding. Sometimes, I skip the pillow case if I have enough clean flour sack towels. The padding gives the stitches something to sink into, so that they aren’t crushed by the ironing process.
Nowadays, though, I do more damp stretching before finishing, instead of ironing. As long as the embroidery is clean and doesn’t need washing, it works best. Here’s a tutorial on damp stretching: https://needlenthread.wpengine.com/2012/07/damp-stretching-blocking-embroidery.html
Thanks so much for this tutorial; it was very helpful. I thought that framing projects myself would be to hard – which made me think I might have to give up my stitching for lack of ways to finish it. Pillows are pretty but do not preserve a larger piece that much work has gone into. Glad I did a search and this site.
GM
Thanks for the great lessons. Is it better to make a cushion cover with your embroidery or to frame it? What sells the best? I have some beautiful pieces that I would love to sell.
I think it depends on the type of embroidery. Some needlework (like crewel work or needlepoint) holds up better to household use. Some wouldn’t hold up as well.
Could you let me know the thickness of the card you used here or the thickness you normally use to mount goldwork on linen?
Hi, Isabel – I use matt board, the stuff that’s available in a framer’s shop or at art stores. Acid-free is best. ~MC
Many thanks.
this is THE BEST post on framing embroidery!! Thank you so much!
Hi
I have a square piece of needlepoint embroidery with the Lord’s Prayer on it. It does not have that much extra on the sides. What do I use to place it on and seal down. What type of frame is best? open or with glass to protect. The background is teal blue so it will show dust over time. Lettering is wine and brown colors. Please help me to know what is best. It measures about 2 feet by 2 feet.
Thank you in advance for any advice
Michelle Witz
Just what I needed! Thank you, ma’am. 🙂
Hi mary thanks so much for your work and sharing, I’ve been making a piece I want to hang with no glass.. do you know any product I could spray into the whole fabric before framing it?
Hmmm….I don’t know if spraying the fabric with something is such a good idea. I think you’d be better off making sure that your fabric is perfectly clean, dried and blocked before framing.
This was very helpful.. My concern was if I needed to starch the linen before frame ng?
Hi, Monica – I would not starch embroidery before framing. Instead of ironing, you can try damp stretching, which will get all the wrinkles out so that the piece is ready to frame. You can find my tutorial on damp stretching here: https://needlenthread.wpengine.com/2012/07/damp-stretching-blocking-embroidery.html
Thank you again, another great tutorial. Enjoy using your great stitching instructions and other information.
Love your work it is so beautiful, especially in the frames! And a very helpful article for someone looking into embroidery!
Thanks so much for this simple how to. I’ve taken on a commission piece and needed a refresher on finishing.
So many people leave their work in hoops now!
Truly appreciate the many pictures.
I was looking all over on line to see how to frame a piece of candlewicking embroidery I am entering in our local fair. I should have known I would find the best explained “how to do it”on your site. Thank you. I have been a fan of your’s for some time, and I love your site.
Another great video!
I’ve just completed an embroidery by Coats Crafts where the design was pre-printed onto the fabric. The packaging says that the inks used are water-based and therefore SHOULDN’T be washed… Would you take that at its word and NOT wash? There aren’t any obvious marks but my hands have been all over it a lot and I’m really worried about discoloration over time…
Thanks
Very helpful — and your embroidery is amazing!
Thank you for sharing your knowledge and experience!
Great article! I knew there had to be a more professional and reliable
(than using tape)
way to secure a fabric piece for framing… I have some heirloom embroidery
And I want to preserve them properly. Thanks! M
Wow, just the kind of information I’ve been hoping to find! I have a wonderful embroidery machine and want to create some pieces to help decorate our new home, but haven’t know where to start.
Thank you for spending the time to put together such clear information with photos of your process!
Love this article! I have a project coming down the line that will require framing embroidery which I have never done myself and I was getting quite stressed thinking about it. This has been a huge help, thank you!
Thank you so much for this tutorial. It was the only one I found that even addressed what to do if you don’t have a perfect square! The frame I was using was a perfect octagon. At first I thought I had to make the backing board the size of the frame and thought that was going to be tough to get even tension. Then I saw a video on YouTube where she made the backing board only an inch or so bigger than the mat. This made so much more sense to me! The inside width of the frame was 10.5″ but I made my square 8″ and only had to cut the corners off by 1/2″. Then I was able to do what you did here and sew the angled bit before lacing the second side. Worked for me! Let’s hope it holds up 🙂
Thanks again!
Very informative. During covid I’ve done a lot of embroidery and I haven’t framed a piece for a long time. I like your thread method for the back. I remember using masking tape back in the day & that doesnt work well at all. I might not use glass, haven’t decided yet. Thanks for the tips!
I love your explanations. I´ve already done like you taught and it was well done. Thank you.
Sorry for the poor English, because I´m learning yet.
I´m from Congonhas, Brazil. A history city.
Very interesting. I have been taping my work to the backing. I can see that leaving it will be a longer life for the project.
Thanks for leaving this article up! Making some gifts for my parents and friends and this was helpful 🙂
May I ask what kind of mounting board you use. Does it have to be something or other free.
I use acid-free Canson bristol board. That’s my favorite. If I don’t have that available, I use a regular acid free heavy mat board.
Wow that is a nice detailed tutorial on framing! I have seen embroidery framed without glass which does look nice. But then there is the eventual problem of dusting and I would be very hesitant to dust the needlework itself even with a very soft brush.
I do like the idea of a shadow frame which keeps the glass away from the needlework and protects it nonetheless.
I appreciate the photos and detailed instructions. Thank you!