


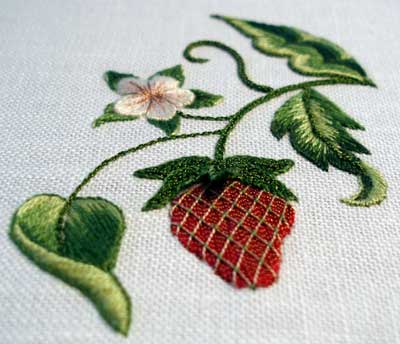
I had so much fun embroidering this little strawberry scene. There’s nothing super-fancy about it, and certainly there’s nothing accurate about it as far as nature is concerned, but the embroidery was fun! I learned several things along the way.
First, I learned about embroidering with Gilt Sylke Twist – some things work, and some things don’t. Well, I should qualify that: they didn’t work for me. They might work better for someone with a little more skill and a little more patience!

For example, long and short stitch and variations, worked on an arch, are probably not ideal with this thread. For one thing, the thread can’t be split, so you have to come up between the previous stitches – which nudges them aside. Because of the stiff nature of the GST, they tend to stay nudged aside…
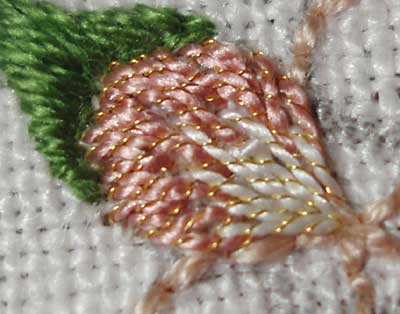
It doesn’t look horrible, but it doesn’t look that great, either!
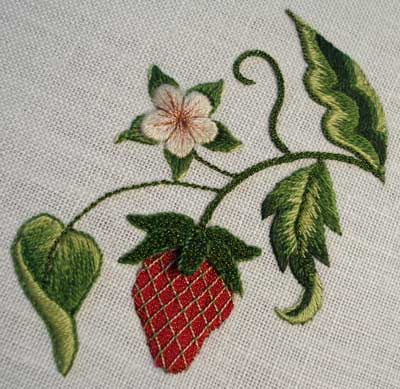
For the blossom, I settled on long and short stitch in ecru and pink, with some highlights of the pink GST in the middle.
I like the way the blossom came out. I used some slightly darker brownish-pink in there, too, and between the petals for a bit of separation.
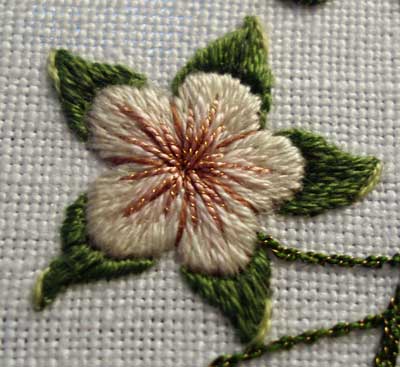
The leaves behind the blossom are worked in three colors of green: I satin stitched the whole leaf in a medium green, then I embroidered a few “shoots” of dark green up from the edge of the petal. Finally, I worked in a very light green at the tips, using just two stitches over each tip, in stem stitch, to give it a kind of curled look.

Another thing I learned: oh, yes, we all know it, but do we do it??? Think things through before beginning to stitch. I wasn’t thinking when I stitched this stylized leaf (right – that’s my excuse: it isn’t supposed to look real!). I meant to do the long and short on the edge, exactly as it is done, and I meant to stitch the green GST on the edge as well. I even meant to work a stem stitch filling on the top section of the leaf. However, I did not mean to break the stem stitch scallops where I did! I should have drawn a line, slanting down in the direction of the scallops on the edge, and broken my scallops of stem stitch filling along slanted lines, so that those lines followed the direction of the long and short stitch.
But I wasn’t really paying attention, and I didn’t notice it until I was finished!
Another way I could have avoided those scallop-lines in the stem stitch filling altogether would have been to alternate the placement of the stitches in each row, not ending at a point each time I came down the scallop hill.
But like I said, I wasn’t paying attention!
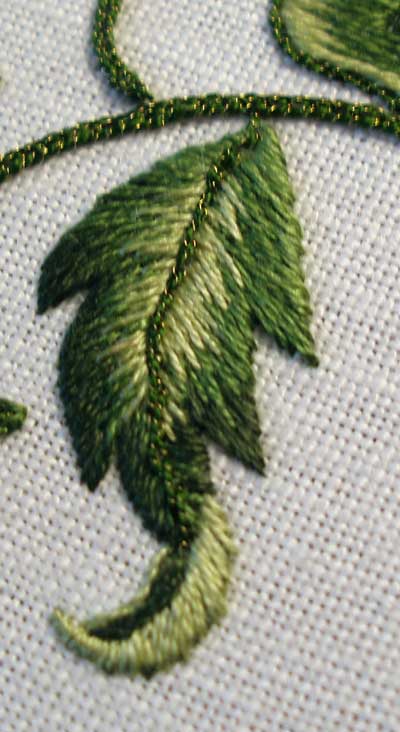
I also learned another thing I already know, but it served as a good reminder: line up your threads and the quantities thereof before you stitch. I ran out of the green I was using. You can’t really tell, but it made the little turn-over at the tip look a bit different than I intended.
But, despite all the lessons, I’m still pretty happy with the way it turned out.
Oh – I learned one more thing. I will no longer be a fanatic over not wanting people to touch my embroidery. Usually, as a finger approaches, I spaz out – “Don’t Touch!” When people see something like this strawberry, with the raised leaves and the sparkle of the GST, they can’t resist it. They MUST touch it. So I learned that, sometimes, you just have to sit back and not get weird over people wanting to touch your embroidery. After all, they’re learning, too!
Hope you liked my GST Strawberry Adventure! Now, on to other projects!
beautiful! i don’t know that i’ll ever try working with this type of thread/floss, but i’ve really enjoyed watching your progress on this piece. i think it looks great and it’s def. something you’d want to touch, lol.
great job!!
terri
Mary, it looks GREAT! I really like the shading you ended up with on the blossom.
Wow, this turned out gorgeous! You are talented.
So so sooooo Stunning!!! Really, I am so amazed and stunned by the beauty in this work. Fabulous! Thank you for sharing it.
Wendy
Mary, it’s beautiful and very professional looking! I can see that it doesn’t fall apart like many other metallic threads. I’m hankering to try it but I blabbed to my husband what a spool costs, ooops.
Mary, you’ve done an awesome job…I can’t believe that this is all your creativity, from pattern to color selection and stitches. It looks beautiful. What are you planning to do with this master piece? Are you planning to frame it without glass :))
This is Beautiful! Very stunning. I haven’t gone back to research this piece, I clicked on the finished project…what type of cloth is it on? As far as people touching the piece…I think it’s GREAT that they simply can’t help it. I’ve done woodwork as well…and people say that it is nearly impossible for folks to refrain from touching something that is/was Alive…pershaps you could be flattered that your strawberry is so REAL and Alive that people that come in contact with it, simply MUST touch it! Congratulations on such a great honor! smiles, Alicia in Hawaii
Bueatiful Mary!————-macabrechaos
Thanks, all, for the nice comments! I’m not sure what I’m going to do with it yet, Meeta. I’ll either frame it (I always frame under glass! keeps the work cleaner longer!) or I was thinking it would make a neat cover or something for a needlebook. I’m not quite sure, though – and I’m no great fan of finish work. So it’ll probably be “unfinished” for a while, unless a lightning bolt hits and I frame it for a birthday present or something!
Whoops. I forgot to add:
Alicia, it’s Legacy linen – they’re a company out of Belgium, I believe, and it’s imported into the States through Access Commodities. The particular type for this project is Alba Maxima, a sturdy white linen, not really “even weave” but on Legacy’s linen, the warp and waft threads are generally very close in size, so this ends up to be about a 40 or 50 ct linen, I think.
Fabulous, Mary. I love the finished embroidery with the three styles of leaf and, of course, the yummy strawberry. I especially enjoyed the GST lessons. As I said before, it is a long time since any one has used a thread quite like this, so we must share our experiences with it and learn from each other. I’m still struggling with covering my walnut shell 🙁
CA
It’s totally totally gorgeous.
Thankyou SO much for the information on the GST used – it’s invaluable.
L&S; – it doesn’t split, but you have to push aside! Well, that’s just saved me a few hours of agony, I’m sure!
Adore the blossom
You talk about the chain stitch on the scalloped edge of the large leaf as is if this is an accepted method to edge a scalloped edge.
I always have problems with my scallops disappearing. So should I be using the chain stitch to get a better, more visibly scallop-y result?
Mary – This is beautiful – I love all the different leaves. Its a much better ‘experiment’ than mine ever are. when i win some GST of my own (grin)…I’ll try to do it justice
Thanks, everyone, for your very kind compliments!
Megan… ?? I’m not quite sure what you’re talking about concerning the chain stitch and scallops? I didn’t chain stitch anything on the leaves…
I can only suppose you mean the stem stitch in the GST along the edge of the larger leaf – but I don’t know what you mean by an “acceptable” method. I just did whatever I wanted. I wasn’t following anyone’s “rules” on what to do or not to do on any of it.
If I missed what you meant, let me know and I’ll try to answer your questions better!
Thanks again, all!
A very beautiful work dear Mary really I like very much!!
I love the finished strawberry – but to me the best part was watching it develop and then reading your summary of the project. A very cool way to learn some valuable lessons with the new threads – much better for me than trial and error! Do you have a link to the vendor(s) selling GST? You’ve inspired me to try it!I never thought of finishing a piece as a bookcover – what other ideas do you have to make use of projects – particularly those sized for pillows? I’m new to the blog so I haven’t read every post yet – and you may have already covered this?
Hi, Terry – welcome aboard!
You can find GST through Needle in a Haystack, Hedgehog Handworks, and Fireside Stitchery. The latter is in PA, and the two former are in CA. You can find links under my “Links” page in the top menu. There are probably more vendors, but those are the three I know of off the bat. If Tricia (on the Plimoth Plantation website) still has any, you can purchase it from her as well.
As far as finishing is concerned… argh. I’m not the world’s best finisher. I generally end up framing my stuff, or, with some smaller projects, putting it into my binder pages (in a sleeve) as a sample to show students, so that they can see different embroidery techniques. For the most part, I frame. But I do want to make a needlebook or a little “hussif” (tool roll made out of fabric), so this might work as part of a cover. I’m not sure!
Unfortunately, when I finish stitching a piece, I’m always dying to start the next project, so that I can have something going to stitch on. I need to discipline myself on finish work!
Maybe that should be one of my goals this year!
Thanks for the comment!
Okay, Mary, I have to be honest, if I made something as beautiful as your stawberries I wouldn’t want any one to “touch” either!
My pride would be out of control….lucky for me that with the talent I have, it is easy to hold on to humility regarding hand work! 🙂
A fan of yours…
Arlene in Alabama
Hi, Arlene!!!!
Thanks! My brother is the biggest offender when it comes to touching my needlework! Does that surprise you!
I sent Auntie a letter and a picture of the strawberry. I hope she likes it!
Hope all’s well down in Alabama!
This a a gorgeous peice and you are an evil evil enabler, because now i HAVE to get try the GST and play with something similar!!! =)
Wonderful work and thanks for sharing–your blog updates are the staple of my workday coffe break return to sanity program.
Ruth M
Dear Mary,
Love the strawberry. can't wait to start the lessons. joanne g.
Again thank you so much for sharing your skill with us.
i have used your design to make embroidered strawberry . hope you like it .
http://roycedavids.blogspot.com/2011/06/strawberry-vine-embroidery.html
Thanks for the link, Royce – It looks great! I love the plush looking strawberry!!
Hi Mary, this strawberry picture is beautiful. I don’t think I have seen it before but that is not surprising to me as I was studying hard to get my degree when this was posted. Thank you for the link.
Amei este bordado, gostaria de ver outros.
Bellisismos embroidering, all of them, I did try some and it’s gorgeous.
What stitch did you use for the stems. I often find with curved stem stitch that the stitch does not stay put but pulls. Any recommendations?
Hi, Anne – I used heavy chain stitch for some of the stems and stem stitch for the finer stems. You can find my tutorial for stem stitch here: https://needlenthread.wpengine.com/2006/10/embroidery-stitch-video-tutorial-stem.html and a tip on stem stitch on curves here: https://needlenthread.wpengine.com/2017/06/stem-stitch-tip-tight-curves.html Both together should help you with your stem stitch problem on curves. Often people change the orientation of the thread to the needle when working around a curve, but that shouldn’t change as you turn – just turn your design (in the hoop or frame) as you stitch, and keep the thread and needle in the same spot in relation to each other (when working left to right, the working thread is always below the needle).
Thank you so much. You are so easy to follow on anything that you explain. The tutorials are great. I would love to get your newsletter but no where to be able to save without overloading my equipment I use. And I wouldn’t throw any away either. I hope I can continue to see you tutorials whenever I need help. Thank you and have a good day.