


Last week, I did indeed manage to cram in this embroidery project and complete it with fairly good success! Mind you, it took all blinking day Saturday to get it finished, but, come 9:00 pm, it was actually delivered! I take back the comment I made about wishing I had done something more complicated. Uh. No. My new motto: the simpler, the better.
Today, I’m going to show you how I embroidered the crown – I left my camera behind at the festivities yesterday, so I can’t unload the finished photos yet. (It was one of Those Weekends. I’m lucky I didn’t leave my head behind…)
When I started thinking about how to do the crown, my first thought was to fill it in like I did the cross, with long and short stitch in various shades of gold. But that didn’t seem very interesting, so I did this instead:
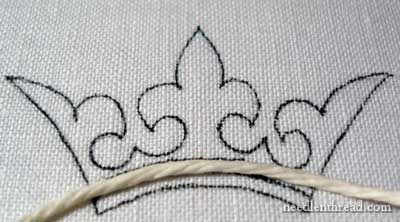
First, I fetched a ball of yarn from my goldwork supplies. I use this yarn to couch gold purl over when doing goldwork. I ran a piece of the yarn through a cake of beeswax a few times, then I ran the yarn through my fingers to smooth it out and distribute the beexwax.
One string of yarn, by the way, was a perfect fit between the two lines on the crown. I was glad and rather pleased with myself for coming up with the idea! But don’t worry – I still managed to make a mistake! Mistakes keep one humble, and they’re the best of learning tools!
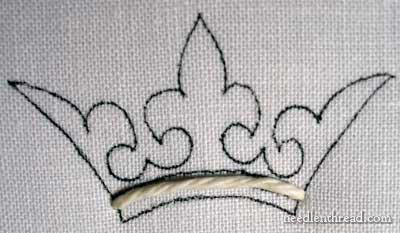
I took a Very Large Needle with a Very Large Eye, and threaded an end of the waxed yarn into it, then sunk the yarn ends at each edge of the crown.

And then, oh joy! oh bliss! I took out the GST (in the yellow – which is a beautiful soft gold, really) and started satin stitching over the yarn, which created a very nice raised band across the crown.
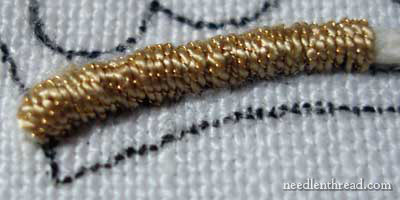
But as you can see, it isn’t so smooth. Rats! In stitching down the sunk piece of waxy yarn end on the back, I didn’t realize how badly it would tug things on the front. I did what I could to prod the stitching back into smoothness, but it never did look quite the same again.

After overcasting the yarn with the Gilt Sylke Twist, I outlined the crown in a dark gold (the same dark gold I used on the cross) using heavy chain stitch. I used the light gold that runs down the middle of the cross on the inside of the crown, stitching tiny seed stitches in there to add a dusting of color and a slight hint of texture.
A couple very good lessons I learned on this little crown: 1. Be conscious of what’s going on on both sides of your fabric when tacking down loose ends; and 2. do the raised work last, after finishing the other stitching around it. I really had to manipulate my needle to get the stitches in around the GST without jabbing it. I jabbed it quite a bit!
I’ll share the rest of that project later!
Coming up, I’ve got some super interesting information from Trish Burr! She’s the author of Redoute’s Finest Flowers in Embroidery and Long and Short Stitch Embroidery, and she has a new book coming out this summer in the US (already out in the UK and Australia, apparently!). She’s also featured in this month’s Inspirations Magazine. She sent me some notes on the path to publishing her books, along with some personal insights on her books, some gorgeous (and I mean STUNNING) photos of her work, and some information about her upcoming title. So I’ll be putting that together into a worthy article this week! Look for it!
Have a wonderful Monday!
Can’t wait to see the finished project. I’m sure your niece loved it. What a very special gift!
Did you notice the ads that Google put into this article? Mostly ads for dentists who do crown work! I thought that was funny. Speaking of which, I broke a tooth over the weekend and must give my dentist a jingle.
Keep us the inspiring work!
This is very cool. I look forward to seeing it finished.
Truly lovely mary!
Thank you, everyone! It was a fun project!
I’m posting the rest shortly…!
What a fun combination of techiques! I’m glad you decided to do it this way instead of just filling it in: it is beautiful and interesting.
Did you ever post close up pics and description of the GST? I want to know why you can stitch through the fabric with it so easily.
You mentioned on a previous post an embroidered First Communion dress. Did you embroider it?
Thanks soooooo much for sharing all this with us, and congrats on cramming successfully!!!
-Christiana
I can’t wait to see the finished piece and am looking forward to your post on Trish Burr.
Super!!!