


Slate frames have been around forever – well, certainly since the Middle Ages, and anyway. They’re made up of four parts – two rollers (top and bottom) and two stretchers (sides, with peg holes).
The advantage of a slate frame is that, with them, you can achieve and maintain perfect tension for stitching. In fact, of all the methods I’ve used of mounting any fabric for embroidery, nothing compares to the excellent and even tension you can achieve with a slate frame.
Now, that being said, and as I mentioned yesterday, setting a project up on a slate frame (or “dressing the frame”) takes a wee bit o’ work. And the larger the frame, the more work. Normally, you should be able to accomplish dressing a frame in an hour or so, if your fabric’s prepared and you don’t run into any hitches along the way.
So let’s go step by step through the whole process, including preparing the fabric.
Preparing Fabric for the Slate Frame
There are different ways to prepare your fabric for dressing a slate frame. I’m going to show you one way. I use different ways, depending on the fabric, project, etc.
I’m using Alba Maxima linen from Legacy, a nice medium-weight, sturdy, smooth linen. The first thing I did was shrink the linen. (I’ve already posted on preparing linen for embroidery – scroll down to the shrinkage section!).
Then, I sat down and did some figuring. I don’t love figuring…
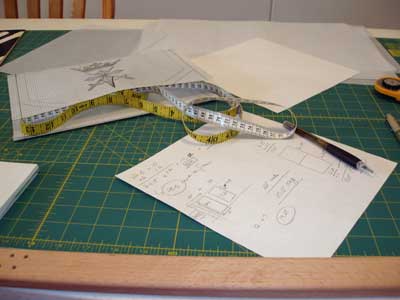
The project I’m preparing is about 22 inches long, and about 13 inches wide. But I’m taking advantage of the width of the frame and killing the two birds with one frame-dressing job: I have another project that I can work on the same piece of linen. The second project is about 7.5 inches wide and 14 inches long. So I will situate them both on the same piece of linen. And that means I have to stitch both of them before I can cut either of them off the frame.
I determined exactly what size linen I would need to accommodate both pieces, and decided that using the frame to its full capacity, without having to roll the top rollers, would be fine. I decided to set up a piece that’s 23 inches wide and about 26 inches long. That gives me plenty of room for seam allowances on both finished pieces, as well as some “doodle room” on the fabric itself.
Next, it was time to cut the fabric out. I laid out the linen and the requisite tools.
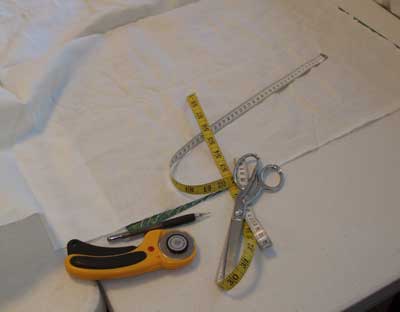
Don’t get any ideas about that rotary cutter! It’s not that easy!
I measured the linen and marked my cutting spot with a pencil. I measured an extra inch on each side and an extra half inch top and bottom, for the turn-overs on the fabric edges.
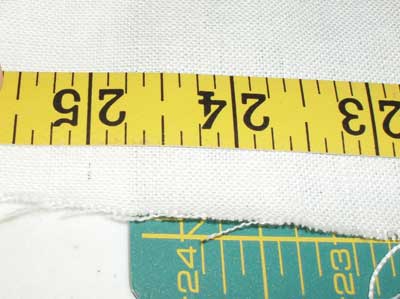
So – 25 inches wide (with an inch on each side to turn in) and 27 inches long (with a half inch, top and bottom, to turn in). I actually cut 28 inches long, to compensate for a sloppy cut (more on that below).
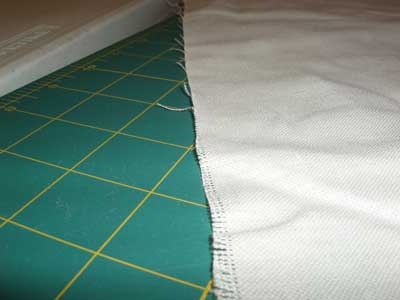
At this point, it would be nice to lay out a ruler and slice the piece with a rotary cutter – so quick, so easy. But this is the thing: You need your fabric mounted onto the frame on the grain, so it’s better to cut the fabric on the thread. If you do everything right from the very beginning of this process, you will have no regrets later (after all the hard work). So cut your fabric on the thread.
There are several ways to go about cutting your fabric on the thread. When working with linen, many needleworkers say to draw a thread out, creating a cutting line, and then cut your fabric.
On the Alba Maxima linen, drawing a thread out of the middle (especially after shrinkage) is a Royal Pain in the … Fingers. So I do it this way:
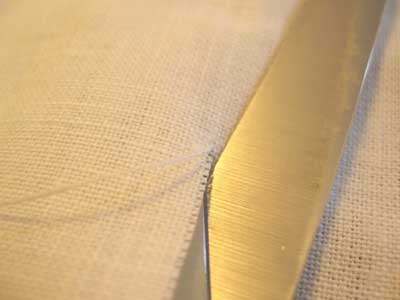
I make a small cut at the pencil mark, then pull up on the thread to the left of my scissor blades. I keep this thread pulled up from the fabric as I cut, and it provides a nice cutting guide. Relatively quick, and sure beats drawing one thread out of the whole piece to mark a cutting line.
At this point, you may well be thinking “This is already too much effort…” but hold on! It really gets much worse!
Still, persevere! It is honestly worth it in the end!
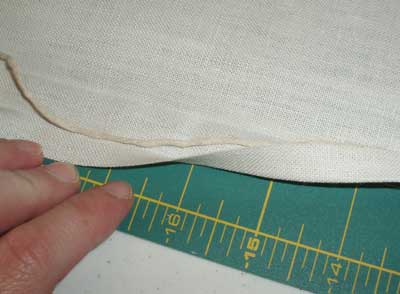
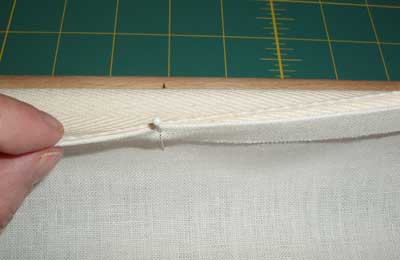
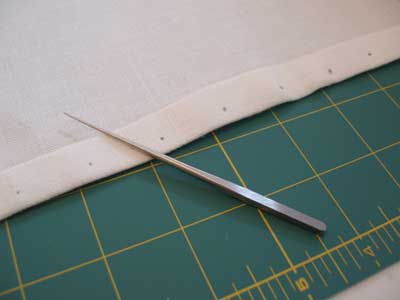
Once your fabric is cut, make sure that all sides are on the thread. For this piece of fabric, to get the size I wanted, I had to cut two sides on the thread, one side was selvage, and the fourth side was jagged from a previous sloppy cut. This fourth side needed to be straightened out. The easiest way to do this is to pull off all the stray side threads, until you can pull one long thread from the entire width of the fabric. Let me explain with a photo:
See the wispy threads sticking off the side in the background? Those can be pulled out, until you’ve got a straight edge visible on your fabric.
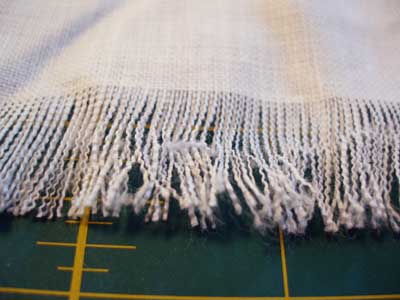
You’ll end up with a bit of fringe, but that gets trimmed off.
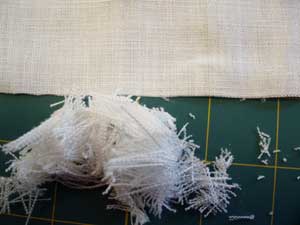
So there’s the straight cut on the thread as a remedy to a sloppy cut.
Now, iron the fabric. Purists may not do it this way, but I’ll admit that I use starch and steam on my linen. I wouldn’t necessarily use the starch, except that I’m planning to put my design directly on the linen with pencil, and I find the pencil washes out better when I use starch. I really like the Niagara starch in the pump bottle (rather than the aerosol kinds, which tend to flake). I’ll wash the whole piece before I do the finish work on it (sewing up the project), so the starch will be rinsed out, anyway. If I weren’t going to wash the piece, I would not use starch.
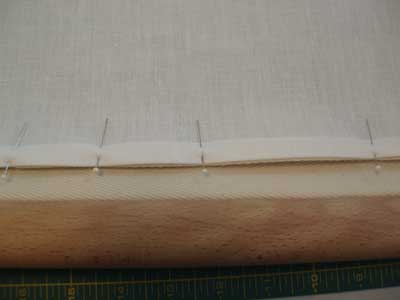
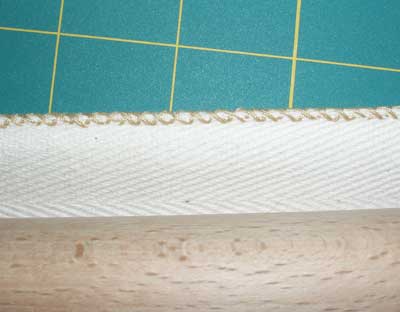
Now, it’s time to fold the edges of the fabric to prepare it for lacing. The top and bottom edges of the fabric will be folded in half an inch. These will be sewn to the canvas strips on the rollers of the frame.
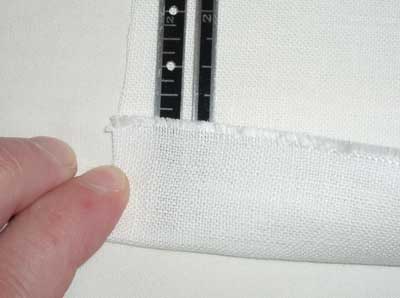
I fold up the top edge half an inch and finger press it along the thread of the fabric (as best as possible), then run the iron over it, then pin it, starting from the center point out.
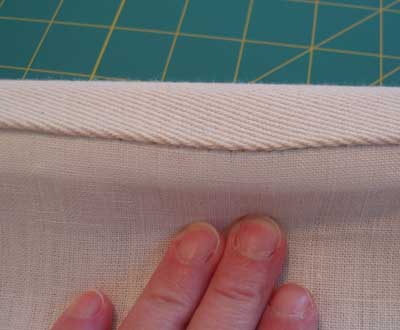
For the sides of the fabric (they’ll attach to the stretcher slats with the peg holes), I turn it up an inch, finger press, then turn in half an inch (into the fold, to make a kind of casing), iron it, and pin it from the central point outwards.
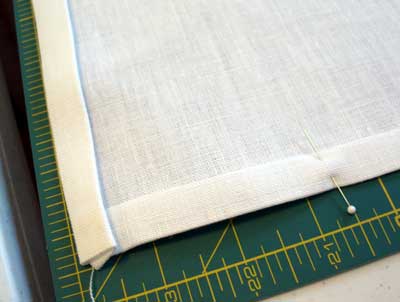
Above, you can see the top edge of the fabric (the pinned edge in the photo) and the one of the sides, folded in to form the half inch casing.
Cut a piece of string a little longer than the length of your sides – not much longer, about an inch – and tuck the string into the casing formed by the double turn on the fabric. The string will help support the fabric when it comes to pulling it with the lacing. (This step is not necessary – I only do this when I think the fabric needs some extra support, when I’m not using webbing on the sides of the fabric).
For the lacing string, by the way, I use regular 2-lb weight string found at the hardware store.
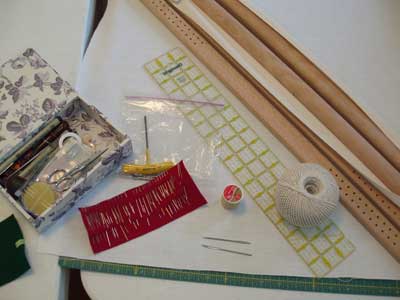
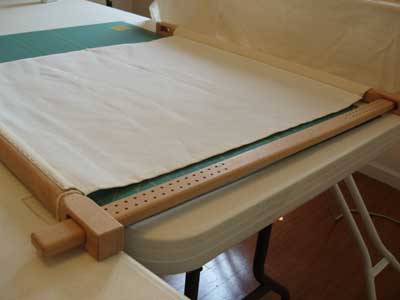
Now that your fabric’s ready, it’s time to attach it to the frame. Gather your supplies and pull a chair up to a table that will easily accommodate the size of your frame. Just like in cooking, the whole process is a lot easier if you have all your “ingredients” on hand first!
At this point, your frame is in four pieces: the two top and bottom “roller” bars and the two side “stretcher” bars (with the peg holes in them).
Dressing the Slate Frame
You’ll need the following:
Scissors
Thread – I use topstitching thread, doubled.
String – regular 2-lb weight string from the hardware store
A stiletto or awl – you have to put some serious holes in the side of your linen; this tool is essential!
Various needles, including a very large tapestry needle and a smaller sewing needle or crewel needle, plus, if you have one, a good curved needle
A ruler
Cotter pins or pegs that came with your frame
The fabric is attached to the top and bottom bars (roller bars) first. Most slate frames come with a strip of canvas attached to the rollers. You can go a step further and mark the center point of the rollers on the bar or on the canvas strip, if you want.
Line up the center of the top of your fabric with the center point on the canvas strip attached to the top bar. (Top and bottom bars are the same thing…)
Pin the center point of the fabric to the center point of the canvas strip.
Working from the center out to one edge, pin the fabric to the canvas, about every inch. Then repeat this, going from the center out to the other edge.
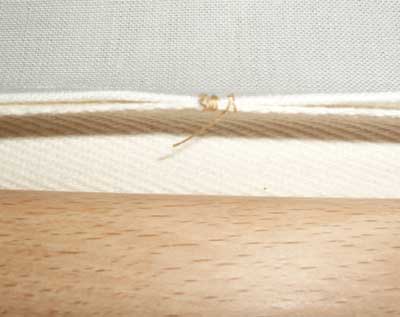
Oversew the center point to the canvas. Again, I’m using a topstitching weight thread, doubled.
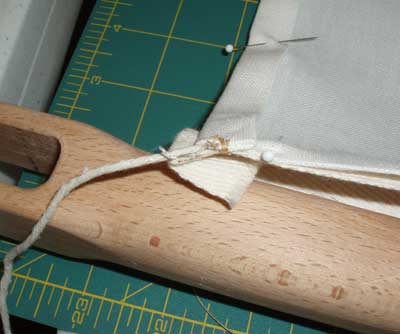
And oversew both of the ends.
Then, stitching from the center point to the outside, and removing the pins along the way, use a herringbone stitch to sew the linen to the canvas strip. If you’ve pinned everything carefully, you shouldn’t have any buckles at all.
When you’re finished sewing it on, and you flip it over, it looks like this.
Now, repeat the whole process on the opposite roller bar, so that both top and bottom edges of your fabric are attached to the rollers.
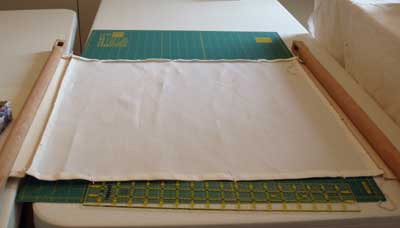
Lay out the frame so far on the table, with the top of your fabric facing down. You’re ready to lace up the sides.
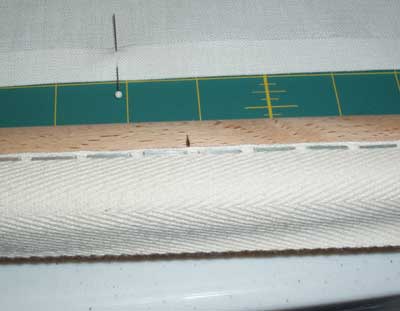
Mark the undersides of the side casing in one inch intervals, and get your stiletto out. Pierce the fabric with the stiletto, making good-sized holes.

Really good-sized holes!! If you have an awl, you might be better off using it. A stiletto is great for the initial piercing, but I really had to work it to get adequate sized holes.
Slide the stretcher sides into the holes on the roller bars…
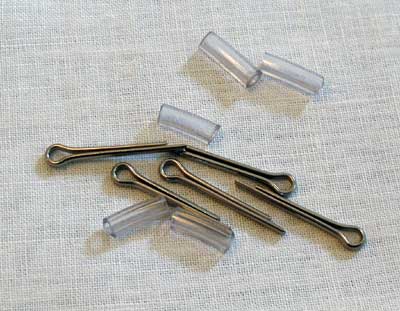
…get your cotter pins or wooden pegs out …
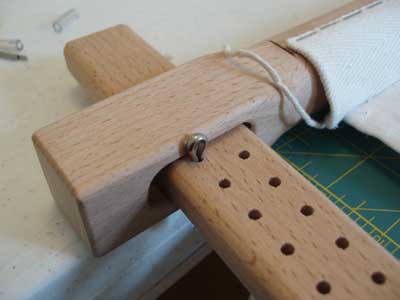
… and stick the cotter pins in to hold the frame together. At this point, you aren’t stretching the fabric from top to bottom or from side to side. You’re just sticking the pins in to hold the rollers in place while you do the lacing.
Stretching comes later…
If you’ve persevered to this point, this is the beginning of the “fun” part, the part that characterizes the slate frame.
You’re going to pull out a good length of string from your ball of string. I would say you want at least five or six times the length of the side stretcher bar. Remember – it’s always better at this point to have TOO MUCH string than too little. You don’t want to get to the end of the lacing and find out that you’re out of string. Aaaaaaaaaagh.
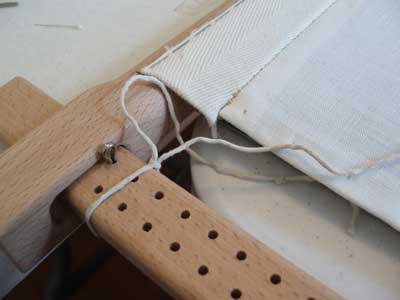
Start with a slip knot at the top of the stretcher bar. It’s important to use a slip knot!! You want to be able to adjust the tension on this string, so you’ll need to be able to loosen or tighten that knot easily.
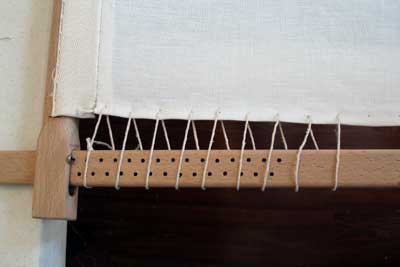
Thread your Very Large Tapestry Needle with the end of the Very Long String, and start lacing. Take the needle down into the linen, underneath the side slat of the frame and up around the slat, then back down into the linen – do this moving down the line of holes.
You may find that you need to revisit the holes in the linen with your stiletto here and there.
At this point, your aren’t concerned so much about tension. Just get the sides laced. As you lace, try to keep the edge of your fabric parallel with the stretcher bar. This is a bit hard on the first bar, since you don’t have anything you’re pulling against, and it’s easy to pull the fabric towards the bar. But resist the temptation, and keep the fabric parallel to the bar as much as possible.
When you reach the end of your lacing – arriving at the opposite roller bar – tie your string off with another slip not.
Now, in exactly the same manner, lace the other side.
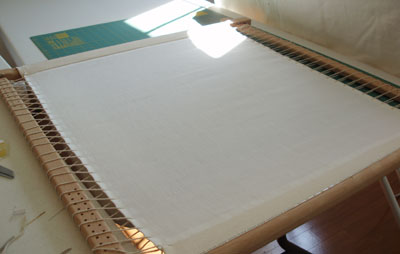
Now, you’re all laced up. But you’re not finished. Notice that the linen looks a bit wavy and rippled? That’s because nothing’s been tightened up yet.
At this point, if your project is being stitched on silk or damask or some other very fine fabric and being backed with linen or muslin, then you’ve only just added the backing to the frame. You need to now add the fine fabric. To do this, you tighten the frame “a little bit” – enough to remove noticeable ripples – but not all the way with the final stretch. Take your fine fabric (which you have already cut on the grain and that’s ready to mount), and situate it on the lining that’s stretched on the frame. The ground fabric (the fine fabric) and the lining (the muslin or linen) must match up with their grains. Match up the grain, pin the ground fabric onto the lining all around, and then sew it onto the lining, from center points out on each side, smoothing it as you go and making sure there are no wrinkles or buckles in it. Use herringbone stitch to sew it, crossing over the lining onto the ground fabric, and so forth. Once all four sides are sewn down, you’re ready for the last step, which is the final stretch…
But on my frame here, I’m not using a different ground fabric lined with linen. I’m embroidering the linen. So I don’t need to add ground fabric. I’m ready for the final stretch.
Because this is a large frame, I’m going to use a combination of hands and feet here – which was really impossible to photograph!
Stand the frame on the floor. You’ll have the ends of the stretchers (which pass through the rollers) touching the floor. You’ve got your cotter pins or pegs in the side slats already. Rest your foot on the protruding edge of one side of the bottom rollers, and then, using the heel of your hand, push down on the top end of the side slat, and with your fingers of the same hand, pull up on the roller.
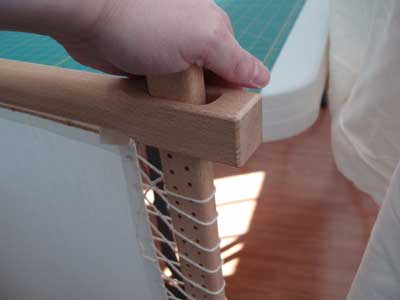
The top of that side slat is really pushing into the heel of my hand, because I’m using the top of the slat for leverage to pull the roller up.
If necessary, use both hands – but remember, you need one to move the cotter pin or pegs!
Pull the roller up as high as you can, holding onto the bottom of the frame with your foot. When you’ve stretched it as much as you can, replace the peg or pin below the roller.
Now do the other side, lining it up in the corresponding hole exactly opposite on the other side slat.
Turn the frame over, so that what was the top roller is now the bottom roller, and double check your pins and holes on the sides slats. Make sure all is lined up well.
Now, adjust your lacing one last time, pulling each side tight by working down the lacing and then adjusting the slip knots. Do both sides.
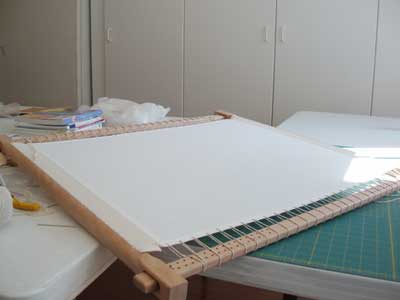
And there it is!!
If you’ve persevered to the end and done it right, you’re ready to embroider on the best surface ever! A lot of work, but worth the effort!
The whole process took me about three hours, but I had to prepare fabric (including washing the linen), and the frame is a large one, which increases the time for hand stitching and the lacing.
That reminds me – I forgot to mention the obvious. You can use your sewing machine to sew the linen to the top and bottom rollers. I prefer to do it by hand, but some people use their machines. It would save some time, but your machine needs to be able to handle the twill tape.
So, would you go to the trouble to set up a slate frame? Or do you think it’s just too much? It’d be interesting to hear readers’ opinions on this one!
Enjoy the weekend!
Mary –
Could you please comment on how one embroiders in the middle of such large pieces of linen? It doesn’t take the project to be too large at all (for me, at least) before I feel my posture is sacrificed.
So what’s going to be going on with that linen? We wanna see!
I know Evan’s mother, she was a member of our needlepoint guild when she lived in Toledo, Oregon. We got to see their first ideas for the Perfect Tension Stretcher bars. Glad her son is doing slate frames too now.
Hi, Joey –
Good Question! I just finished transferring my design, and this very question occurred to me, since I was working with the frame set up between two tables, using them like trestles. The middle of this frame is “just” within my reach, with a stretch. Fortunately (and on purpose!), the entire stitchable area of the design is on the outer edges.
I’ve seen different equipment to hold slate frames, so that one can reach better the middle of a larger frame without sacrificing posture. The best by far is at a convent which inherited the old stitching equipment from an older convent. They made vestments, and the newer convent apparently still does. They used to have pictures online, but unfortunately, they’re no longer on their website.
The equipment they used were a pair narrow tables with arms that reached upwards from the center inside edge of the table. To these arms was attached a piece of some kind of equipment to which the slate frames are attached. The frames “hung” rather than laid flat, and it looked like they could be rotated and adjusted at various levels of tilt, as well as various heights. It looked, to me, like an ideal set-up. The side table things with the arms extending upwards from them sported a narrow surface with grooved areas for tools, as well as what looked like bars (or dowels) fitted on part, on which threads could be hung.
For the very, very large frames that were used for clothing – pictures of which I’ve seen in some old, old books – I have no idea how they would have reached the center if the full width of the fabric were left exposed.
However, this is where the rollers (top and bottom bars) come in handy. The piece can be rolled up so that the stitcher can reach the middle and stitch there first. As the center sections are finished, the outer roller bars are unrolled gradually, exposing the rest of the design, and the piece readjusted, the area stitched, and then more unrolled, until the whole piece is finished.
So I suppose that’s how it’s usually done!
If anyone knows of any other way, do please share!
Cindy – I’m embroidering a kind of pouch made out of linen, as a gift. As much as I would like to say that it’s going to be covered with silk and goldwork, I’m afraid it’s actually going to be plain old whitework. I wanted to do golds and silks, but it happens that the recipient is rather partial to simplicity. Also, as the pouch will certainly get use, it needs to be washable!
I’ll post pictures along the way!
Thanks for your comments!
Best,
MC
Hi Mary,
With regard to the question of reaching the center of really large liturgical pieces etc. – I have the feeling that I have heard a reference to the embroiderers working in pairs to do the middle areas, with one underneath sending the needle back up. Still rough on the person doing the top though!
Regards,
Betty
Wow! What a project! It sure does look like a nice surface to embroider on though!
I am curious as to why these stretcher frames are called “slate” frames. When I first heard you mention slate frames, I imagined frames made out of slate like what is used on old roofs here in New England. That stumped me. But now that I see what a slate frame is and how it works, I’m really stumped. Am I missing something obvious?
MGM
Every source I have says something about not knowing where the name came about…
But I kinda figured it had to do with the word “slat” – as it was originally made out of four slats. (Traditionally, I think the top and bottom bars were flat, like the side bars…)
But who knows?
Anyone else?
The story I’ve always taken is one that makes a lot of sense here in the UK and it is that the ‘slate’ comes from the similarity to a school slate upon which children used to work their lessons from the earliest days ; happy to be corrected 🙂
I’ve not long come back from a beginners course at Hampton Court Palace with the RSN and it was just brilliant! Highly recommended although I realise it’s not that close for some, there were folks from Belgium, France and the USA as well as all corners of the UK. Two days of stitching bliss 🙂
How much of this would be applicable to lacing a *scroll* frame?
– me with my goldwork, stumpwork and silkwork project coming up would love to know.
I do have a method I found, but nothing about ‘on the thread’ or many other details you’ve mentioned.
Hi, Megan…
Well, it’s more or less the same thing. I suppose one doesn’t have to be too meticulous about cutting exactly on the thread, but you’d certainly want your cloth mounted and laced more or less on the grain of the fabric – otherwise, if you’ve got a “tilt” in it, you’d be working slightly on the bias, which makes it stretchy, and lends to warping the fabric… so the finished results could indeed end up wavy or slightly warped. Better to be careful in the mounting, than to regret it later. I’d definitely lace the sides of your scroll frame – otherwise, you get good tension only right in the middle of the piece.
Good – I laced my current project.
I find that I need to occasionally roll a scroll bar a tiny bit, because the tension on the material is loosening.
Would you know why? (Something obvious I’ve done)
I did do it on the grain 🙂
I just ask myself how can you transfer your design!
I think that’s just the nature of scroll bars! I think it has to do with the fabric around the scrolls slipping.
I used scroll bars on the silk stole project – I always had to adjust them…
MC
Hi, Meri –
Funny you should ask. I’ll have a post on that either later today or tomorrow…
If I were doing a needlepainting project on that piece of linen, I’d use the prick and pounce method, because I would have no worries about covering up my paint lines. But since I’m doing a whitework design, and part of it is only outlined, I needed to have lines that would wash out, so I used pencil…
MC
ok, cool – thanks.
Mary, I’ve used a slate frame and roller frame in the past with goldwork, Victorian silk shading work and some stump work with beading. I always feel so “professional” sitting with the work framed up, LOL. It always draws comments from onlookers at Craft shows too, people think the bigger frames are just for tapestry work, I think. Your tutorial is detailed and very clear I think, well done.
I always rest my frame against the edge of a table with a weight (I have dressmaking hams which are quite heavy) to conterbalance it. Otherwise, I’ve seen old photos and drawings of 18th and 19th century using stands not unlike saw horses used by carpenters to support the frames at the sides.
I’d definitely endorse the HB pencil idea for marking up whitework embroidery, using a very light touch to mark in as little as you can.
Can’t wait to see your results,
Hooroo,
Christine
http://missmuffettwo.blogspot.com/
I’ve done stumpwork and all kinds of pulled and drawn threadwork on a scroll frame (up to and including Elizabethan whitework ala Sharon Cohen). You hem and mount the top and bottom rollers in exactly the same way. I then lace my sides using a double thickness of unwaxed dental floss. I don’t fold a hem into my side edges, though. I use tricot bias binding folder over the edge there instead. I don’t want the edges to “build up” on the rollers – which they will tend to do with a folded hem.
I find that I can get a close approximation of the tension of a slate frame this way. The budget just couldn’t swing an English frame, but I’ll have to look into the source you recommend, because I’d LOVE to have the real deal.
I agree that spending a bit of time up front getting your linen just right, basting the working area, etc will make the whole project just run so much smoother.
I plan on one “round” of my rotation – up to five hours – for the set up and prep. Framing up the linen, organizing the threads and materials, basting, getting my working copies made and put into a binder – etc, etc. If I start stitching on that first round, all the better, but I don’t stint on the first and last.
Prep and finishing/framing can make a decent project into a great one, or totally ruin a good project.
Off to add you to my blogroll……
Maybe I missed something but… I wanted to know if the holes made for lacing the sides are permanent, therefore if the width of the fabric must be augmented to add the part on both sides that will be pierced and then discarded later.
I have acquired an old-style slate frame on eBay from a Goodwill type of vendor. The stretcher bars are threaded like screws and at each end there are two large wood "nuts" about 2" in diameter. The roller bars are placed between these 2 nuts so that by turning the nuts the roller bar is either pushed up or released. This is easier on the hands but I haven't dressed this frame yet. I'm still studying how to do it.
Your site is a gold mine of advice. No enclopaedia could ever come close to explaining all these important details. Thank you. Brigitte in Paris
A wonderful tutorial — copious gratitude for posting it! My question is this: when the time comes to roll the embroidered linen onto a horizonal frame member to embroider the next section — how is this done? Must you undo ALL the side lacings, remove the cotter pins, slide the horizontal members off, roll the linen up, then relace the whole thing? Is this the only way?
Hi, Orlythe –
Well, you don't have to undo all the lacing. You just have to undo the part that's getting rolled – unless you don't have enough leftover lacing on the other end, if you have to lace newly unrolled fabric. It's useful to lace with plenty extra on each end, which can be tied up. But yes, the method you describe is how you move on to the next section, if your piece is longer than your frame.
MC
You're a peach to respond. But I'm struggling to see clearly a way to roll the linen without removing all the lacing. Here's where I'm stuck:
One end of the linen is stitched to each of the horizontal members.
The vertical members pass through holes in the ends of the horizontal members.
The only way I can see to roll the linen onto one of the h.m.'s is to slide the horizontal member completely off.
How can you do this without removing ALL the lacing?
(I'm grateful for your patience with a senior citizen, Mary!)
Well, if you loosen the side lacing, thereby loosening up the tension on the piece, you can then move the horizontals up or down, pulling the whole piece of fabric (and the other horizontal bar) either up towards the top of the slats, to get the horizontal bar off, or down to the bottom of the slats, to get the horizontal bar off down there.
Then, remove whatever lacing you need to, to roll the fabric up – or, or unroll whatever you need to unroll, and then lace or relace just the sides that are parallel to the vertical slats and tighten them (and the horizontals) up again.
Yikes. I hope that makes sense! Kind of confusing, but perhaps it is a bit clearer?
Let me know!
MC
hi, how do you do with the reverse of the embroidery for the thread termination, i mean, you can finish the thread for the upside of the embroidery? sorry about my english, i am from chile, thank you
Hi, Alexandra – yes, it is rather large to turn over to end every thread. I end my threads on the front, in a place where they will be covered up by other stitches.
Hope that helps!
MC
thanks may, i think i can understand you… 🙂 do you know some site about that, for i can see really how work that… thanks dear
I realise this comment is wildly out of place, but I just wanted to let you know that thanks to This picture tutorial of yours I have just now dressed my own first slate frame with a piece of Elizabethan embroidery. I'm making a coif using blackwork (stem stitch) and silver metal thread, and I didn't have a round frame large enough for the project so I asked my carpenter father to make me a slate frame. He delivered to my specifications and I have just now finished stretching my inked piece of linen in there.
Thank you!
Dear Mary
I am about to go to a crewel embroidery workshop and had never dressed a slate frame before, let alone attempted crewel embroidery!
I wish I’d found your excellent tutorial BEFORE I attempted dressing my frame the other night.
Anyway, with your help I am now much, much wiser and will be able to dress frames with confidence in the future.
Thank you so much for your very informative website.
Greetings Mary,
I am so very glad I came across this entry on dressing a slate frame. I purchased a slate frame from Hedgehog Handworks a few years ago (before they started to make their own), but even with a few different books and other web site that discuss dressing the frame, I never could get it to work. And part of the reason was that my frame came with wooden pegs, and those pegs just would not stay in place. It was fine for a temp hold, but if I moved the frame, out popped the pegs. In reading this entry the answer was there… cotter pins! with plastic tubes as ends. How wonderful!
More than just cotter pins was your clear instructions on making sure the linen itself is cut on the grain. I was sloppy, and couldn’t get things aligned right, but now, for my next project, I will take out my slate frame out of hiding in the bottom of the closet, get some cotter pins & tubes, and finally dress my slate frame properly.
Thank you so much, for this entry, and for so many wonderful and informative entries on various embroidery styles.
ROTARY CUTTER — first thing quilting teacher taught the class “After cutting, CLOSE the cutter”
After each cut, close the cutter before moving!!!
I forgot to close my rotary cutter and when my free hand ‘leaned’ across to get something, the cutter was right there to nick me — it was sharp and painless — but deep!!!
ALWAYS close the rotary cutter immediately.
Ok … getting off soapbox.
Hi Mary,
In You Tube videos on Chinese silk embroidery, I see the stitchers working on a very sheer looking silk fabric with ultra fine silk filament. There does not seem to be a backing material to their fabric. The light shining from underneath does not show a backing material from what I can see. Do you think this is correct?
(They are working with slate frames or roller frames. They seem to be using a muslim type fabric for the sides for lacing in some of them,but this looks sewn onto the sides only.)
PS. Thanks so much for the excellent directions given here!
This is a very late reply. On all the Chinese silk embroidery I’ve examined, they do indeed work on a relatively sheer silk ground. I suppose the relative fibre strength of silk makes a difference (for it’s size it’s stronger than steel). On the other hand, perhaps they are careful not to pull too hard as they stitch. When I’m embroidering on fine silk face fabrics, however, I always feel happier with another fabric in the back to provide extra support…
Thank you, Mary. It’s a great aid.
Dear Mary,
You are a godsend. Your tutorials have really been incredibly useful. Now where is that frame….
Your website is amazing! I stitched quite a bit as a kid but haven’t done it in years. So what do I decide to do? I bought a Norwegian bunad kit on a recent trip there. Now I have this horrifically expensive kit and need HELP!
I’ve looked at hoops and scroll kits, etc. I actually bought a scroll kit with a stand and it wasn’t until I got it home that I realized it probably won’t work This kit is LARGE pieces of fabric. The cape is a triangle. There’s not a scroll made that is wide enough to hold the width of fabric especially the cape. What do I do? I’m afraid a traditional hoop will leave marks on the wool fabric. Thanks for any guidance you can give. Beth
Hi, Beth – if you bind your hoop (I have a tutorial for that here on the site) and mount the wool with a piece of muslin or cotton over it, both of them in the hoop at once, and then cut a window in the muslin so you can see your stitching area, then that should protect the ground fabric. I don’t think these capes were ever traditionally embroidered on frames – I think they used hoops. Wool is pretty resilient fabric, so you should be ok!
I can’t say that I would never use a slate frame,but I do think that my level of embroidery is not up to this. This type of frame looks like it would be most useful for a larger project. At this time, I’m still in the learning process.
Hi,
I have been reading all of the information on your site for at least two years, thank you. Starting with some small and medium size kits and run into immediate problems hooping. Even thinking about framing is a little scary. Your articles on slate other frames has opened my eyes and I want to start with one as soon as I can.
Many of the “kits” have no borders. Can I add strips of cloth to the sides so I can center the design? I also have trouble embroidering the edges of the design if they are to close to the
hoop. Will I have the same difficulty with a frame, or should I have four or more inches around the design?
I love every thing about embroidery and as a rank beginner feel that I may have missed something that is obvious to the most casual observer, or embroiderer. If you can, could you please give me some advice on how to handle and solve these issues? Living in a small town there is no shop I can go to get the information. Thank you. Anna
Hi, Anna – yes, with a frame, you have a lot more room than you do with a hoop. Whenever my design is too small for framing up, I add strips of fabric to the side – that’s the best way to do it. Any easy way to add the fabric is to actually cut a larger piece of muslin, center the ground fabric over it so you have several inches (3 or 4) on each side, then use a zig zag stitch or overcast stitch on a sewing machine, and sew the ground fabric to the cotton. Then, cut the back of the cotton off, a quarter inch or so inside the sewn area. You should probably pull the two pieces of fabric apart, so that you’re sure you’re just cutting the backing and not the ground fabric! But if it’s easier, you can just see strips.
Hi Mary,
I am amazed at the complex preparation of the material! I must be rather slap dash. I have never washed my fabric before use, and I use a stapler gun to attach the material to the frame. I have never laced before, but then crewel work is a new direction for me. I love your site too, a wonderland of useful resources.
Best wishes from Wanganui, NZ.
Mary
I am soon to invest in a floor stand for needlepoint. Have you tested the Frank A Edmunds floor frame? (http://faedmunds.shptron.com/p/stitch-master)
If you had to buy just one, would it still be the Millenium frame? I don’t plan to take my work travelling at any point. I apologize in advance if I am asking a question that is answered on another post, but then – you can just direct me there! Thanks for all you do. I just wish I could find a way to do what you do – stitching and researching needlework projects and products all day long and for the majority of the days of the week!
Warmest regards
Maggie from TO (oh and Canadian sources if possible would be wonderful)
Hi, Maggie – I haven’t tried the Edmunds stand, so I can’t really advise you in that. I like the Millenium frame, but keep in mind that delivery times are generally very slow. It could take up to three or four months to get your order from the UK (which is the only place they are sold). I haven’t used them for needlepoint, but I’ve heard they work for it. I use Evertite stretcher bars for needlepoint canvas.
This is the first I’ve seen a slate frame set up. With all those layers it almost sounds like setting up a quilt.
Is it worth it? Would I try it? Absolutely. I cannot tell you how many times I’ve had to restretch the fabric pn my embroidery frame when it starts to ripple. And I’m a stickler for a taunt fabric.
Marla from MN
Mary, I am from Argentina. I love your website. All the explanations and tutorials are excellent, so clear and complete that the more I see the more I learn, and the more I learn the more I want to start a new project.
Thank you for sharing.
Congrats!
Thanks, Pamela!
Do you carry the stand for the slate fram,please let me know,l am interested to perches. Thank you
Li Wang
Hi, Li – You can find trestles for slate frames reviewed here, with a link to the company that sells them: https://needlenthread.wpengine.com/2018/05/first-things-first-my-embroidery-trestles-are-up-ready.html Hope that helps!
Hello. I love your site.
I made a slate frame, and I have dressed the frame in order to make the Guardian Angel embroidery. I saw something about attaching velvet to the dressed slate frame and then cutting out the center behind the velvet and now I can’t seem to find anything about that.
Do you know what I mean, because it would be too thick to embroider through the backing fabric and the velvet. Do you have any information on how I should proceed with this step? Thanks for any help you may have on this.
Carla
Hi, Carla – Normally, you’d stitch through the velvet and the backing fabric. The backing fabric would be what’s attached on the frame. Then the velvet is tacked onto the backing fabric, usually sewn on with herringbone stitch or something similar, before your last tightening of the frame. Then, you stitch through both layers – the velvet and the backing – and through any layer you might put over the velvet to keep the stitches from sinking into the velvet as you embroider.
Well…..I been embroidering on and off for 56 years…and never knew of this type of frame, nor of the labor involved in setting it up. It’s positively exhausting! I can understand the whys and how’s of this system…those large scale Medieval and Renaissance embroideries would have warranted this. But in the 21st Century, I will stick with hoops! I once embroidered a 3 foot square banner, but I think I stapled the fabric on to a painters canvas framing strips. Then I pried it all off, cut off the excess, and hemmed the edges.
My goodness, you opened my eyes today.