


The linen pouch I’ve been working on needs some kind of “something” to close it. I’ve seen different linen pouches with snaps or velcro or other regular closures, but I prefer to use a cord and tassel around a button. I wasn’t able to find a ready-made cord and tassel that I liked, so I decided to make them, with a button to boot.
What I didn’t like about most of the cords and tassels at local craft / sewing / hobby shops was that the tassels were either too big, or the cord was too short – and the white looked “off” next to the linen. I hunted high and low for just the right tassel while in town last week, but all to no avail, though I did bring three home, just to try.
Besides, I find that the little 99-cent tassels from places like Hobby Lobby fall apart pretty quickly.
So – I decided to make my own, which led me to pulling out some little-used equipment from the cabinet – my marudai, bobbins, and chopstick. I don’t have warping pegs — I need to get a set! — so I resorted to 2-liter filled bottles, which worked ok.
I needed a thin cord that would wrap around a small button. You can see the cord and button concept in this photo, which I’ve posted previously:

I didn’t want to do a covered button for this project, though, so I had to come up with a different idea. But first – the cord.
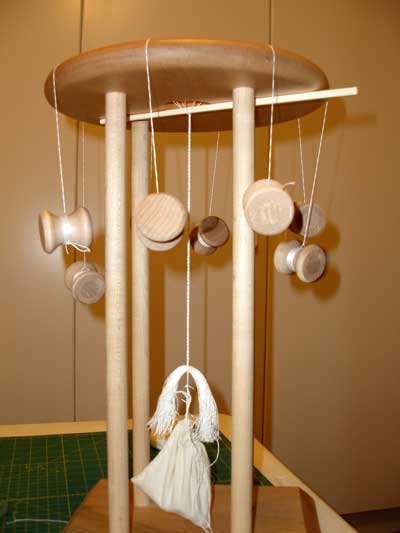
Kumihimo is a Japanese weaving technique worked on a marudai – which is a stand with a circular top (called the mirror) and four legs. The mirror has a hole in the middle of it. A woven cord is formed by working the warp threads, which are wrapped on weighted bobbins, in a certain pattern of movement, crossing them, interchanging them, etc. It’s a fun technique, and, although I haven’t mastered it by a long shot, it’s a great way to make nice looking cords, ropes, or flat straps. Normally, these are worked in silk, but I used cotton to match the pouch.
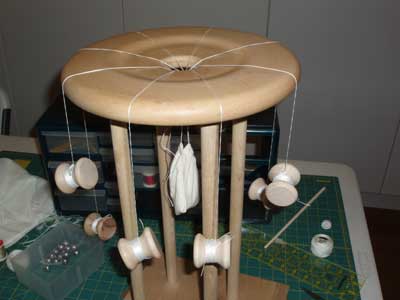
Here, you can see the bobbins threaded up and hanging over the mirror in the starting position. The counter weight on the cord is hung in the middle – in that little drawstring bag. The bobbins are 70 grams each, but I have no idea how many weights I put in the bag! I know I only put about half the quantity that I have, and it weighted less than all the bobbins, because the bobbins pulled the bag up slowly until I got underway. I didn’t want to use a lot of weight, because I didn’t want the cord to end up too thick and loose. The more weight you add in the counterweight bag, from what I can tell, the fatter and looser your cord will be.
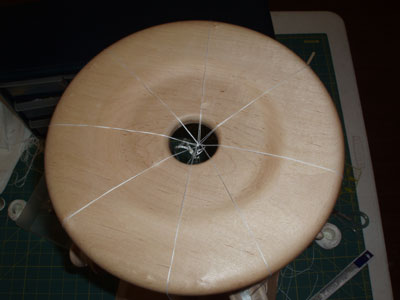
Here’s the top of the mirror. I’m using a #12 perle cotton, and only two warp threads per bobbin (so 16 threads in all). I started (I’m a moron) with 8 threads per bobbin, and realized the cord would be far too thick. Then I reduced it to 4, but luckily only wrapped 1 set of warp threads and loaded the bobbin. I knew it would still be too thick! So I reduced it to two, attached my lead threads using a Japanese knot, and set up all the bobbins.
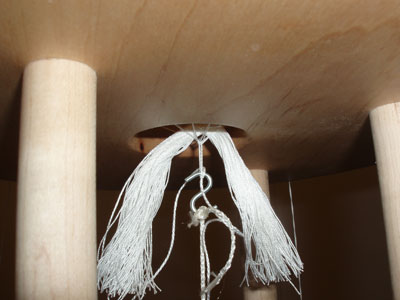
I wanted a tassel set into the end of the cord. Normally, with a Kumihimo cord, you can arrange a tassel at the end, anyway, by tying off a portion of the rope and cutting the length you want for the tassel. Then you just unweave the rope to form the tassel. But I wanted a tassel with a “head,” so I wound the #12 perle around a 3″ wide quilting ruler, until I had enough for a full tassel. I ran a thread under the top and bunched it up, then cut at the other side, and had this bunch of white threads, which I placed between two of the warp threads below the mirror.
This way, as I wove the cord, the two warp threads would hold the top of the tassel in place, and then I could finish off the tassel when the cord was finished.
I put the marudai on the floor, and started weaving. I used just a basic “honeycomb” pattern. In my head, the rhythm was basically this: “North & south, east & west, north & south, east & west, corner, corner” then repeat. If you’re not familiar with Kumihimo, this might not mean much to you! But I find I have to keep the rhythm in my head while I go; otherwise, I lose track of where I am!
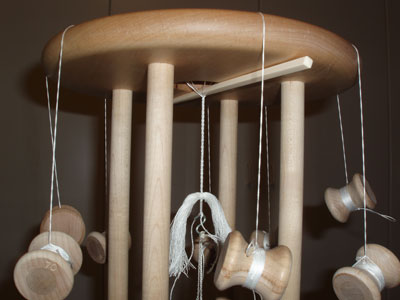
When I came to a stopping point, to check the length, I slid a chopstick between the threads and under the mirror to hold everything in place. I wanted to weave about 16 – 18 inches.
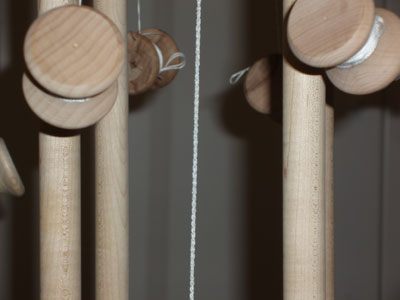
So you can see here that it’s getting pretty long (this is after about 35 minutes of weaving). The weight bag is about to hit the base of the marudai, so it was time to move it up.
The cord is nice and small, but not as small as a cord made with a single thread of the #12 on a lucet (which is what I tried before resorting to the Kumihimo cord). A lucet is a little horned “tool” (mine’s made out of wood) that’s shaped kind of like a “Y.” It’s great for making cord. I tried to make the cord for this on the lucet, because it’s only one little hand-held tool (as opposed to winding the bobbins and everything for the marudai). I realized about two inches into the lucet cord that it would be too small, and I didn’t have a larger white perle cotton to use. So … back to the marudai….
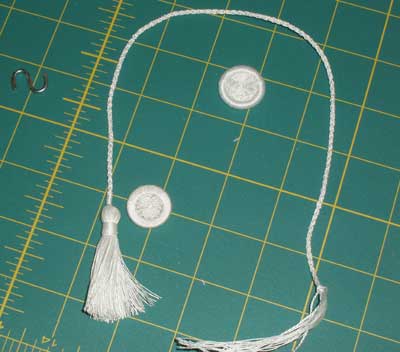
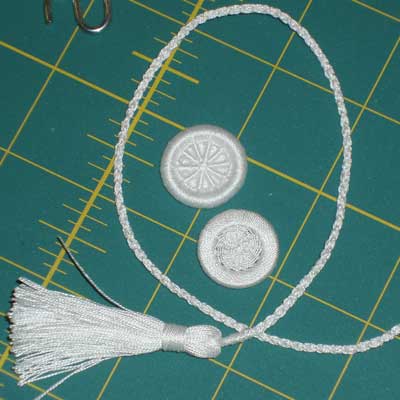
When I finished the cord on the marudai, I sewed up the tassel and trimmed it – and voila – a nice cord and tassel, ready to go.
You can also see the button choices there…
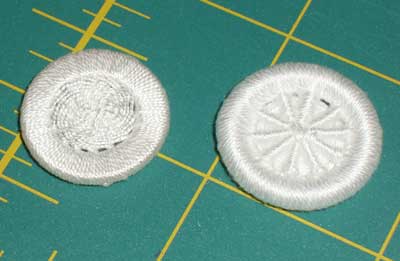
These are Dorset buttons of a sort – hand-made buttons out of thread wrapped around a ring.
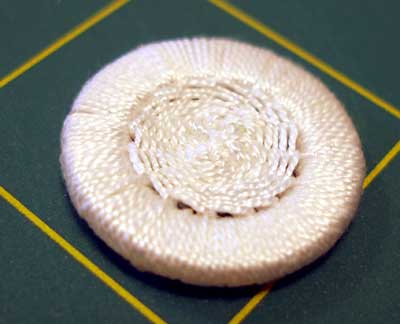
This one – you can see that it’s smaller than an inch – is wrapped around a small mother-of-pearl ring. The sides are squared off. The inside is filled with a basket-weave, working in a kind of stem stitch around the spokes. I used a #12 perle cotton on it. You can see kind of a golden rosy glow on this button, because the mother of pearl ring underneath shows through a tad, and it’s streaked with rosy-gold color. Next to the white linen, the button has a bit of a shine to it, with just a hint of rosy-goldness behind it.
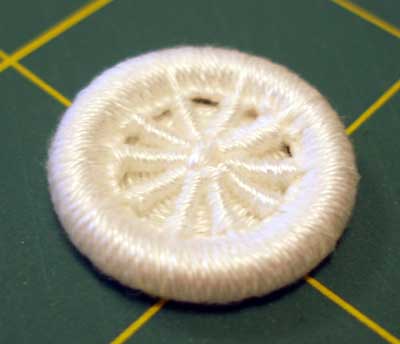
This button is just slightly larger (not enough to be noticeable), and is worked around a plastic ring, with #16 coton a broder. The spokes are covered in the same manner as a ribbed spiderweb stitch.
I hesitated about which one to use at first, but then, I considered the materials involved and the usage and the looks, and I chose… the ….
Well, can you guess????
Next, I’ll show you the finish work.
You can see the progress of this project in the following articles:
Transferring the design the first time, and setting up the pattern
Starting over – transferring the design (again) and stitching
Embroidery Completed
Ironing the embroidered linen
I can’t guess which button you used. They’re both beautiful! Thank you so much for the introduction to Kumihimo. Very cool! You are a woman of many talents, Mary. Can’t wait to see the finished project…it’s all coming together so beautifully.
– Jeannine
Wow, the finished tassle looks fantastic. I have never seen this technique before, thank you for showing us
In my blog has a gift for you is that you do not get used to this … but it is a way to thank your work, and thank you for sharing your ideas. This space is wonderful. Every day I learn something new
Is there anything you *can’t* do ??
Elmsley is right, you're a master of ALL trades & jack of none :))
As always you deserve a pat on your back!
No, no… I’m pretty sure my middle name is JACK. It’s the theme of our family – jack of all, master of none. Rrrgh. One of these days, I’ll master something. Problem is, I just can’t decide what!!!
Thanks, Meeta, and everyone! Stay tuned for the finish product…!
IMHO, I think the spider web button would be perfect on the bag.
Thank you for introducing another way to make a cord and a better way to make a tassel.
How accomplished you are! I’ve resisted the temptation of purchasing all of the marudai equipment etc. though I have to admit I’ve been tempted many times…I didn’t realize you could make such beautiful tassels. Thanks for the post.
Like Susan, I’ve been resisting a strong temptation to get a marudai kit and take some lessons for a long time. Fascinating post, thanks.
CA
I find all this so fascinating! Can’t wait to see the finished results!