


Usually, my embroidery classes for kids end when the summer comes to a close, and I don’t really think about children’s embroidery projects again until the following spring. But that changed this year, with the phone call of a friend.
I have a friend who is a teacher’s aid for a fourth grade class of 29 students. She thought it would be fun for the kids to do a little embroidery project for art class, so the other night we met and bounced around some ideas, using scraps of felt and bits of thread leftover from last summer’s classes.
Since she’s thinking the project would be good for the last three weeks before Christmas break, we migrated towards the idea of little individual tree ornaments made out of felt.
I didn’t have a lot of felt on hand, since we used it up last summer, but I did have a length of dark brown wool felt that served for mucking about on. This is what we managed to stitch up while we were discussing possibilities:
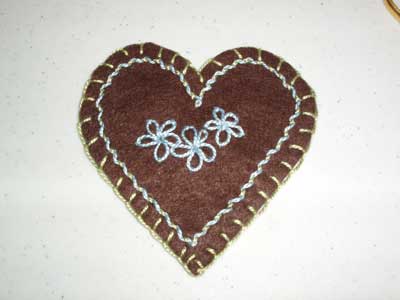
The colors are not, overall, too appealing for fourth graders, but that can be adjusted. But the concept is there: basic embroidery on the front in a cute design (not necessarily this one!) backed by a second piece of felt, and buttonholed all around. Simple enough.
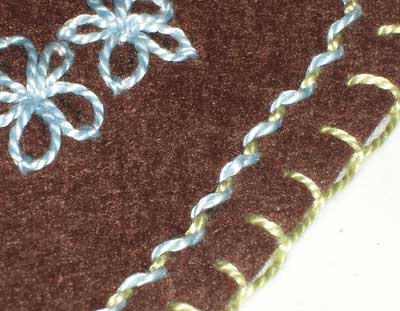
We only used three stitches, really: whipped running stitch, daisy stitch, and buttonhole or blanket stitch around the edges.
But this is the thing…
My friend has never (that’s right, never) embroidered before! So … not only will this be a crash course in simple embroidery (she won’t have a problem with that), but also a bit of a crash course in how to organize for such a project and how to teach it in a logical and ordered way to a class of 29.
These are some of the pointers I’ve given her:
1. Limit their options. As we were talking and enthusiasm was abounding, we came up with all kinds of possible shapes for ornaments: gingerbread folk, houses, trees, hearts, ornament shapes, simple bird shapes, simple flower shapes, etc., etc., etc. Oh, I agree they’d all be cute… but with 29 students on a first-time project, limiting the students’ choices will help minimize confusion.
2. Limit the number of stitches for instruction, and keep the stitches simple. I suggested instructing on no more than four basic stitches.
3. Limit the number of colors for the projects – again, I’d limit them to four.
4. Pre-design the ornament, drawing out the design on it. This is where there can be some variation – draw different designs on the ornaments, so that they aren’t all exactly the same. This will give the students a sense of individuality, but it won’t leave the burden on them for deciding “what to do” on their ornament. If the designs are pre-printed on the fabric, they can start on the projects a whole lot faster!
5. Plan everything well in advance. Make sure all supplies (felt cut-outs, threads, plenty of needles, etc.) are all on hand, and divide up a little package or kit for each student. Use zip-lock bags, so they have something to keep the project in. Plan the instruction out in step-by-step increments, allocating enough time to each step.
6. Print out a picture diagram for each stitch, and give a photocopy of each to the students. Maybe even make blown-up copies of the diagrams to use while instructing on the stitch. If they can look at the diagram as you walk them through it, then they’ll be able to understand the diagram better and can refer to it for help on their own (whether at home or in the classroom).
7. Plan for small group instruction. While the whole group is occupied with a task, break off into small groups to give more individualized instruction.
8. Make sure to plan in enough quiet stitching time, in which you can circulate and help individuals, and in which the students can get the “rhythm” of the stitch down.
9. Although there will be two instructors in the room, perhaps consider finding one other assistant to help out. 29 first-time little stitchers will have lots of unthreading needles!
So those were my recommendations. I’ll be teaching her the basics of embroidery over the next couple weeks, and we’ll narrow down ideas and make supply lists for this series of embroidery classes.
My question to you: Any other suggestions for this venture? Or any alterations on my suggestions above that you think would be helpful?
I’ll keep you posted on how it goes!
Other news:
If you haven’t signed up for my October stash give-away, don’t forget! The deadline is Tuesday morning, 5:00 am my time. See the details on the original post.
In Country Bumpkin’s e-mail newsletter that I received this morning, they also mentioned the advantage for overseas shoppers that I mentioned yesterday. A year’s subscription to Inspirations is averaging just over $50…. much better than $70 and higher, so it really is a good deal!
Enjoy the weekend!
Mary,
A couple of extra suggestions, learned from experience!
Have a couple of sturdy needle threaders available, I use a metal one with hooks on both ends and put it on a lanyard around my neck.
Definitley go with pearl threads to start, and I’d pre-cut a few lengths for their kits. I like kits, but I always have some extras available for that child who always says “but my favourite colour is pink!” when the kit only contains red, green and yellow.
I usually go with crewel size 6 or 7 needles, sometimes 5’s if the thread is thicker. Bigger eyes mean less furstration threading (usually!)
Hope this was helpful,
Hooroo,
Christine.
http://missmuffettwo.blogspot.com/
Hi, Christine –
Thank you! Good suggestions!
Yep, we’ll be using pearl #5, and I prefer, for the kids, a #3 needle. Threaders are handy tools, and I’ve got a few we use in our summer classes, so I’ll definitely suggest having those on hand. Perhaps it would be best to go with two design options and two color scheme options, each color scheme option having a range of four colors in it. Something like that….
Thanks again!
MC
Hi Mary,
Have you considered adding one or two sparkly beads – nothing complex – to the design? It might be a way to add personal expression without creating too much trauma for the instructors, and 4th graders do like the ‘bling’ factor.
And I’m sure you already know this, but please advise your instructor to be ready for the left-handed child. A tiny difference in the overall picture, but to a young child it can seem huge.
Thank you again — I learn something every time you post.
SF
Hi, SF –
Thanks very much for your comment and input. We discussed using a decorative button or something along those lines – I wonder if a fancy bead or two might be better. We have to keep the cost as low as possible…
Good point about the left-handers. That’s something that took me by surprise the first time I taught kids. I had forgotten about that little difference, which is actually a mammoth difference to the kids! I invested in a couple books on left-handed embroidery, just to have them available for reference and diagrams, and they were a great help last year. I’ll have to touch on that point! Thanks for the reminder!
MC
If she can round up another few helpers that would make a big difference. Most children that age won’t have any experience with sewing, so breaking the class down into groups of six or so would make it so much easier.
Drawn to this post by a search for teaching children to embroider. I do have a comment. I am currently teaching 90 students embroidery. Most of them have never threaded a needle before. I have been teaching at the same school for many years and have a tried and tested and constantly adjusted system. We start with cross stitch on 8 count Aida, # 20 tapestry needles and perle # 5 thread. It takes about two sessions of thirty minutes to have most of the third graders stitching confidently. This is a year long endeavor and by the summer the students are confident embroiderers using different stitches and choosing colors with pleasure and aplomb. I have been volunteering in a local elementary school and the teachers treat this class as art, social studies, math all of which feature in embroidery. Needle threaders are a must. 5 to a class. Good luck.