


Drawn thread embroidery is not relegated solely to even-weave linen. Today, we generally associate drawn thread techniques with even-weave, and it’s true that it’s possibly easier and more precise when it is worked on even-weave. But in the past, drawn thread embroidery was worked on all kinds of fabrics, including fine, high-count cottons and plain-weave linens.
A couple months ago, Laurie LaTour contacted me about some chicken scratch (embroidery on gingham) aprons that she had collected, with a question on an embroidery stitch employed on one of the aprons. We’ve been exchanging interesting e-mails ever since, and wow – some of the chicken scratch aprons she’s collected are really nice! One in particular caught my eye – a chicken scratch apron worked on cotton, with double drawn thread strips worked on the apron’s front and the pockets. It’s meticulously worked and really pretty! (Update, 2018: The links to these publications / pictures on the sites they were hosted on no longer work, so I have removed them. Sorry!)
Discussing the different stitches with Laurie led me to working up a tutorial for drawn thread on gingham, to show how to twist groups of threads together for a decorative border.
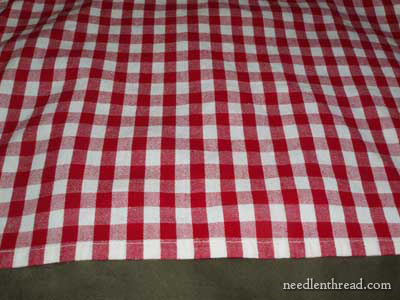
I began with a simple gingham dish towel. It’s a soft cotton towel and hems are squared up with the gingham, so it’s perfect for this kind of work. I’ve washed it once already, and you can see that the colors didn’t run, which is great! It’s a good towel!
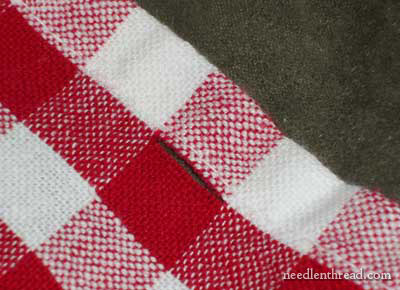
When I first started, I was going to make the drawn thread area only as high as one row of checks on the towel, so I began by cutting a slit right next to the side hem, abotu six rows of checks up on the towel. (Later, I decided to make the drawn thread area twice as high, which you’ll see below…)
About every three or four checks, I cut a vertical slit between two vertical threads, so that I wouldn’t have to draw out long horizontal threads.
When you cut your horizontal threads, you want to use nice sharp, small scissors. Fold the fabric over the blade of the scissors to that you can see the horizontal threads you are cutting and so that you avoid accidentally cutting any vertical threads.
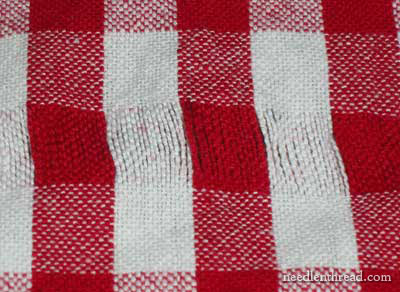
With this weave, it was very easy to draw out the horizontal threads. I used a tweezer and just picked them out. Though it takes a little bit of time, it’s not labor-intensive or stressful – the horizontal threads just pull right out, and removing the threads actually goes very quickly.
Once I was finished drawing out the threads, I hemstitched the base of the strip using a #5 white perle cotton, and dividing the threads into two groups per check on the fabric.
I didn’t count the threads – I just estimated the center of each check, which worked fine.
If you don’t know how to hemstitch, check out my photo tutorial for the hemstitch.
This is the exact technique I used, and it’s really simple. I was working in hand (no hoop or anything) for this, and it went very quickly.
After getting to the end of the first row of hemstitching, at the base of the drawn thread area, I decided to go ahead and increase the height of the drawn thread area by removing the horizontal threads from the row of checks above. Then, I turned the work 180 degrees and hemstitched across the top of the area.
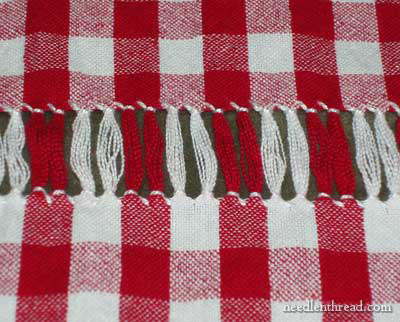
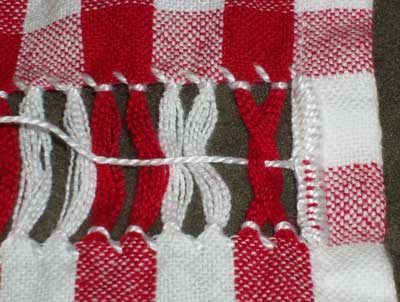
This is what the towel looked like with all the hemstitching done. You can see the two groups of threads for each check – two red, two white, two red, etc.
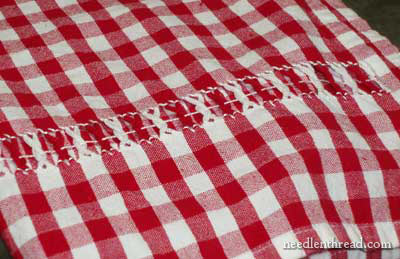
After I finished hemstitching, I decided to go ahead and buttonhole the edge of the hemstitched area.
Up to this point, I had not done so, because the edge was on the seam and I didn’t think it was really necessary. It probably isn’t absolutely necessary, but in case it would fray, I figured I might as well finish the edge.
I don’t really like this buttonholing here. It’s rather thickish and lumpy, but since the towel has a bit of a “rustic” look, it’s ok. If I did this again, I’d probably finish the edges with a simple overcast stitch (like the satin stitch bars you can see in the hemstitch tutorial), and maybe even in a finer thread.
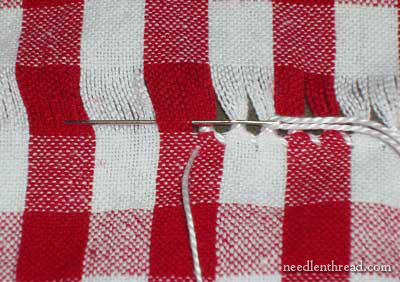
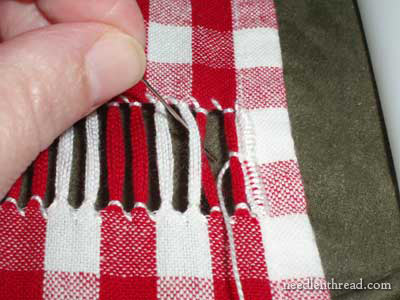
Now it’s time to start twisting the groups of threads. This part is really easy, and it goes really fast! There’s nothing to it.
First, you’ll want to cut a length of thread about 5 or 6 inches longer than the width of the towel. Thread your needle (I’m using a tapestry needle with a large enough eye to accommodate the perle cotton), and then anchor your thread by running it under the stitches on the back of the buttonhole bar. You want your thread to emerge right in the middle of the drawn thread area, which is conveniently marked by the edge of the two checks.
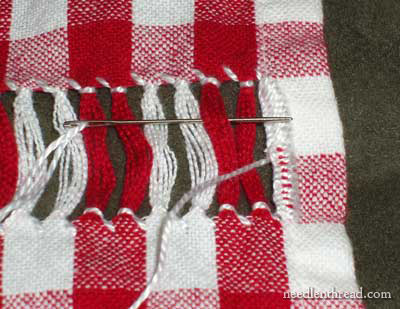
The direction I’m working here is right to left, but to twist the thread groups, I’m taking my needle under the second group of threads from the edge, pointing back towards the edge. The needle goes under the second group and over the first group (which is the thread group right next to the edge.
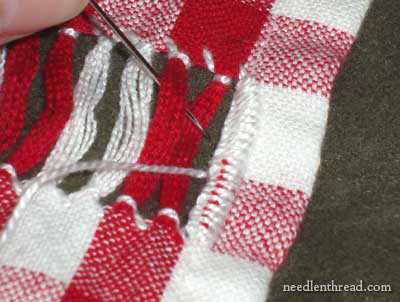
Once the needle is in position – under the second group and over the first, pointing towards the edge – you’re going to flip the needle so that the eye is now next to the edge, and the point is pointing down towards the far left edge of the towel.
When you flip the needle, make sure you push the first group of threads underneath the second group.
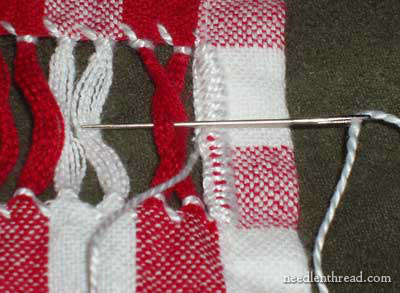
Now you see that the needle is pointing in the direction that you’re working – that is, from right to left. The twist is held in place right now by the needle…
… but once you pull your thread all the way through, the twist will be held in place by the thread.
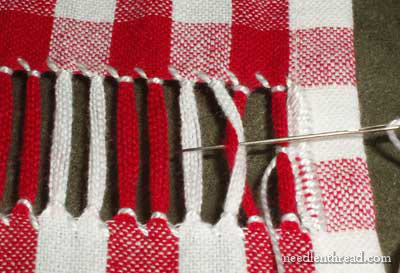
Continue down the line in the same manner, pointing the needle backwards, under the second group of threads, then over the first, flipping the needle and pushing the first group under the second, then pulling the thread through.
When you get to the end of the drawn thread strip, take your needle to the back of the buttonhole bars right in the center, and anchor your thread by running it under the bars a couple times.
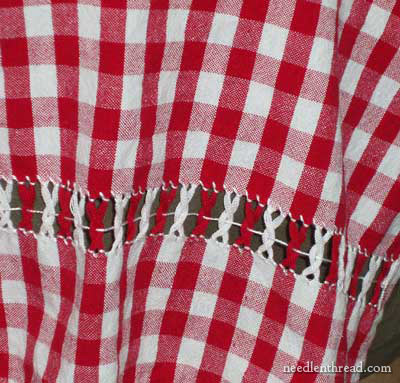
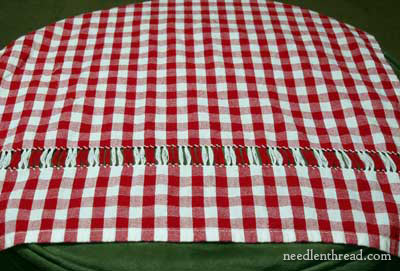
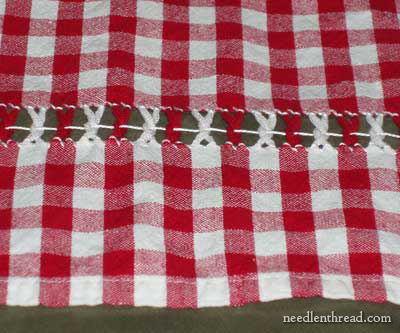
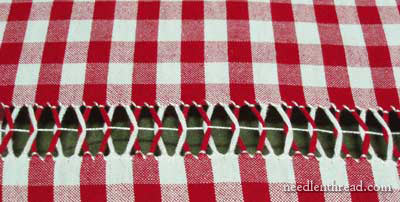
And that’s what the finished towel will look like.
I like the way it turned out!
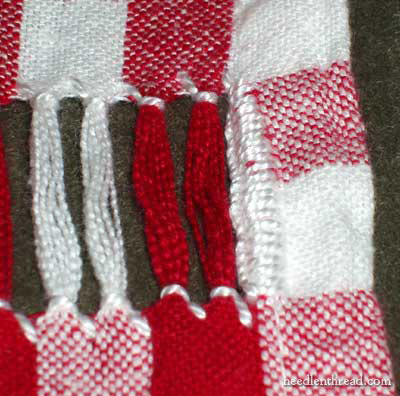
Now, on the apron that I mentioned above, the stitcher used each check as a group of threads, so that the twists were made up of two colors. You can do the same thing, or you can still divide the checks into two groups (using hemstitching) and alternate the twists to make a kind of diamond pattern, as I did below:
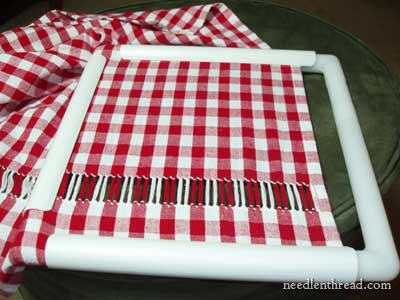
First, on this time around, I thought I’d try doing the twisting part with a bit of tension, to see if it made any difference. I used a Q-Snap frame, but left one edge “unsnapped.”
Using the same method as above, I anchored my thread in the buttonhole bar and brought it to the front, working from right to left.
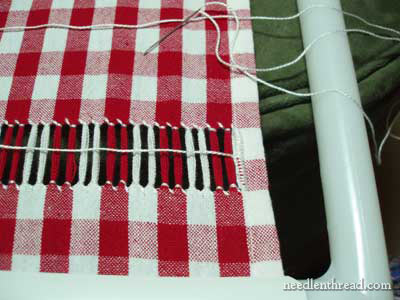
Because I wanted to use alternate colors, I had to anchor the first (out of two) group of red threads to the side of the towel. Then I proceeded to twist the threads as described above, but using one white group and one red group.
Pointing back towards the edge, the needle went under the first white group of threads, over the remaining red group…
… and then I flipped the needle to reverse its direction, pushing the red group under the white group with the tip of the needle.
I continued in that manner down the strip, ending by anchoring the last red group of threads against the edge of the towel.
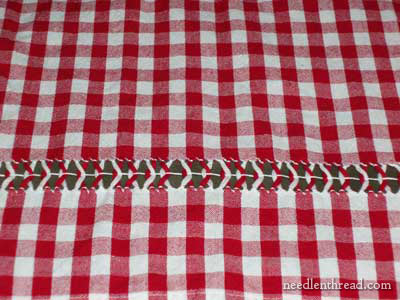
This worked ok, and made an overlapping diamond pattern in the drawn thread area. But guess what? After trying that, I took it out and worked the first method on the towel again. I like the finished look of the first method better, personally. But at least you can see that there are options in the way you go about bunching and twisting your threads.
Concerning tension and hooping and so forth, I found this project very easy to work in hand, without a hoop or frame. For the twisting part, if you can lay your fabric down on a surface and smooth it out, you can work easily without a hoop. You just want to be careful that you pull the center thread firmly enough to keep things from sagging, but not too firmly to where it pulls on the end and makes the towel pucker. In fact, if you lay it out on a cloth surface – like an ironing-board cover (or the top of a footstool, like I did!), or even on your self-healing cutting matter, the friction will help hold the fabric in place (better than working on a slick surface!).
Now, if you really wanted to, you could decorate the towel further with other embroidery. But I like the simple drawn thread area, and I think it would be really nice on a summer picnic tablecloth, with matching napkins. In fact, wouldn’t that make a great gift? A matching picnic set and hamper, or something? Hmmm…. I’m thinking summer wedding presents… summer birthdays… just something nice for the family gatherings…
Enjoy!
I like how every other ‘section’ is either red or white. I know that stands to reason when you think about it, but it simply hadn’t occurred to me. Interesting effect!
I like the way this has turned out. I am becoming more and more interested in the combination of two or more techniques that traditionally were not combined.
I love it, Mary! I adore chicken scratch and other “false” laces, but drawn gingham is a whole other field. I am itching to try it myself. Since you were testing out various ways to twist the strands into a pattern, may I suggest that you substitute a ribbon or cord or something more decorative than thread to create a pattern. It will give a more woven-pattern look as a band built into the fabric. Try it, please, and post pictures!!
An addendum to my previous post; I checked out the PDF apron and was really taken by the waistband “smock” structuring. The apron was done in imitation of English Smocking and Pin Tucking (no elasticity) Original Smocking is done on flat fabric and creates built-in elastic effect. I think this rigid English Smock/Tuck was a very original way to create a waistband/belted area.
I’m glad you all like it! It’s a fun and interesting way to add a personal touch to a towel – and it works up very quickly.
Great idea on the ribbon addition, Laura. I think I’ll try that or something similar. I wonder what I have in my stash that would work….
MC
This tutorial rocks! I just put a link to this post on my blog. Hope it brings you a few extra visitors.
Denise
http://needlework.craftgossip.com
As an embroidery dabbler, I have to say that this is one of the best tutorials I’ve come across in a long time. I recently read an article about drawn thread and felt a little intimidated by the technique; now I can’t wait to try it out. Thanks so much!
Thanks, all, for the enthusiasm! Anitra – trust me! It’s really easy, and it works up quickly! Have fun!
Beautiful! I love chicken scratch but I never thought of doing drawn thread with it. Oh the ideas 😀
Beautiful and so easy indeed!
Mary, this is truly lovely!! Thank you so much for taking time to explain how to do this & where to find the cotton towels. I am inspired to try this on an apron! How well do you think the towel will hold up in the washer/dryer, or should it be hand washed. After all this work, I guess I know what I'd do!!
Blessings to you!
Laurie
Found your blog through Nordic Needle and just LOVE it. I would like to do this gingham project. Went to All About Blanks and all they current sell is the micro check towels or the “gingham” with an intermediate stripe. Would these towels also work with this technique?
Thanks.
Hi, Marilee – Thanks for your comment! I think the technique works better with the medium sized checks, rather than the micro checks, though I suppose if you were working “small” it would work. I’m not sure what would happen with an intermediate stripe. I’m trying to picture what you mean, but I’ll have to go find the towels and see what they look like. I’ll see if I can find them…. ~MC
Gracias: todos los temas son muy amenos y muy lindos,dan ganas de trabajar aunque no sea de la misma calidad y belleza.
I have a long family history of “chicken scratchers” and as a bratty child received many wonderful, and woefully under appreciated, gifts using this technique, including aprons and a full length dress with apron.
Now that I am just about to turn 65 I am building up to actually trying it myself.
Thank you for the information!
That Christian homemakers site does NOT work.
Thanks, Marny – I removed the links!