


The hemstitch is commonly used in drawn thread work. While adding a decorative edge to a drawn thread area, it bunches together the remaining threads. These bunches of threads can then be further embellished or arranged.
Now, hemstitch is a strange name for the stitch, you might think, but before drawn thread work was done for mere decoration, the hemstitch served a very practical purpose. It… hemmed. By withdrawing one thread from a piece of linen near the edge of the fabric, the sewer could turn up the remaining bit of linen and catch it in the hemstitching, which was pulled slightly to create a small decorative edge above the hem, thus accomplishing the utilitarian aspect of hemming and the decorative aspect of pulled thread. Sometimes, no thread would be withdrawn from the fabric – the hemstitcher would rely on the pull of the hemstitching to create a small pulled thread line just above the hem.
Hemstitch is an easy stitch! Before delving into it with drawn thread work, you need to secure your edges of the drawn thread area, either by re-weaving them or by using satin stitching, and you need to withdraw the horizontal threads from the band. Then, you’re ready to hemstitch.
In the following photos, I’m using #25 coton a broder on 36 count linen, with a size 24 tapestry needle.
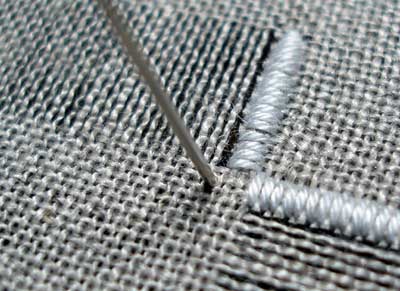
Begin by bringing your needle up in the fabric two threads down below the last empty line next to your satin stitch band or your re-woven edge. You’re one space over from the edge and two threads down.
If you’re grouping two threads together, you’ll take your needle behind the two threads and out again to the front.
Pull the thread through…
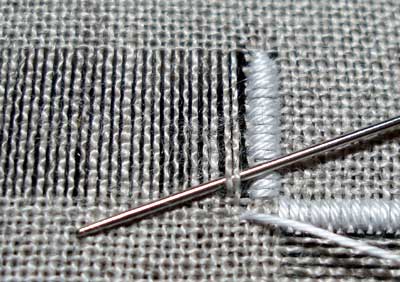
Then take your needle back behind the same two threads (so that your working thread wraps around the two threads), angle the needle down, and bring it up into the fabric two threads down from the edge, positioning the needle for the next stitch.
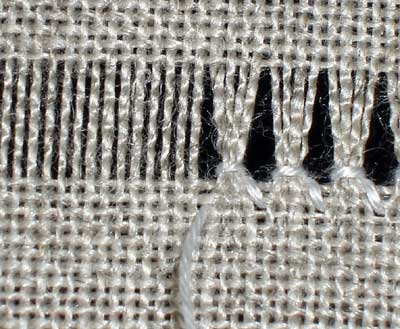
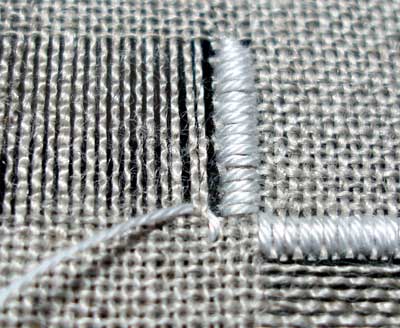
Pull the needle through, and tighten the stitch around the bunch of fabric threads. You can see here that I switched to a photo of four threads being bunched together, to give you a better idea of bunching. If you do not pull the thread firmly, you won’t get nice bunches, which is what you want.
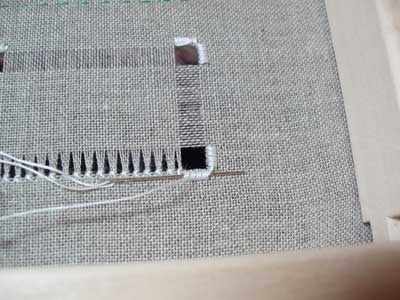
Now, continue working the hemstitch towards the end of the band, then run your needle and thread under the satin stitching at the end of the band to secure it.
Ta dum! You did it. Simple, isn’t it?
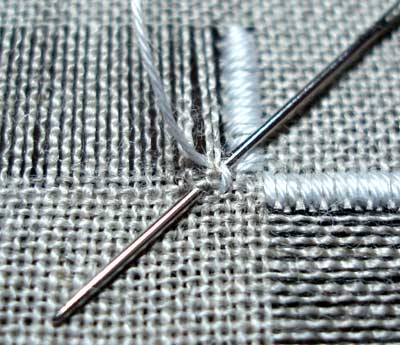
If you are hemstitching around a square, as I was in the last piece where I’m bunching four threads together, when you get to the end of the band, don’t end your thread. Instead, do this:
Turn your work over… (the photo above is the back of the work). Take your needle under the satin stitch band that runs horizontal, like the line of hemstitch you just finished…
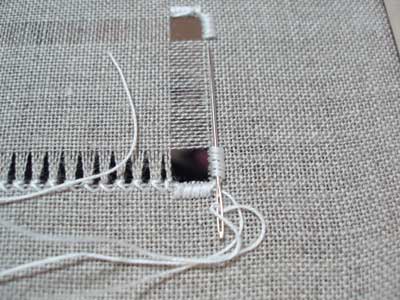
… then up through the next satin stitch edge, which positions you to continue hemstitching along the next side of your square.
And that is the hemstitch. It’s a very simple stitch, don’t you think? There are other variations of hemstitch, actually, but this is the basic hemstitch, most commonly used in this type of embroidery.
I hope you try it, and I hope you like it!
Enjoy!
This is a great tutorial Mary – hemstitching is almost therapeutic, isn’t it? I have been playing with drawn thread too – in fact I have another little piece finished just needing a photo for the blog – mine doesn’t look nearly as good as yours but I have enjoyed myself and that is what embroidery is all about.
I just l-o-v-e make this, Mary!
I make it in a different way: from left to right on wrong side, don’t ask me why… is this bad???
I learn by myself, looking at magazines and some old pieces, so I’m not sure about my way…:)
and thanks for your tutorial
Mary, thank you, thank you, thank you for making this so very clear!! It’s so easy to understand. Your high school students must love you as their teacher, you explain things so well. I know I can do this now!
Marilyn
Does this mean you’re keeping with the original fabric for the remainder of the “white on white” project? I love it! Really beautiful, Mary!
Mary, do you by any chance have any web resources for those special stitched and needlewoven bands found around hems?
Thanks!
Hi, Joey!
I’m not sure if I can picture exactly what you’re talking about. It sounds like hemstitching, but with some sort of decorative something above it? Does the technique have a name?
Hmmm… Thinking, thinking… Can you post a link to a picture of the technique?
Thanks!
MC
The tutorial is WONDERFUL! I would like to know how the actual “hem” fabric figures into the equation when this stitch is used for hemming (i.e. hankies, tablecloths, etc.) In the hope of not sounding too ignorant, could you explain this. I assume the hem “fabric” is folded to produce a clean edge and that edge is incorporated into the stitch. So do you to through all of the layers with the tapestry needle? I would like to do tablecloths and other reproductions of vintage linens. Thank you in advance for your assistance. This is a very valuable site!!
Hi, dottyeb –
Yes, that’s right. The hem is turned up to the base of the line of withdrawn threads, then the stitch is worked as shown, picking up the folded edge of the hem. Normally, the corners are mitered before you actually begin the hem stitching. No, with “real” hem hem-stitching, I would use a regular crewel, chenille, or sharp as far as the needle goes…
Hope that helps!
MC
Is the withdrawn thread the fold line, or is it where the edge of the folded up piece of fabric ends up? I'm having a hard time picturing it in my head, and I'm making a table cloth too. Thanks for your help!
Oh, I found a vintage reference with drawings, here:
http://www.vintagesewing.info/19th/1892-sn/sn-03.html
Hello
Iam living in Iran- Tehran.
Iam really glad to meet your site
Such clear instructions and pictures! I had been searching the internet for information on drawn thread embroidery and I am so glad I chanced upon your instructions. They were the best! I live in India and am very interested in embroidery – cross-stitch, crochet, tatting and drawn thread embroidery. I agree with someone who had posted comments on your website, it is certainly therapeutic. Thank you so much. Best wishes, Prabha
I’ve poured over your site and am so very inspired. I have been sampling the drawn thread work and am having difficulty with two specific areas. When I use the satin stitch at the end, my cut threads pull out and leave a couple threads with the satin stitch wrapped around it. I then thought I would just pull the stitches completely across the material (looking at patterns in the DMC book) but then I am left wondering how to finish the edges. Any help you could be would be appreciated.
Thankyou this is just what I needed.
Fantastic work
your directions are great and clear, but it is still difficult for a left hander. Are there any sites teaching this method for left handers.
Hi, Eileen – I don’t know of one like this for lefties, but I can recommend a good book! It’s called the Left Handed Embroiderer’s Companion, and I reviewed it in depth here: https://needlenthread.wpengine.com/2009/12/left-handed-embroiderers-companion-by.html
Thanks again for such a helpful tutorial! So, if you actually wanted to HEM with this stitch, do you have to roll the cut edge at all, or just catch it in? I’m a little bit lost…and most of the instructions I can find are assuming the stitch is only decorative. Thanks for any help you can give!
Hi, and thank you for such a wealth of information and clear teaching! This site is a gold mine. I am wanting to do some simple drawn thread work on the edge of a linen crib sheet, and would like for the hem stitch to be a functional hem. I’m a little lost however, how to turn up the edge and catch it in the stitch…and all the instructions I have found online are assuming it’s simply decorative. Any help you could offer would be much appreciated! 🙂
When hemstitching the inside edge of ladder hemstitching, how would you finish off a thread and start a new thread?