


Last week, I showed you how to re-weave the threads withdrawn from the fabric in order to produce a “clean” edge for drawn thread embroidery techniques. Here’s a little easier way to finish the edge of a drawn thread area.
This is perhaps the most commonly used technique for making an edge around a drawn thread area or an area of cutwork in embroidery. At the edge of the area where you want to withdraw threads, satin stitch over three or four threads to block the threads from being able to unravel from the fabric.
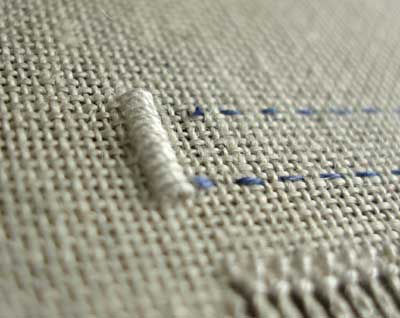
For the satin stitching, you want to use a thread that covers well. If the thread’s too thin, the fabric will show between the stitching and the edge will look really ratty. If it’s too thick, it’ll end up distorting the fabric. Here, I’m using a #12 perle cotton in 32 count linen. It worked ok.
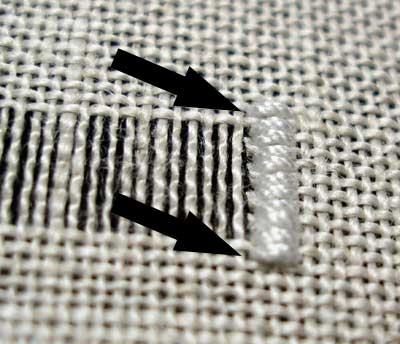
Your satin stitches should be worked one stitch beyond the withdrawn threads. In the photo above, the arrows point to the hole after the last thread along with the withdrawn area.
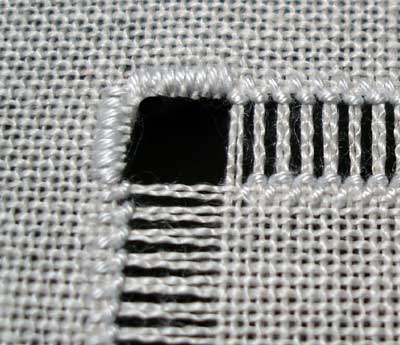
If you’re withdrawing horizontal threads, your satin stitch blocker will be vertical. If you’re withdrawing vertical threads, your satin stitch blocker with be horizontal. If you’re withdrawing both horizontal and vertical threads, you work the satin stitches on a corner, as shown above.
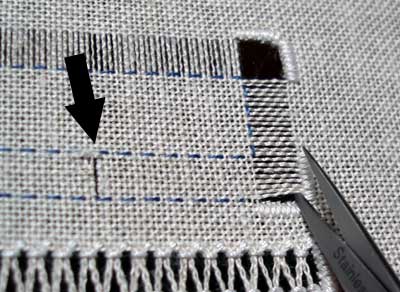
Once you have your blockers stitched, you cut the threads heading into the blocker, right next to it, using a pair of fine, sharp scissors. You can cut the threads at the opposite blocker and withdraw straight across the strip, but I prefer to cut in the middle of the strip as well, to shorten the threads that will be withdrawn. It’s just easier to withdraw shorter pieces of thread!
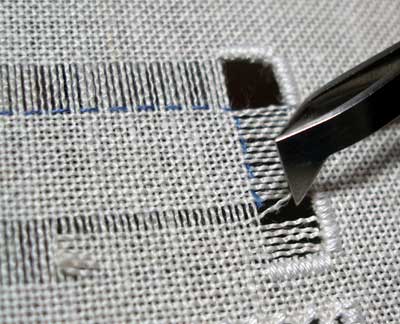
In fact, if the threads are short enough and loose enough in the fabric, you can simply grab each thread individually with a pair of needlework tweezers and pull it straight out of the fabric without having to pry the thread at each weave. It makes a nice zipping sound, and, in a wink of an eye, it’s done!
The little fuzzy ends of the cut thread that are sticking out can be “wiggled” into the satin stitch area by running your needle under the satin stitching and moving it back and forth. I kind of “roll” the stitches towards the edge, and that helps pull the little cut edges in.
The advantages to satin stitching the edges like this are several:
1. Golly, it’s easy compared to re-weaving the threads! It takes a lot less time.
2. There’s something decorative about it.
3. The satin stitch blockers provide a great place to run your threads under for anchoring.
Now you’ve learned two ways to finish the edges for drawn thread work – re-weaving the drawn threads or using satin stitch blockers. Either way works. Which one you use depends, I suppose, on the look you want.
Enjoy!
Okay, I don’t get it. How does satin stitching parallel to the threads to be withdrawn prevent them from going anywhere?
Why not use a buttonhole type stitch instead?
Just askin’…. Thanks!
PA
Hi, Pam –
The satin stitching is perpendicular to the threads withdrawn…!
MC
Ah, I done got suckered by the upside, didn’t I? The satin stitches are secured UNDER the threads that are withdrawn, which pulls them against the others and makes everything stick together, doesn’t it?
Cheerfully showing my ignorance again…
Once again Mary thank you very much for these instructions and my complements on your very neat satin stitches!
Thanks so much Mary, your explanations are very clear!
Besitos
Maria del Valle
works better to do 2 rows of back stitch or running stitch under the satin. do them over 2 threads with each row on off of the other to create alternate “pulls”. Satin stitch is insufficient in my experience.
Absolutely what I was looking for. Explained in a way that a complete beginner like me was able to comprehend. Thank you
Thank you for this explanation on satin stitch versus rewearing. I am doing the snippet called sweet margarite. The drawn threads are not all long enough to reweave, as they shredded apart as I was pulling them out. Finding this article in your archives has kept me from giving up completely on this project. You are as amazing in 2023 as you were when you originally posted this. Bless you, Mary!