


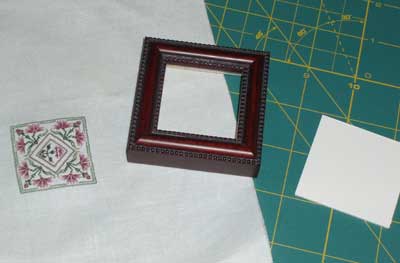
The miniature embroidery piece that I framed last weekend went together pretty well, so I thought I’d show you how I framed it, step-by-step. It was really simple, and very quick! Of course, I’m no professional framer or “finisher” – I’ve always thought it would be a worth-while thing to take a class in finish work. Either that, or to find someone who wanted to enlist as my “personal finisher.” Ha ha. Anyway…. here’s how I framed it.
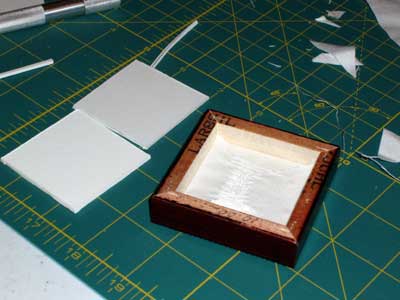
The first step was finding something to mount the embroidery on. Ideally, a piece of archival mat board works great. And, as a matter of fact, I did have a little scrap of mat board left over from another project. I knew I wouldn’t need much for this one, so it worked out really well.
Measuring the opening of the frame on the back, I subtracted one-eighth inch from the measurement to give me room for the fabric around the mat board. I cut the mat board to fit the opening perfectly, minus 1/8th of an inch. A regular utility knife or craft knife or X-acto knife works well for cutting mat board, and I just use my sewing / cutting mat for cutting mat board, too. The self-healing mats are great – not only do they serve as my base for cutting with a knife, but they serve as my ruler in practically everything!
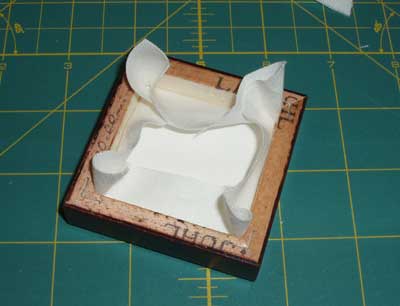
To make sure the piece of board and the fabric would fit the opening in the back of the frame, I lined up the design on the little board and pushed it into the frame. It fit fine.

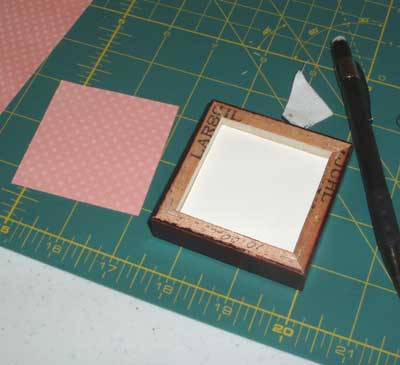
I finger-pressed the edges of the fabric around the mat board so I would know where to line it up as I worked. First, make sure your embroidery is exactly where you want it to be. Then, fold each edge of the fabric over the mat board, and run your finger along the edge, to make a crease in the fabric, marking the spot where you want the mat board to fit.
After doing that, I cut the excess fabric off the corners, straight across.
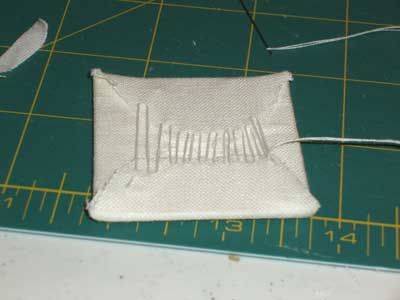
Then I folded two opposite sides over the mat board, making sure my embroidery was centered where I wanted it. With a double-threaded sharp sewing needle, I “laced” back and forth between the edges of the two sides of fabric, keeping the stitches fairly close together and pulling tightly so that the fabric was taut.
Then I folded over the two remaining opposite sides and repeated the lacing on those sides.
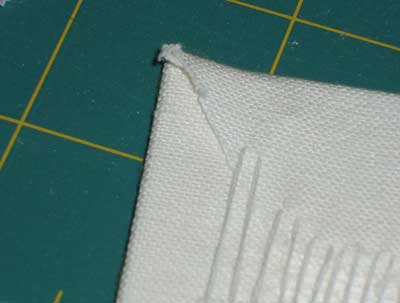
I didn’t really like the way the corners turned out – they’re so unfinished looking. I briefly thought of tucking in that little edge and re-sewing the whole thing with mitered corners, but then I remembered that no one would see it! There’s a good quarter inch all around the embroidery that is hidden by the front lip of the frame. Besides, the tweaker you see there in the photo tucked to the back of the mat board just fine. So I left it.
Next, I fitted the embroidered piece into the frame, and when I was certain that all was lining up correctly, I started working on finishing the back. I should have filled the whole space in the back, but instead, I used a smaller square of mat board right behind the embroidered piece, and then one more square of mat board cut precisely to the size of the opening, so that it fit very snuggly into the frame opening on the back.

You can see there’s still a good amount of space there. It would have probably been wise to go ahead and fill that with little mat board squares until the last piece was flush with the back of the frame. Probably, nothing will happen to it – but I still have visions of someone picking up the frame and giving the embroidery a good poke, which would dislodge it.
After fitting in the two pieces of mat board, I selected a pinkish piece of card-stock that matched the pink in the embroidery. It’s an “ok” match, anyway – not perfect, but it’s all I had on hand.
I cut a square of paper to the size of the back of the frame.
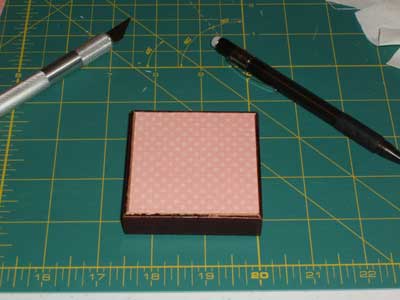
A tiny bit of glue fixed the decorative paper to the back of the frame to give it a finished look.
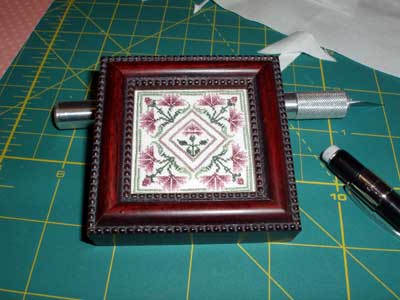
I suppose you can tell I went about this rather haphazardly, but the finished result is ok, I think. It’s nice to have it done, anyway. I think I’d like to find a teeny tiny easel to put the frame on for display. At this point, it’s just leaning against the base of a statue on the table in my entrance way. Kind of lost and small and dwarfed. But… I like it!
Now, it’s time to move on to other things! I’ve been experimenting with something drawn-threadish, and I’m hoping to be able to show that to you tomorrow, depending on whether or not I get close-to-finished today! I’m also in the middle of trying to draw a design for an ecclesiastical project I’m supposed to be working on already. I can’t quite get the drawing where I want it! Oh, where is my Muse??? And, then, once I get that going for real, I’ve got a couple other needlework-related ideas brewing (or at least half-way brewing – they haven’t come to a complete boil yet!). Now, for the invention of the 36-hour day….
Good work, Mary!
It’s a little beauty.
Great tutorial, Matry!! I’ve struggled for a while with keeping the fabric in place. Duh! Hadn’t thought of sewing it together! Can wait until next time!! Thanks again! KarenH
Very pretty!!! I like the final touch of the paper on the back. Thanks for the step-by-step instructions.
Have you ever tried the mounting board that has the adhesive/tacky side so the fabric doesn’t wiggle around? The Pres-On brand says it is “acid free, chemically inert”. I’m tempted to use it.
I love my FrayCheck… 🙂
It’s very nicely done, Mary! When you wind up with a gap, try the stapler–whack a staple into the back interior frame, partway, then bend down against the backing. You can also make a diamond of spring-steel wire which will snugly secure the whole shebang.
Nice work!
So pretty, Mary. The frame really does set off the little gem beautifully.
Cissie
Hi Mary,
Your piece looks so beautiful and thanks for the framing instructions
I’m sending you some Muse-attracter