


Frequently, e-mails show up in my inbox requesting pointers on how to hand embroider text or lettering. Here are a few of the questions on this subject that have shown up in the last couple years:
What stitches should I use to embroider a name?
I’m hand embroidering a poem on a quilt. What type of lettering should I use and how do I stitch it?
How many strands of thread should I use to embroider text on a baby blanket?
I want to hand embroider a baseball cap but I don’t know what stitches to use. Can you help me?
I’m using stem stitch to embroider a poem, but my stem stitch looks bad especially when I go around corners. Any ideas how I can fix it?
To answer all these questions and more, I’ve developed a plan…
… and I plan to work on the plan over this weekend. In the upcoming weeks here on Needle ‘n Thread, I’ll be presenting some short tutorials on embroidering lettering or text by hand.
Not to be confused with stitching monograms, embroidering text or lettering – especially multiple words – so that it looks good and is clear to read can be daunting. I want to address the subject so that beginners especially can get the hang of hand embroidered lettering without suffering too much grief along the way.
Do you have any questions about the subject that you would like to see particularly addressed? If so, now’s your opportunity to bring them up, so I can address them in the tutorials!
If you’ve embroidered lettering before, I’d love to know what your favorite stitch is for lettering!
What do you think? Will this be a worth-while series of short tutorials? Any thoughts or suggestions?
I'm super excited for this–I have all these ideas for embroidering text but never follow through with them, which I want to change. Can you hopefully include some information about designing with both text and a motif? I have all these stellar ideas but no idea how to execute them.
I think it's a fabulous idea, I always get stumped on stitching words. One year I made stitched pictures for my grown up kids for Christmas. A simple vine type border with a few berries here and there, and then I stitched a Bible verse in the center. I used outline stitch, and sometimes it looked nice and other times it didn't. I never could figure out what made the difference. I'd like to make some more, but I'd like to be sure my words turn out well. So, this is very timely, thank you for taking it on 🙂
I think this would be a great tutorial. I avoid doing lettering, though I love to do monograms, simply because it always looks like my three year old daughter got into my supplies when I try.
This is a great idea for a tutorial!! I do some lettering and struggle with it, never thinking that it looks clean and crisp like I would like it to look. Thanks I can't wait to see what you have!
I would like to see some tutorials on lettering. I've been doing quite a bit on my band sampler, but I try to keep it simple. Since I'm working mostly on even weave fabric or waste canvas, I've just used straight stitch lettering. I've found several free and simple alphabets online and graph one of those on graph paper.
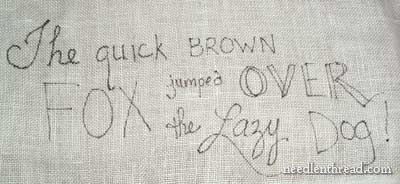
I would like to learn how to duplicate handwriting like in the "lazy fox" on your sample.
Oh yes, I would love tutorials for lettering, and am definately looking forward to that! Thankyou! 🙂
When I embroider names on my crazy quilts I use a chain stitch. I have also used the stem stitch but I think my chain looks better than my stem stitch. I will be very interested in your tutorials. 🙂
Oh !!! How Great !!! Thank You Mary !!!
I've always wondered , when embroidering letters or words in print;
If the floss/thread should start and end for each one of the letters in the word and what method for beginning and ending will work the best ?
I too have trouble with my stem stitch when embroidering letters, specially smaller ones.
Yes, yes a tutorial would be wonderful! I plan on doing some lettering on my casket pall and would love some pointers. My handwriting is very fancy, full of flourishes so not always legible to everyone. How do I make sure that the lettering is clear? I would probably use stem stitch and I can corner with no problems. Thanks for taking the time to share you wonderful knowledge.
Alice
I'm interested!
I'd like to be able to sign my name nicely on a piece
I don't have any suggestions Mary, but I know I'll be interested in following your tutorials. I never fail to learn something worthwhile from you!
Please, I would love to have access to a tutorial like this. I save all your daily newsletters for future reference. Please keep them coming.
Debby P
I think that would be a wonderful tutorial. I have tried some text and the easiest I've found is a cursive, flow-y type handwriting and a chain or split stitch.
When I use an outline or stem stitch, I have the hardest time with rounded letters like O, d, b or a.
Thanks!! 🙂
PS, found your blog about a year ago while searching for tips on how to embroider. You make some of the only GOOD tutorials out there! thank you! it's so hard for me to follow with just written instructions, but your videos are very easy to learn from.
I'm very interested in your tips and techniques for lettering!!
I too have had trouble with letter embroidery. I do this on my quilt identification as well as other embroidery. Typically I use 2 strands of floss and if a sharp corner does not lay like I would like it I will go back and take a tiny tack stitch. This may not be the proper way and would like to know more about this. Thanks so much for all your tips and wonderful work. Sue F in Mo
That would be a great tutorial! I am also interested in stitching a sig line on my samplers, I have seen others do it, and it looks great. All I have been able to do is back stitch and that is not the look I want. i also am able to "sneak" in my initials and sometimes i just want more than that. The curvy letters do present the most problem,as mentioned above, like o.
So from the big to the small, a text tutorial would be most welcome. thanks
Mary
I have done monograms and lettering for my family as gifts but it is always great to see things from a different perspective.
As far I can remember the first time I've contact you was asking how could I stitch a phrase. Then you gave me precious advises.Since then…
I'm very interested in these tutorials speccially for little letters – I like to label my embroideries by stitching made by avó méri but not always I'm well succedeed…
Absolutely! For me, whether it was stem stitch or tiny satin stitches, going around those curves was always frustrating. I'll be watching for your lessons. Thanks.
I tend to use chain stitch – I find it gives a much smoother line than stem stitch.
I think it will be very interesting to see what stitches you choose. I usually use whipped back stitch when I'm embroidering lettering, especially in a small area like the back of an ornament.
celeste
I accidentally posted a comment on the wrong entry, so here goes again. I definitely would like to see a tutorial on stitching text on fabric. I usually stitch dates and short words freehand, but use waste canvas for longer text. One can find various sizes and fonts available in counted cross stitch charts, or make up one using graph paper.
I think a lettering tutorial would be fabulous! Your videos have been so helpful to me…it's funny how lovely it is to watch people stitch.
By the bye, if you are planning on stitching the 'lazy dog' one don't forget it's 'jumps' not 'jumped'…otherwise there is no 's' in the phrase, to include all the letters of the alphabet.
Hey mary
i would love this book so i can learn a new technique!!!!!!!!
Looking forward to the text tutorial! That I can recall, I've used stem, outline, chain and back stitch for lettering, but haven't done any great amount of stitching text, usually just initials or a date. Certainly not entire phrases.
YEs,yes,yes lets do it. I have needed it several times and just had to skip that project. Pleassssssse lets do it.???? Eileene
Pointers about spacing would be very much appreciated. I'd also like to know how to embroider very, very small letters.
Mary…I "ditto" all the comments about my anticipation of a lettering tutorial! Wonderful idea! I've been making pillowcases with the grandchildren's names (14 of them) for part of their BD gifts this year. I've tried to do different lettering on each to make them unique….some in block and some in script. I've used stem, back stitch, satin, and chain-stitch varitions. I think the chain-stitch variations have seemed the easiest on the block type lettering, while the back stitch or stem stitch variations seemed best for the script. I looking forward to seeing what you have to teach us…..I always learn something new. Thanks for all the effort you make to do these for us.
Sher
Can't wait! As a beginner, this will be perfect for me. I have several projects that I would like to do and this will give me a better idea of how to tackle them.
I’m just about to start lettering on a heavy duty apron and I would love your input on the subject.
/Matilda
Brilliant! I'll be looking forward to this one after unpicking my last try at a couple of words. Different materials would be good. I was trying to use art silks and failed at it.
This would be a great tutorial for beginners. I am always confused on reversing. for example, how to make an R look better than a 'P with an abrupt tail'?
Resmi
What good comments; ditto them all. (Chain is smoother? I'll try. But bulky, right? Suitable for small spaces?) Maybe you cover this elsewhere but on stem stitch I lose track of which direction to go, that is, on which side of the stitch I should insert my needle in order to get the best curve. You probably can guess that I have a very amateurish stem stitch! And I admire it when it's well done.
Well, it depends… For large letters, I like a chain stitch, and sometimes I will interweave with gold thread, as I did recently on a Christmas Stocking. For small cotton projects, I always sign them with my initials and the year in backstitch. For small script, I like to use a combo of stem/outline, always following the shape of the curve. If it comes out a bit funky, wrapping the stem/outline stitches with matching or a complementary color often evens out the stitching and greatly improves the final result. All that being said, I would love a tutorial, as I am sure you would come up with many more ideas.
Like other posters, I look forward to your lettering tutorial(s) with great anticipation, Mary. Very timely for me–I will hold off finishing a current project pending your always-wonderful advice. Thank you!
I have two questions. How do you begin and end embroidery so that it is neat and do you always use a hoop? There are some people who interface their embroidery so that they do not use a hoop.
Great idea! I'm excited to learn.
While I've never had any issues with using stem stitch for all of my lettering, I'm always interested in seeing how others do things.
I find the stem stitch looks best if you stab all the way through the fabric and back up. It allows for much smaller stitches which make curves a lot easier. That and paying attention to the direction of the wrap so that it helps pull the line away from the center of the o's.
-Andrea
Hello Mary, I read your blog for a while now but had never posted a comment. This new tutorial is a great idea and I like the different lettering you use for the sentence. Personnaly I use chain stitch to write with a needle. But I curious to discover other way to do.
Sorry for the mistakes: I am french speaking, Belgian living in France. And congratulations for your blog as technical as friendly.
Kind regards, Laetizia
Thank you all for your input and for your insights into how you "write with a needle" as Laetizia put it (an excellent choice of words!)
The first article in this series will be up tomorrow (Wednesday, the 14th!)
Best regards,
Mary
Hurry up, tomorrow! 🙂
Mary I am new at embroidery do you go over under or continue past where a letter crosses over it self.
Thank you
Karol
[email protected]
Wow! just found your website as I was searching on 'how to embroider text' for a quilt label. Do you think I should do it on 'embroidery linen' rather than the light grey sashing material that I was planning on using?
Hi, Linda – If the sashing material is cotton, you can use that just as well as linen. The weave probably won't be as "open" so you'll probably need to restrict yourself to finer embroidery threads – such as 2 strands of cotton floss, etc. (rather than pearl cotton, which can be a bit thick for cotton).
Glad you found me! Tomorrow's post, incidentally, is #11 in the series on hand embroidered text.
Mary
thank you so much for your reply–I am really enjoying the series and the videos!
Yes, it would be very helpful for you to give a tutorial on hand embroidered lettering and text. I look forward to seeing it.
Hi, Sharon – I actually did already work a whole series on lettering and text. You can find all of the lessons listed here: https://needlenthread.wpengine.com/2009/10/hand-embroidery-lettering-and-text.html
Enjoy!
~MC
I could use a tutorial being a novice embroiderer myself, tried to crochet and it didn’t work. Embroidery is more my speed.
I love all the information on your website. I am looking for a hand embroidery pattern for cursive writing, as I want to embroider my granddaughter’s name on her christening gown. Any information you can give regarding where to locate cursive patterns would be greatly appreciated.
Thank you,
Sandra Blanks
Hi Mary,
Do you have a pattern to print your letters/writing for this because I would like to start this and my writing is awful.
Sorry for taking some of your time.
Kind regards,
Mieke
Hi, Mieke – I made a version of this design available for my patrons on Patreon, but I don’t have it available here. It’s not quite the same – it’s a little more balanced and it has a lazy dog and a fox on it, and it has a linear background, for working line stitches. You can find my Patreon page here: https://www.patreon.com/marycorbet If you don’t want to go that route, though, you can always look up computer fonts that would work for you.