


Before venturing a bit further on the hand embroidered lettering tutorials, I wanted to show you how the direction in which you stitch can make a difference in the look of your stitches. Here, I’m focusing on whipped backstitch, but the concept applies to any whipped stitch.
I’m starting with a small backstitched line, which I’ve stitched from the top of my fabric down towards the base.
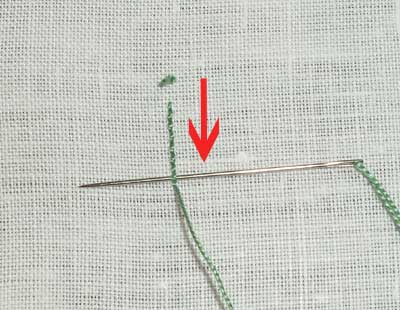
The arrow in the above photo indicates the direction I stitched the line. This part really doesn’t make that much of a difference, but you can see that, from the base of the line, I’m beginning to whip the back stitches from right to left, going back UP the line.
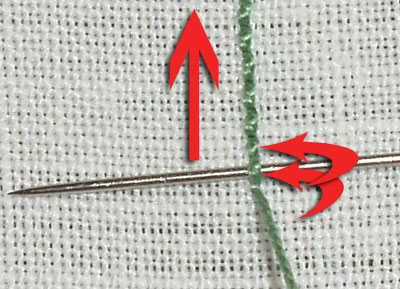
I’m going to whip each stitch, going in the same direction – up the line – and working my needle in the same direction, from right to left, as the curved arrows indicatel
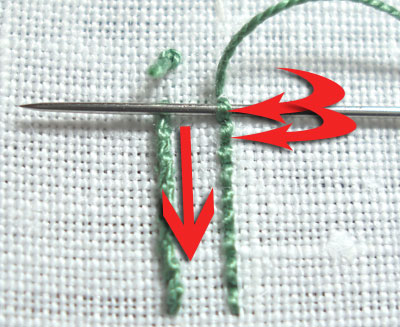
After whipping the first line of backstitch, I stitched another line right next to it, and as you can see in the photo above, I began whipping the backstitch at the top of the line, working DOWN towards me, and still whipping the stitches from right to left. The difference here is the direction in which I am traveling, which is down the line instead of up it, as I did with the first line.

Though the whipping of the stitch is done in the same direction (from right to left under the backstitches), the direction in which I stitched (from the base to the top on the left line, and from the top to the base on the right line) makes a difference in the way the two lines look when they are whipped. The left line is smoother looking, and the right line is a little chunkier looking. This is because, when I worked the left line, the working thread was untwisting while I whipped the stitches, and when I worked the right line, the working thread was twisting itself as I whipped the stitches.
My point here is not to say that one way of whipping the stitches is better than the other. Rather, the idea is that, when you are working a whipped stitch, if you want all your stitching to look the same, you have to be consistent in two ways: 1. in the direction your stitching is traveling (here, up the line or down the line); and 2. in the direction in which you whip the stitch (from right to left or left to right).
It helps to work two parallel practice lines before you start whipping your stitches, to see what look you like better, so that you can be consistent in whipping your stitches in the same direction.
SO – when we move on to the next hand embroidered lettering tutorial (tomorrow’s post), you’ll see that I made an effort to be consistent with the direction of my stitching and the direction in which I moved my needle to whip the stitches.
I think stitch direction shows up most on the Stem Stitch, especially around curves.
Your demonstration is really a good example of how direction can entirely change a stitch.
Thank you for the demo.
Thanks Mary! These tips and tricks are so precious, Thank you.
This is an excellent little tutorial, thank you!
Thank you again, Mary. I've been printing this entire tutorial so I can keep the lessons in a binder and nearby as I stitch late into the evenings.
Mary, isn't it the obvious things that are so simple….that we jump past failing to look. Thanks again for stopping me in my tracks to show me the obvious…..P.S. Loving the rosebud!….Judy In Pittsburgh
Thanks Mary. Your attention to little details is what makes your blog so interesting and your needlework so beautiful
Thanks so much for tips like these! As a self-taught newbie who doesn't know anyone else who embroiders, I often feel like I'm working in a vacuum without any feedback or direction. Your blog really helps me a lot!
Por suerte encontré su pagina, estoy feliz de encontrar lo que yo quería hacer, tengo 63 años y me encantaría hacer un mantel y algunas otras cosas, muchas gracias !!!!
Aprendí a bordar cosas sencillas en Secundaria, – ahora tengo tiempo y ganas…
I am doing a practise piece of lettering, and using Roman characters the word AWAY. I am using hand dyed silk from an Etsy artists’ supplier, and they are Z twisted. Using a violet and bright pink thread colours, one for the back-stitch line and the other colour for the descending whipped line. When I returned to this page to compare my stitching to your samples, I realised it looked much tidier than I expected and in a moment of realisation when I reread your explanation of why the one is tidier looking – the twist of the thread also makes a difference. I suppose it would be the same as the stem stitch vs outline stitch — but I hadn’t thought about that. I am posting this late question in the hope of anyone else having discovered something different?
All the best,
Sally-Ann