


Yesterday, when discussing my present Embroidery Crisis (what to do next?!), I forgot to mention that I also want to make an embroidered box. The truth about that right now, though, is that I don’t have the space to lay things out. That’s a Big Project, and I have to wait until I clean up my work space out in the studio. In the meantime, though, Sue from Missouri sent in some pictures of some embroidered boxes that she has recently made – but they’re a completely different take on embroidered boxes, and they open up a lot of possibilities!
Sue embroidered a bunch of boxes in the last year – and she embroidered them literally. She didn’t embroider fabric and then cover the parts of a box. She embroidered wooden boxes, straight through the wood.
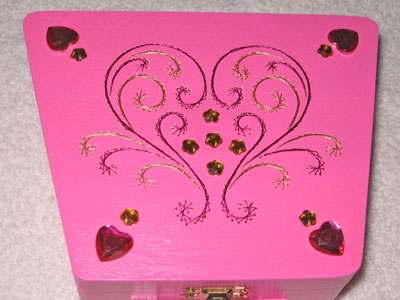
Using pre-made, unfinished wooden boxes purchased at a craft store, Sue and her husband sanded and painted the boxes. Then, using a design for paper embroidery, Sue marked out the stitching holes. Using a fine-tipped Dremel drill, they drilled all the tiny holes used for the stitching.
Then, using metallic threads, Sue stitched the designs onto the box lids following the holes made by the Dremel drill. She lined the inside of the box with matching craft foam to cover up the stitching.
This particular pink box with the heart design (happy Valentine’s Day, by the way!) made a perfect treasure box for her granddaughter.

This purple and gold medallion design looks great on the stained lid of this box, doesn’t it? I love the rich tones.
I thought this was a clever way to add embroidery to a box and to personalize a gift. Perfect keepsake boxes for little treasures!
My mind immediately started brewing up possibilities. You know those pre-made paper maché boxes with the separate lids, used for découpage? They could be covered with paper and highlighted with matching embroidery, in a method similar to Sue’s. They’d make great little gift boxes!
Thanks, Sue, for the inspiration – and for more ideas for more things that I want to do. Ah! So many ideas. So little time!
G'day Mary,
Oh my goodness. The mind sure boggles.
I've been collecting up magazine pictures of embroidery and old lace etc to decoupage onto some boxes. Kind of a crazy quilt style so it almost looks as if the box is embroidered. I hope, I haven't tried it yet.
It would be interesting to have some actual embroidery highlighting this. But I suppose that type of surface embroidery would have to be done on the paper first. It could work maybe with a stiffening of some sort behind the paper. Mmmmm. We'll see eh.
Thanks for sharing Sue's clever idea and fine work.
Cheers, Kath.
These boxes are beautiful and very different.
How very clever! I find it wonderful that her husband joins her in their creations. Team work……makes the work go faster and creates lasting memories for the crafters.This is a great sweetheart story. Happy St. Valentines Day to all.
Karole
Thank you ladies for the comments. Yes it is a sweetheart operation and we do enjoy it. Thanks you Mary for having me as a guest!
Sue F