


This last December, thanks to a generous Christmas present, I was able to join in on the Thistle Threads Floral Glove Needlecase online embroidery class. The set up is really rather simple – besides giving in-depth history lessons each month on 17th century embroidery (featuring particularly embroidered gloves), the class features six months’ worth of step-by-step instructions to complete the needlecase and includes all the supplies necessary for the project. Now that I’ve gotten into the project, I’m enjoying it.
At first, I have to admit, while I was keen on the finished project – it really is a beautiful little embroidered needlecase – I wasn’t that interested in the whole “class” thing. I was curious about how Thistle Threads would present the class and interested in the finished product, but not curious enough to overcome the price hurdle! When the supplies arrived, I expected my interest would be piqued and that I would launch in with all enthusiasm. It didn’t happen. Still, not wanting the opportunity, the lessons, or the supplies to go to waste, I told myself I better get on with the project and have something to show for it! (Guilt can be a great motivator!)
And once I got into the stitching, I was hooked. As usual, for me, the sell point was the thread. Working with certain threads is a pleasure, and since the silk in this project is Au Ver a Soie’s Soie de Paris, I found myself in thread heaven.
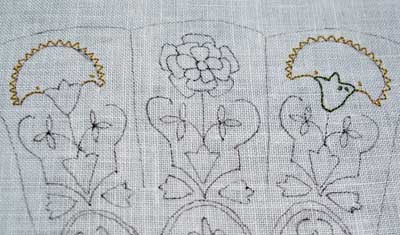
The kit for the project came with the design already traced on the linen. It took me forever to get past the first stage of stitching, which was supposed to be outlining the various filled motifs. In fact, I decided to jump around a bit and not follow the instructions step-by-step. I outlined a couple elements and then started filling right away.
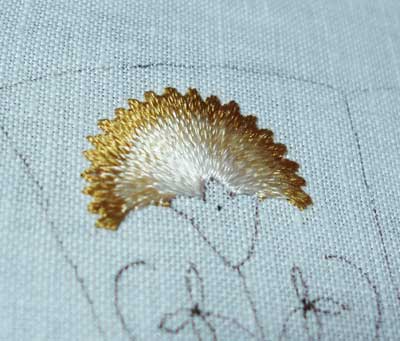
I love Soie de Paris. The trick to using it for needlepainting is to think of it as a stranded silk – don’t try to stitch with all the strands in one thread. Stitch with one individual strand. It makes a beautiful long and short stitch and a beautiful satin stitch. The silk is a twisted filament silk with a very nice sheen.
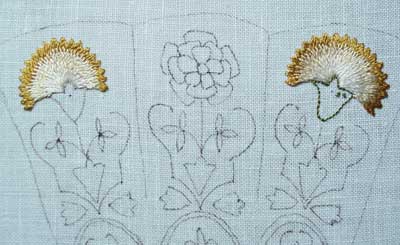
While I think the two side flowers came out ok, there are a couple things that bother me about them. First, the transfer was a bit off – the flower on the left is much smaller than the one on the right, and the left flower is also skewed a bit – the arch leans left. I considered drawing over the flower and trying to enlarge it slightly and straighten it out, but I didn’t want to do something that I couldn’t repair. This is why I tend to be a bit obsessive about accurately transferring a design; it’s pretty likely that mistakes in the transfer will show up in the stitching. Still, in the finished product, once all the gold and the other decorative stuff is stitched on, I don’t think it will be that noticeable.
When stitching the carnations, I left the top row of darker gold somewhat thin, instead of dividing the flowers evenly in three sections. I like the idea of the flowers tipped with the gold, rather than the whole top third of the flower being gold. This might not be historically accurate, but it’s the way I like it, so that’s how I stitched it.
Another thing I did differently: I followed my inclinations on the long and short stitch. Oh, it’s true! I tried – honestly – to stick with the whole rigid long-short pattern, but it looked so very rigid, so I strayed on that, too. I also found I didn’t like the way the silk blended when following the directions to stitch down into the previous row of stitches, instead of up into it. One reason given in the instructions for stitching down into the previous row is that it’s too difficult to stitch up from the back into the thread, but I find it easier to stitch up into the previous row, and I think the finished results are much smoother when stitched this way.
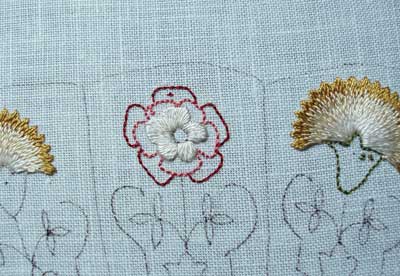
The center flower is also a product of a wonky transfer. It’s not even – and I suppose this keeps with the historical look of the thing. I suppose that, today, we tend to get a bit particular with evenness and accuracy because, after all, we can line designs up on the computer and make sure they are spot-on accurate. Back in the day, I imagine that designs were a bit more roughly drawn. So I launched into the flower with fewer misgivings about it turning out crooked.

Still, the flower in the center stretches off a bit to the left, too, almost as if it’s slightly warped. But – again, once all the gold and frillies are in place, I don’t think it’ll be all that noticeable.
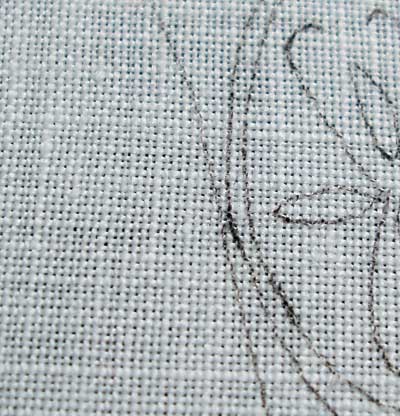
In case you think I might be a bit too weird on the whole transfer question, this is the side of the needlecase – the line on the left is the outside edge of the design, and there’s an oval medallion that’s resting against the line….
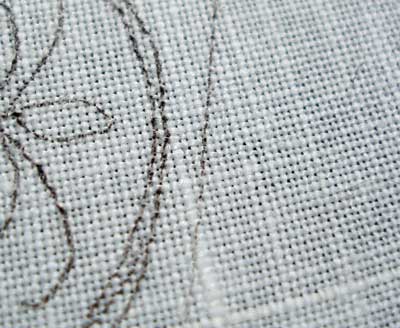
This is the outside edge on the right side of the design…. with a good 3/16ths of an inch between the edge of the medallion and the outside edge of the piece. The medallions are kind of leaning left, too. There are lots of reasons this can happen to a traced design during the transfer process – the fabric could be stretched out of “square” over the design, or, if either the fabric or the design were not secured, either one could easily shift during tracing. The moral: Be careful when you transfer your embroidery designs! Take the time to make sure everything is lined up and secure, and then don’t rush while tracing. You’ll be happy in the long run, even if you find the whole transfer part tedious!
I’m not much worried about it. I think any line problems can be covered up with the finish work on the whole project. It looks like there’s some kind of frilly something outlining the cuff on the glove, so my plan is to fix up the lines at the point of finishing. If I can’t cover up the misplaced lines, I figure I can always try a dab of amodex with a tiny brush or something. Either way, I’m not sweating over it (yet).
So that’s where I am on this particular project. I’m alternating between this and the blackwork fish right now. I’m thinking, though, that the glove project is pretty small, and if I devote myself to it this week, I can probably finish it. Shall I try, or should I stick with my alternating fish schedule? Hmmmm….<
br />
Well, I shall surely keep you updated on progress on both!
Stay tuned this week – I’m going to give away another book! So keep an eye out for that!
Hi Mary
I heard that some places had become available on this course so I am a late addition to the class. My supplies arrived this weekend and I am really inspired by them, but I have a couple of things I need to complete before I dare let myself start on this one. It will be fun to have a virtual stitch-along with you but I think you may be done with the silk embroidery before I get started on it.
I still love that FISH the best!!!! It is really something different, can't wait to see how you are going to fill the rest of the body in!! Kind regards Elza Bester. xx
Thanks for showing the Floal Glove needlecase project. I an hoping to be able to start mine next week. I will be sure to follow along as you progress with this. It looks beautiful, Mary.
The silks look really beautiful, such a nice sheen. I really DO admire your photography, I've never seen anything on the web like your column, I feel willing to go back and finish a picture now that I started long ago that has long and short stitch in it which I abandoned long ago!
I am a scientist and I agree about wanting "perfection" in my craft work. I too had a project of a sampler which I bought in 1980 (!) while I lived in the USA..put off starting it for decades, then I no longer liked stamped pieces. But I began the reproduction sampler and then noticed quickly that the stamping leaves much to be desired. On one side it fades away (so you have to make it up as you go following the rest of the pattern, and some bits dont line up well at all. However I have persevered and interestingly, like you say, it looks OK when complete.
Look forward to your progress with this one.
cheers
Julie in Australia
Hi Mary,
I had the same problem re: symmetry and transfer of the design. I spent roughly 5 hours redrawing the design and transferring it to a new piece of linen. Much happier with the result. The Paris thread is a delight to stich with!!! Love the sheen.The goldwork is really lifting the design.Great to see your work. I have to keep up with the floral glove as my supplies for your Pomegranite are arriving in the next few days.
Kind regards,
J
The project is lovely and you have made changes that have added to the beauty of the stitching.
Is Soie Perlee divisible?
Aaaaagh. You're right, Joey – it's Soie de Paris.
Well, I knew there was a "P" in there….
I corrected it in the article!
Thank you!
I had the same reaction to the designs not being quite symmetrical. I was too lazy to redraw them but when I stitched them I altered the outline to try to make them more uniform. I also assumed that because it was meant to look historical symmetry was probably not as important, but it still bothered me! Glad you're stitching this; it will be fun to read what you have to say about it as the class progresses.
I think that the off-centre-ness would drive me mad. I find it strange and surprising that for a course so expensive (therefore leading you to believe that it is Quality) that they didn't bother extending the Quality to the tracing of the design. If a job's worth doing, its worth doing well… If they're not going to bother with getting right, can't they leave it to the stitcher to do it, allowing them to get their own personal level of perfectionism into it?
I’m new to your site, and not really an embroiderer; quilting is what I do best, but I must tell you that I absolutely love your site. Seeing such exquisite work clearly photographed is truly a delight. I know that many of the stitches you use would be applicable to a crazy quilt, and so seeing how they are done is really useful to me. As a former English teacher, I appreciate the clarity and precision of your writing. Thank you for sharing your embroidery adventures and discoveries. I’m fascinated!