


Running out of thread when there’s only four more stitches to go is one of the Absolutes in the Life of the Stitcher.
It’s also one of those wonderful little aggravating trials that makes people of a certain personality (take me, for instance!) want to swear (under my breath, of course…). It’s a Riffemrackemfrickemfrackem Moment!
I’ve been working up instructions for doing the chain stitch and some of its variations, and while I was chain-stitching along, It happened. I ran out of thread with just over an inch left to stitch.
Aha! A perfect teaching opportunity, because you know what? It will probably happen to you some day, too, if it hasn’t happened already. As my Dad would say, “It’s a has or it’s a gonna.” One day, you’ll be chain-stitching along, and bammo! You’ll have about an inch of thread left and four more stitches to go. Instead of cursing under your breath, though, you’ll remember that switching threads is not so difficult as all that and that it’s even – yes – fun.
(Ok, fine. I admit this might be a stretch. It would be easier not to have to change the thread. But we’re trying to be optimistic here!)
So here’s a little photo tutorial on how to change threads when chain stitching. First we’ll talk about the technically INcorrect way to change the thread, then I’ll show you the technically correct way to change the thread, and then… I’ll admit that you don’t always have to be technically correct.

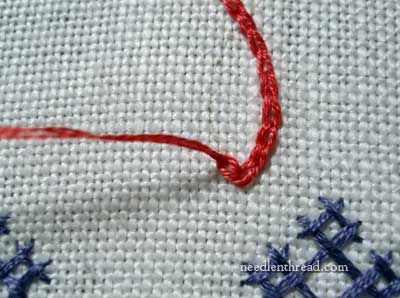
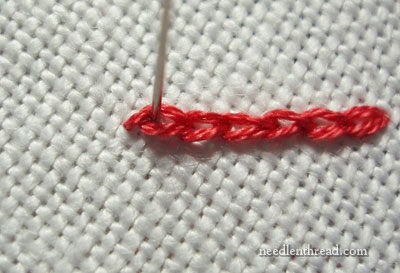
First, let us talk about the technically INcorrect way to change the thread.

Easy-peasy as it may be, the diagram above is not the technically correct way to switch to a new thread when you’re working chain stitch. In the diagram above, the old thread is finished with the typical anchor stitch that comes at the end of a line of chain stitch. Then the new thread is brought up inside the last loop of the chain stitch, and regular chain stitching commences from there, over the anchor thread.
And this is technically incorrect.
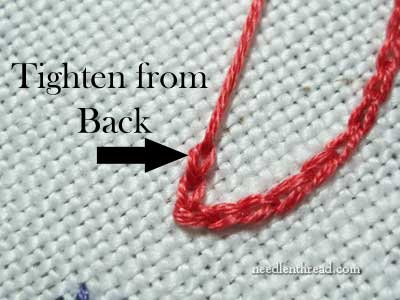
Let’s look at the technically correct way to switch threads out on chain stitch.
In the photo above, that little tail sticking off to the left was just about all that was left of my working thread, so it was time to make a switch.
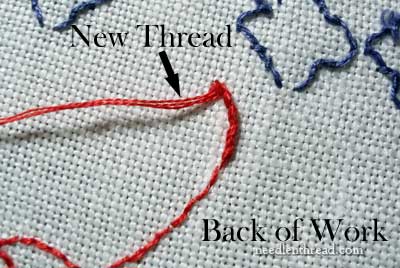
Leaving the old thread on the front of the fabric for now, I threaded a needle with the new thread, turned the work over, and anchored the new thread by whip-stitching around the stitches on the back of the work. I haven’t ended the old thread yet – it’s just hanging around on the front of the fabric while I work on the back with the new thread.
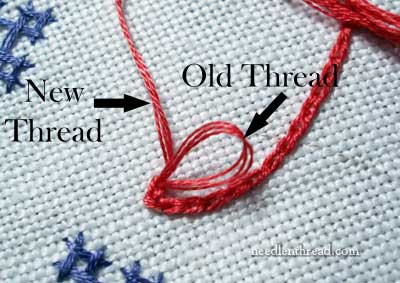
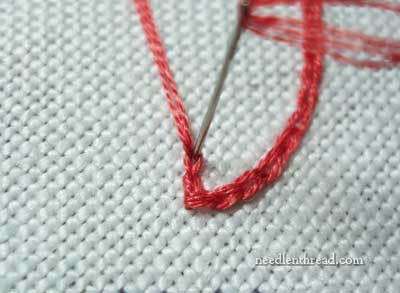
Now that the new thread is started, I flipped the work over. I took the old thread to the back, by going down in the same hole, as if I were making another chain stitch. I left a good size loop on the front, and brought the new thread to the front of the fabric, one stitch length forward. The new thread comes up for the first time at the same place where the next chain stitch (not the one we’re doing now with the old thread) would start.
I brought the new thread inside the loop formed by the old thread (the tail of which is still on the back of the fabric at this point). I made sure the new thread was pulled forward in the direction of the chain stitch line, because the new thread is going to form the “anchor” for the loop of the old thread. (Are you with me still?!)
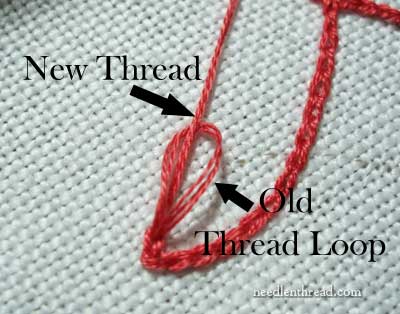
Pulling from the back of the work on the old thread, I tightened that loop around the new thread that’s pulled forward on the front of the fabric.
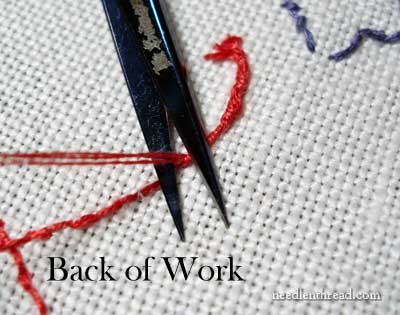
Now, I can treat the tail of the old thread on the back in two ways. I can leave it back there, and make sure I stitch over it with the new chain stitches. Or, I could just get it out of the way, by running it around the stitches on the back, and cutting it off, which is what I did at this point. If you choose to run it under the stitches on the back, be careful not to pull it tightly as you do so, because you don’t want to pull the loop on the front out of shape.
With the old thread taken care of, I turned the work back over and proceeded to chain stitch with the new thread. Voilá! The join is made, and no one is the wiser.
Now let’s be technically incorrect for a little bit!
Sometimes, it really doesn’t matter which technique you use to switch your threads in chain stitch. That is: it doesn’t matter, because no one will be able to notice the difference.
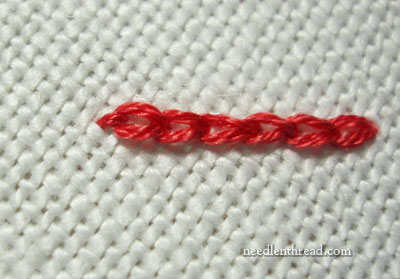
Here’s a short chain stitch line, and I’ve ended it on the left with a regular anchor stitch.
I’m bringing my needle up into the last loop, which is already anchored down (just like I said not to do, up above!).
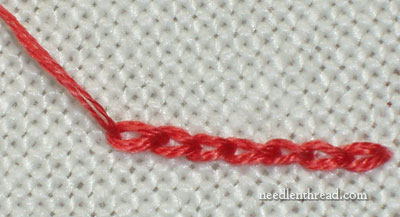
And there’s the first new stitch, on the left, which was taken over the anchor stitch.
Can you tell?
Not really.
Is it cheating?
Not really.
BUT (there’s always a but!) – the technically INcorrect way doesn’t always work with every thread. Especially if you are using finer threads, or you have larger loops that are more open, the anchor stitch can be quite evident. But if you’re using several strands of regular floss, or even a heavier pearl cotton, normally the anchor stitch isn’t really noticeable, and you can get away with being Technically Incorrect.
How do you switch threads when chain stitching? Are you a technically correct or a technically incorrect person? I admit I’m both! I just depends on the thread I’m using, really.
Switching threads isn’t the Biggest Question when chain stitching – I’ll show you a more obvious problem with chain stitch later this week, when you can see a clear difference if you do this particular thing the wrong way. Also, later this week, I’ll be giving away another book, showing you some progress on my spot sampler, putting up another step in Developing a Spot Sampler, engaging in a little Hoop Talk, and discussing a satin stitch dilemma.
Hope you have a terrific week!
G’day Mary,
I didn’t know I was a TI chain stitcher. Seems that I am/was one.
That’s one reason I follow your blog. To become a well informed Non-TI stitcher!
Breaking the rules is the spice of life, but, one has to know the rules to successfully break them.
Thanks for the detailed pics/diagrams. You’ve gone to a lot of trouble there.
Now our daylight saving has started again, your posts come through earlier. Good.
Cheers, Kath.
Thank you very much for this tutorial.
Is there any way I can calculate how long thread I need to cover a line? I know it depends on the type of stitch, but I am looking for a rule of thumb.
Once again I am thrilled that Mary Corbet exists in the world. Your technical precision and willingness to work through the tiniest details AND THEN share them will all of us…well, it just makes me love you all the more and want to add you to my Christmas list.
Bravo Mary!
I’ve always done it the INcorrect way. Thanks for the information. Now, here’s another one. If you run out of thread in the middle of a row of open cretan stitch, how do you handle that one?
I guess I’be been incorrect. Seems to me, in fact, that the technically incorrect way is the way I was once taught.
On the other hand, I almost always to reverse chain now as I find I can control the sizes of my loops, etc, much better — and changing threads is easier too!
Another gem of a post Mary. Thank you. It looks like I have been both an incorrect and correct stitcher but mostly incorrect. Following on from Cynthia’s comment I think a lot of us (self taught) embroiderers have difficulties when it comes to changing threads in certain stitches. We guess and muddle along but it would be good to know the correct way.
Should be a good student – I am always technically correct 😉
Hi Mary,
Is it technically correct to follow this two thread concept for other stitches? I have used this technique for buttonhole, cretan and chain. I find it seems to be the only way to smoothly continue with the stitch when I run out of thread – and I ALWAYS run out of thread in the middle of the stitching area!
Speaking of thread length, what length do you use in general? I read elsewhere to use only short lengths (12″ max) as it helps reduce the likelyhood of tangles and the constant motion through the fabric ends up fraying the thread and you end up with fuzzy stitches at the end of the length.. but this leads to continually having to change to a new thread. Your advice would as always be invaluable.
I’ve been faking my way through changing threads on all my stitches. Thanks for the well presented and accurate information.
Past week started a project with a gazillion satin stitches, did a “satin stitch” search on your blog before I dug into the project. Can’t wait to read about ‘a satin stitch dilemma’.
Thanks again!
Thank you, thank you, thank you! I have done several pieces of nothing but chain stitch(inspired by traditional Indian and central Asian embroideries) but never felt 100% about the quality. This is a great tip and I can’t wait to see what else you’ve got up your sleeve!
thanks for this…learn something new everyday:-)
Alison.
I used to do the INcorrect way…
Thank you Mary!
I totally subscribe Susan’s comment!
I have not received your last two newsletters and I hope I am not off the list. Did you reorganize? Maria M.
P.S. I enjoy them very much even though I do not stitch as much as I would like.
Hi, Maria – I just checked and your on again. You should receive the next ones. I’m not sure what happened, but it looks like the e-mail was stopped from your end. Anyway, let me know if you don’t receive tomorrow’s newsletter! Thanks! ~MC
This is a perfect example of a stitch (dilemma in this case) that I would find extremely helpful to see on video as a beginner. I was completely lost in this tutorial. By the way, it’s unusual because I find you to be incredibly gifted as a teacher. I’m always so impressed!
Excited to find your site. I’m self taught and do only basic stitches. Your world has opened up to me and I’m almost 80 years old. Thanks so much.
OMG, I’m so excited I found your lessens!!! I was just trying to find what the best stitch to use on lettering when I ran across your website. I am at work and have read 3 lessens on other tips (oops). I’m so excited to go home and stitch!! Will read more when I am not at work! 🙂 Thanks!
Thank you for showing a good way of changing threads mid-stitch, so to speak :-).
A similar way which I tend to use is to leave the old thread at the front, and use the new thread to start a new “first” chain stitch one stitch-length away. When the new thread is nicely settled with a few stitches, re-thread my needle with the old thread and take it behind the first stitch of the new thread, then go down to complete that loop and fasten off – like your method, it makes an invisible join.
I am new to hand embroidery and I just love your tutorials they explain in detail plus the video are there to help if I still dont understand. I intend to work through them one at a time starting with the basic stitches – hopefully I will master all the stitch in you A-Z list.
Thanks for all the hard work.
Thank you Mary for your clear & easy to follow video on the chain stitch. I am hoping to embroider initials on a crocheted afghan I made for my granddaughter for her college dorm.
Hello. https://jayrims.co.uk/
Can you make video please on those difficult combinations and techniques?