


The crested chain stitch! It’s pretty, it’s fairly simple, and it’s a neat little stitch to add to your repertoire!
What I like best about this stitch is that it can be made large or small, with just about any thread, on any fabric, and the look can be varied quite a bit, depending on how you work the stitch. You can use a heavier thread and increase the height of the stitch between the chain stitch and the top knot, and come up with something completely different looking when compared to the stitch worked small and compact with a finer thread. My favorite look of the stitch, though, is a bit more compact, used as an edge or border stitch.
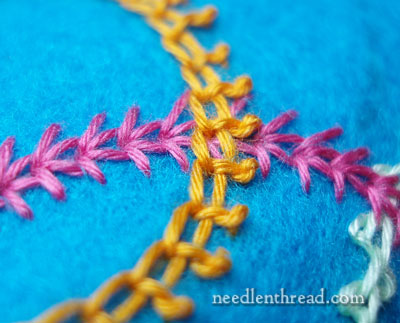
In the above photo, I worked the stitch with orange floche on a turquoise-blueish felt, and I kept the distance between the chain stitch and the knot on the crest of the stitch rather short, but still long enough to see the “bridge” between the knot and the chain stitch.
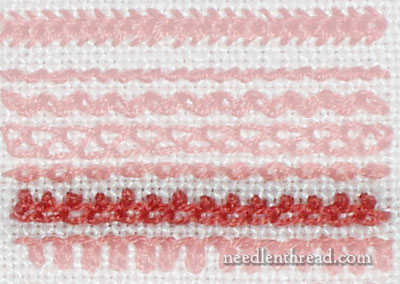
I also worked a short line of crested chain stitch on my spot sampler, using two strands of stranded cotton, and working the knot practically right on top of the chain. When you work the knot close to the chain, it looks a lot like a little line of picots sitting on top of chain stitches…. either that, or a little line of swimming ducks. (For some reason, that’s what it reminds me of!)
The stitch makes a great border (as mentioned above), and looks good outlining anywhere you want a slightly textured line. It works well around tight curves, too – just like a chain stitch.
Here’s the video:
I hope you like the stitch! If you have any inspiring ideas on how you would use it, feel free to leave a comment below!
Enjoy!
Looking for inspiration & information on hand embroidery?
There are all kinds of reasons to sign up for the Needle ‘n Thread daily newsletter! Check them out and sign up today!
If you like what you see on Needle ’n Thread, if you want to be a part of keeping the website thriving (and free of annoying network advertising), why not become a patron on Patreon? Check out my Patreon page here, where I’ll occasionally add special needlework bonuses for patrons.
If you shop on Amazon, you can support Needle ’n Thread without any extra expense to you by visiting my Amazon Recommendations page here, where you’ll find books and sundries for the needleworker available on Amazon.
I am so glad that I found your website, I really enjoy the teaching videos and all the tips and techniques that you pass on to us. Thank you so much.
I can see this stitch being used in a mixed media piece as a crown. Also in a crazy quilt stitched on to an image as a crown.
Debbie
That is a nice stitch, and would be hard to learn how to do without the video.
I agree. I wouldn’t have been able to have figured out how to do this stitch without the video. This is the first time I have seen this, so thank you for sharing it
Easily shown. Until you want to embroider. I love the look here. Greetings from Polish.
A nice stitch and a clear video. Thanks Mary.
muy bonita la puntada, yo la emplearia en el borde de un cuello.estoy interesada en aprender bordado mountmellick, puntadas como:punto de manta ,pista de caracol, siembra etec. les agradeceria inmensamente si me pueden colaborar. disculpe que abuse de su buena voluntad. mil gracias. sorany
It is a nice stitch.I am learning new stitches through your website.Thank you.
Já tinha visto este ponto, mas não sabia como era feito. Obrigada pela aula!!!!!
Quando vi este ponto pela primeira vez ele estava sendo usado para rebordar flores em tecido estampado. O efeito é lindo.
Fotaleza-CE-Brasil
this one looks like a winner. thanks for the tutorial!
Mary although I love your videos and often look at them to see if I am doing a stitch properley. I also like the written tutorials. I can put them in a book and take them with me when I am taking my stitching on the road or to a friends house, or the doctors office. Can you please include a written tutorial along with you videos.
Thank you
Karol. B
me encanantan todas estas puntadas, mil gracias por enseñar tantas bellezas, abrazos, lucia
I am so glad that I found your website, I really enjoy the teaching videos and all the tips and techniques that you pass on to us. Thank you so much.
Dear Mary,
I love your site!! I am new to embroidery and your site has helped me immensely.
That was awesome and easy!
wow mary!
its awesome and i like the way you teach…
like it
I wish you would demonstrate the stitches in Z twist thread
Very detailed and good tutorial, thanks Mary
My first impression was ducks too! In that respect, this would make an adorable border or garment edge, done in ducky-yellow, with a tiny black knot for an eye and perhaps a different shade of yellow fly stitch for a wing in each duck. It might even make a cute frame, although I’m not so sure about the ducks swimming heads up or heads down. Perhaps the sides could be done as single chain stitches to keep the orientation correct.
Great…..first you’ve got me seeing caterpillars, now it’s ducks. What’s next in the menagerie? LOL
I am working this stitch around a circle and I’m not convinced that I’ve ‘finished’ the connection correctly. Do you show how to do this?