


Have you forgotten about the silk “jumble” project I’m working on? I almost have! It’s a slow project, to say the least. The point of the project (for me, right now) is to see how different silk threads can work together with different stitches to create a kind of “jumble” of stitches and threads – but a jumble that has a bit of organization to it. I want it to make sense, but at the same time, I want it to blend into kind of a …. jumble.
You can see that I’m not exactly clear on the whole project myself!
But one thing I do know is that different parts of the project will have a little bit of padding on it – under some of the silk stitches, and under some touches of real metal thread.
Wool felt is a great material for padding a stitched area in order to raise it up above the areas around it. If you’re trying to “lift” part of your design, this is a good way to do it. When using real metal threads (like passing thread) and filling an area, gold-colored felt underneath the passing thread serves two purposes: it lifts the area a little above the ground fabric, and the color helps minimize the effect of any gaps between the threads.
I’m using the gold-colored felt underneath some gold threads, and the red felt is going underneath some of the silk embroidery (in red threads).
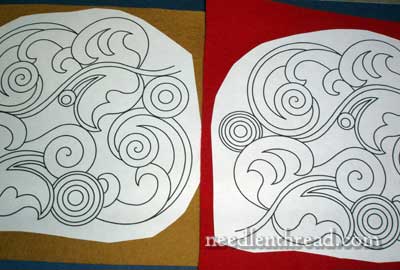
I inverted the designs on my computer, and then printed two copies on freezer paper. Then I ironed the freezer paper to the felt. I’ll cut the pieces I need from each piece of felt. Alternately, I could have traced onto the freezer paper only the areas of the design I wanted to add padding to, and then iron the freezer paper onto the felt and cut out what I needed. To tell you the truth, the reason I did the Whole Design on both the gold and the red felt is because I’m not quite sure which parts of the design I will definitely be padding. To save time, I adhered the whole design to the felt, and I’ll cut out the bits I need as I decide on them. The felt that I don’t use can be used for other things, because the freezer paper peels right off without leaving any residue.
So, if you’re looking for a good way to lift an area of your design, try wool felt, and use freezer paper to cut out the pieces accurately. If you’re planning on using felt for padding underneath an area stitched with silk, remember to choose stitches that will cover the felt completely, unless you want the felt to show, too.
That’s really the only thing I got done this weekend, stitching-related.
Things are piling up! I’ve got my fingers crossed that I will have a much more productive week!
Enjoy your Monday!
Mary – a lot of blogs I read mention using freezer paper, which I’ve not come across before. Is it the same as greaseproof paper, or is that something different?
Hi, gals –
Freezer paper is greaseproof paper – it’s got a shiny, waxy size, and it’s often sold cut in printer-ready sizes, so you can print on the non-shiny side and then adhere the paper to fabric, by putting the shiny side to the fabric and ironing. Then you can cut your fabric shapes accurately, without leaving a residue (like a fusible interfacing would do) on the fabric.
Sorry I didn’t explain that more thoroughly!!
MC
This will be a daft question, but what is freezer paper?
Do we buy freezer paper in a store like Bed, Bath, & Beyond? I don’t ever remember seeing it in a grocery store. What setting for the iron? Do we put a pressing cloth on top of the freezer paper before ironing? Janet.
Hi, Janet – I usually buy freezer paper in craft stores, fabric stores, quilt shops, etc. It can be bought on rolls or it can be bought in printer-ready sheets. I use the setting suitable for the fabric I’m ironing the paper onto, and I don’t use a pressing cloth…
Hope that helps!
MC
Good morning all,
Mary I would have forgotten the inverting part!
I have enjoyed using the wax coated freezer paper ( costco, or butcher shop) for lots of things. Recently I cut it the right size for the printer and ironed it onto muslin then cut and trimmed it to fit the printer. I printed my design out on the cloth and skipped the light box and tracing. I used this when I was practicing Long and Short with your designs also. It has worked well with Legacy cotton and osnaberg. If the 8 X 10 sheet is too small to be snug in a hoop I sew strips of muslin on the sides to make up for it.
Enjoying watching your Jumble grow as well as your miniature.
Glad your feeling better.
Blessings, Sharon
I am soooo excited! I want to do a happy dance. You thought you were writing about raising an embroidered area, didn’t you? And yet all the comments are about using freezer paper. I have never come across this tip, and I have searched the internet for ways to transfer a pattern to felt. I have tried many different markers, etc., all to no avail, and so I have a lovely set of Christmas ornaments tucked away, languishing, since I was being a perfectionist, not moving forward with it with some “make-do” technique. I have a huge roll of freezer paper (not printer-ready). I will either trace onto it with a light-box (or my dining room window in the afternoon sun) with different markers, or I’ll cut it to fit my printer. Hmmph! I was so close — I even tried ironing a tracing made with a transfer pencil on reg. printer paper. If only I had thought of using freezer paper! You have made my day!
Thanks, Mary
WendyBee
Ut Oh, Wendy! I think I have misled you. In fact, the freezer paper works for a cutting pattern on the felt – it doesn’t transfer the lines to the felt. So I use the iron to adhere the freezer paper (with the design on it) to the felt, so that I have the exact sized pattern stuck on the paper, on the felt, and then I can cut the pattern pieces easily. The design itself doesn’t actually transfer……
Hope that clarifies it!
~MC
Mary,
Wouldn’t it be grand if the ink manufacturers came up with a transfer ink cartridge that we could use to print out designs on freezer paper and iron them on our projects. Just like the iron on motifs for dishtowels. The only thing that would spoil it, would be the ink companies would gouge us with the price.
I wonder how the dishtowel patters are printed on paper to be ironed on to flour sacks?
Hi, Judy – I’m with you on that! That would be a neat idea. Some folks have said that you can iron on things that are printed from a laser printer, but I’ve not tried that. I wonder….. I’d love to know enough about inks and chemicals to develop the ultimate no-fail transfer method! ~MC
RE: Printing Transfers – Laser Ink does transfer to fabrics when you iron it on (sometimes irregularly, in my experience), but to use regular inkjet printer ink, look for “T-Shirt Transfer” paper at a business supply or craft store. Avery, the label-makers, manufacture it (in two different formulas for light fabric and dark fabric), as do many other companies (Staples has their own in-house brand).
It is a little expensive, but you can print any design onto the T-shirt paper just as you would print regular paper (it doesn’t glom up the print heads, thankfully) – even full-colour photos – and then iron it on to the fabric of your choice. Most are meant for light-weight fabrics, like cotton and jersey, so I am not sure how they would work for felt, but it may be worth a try if you are trying to find a no-mess transfer technique. Hope this helps.
Mary, I’m excited to see how your jumble project goes! I’ve heard about padded stitches, and about real metal threads, but have never tried them, so I look forward to seeing how it turns out 🙂
Hi, Aurelia! Thanks for your comment and the tip! For embroiderers, I’d suggest being careful of T-Shirt Transfer paper, as often it transfers the picture via a film that adheres to the fabric. I don’t know if this is the case with all T-Shirt transfer paper, but the one experience I had with the stuff definitely transferred the image with a film on it – not really “plastic” but sort of like a thin plastic, if you know what I mean!
I’m looking forward to making some progress on the jumble – one of these days soon!
~MC
J+M+J
Hi Mary,
Quick question…on those small “cords” around the images- here- is that cord covered with satin stitch, do you think? Or padded satin stitch…??
Can you tell me how to achieve a similar result? I’d so appreciate it.
Thanks,
Jessica
whoops…perhaps the link did not go through!
Thanks,
Jessica
Hi, Jessica – the link still didn’t come through. Can you e-mail it to me? mary (at) needlenthread (dot) com – It might be easier to get it!
Thanks heaps – looking forward to it!
~MC
Hi Mary, I just wanted to comment on the t-shirt printing idea. You’re right. It transfers a film just as screen printing does. That would seriously mess up a nice piece of embroidery. The freezer paper is the perfect tool. I can’t wait to see this Jacobean Jumble with the felt for padding.
Ive been privileged to see some old gold work projects that have used all sorts of padding’s. Cardboard,paper, wool, felt, carpet thick felt, to name a few. The card and paper give the gold work a crisper edge.