


When you see a needlework technique that looks intriguing, are you the type of person who says, “Hey, I think I’ll try that!”? Yeah, me too. And normally, if I see a needlework technique or a finished product that boggles my mind (you know: “How Ever in the Wide World did they do that?!”), I’ll at least try working it out so I know how it was done.
I’m not going to bother with this. It boggles my mind. But there are some things I know I just won’t ever do, and this is one of them. Still, I find it amazing that someone out there did do it, and in the scheme of All Things Easter Eggy, I can see how these things would be a show stopper!
Over on Au Feminin (a French website, so you can use Google translator if you need to) you’ll find a photo gallery of a needlework expo. And within that photo gallery, you will find five photos (numbers 55 – 60) of “broderie sur oeufs” – embroidery on eggs.
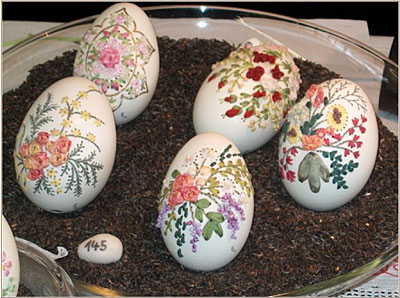
No, really! They mean it. Embroidery on Eggs. Embroidery on Eggs. On oeufs. On Real oeufs.
At first the thought occurred to me that maybe the embroidery was done separately – on a gauze or something – and then cut out and applied to the egg with glue.
Nope.
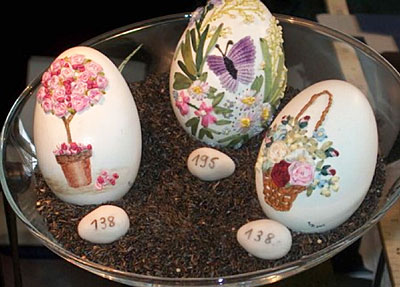
If you look at the egg #195 in the photo immediately above (that’s the one with the purple butterfly, you can see the holes for the embroidery right below the butterfly. And in fact, on most of the eggs, if you look closely (you can see larger versions of them on the Au Feminin website), you can see the holes for the embroidery on all the eggs.
I admit that my experience with embroidery is hardly exhaustive – I’ve not tried everything, and I probably never will! – but in my experience, most embroidery involves passing the needle from front to back to front again.
How do you do that inside a blown egg?
I’ll tell you how:
Very Carefully.
So if you want embroidered eggs this Easter, and you really want to impress people, give felt, fabric, and plastic canvas a pass and start blowing those eggs!
If you happen to have any experience in the above – because you know everyone is going to be curious – do share your technique. If you don’t happen to have experience in it, but are the adventurous type, feel free to go try it and then come back and report! I’m sure we’ll all love you forever for it.
Enjoy the day!
WOW! I imagine making the holes is the easy part, a dremel tool and small drill bit would make short work of that, as long as you don’t press too hard. As for the stitching – maybe it’s done using tools like they use for setting up the ships in a bottle? My other thought (I can’t get to the Au Feminin site to see any closer) is maybe there’s a larger hole cut and its’ hidden in the brown stuff. What is that – fabric? Tea leaves? Small seeds of some kind?
No matter how they did it, I wish my embroidery on cloth looked so good!
My guess is that holes are drilled with a Dremmel, and the embroidery done through the holes with curved needles, similar to those used by surgeons. I have also seen large ones that are used by upholsterers. You would have to have a collection with a significant variety of radiuses (radii?), and a needle-holder (much like an alligator clamp. And even with the right tools, it would be painstaking work. I think the hardest part would be selecting the needle with just the right curvature for each pass, that and developing just the right technique of passing the needle in an arcing motion. (Hint: I am an MD, and have plenty of suturing experience!)
Wow does not express the awe I feel when looking at these miniature pieces of art. Does anyone know of a site that says how they do this?
I agree with WendyBee that they must use curved needles if there is no hole cut in the back of the shell.
This is brilliant! I bet the curvature of the eggs helps in getting the needle from one place to the next. I’m dying to give it a try. But those look like goose eggs. Where does a girl buy herself a goose egg in Northern Virginia?
WOW! I thought I had seen it all…guess not. My Sis-in-law is so talented, and she happens to collect all things “egg”, that I must fwd this article to her. I would never have the patients to create even the holes needed for this. Do love the fact that you seem to find all these ‘rare finds’…Can’t wait to see what you have for us next time.
What astonishes me is how people come up with the idea to embroider on something like an egg to start with! Are they just sitting around in their kitchens bored one day and say, “Hey, what would be the most impossible needlework challenge I could set myself?” Perhaps I will try and pretty up a few tea bags or some coffee filter paper next week (at least they are perforated!)
It is very impressive, and like you, I’ll not try to do it. Thank you for sharing. It is always interesting to know about other types of techniques.
I wonder if they’re using very fine curved needles? Very impressive. I always love to try something new. Anyone find a website with instructions yet?
Well, you really stirred my curiosity and I searched Google a bit and found this, just scroll down a bit, http://www.hand-dyedfibers.com/oscnuked/modules.php?name=Forums&file=weblog&w=81 Here you can see how it is done.
I am absolutely floored! those are incredible, beautiful, impossible! 🙂 thanks so much for sharing.
fantastique
Here is a blog that shows a step by step
http://www.hand-dyedfibers.com/oscnuked/modules.php?name=Forums&file=weblog&w=81&previous=5 Start from the bottom up, then at the top, under the hummingbird, click forward to see the rest (again, from the bottom up.)
Mary, check your email; I found a couple of sites for you.
Apparently the technique was invented by Naphtali Kahn, and the inside of his eggs were precisely tidy and clean as the outside.
If you Google the name you should come up with the article (which is in French and Google Translate is your friend here unless you read the language).
This is like ship-in-a-bottle only worse, to me–something I can admire but would never, ever be able to do.
Thanks for boggling my mind first thing on a Monday, Mary! 🙂 Wonder what your class would think of it….
What a way to start the week. If that was done on fabric it would still be way beyond my current skill level. I wonder what you could do on an ostrich or emu egg?
I imagine that curved needles would have to be used. I use my dremel all the time and I would think the lowest setting would be needed. I cut license plates and I can see me going through the delicate eggs like a mack truck! I cannot imagine how bullion knots could be done on a curved needle. I am sure someone has done it and it is a technique that I will check out. Thanks Mary for posting such lovely eggs.
Hi, All –
Thanks for the comments! Uh, at the risk of sounding a bit corny – the whole idea of embroidering on eggs cracks me up!
I’m fairly certain (but open to correction!) that they don’t cut the back of the egg off….
~MC
https://www.youtube.com/watch?v=sLWW65_Outs
this is a short video of it.
Seems to me like it would be easiest to work with pieces of thread, and push them into the holes on either side of the stitch, securing with some sort of glue, but that would probably raise other problems etc. but would make the idea much less frightening
Wow! Color me impressed! And very intrigued! Thanks to everyone above who left links, I devoured them!
I have a niece who collects eggs. She would be estatic with a keepsake like these!
My mom used to do nails, back in the 80’s nail jewels were the big thing. The fine gold charms were on a tiny post. She used a very fine hand-drill to drill a hole in the fingernail (long tips, not into the bed) and the gem or charm was secured by a tiny nut that screwed onto the post. I am thinking I’ve got to find me that teensy drill….
here is a fun video that gives you a peek at one womans technique.
http://videosonar.com/2/video/%20garcin/xetwfm.html
I’m too much of an oaf to embroider on oeufs!
OH MY GOD. Is Sorcery involved? I must say, though, the most beautiful needlework seems to come from France. Do they teach it in school? Thanks for the pictures.
Wow, I want to try!If I do, I’ll take pics and pass them to you.
Mind boggling for sure! How in the world would anyone have enough patience to do that? It’s like putting those ships into bottles!!
Wow, what impressive work!
Thanks to those of you who left links.
Irene in NZ
1-JustGail- that brown stuff is flax seed.
4-Kara- Run a search for “goose eggs for sale”. You should find dozens of places that offer all kinds of blown eggs for fairly reasonable prices.
I think I’d practice on chicken eggs, though.
I’m with valerie on this one. I’d be making dozens of omelettes rather than art, I fear.
Super post, Mary.
Yes they really do embroider onto the egg >
https://www.youtube.com/watch?v=sLWW65_Outs
This is really crazy -wow and she makes it look easy in that video. Wonder if helps to drink French wine? 🙂
hi Mary
thanks
that was great
Amazing results – I love decorated eggs. Don’t think I have the patience for this.
Thanks for the links to the videos. The work seems to be all from the outside. After watching the French woman, I’m wondering if that is a very thin crochet hook rather than a needle. The stitchers may put the thread in through one hole, leaving a loop, then pull it up through another hole.
Definitely works of art. Thanks to all for sharing.
holy moly. those are awesome.
This is one of the most mind boggling things I have seen in a long time. From what I see in the video, the designs are done on both sides of the egg and you run thread through from one side to the other with a straight needle. I would love to try it. We have an ostridge farm not far from here, have to see if they sell the eggs. They do sell the meat.
Thanks for giving us the link.
Connie
Use “Water Glass” (liquid sodium silicate), the thin syrup type, not the powdered. After blowing, washing your eggs and allowing them to dry simply dip them in and allow them to dry again. This will make your egg shell many times harder. You can use this for any blown egg, whether you want to embroider it, paint it or other treatments. This solutions is used to keep eggs longer and is safe to use.
Here is one source to find “Water Glass”
http://www.lehmans.com/store/Tools_Farm___Farming___Poultry_Equipment?Args=&page_number=1“
Thanks for the info on the hardening agent, I am going to have to check around for it. I do have something that was used to seal the grout on my kitchen floor…wonder if it would work. It does not say liguid sodium silicate anywhere on the bottle. I got some duck eggs and my dremel and am ready to go.
I found another how to for these…
http://www.designsponge.com/2011/04/sewing-101-embroidered-eggs.html
Sur mon blog, je vous montre comment faire pour broder des oeufs.A la date du 24 janvier 2011 puis en février et mars.merci pour le durcisseur de coquille, je cherchais quelque chose mais personne ne pouvait me renseigner!
There are identical images on both sides of the egg. A straight needle is used to do then both at the same time, going from one side to the other.
An infertile emu egg was given to me years ago. The contents were not removed–its been allowed to dry naturally………Now I wonder what drilling would find? The rich, green-black color is wonderful.
Absolutely exquisite…would love to have one!
it is very wonderful and beutifull.thank you very much
This is very interesting to me! My Dad used to decorate blown eggs but none ever looked like these. He is gone now so I can’t ask how he did it but I do remember a small hole pierced on each end of the egg and he would blow out the yolk and whites very successfully.
I would love to see the back side of these eggs. I am assuming they put the same design on the back of the egg and push a long needle thru to the other side to duplicate the design. Either that or use a curved needle. (how awkward is that!) I am looking forward to future articles on this craft. I have to try it!!!!!
Sharen
I just found this site that show a woman doing this with a curved needle. https://www.youtube.com/watch?v=EuTLgnsSO3s I just noticed how old this blog is but decided to comment anyway.
Hi, Wendy – yes a curved needle works in some circumstances, but not in all. I prefer a straight needle in most circumstances, working from the front to the back of the egg. If the egg is hardened with sodium silicate or something similar (which is the case in the video, as you can see from the thickness of the egg) then a curved needle is easier to manipulate, but if the egg isn’t hardened significantly, then the pressure from the curved needle as it makes the curve can easily break the egg. With ribbon, when working with larger holes, it’s less problematic to use a curved needle, because there’s room in the hole for the needle to move. When I start blogging the process, I’ll show the tools I’m using. The needles are kind of weird, but brilliant – they work great! -MC
It’s very amazing I never seen it before. It’s very awesome I like it very much
What a great idea! At first I was thinking it has to be goose or duck eggs (since they’re stronger than chicken eggs) but I found a youtube video on it and it doesn’t really look hard to do?
https://www.youtube.com/watch?v=EuTLgnsSO3s
Gorgeous work though! 🙂
Estoy extasiada con todas las maravillas que Ud. nos envía. Quiero agradecer una vez más su gentileza y desearle toda clase de exito. ¡ Bendiciones !
wow,impressing,trying to do this
oh my oh my I can’t believe that is possible and no way could I even attempt this. Thanks for sharing… stunning
BEAUTIFUL. maybe a string or flexible needle is used like the curved kind used for sewing canvas – I know a very little embroidery, but this is definitely something I might try -if I can find or they make a needle fine enough (like the one in my mind – I’ve seen bendy long knitting needles – something like that
Hi, Lmaisch – I’ve explored embroidery on eggs a little bit, including the tools and needles needed for it – here are all my articles on the topic: https://needlenthread.wpengine.com/2013/03/hand-embroidery-on-eggs-index.html
My mom and I once, long, long ago, tried blowing eggs. I say ‘tried’ but it really did work. Basically, you just make a hole on both ends of the egg with a pin and blow through the top one, while the egg comes out the other hole. Very easy! Hardly any of them broke. In fact, I can’t remember if any of them broke at all. Perhaps even the embroidery holes could be poked with a pin…? Probably not, but worth a try, I suppose! Then again, there’s also the issue of actually working the embroidery….
Hi, Karisa – blowing the eggs by mouth works fine, but doing the holes with a pin would take forever and be quite painful for the hands! By the time you had enough holes to work the embroidery, the egg would also be significantly weaker, so pushing a pin into the egg becomes a more difficult proposition. The dremel drill works great – it’s just a matter of having very fine tips for making small enough holes.
Thanks! I just completely read the whole entire index about egg embroidering. Definitely not something I could accomplish right now, but perhaps someday… I am just amazed by it!!
Hi Mary – Happy New Year! If I were going to try this then as long as I had some holes on both sides of the egg I could put a straight needle right through the egg to the “back” and return it (very precisely so I don’t pierce the thread) through the same hole. No stitch would be made on the “back”, while allowing me to advance my needle to the next hole on the “front” of the egg to complete a stitch there. Of course the “front” and “back” are simply relative to each other, such that a fairly long a straight needle could get all the way through… And you can probably “angle” the needle through to more than one hole from a hole on the opposite side. I may well work a bit on one side, then a bit on the other and so on in order to keep as many holes available on opposite sides as I can. At the end, when all the holes are getting pretty full I might have to move to finer needles (so save my finer threads till last?) – but I think it would work and you could stitch all over an egg this way. Has someone else mentioned this already and I’ve just missed it? If I were going to play with the technique, I’d try something like a ping-pong ball first before stitching on a real egg just so I wouldn’t be so nervous!
Hah! Ignore me – I just found your post on Embroidered Eggs – stitching lines and swirls. I see that it is, indeed, pretty much the idea with the needle returning through the same hole!! That’ll learn me for not reading everything first. Lovely puzzle, though, isn’t it. I’d love to teach this to kids on a ping pong ball. They’d feel like magicians.
Nice save on the cracked egg. In art there are no mistakes, just creative opportunities!
Ich suche solche Bücher in deutsch
Simply amazing!