


Last night before hitting the sack, I snapped a couple photos of the miniature stitching project I’m working on (and that I just spoke about two days ago…) I promise I won’t be updating you every single day between now and next Wednesday (when I intend to have this embroidery project finished), but the fact is, I wasn’t actually convinced that I’d finish by next Wednesday, until I took these photos last night. There’s not that much left to go – and I’m pretty excited to see the end so close at hand!
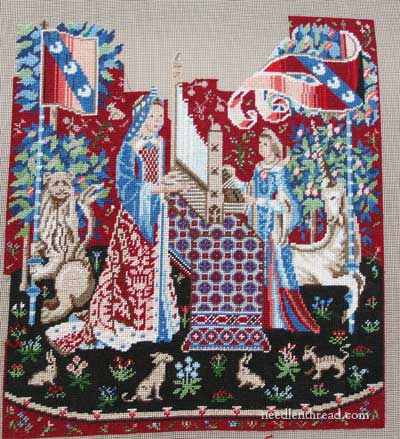
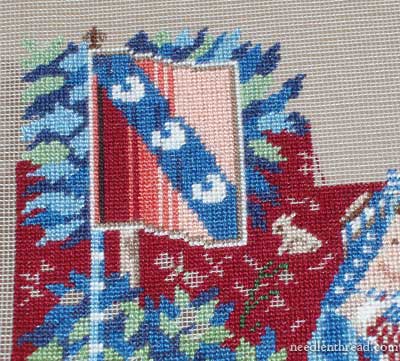
The foliage around the banner is somewhat fiddly, with the color changes in there. Now that this area is stitched, I know I’m in the home stretch. The rest is just background.
This is the part that’s had my attention the last couple days. And that bunny – that wee bunny – is just too cute. He’s my motivation for getting to the other critters in the background! He’s only about 1/4″ high.
What’s left: the pods in the foliage under the left banner, and the background above the organ. I have six days, in whatever stitching time I can snatch. Will I do it?! You bet I will!
Um… well… barring the emergence of any crises, disasters, acts of God, or anything of that nature.
Coming up on Needle ‘n Thread: Stitching Fluff. Now, you can translate that however you wish – but you’ll have to wait to see what I’m talking about. Also, some needle talk!
See you tomorrow!
Dear Mary
Knowing you you will finish by next Wednesday, good luck anyway.
I can’t wait for the update on fluff & needles. I love talking about needles and the different sizes also counted fabric and thread, what does it all mean, “oh the mysteries of needle work.”
By the way just to let you know I’ve started the long & short stitich samplar it doesn’t look to bad.
Take care transmit later
Anita
Mary el final está cerca, el miércoles seguro que el proyecto estará terminado.
Lo vas a conseguir.
The end is near, on wednesday the project will be completed.
What you get!!!!!!
You can finish this, Mary! It is amazing how much you are able to accomplish in addition to your teaching. Speaking of your teaching, now that we are nearing the end of the school year, will you update us on the students’ Spot Samplers? We haven’t seen those in a while. Thanks!
Dear Mary,
I love the bunny! You’re in the homestretch and it is looking fabulous!
Mary, I think you mentioned in an earlier post that you were working this with multiple threads going at the same time. I haven’t done much cross stitch and have never carried threads on a project. How does that work? Don’t you end up with loops on the back of the piece?
Julie F.
G’day Mary, I was going to comment on the bunny before I’d finished reading the whole post. Thought I’d better read it all first, and there it was! I can’t remember what’s to come and won’t look it up again but will wait for the surprises. Your’s in anticipation, Kath.
Hi Mary,
Watching your progress with this work has been a good reminder that even the longest journey is completed one step at a time. It has inspired me to begin an odyssey of my own.
I was recently given a tablecloth-sized piece of wheat coloured evenweave linen from Austria. It’s about 12ct or maybe 14ct. Apparently it is commonly used for a type of cross-stitch called Ebenseer. I was wondering if you’d tried this technique. It results in a back that can look as good as the front. Here are a couple links: http://romyaustria.over-blog.com/article-1066226.html http://www.hamburgerstickladen.de/shpSR.php?&c=e&p1=377&p2=385
Cheers,
Jen
Hi, everyone! Thanks for your comments and questions. Let’s see if I can answer a few….
Jen – thanks for those links! The red and white tablecloth in the first link is STUNNING. I love those kinds of designs. I definitely think you should start your tablecloth! Have you thought about what color to do on the wheat-colored linen? White would look so elegant! That would indeed be a journey, but imagine the satisfaction when completed! (No, I haven’t done this particular kind of cross stitch. It almost looks like long-armed cross stitch in the photos on the second link, though. I think you can achieve regular vertical stitches on the back with regular cross stitch as well.)
Kath – oh, yes, the bunny! It is SO cute. I love its tininess. I was thinking it would be darling done isolated on a little tiny piece of silk gauze, and made into a pendant necklace or something of that sort!
Julie – yes, I work with multiple threads going at once, and you can actually see that in some of the photos along the way. Here’s an example of what I do: on the foliage around the banner on the left side of the piece, I started with the darkest blue at the base of the right side, and I worked all the dark blue on that side of the banner, carrying my thread when necessary from one section to the next. The thread carried on the back only a very short distance, because the different “leaves” in that section are mostly the darkest blue. Then I started up the side with the next shade of blue and the light green, trading off the areas where I was filling in that color. It’s kind of “leap frog” stitching – first I’d stitch a blue section, but I wouldn’t end off the thread – I’d bring it to the front, out of the way of my next stitches. Then I’d stitch a green section and leave the thread, bringing it to the front out of the way of the other stitches, then I’d pick up the blue thread again, and run it under the back of the green section I’d just stitched, and do the next blue section. Then I’d go back to the green thread, and run it under the blue section I’d just stitched, and bring it to the front again and stitch the next green section. The sections are very tiny, so the threads aren’t carrying very far, and they aren’t loose on the back of the work – they are run under the back of the stitches, until I get to the area where I want to stitch the next color. If I’m working in any open area where there aren’t any other stitches, and I have to move to another area of the same color that is close by, I just move over to that area, which leaves the thread crossing the back of the silk gauze, but when I fill in the stitches around that area, I make sure I’m stitching over the thread on the back, in such a way that it doesn’t displace the stitches on the front or show through. So in that way, you can stitch a multi-colored area without cutting your thread a dozen times.
Patti – Ah, the spot samplers. The students have them now, and I didn’t take final photos, but if I have a chance before the year ends, I’ll see if I can!
Marisol – yes, very near! I have 15 minutes right now, and I think I’ll add a few more stitches!
Thanks again for your comments, all!
~MC
this is quite an amazing little piece…it is a joy to see it almost done…. silk gauze is just way too tiny for me, but it is quite something to see it done. What will you be doing with this piece?
ktj
Oh, Mary!!
This piece is amazing, and the bunny is darling! I am in awe. 🙂
I subscribed to your blog because I love gorgeous hand embroidery. Your blog has been pure eye candy, and inspiration in abundance. I’ve done very litte hand embroidery, but have several projects I would like to start. You’ve helped me overcome a lot of my fears. The information about how to stitch a multi-colored area is not only clever, but just what I needed to finish a wolf piece I started 15 years ago.(It must have every color of grey ever dyed!) I sat it aside because of all the fiddling – starting and stopping. My DDH’s wolf may actually get finished, and after I watch your videos I’m goint to start a practice piece. Thank you, thank you, thank you!!!!
Mary that is a great idea to have a project that is portable. I am always going to my friends house and toting so much stuff back and forth. Tomorrow I am going to pick a project to work on and put the things together for it. In a seperate tote. Then I will work on that project when I am over there and work on a different project when I am home. I was always afraid of running out ofm things to do so I would tote way to much stuff. I hope this makes since.
Ah! I get it. I didn’t understand that you were running the threads under stitches when you moved from area to area. It makes sense now.