


Yesterday, working with my one-and-only student right now, we transferred an embroidery design onto a piece of velveteen. We managed the transfer in three steps instead of two. I’d like to show you the beginnings of the work, and tell you about our decision process along the way.
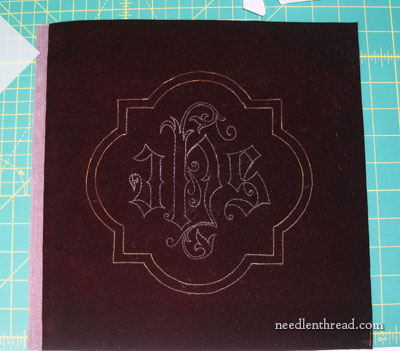
Here’s the design transferred onto the velvet. Now, you may notice that there’s been a plethora of talk on ecclesiastical needlework on here lately. This has to do with my summer embroidery “class.” In fact, I took on only one student this summer, with whom I meet twice a week. Her desire was to work together through some church embroidery projects of her choosing so that she could learn along the way, so that’s what we’ve been doing.
This particular project (it would fall under the heading of “sacred monograms,” I suppose) is 8″ across at the widest points of the quatrefoil. We’re working it on a dark burgundy velveteen (100% cotton). The velveteen will be backed by linen, once the piece is mounted on the frame.
Concerning the transfer of the design: normally, I would prefer to do this type of transfer after the ground fabric is mounted on the backing fabric on a slate frame. Unfortunately, I only have one slate frame that will accommodate this piece, and it was in use. So we went ahead and transferred the design onto the fabric as it was, and we’ll mount it later.
To transfer a design onto velvet or velveteen, the prick-and-pounce method works like a dream. I use a white-ish pounce powder for fabric this dark. After the design is pounced, the next step would be to connect the dots by drawing or painting in the lines.
We did both!

To connect the pounce dots, I used a Bohin mechanical pencil with white ceramic lead (shown on the right in the photo above). This is a terrific pencil for drawing on velvet and velveteen. The letters in the photo above are drawn this way. The pencil draws nice and smoothly, and the ceramic lead makes a very clear line. If I didn’t buy the Bohin pencil for anything at all but drawing on velvet, I’d still be happy as a clam with this pencil.
But there is a difficulty when working with any kind of chalky line on this type of fabric. While the line is sharp and visible, it won’t last long at all. It brushes right off the velvet, which is a good thing when you want to remove the transfer, but a bad thing if you don’t. So the third step of our transfer process was to paint over the pencil lines with a gold-colored opaque watercolor paint and a tiny brush.
The Logical Question: Why draw the lines in with the Bohin pencil first, before painting? Well, to tell you the truth, it was a mistake! A happy mistake, but a mistake nonetheless. I planned on just using the Bohin pencil, but we noticed right away that the design would very easily smudge off, even if the fabric is covered with a protective layer of tissue paper during the stitching. I loved the way the Bohin pencil drew on the velvet, though, and best of all, it made painting the lines in much easier, on two counts:
1. When painting over pounce dots, they tend to gum up the brush. 2. When connecting the dots in the complicated areas of the designs, it’s sometimes hard to follow the dots.
But once the design was traced on with the Bohin pencil, we could shake off all the pounce powder. No gummed up brush, and a clear design, so we could paint with confidence.
Once the paint was dry, I took a soft brush and brushed lightly over the velvet to remove the ceramic lines and any pounce residue. The whole process worked great!
True, it was an extra step, but it was worth it. My conclusion at the end of our little class: This is going to be my go-to approach for transferring designs on velvet and similar fabrics. I love it when discoveries like this happen.
So what about you? Do you ever embroider on velvet or similar piled fabrics? If so, how do you transfer your design? I’d love to hear! Feel free to leave a comment below.
Tomorrow: I’ve got a book review for you that I’m really excited about. I read this one cover-to-cover the day it arrived, and loved it. I didn’t intend to buy the book this year, but I’m glad I did. I learned a lot of Very Interesting Stuff from it and enjoyed it immensely. I’ll show you the book tomorrow, and I hope you end up liking it as much as I do!
I would like to see some more of this project, Mary – I haven’t embroidered on velvet, but I’m interested in how it works. Couching gold threads I can see would work well – can you sew with ordinary threads as well or do they get lost in the pile??
Many thanks as ever for your daily chat, I really look forward to it!
Have a lovely day – Judith
Hi, All – Thanks for your comments!
Judith – good question. Regular stitching does get lost in the pile, usually, depending on how deep the pile is and how heavy your thread is. Even with couching these gold threads, we’ll be using padding on part of the lettering, both to lift the lettering and also to avoid the pile from protruding between the gold threads. I’ll show it to you as we go along!
~MC
Thanks for the valuable addition to my tranferring “bag of tricks”. I always find this one of the more difficult aspects of my projects — picking the right transfer method. Sounds like your “experiment” (w/ the ceramic pencil) provided some valuable insight. Hurray!
Hi Mary!
It’s an interesting topic and am sure each one has a different method to transfer.I do trace out the design on to a thin paper and tack it on the velvet fabric,then work tiny running stitches (picking up both paper and velvet)on the outline of the design and once I finish the entire design I use to tear off the paper.I’d learned this technique from my mother and it has worked out well for me. I normally choose a bold design which will be completely filled and trust me the running stitch will not be visible.
Anita.
I’m planning a beadwork embroidery project on dark velvet (a dress!) and my current idea is to trace the pattern on a piece of silk gauze and stitch over it in place, pulling the threads out at the end. I know there’s going to be trouble with shifting, but I can iron the gauze to freezer paper for the tracing part and use a lot of tacking stitches afterward. It seems a bit cleaner and easier in the long run than tissue paper, since the threads don’t tear as easily, and for this project I’ll just plain feel better if I don’t have to worry about covering my lines 🙂
Awhile ago you did a couple of posts on using Solvy to transfer patterns to velvet. Any pro’s and con’s between the methods (except I hate the idea of stitching through ‘plastic’)?
Off to get a Bohin (to the theme of “Off to see the Wizard”)……they come with a set of mixed coloured leads too! Found some on Ebay.
Fabulous timing! I just got some silk velvet with the idea of doing a combination of sewing, couching and embroidery to decorate it before I stitch it together…but afterwards couldn’t figure out how to transfer the pattern. I found a very similar mech. pencil with white lead at Hobby Lobby today that I think will work like what you suggested- altho’ now am considering replacing the silk velvet with velveteen which has pile that is way less deep!
Wow Mary! I learn so darn much reading your posts! I’ve only stitched once on velveteen, and that was with wool threads. It was Jenny McWhinney’s Jingle Bells Christmas stocking, and you can see it on my blog if you click on the Christmas label. I used Solvy for the pattern. You just trace the pattern on a thick piece of Super Solvy, tack it to the velveteen, then stitch away! Yes, it is a plastic, but as it dissolves completely in water, it does go away and does not stick to the fabric at all. It works quite well for colorfast wool embroidery, but I don’t know about really fine embroidery, especially if there are metal threads involved. You certainly wouldn’t want to wash those.
I have used a Clover white iron-off marking pen to draw on velvet, rather than paint. It produces a very fine clear white line that won’t brush off.
One method that I’ve used to get the design onto the velvet is to trace it onto tissue paper or fine fabric, pin that onto the reverse side of the velvet and go over it with a pen. This changes the pile direction under the pen lines, so when you turn the velvet over, you can see the design. Then go over it with the clover pen.
I have a similar pencil with ceramic leads, not Bohin another brand the name of which escapes me right now. My leads are green which works well on white or off-white backgrounds. I have been using it to draw free-hand designs that I embroidered and liked it very much. I don’t know whether the ‘lead’ is better archivally speaking than air drying pens, so if anyone knows I would appreciate the benefit of their wisdom, thank you.
hey anita,
can u explain that method again,
i mean do u keep the paper on top, then stitch n cut it. please comprehend a little bit.
i would be grateful……
Hi Madam,
You are right,place the paper on top and then stitch .Will try to take photographs and send it to Mary sometime soon.
thank you anita
je vous remercie pour vos precieux conseils mais es ce qu’on trouve ces CRAYONS en ALGERIE OU en SUISSE.MERCI
Hello, Mary
Thank you, again, for your generosity in sharing your videos and instructions . . . .
I’m a ‘beginner’ . . . and . . . probably . . . because I didn’t know any better, I used a ‘cloth-type’ WATER SOLUBLE (white)stabilizer used in machine embroidery to trace my design on and then based that on top of the burgundy cotton velveteen fabric of my project. The first time, I used a PERMANENT marker, but that was a mistake. It faded into the thread when the water dissolved the stabilizer. Then I tried a water-soluble fine-line pen, and that worked beautifully.
Sandra Dorbandt
I have been asked to embroider our church’s name on a velvet banner. Thanks for helping with the marking. Any advice on the actual stitching? I have a choice of threads and methods.
Bonjour Marie,
J’utilise un voile thermocollant où j’ai transferé le dessin et je fais des petits points en suivant celui-ci sur l’envers du velours.Certes double travail mais mon dessin sur l’endroit est impeccable.
I am new to cross stitch and i have a cross stitch kit that i really like but the co. Has used very bright colors for the printed canvas and i need 5 strands of floss to cover the color. What no. needle should i use?
Hi, Irene – you’ll probably need to use the largest tapestry needle you can get ahold of. I’d try an 18.
How glad I am to have found you! Many years ago I had taken a class in goldwork on velvet. The teacher had prepared the fabric with the pattern ahead of time, and it was a thin white line that appeared to have been painted on. Recently I have been contemplating a project like it, but was unsure of how exactly to proceed – now I know! Thank you so much!