


“Prick and Pounce” is a method of transferring an embroidery design by using a pattern that is pricked with tiny holes, placed on the fabric, and then pounced all over with a powder that filters into the tiny holes, leaving tiny dots on the fabric. Nowadays, the prick-and-pounce method of embroidery design transfer gets very little attention in the everyday embroidery world. Perhaps it’s because we have so many other design transfer methods available – from iron-ons to water-soluble transfer materials to “disappearing” pens – that we tend to think prick-and-pounce transferring is a bit passé. If not that, it may simply seem too labor-intensive or too messy to bother with. And so, we don’t.
But this seldom-used method of transferring an embroidery design has been around for a long time, and it’s still used, for good reason: it’s reliable.
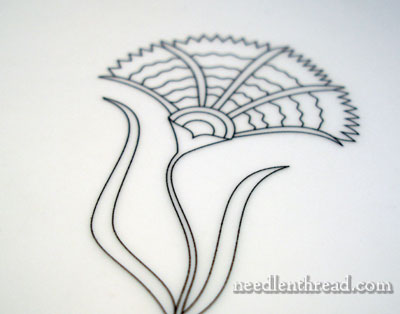
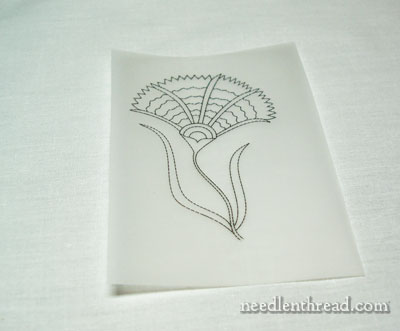
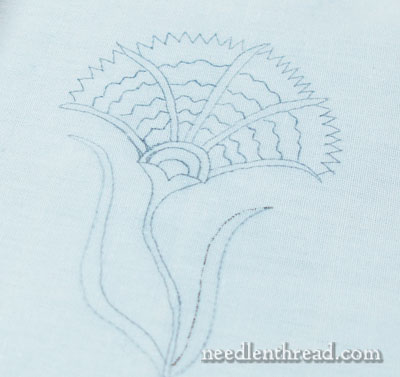
Now, this is a wee little embroidery project – the design is about 3″ high. On such a small project, I would normally trace the design, but using this method will give me a permanent pounce pattern that I can re-use as often as I need to. Once the pattern is made, it’s really just a matter of a quick pouncing and tracing, and it’s done – it’s really not as time-consuming a process as it seems.
So you start with your pattern. It’s best to have the pattern traced or printed on vellum or a heavier tracing paper, so that the paper doesn’t tear when you prick the smaller detailed parts of the pattern. A heavier tracing paper is easier to work with and will result in a pattern that lasts, whereas a lighter tissue-type paper won’t last as long.
I printed my pattern straight from my computer onto the vellum.
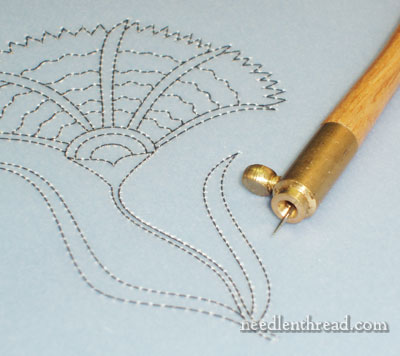
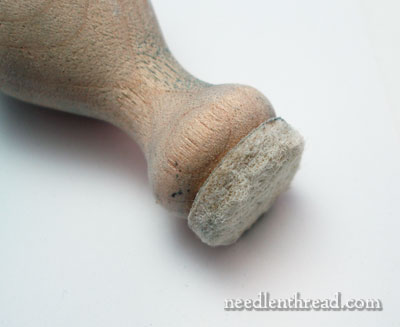
For the pricking part of the pattern, I used the wooden shaft that holds a tambour needle, but instead of a tambour needle, I’ve got a tiny eyeless needle (a tattoo needle, to be precise) mounted at the tip. If you don’t have these tools lying about, never fear! A #10 embroidery needle works just as well, and you can hold it in your fingers to prick the pattern, or you can push the eye end of the needle into a cork, which will give you something more substantial to hold onto.
Prick the pattern, following all the lines and spacing your holes about 1/16″ apart. Using a very small needle (like a #10) makes this easy, and keeping the dots close together and small ensures that you can transfer even the most intricate details of your design.
When I prick the pattern that I’m using, I always make sure that I end up with a hole at the beginning and end of every line and on every pointed part of the pattern. Anywhere a line terminates or intersects with another line, make sure you have a hole. You can always prick the ends of lines and the intersections first, then go back and pierce along the line between those points, spacing your holes to fit between the terminal points. Once you’ve pricked a pattern a few times, it becomes really easy to eyeball the spacing.
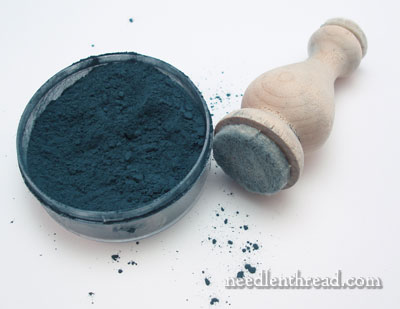
Now for the pounce. Pounce (dark pounce, like the stuff above) is simply powdered charcoal. It used to be sold (for a fairly pretty penny, for this small amount!), but it’s hard to find these days. Tanja Berlin sells charcoal pounce, which she makes herself. You can also find pounce substitutes out there – especially in white, which I’ve seen at quilting stores. But dark charcoal pounce is the traditional powder of choice for pouncing a design, and your best bet, if you’re looking for it, is to get it from Tanja Berlin, or get brave and make your own. (I’m going to try that one of these days!)
In addition to the powder, you’ll need something to pounce the powder onto the pattern with. There are tools for this, like the one pictured above, but you don’t really need a special tool. You can take a piece of felt and roll it up tight, secure it with a rubber band, and use that just as easily.
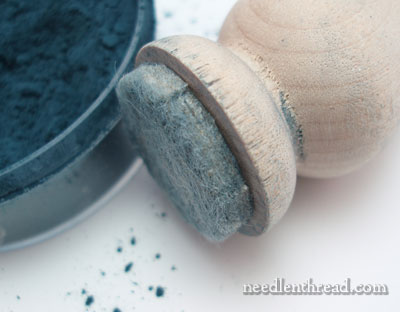
The pouncing tool I’m using is a wooden piece with thick carpet-like felt circles attached to each end. I use the larger circle of felt for dark pounce…
… and the smaller circle on the other end for light pounce. Light pounce is great for transferring patterns on dark fabric. It’s a white powder made from cuttlefish bone.
When it comes to positioning your pattern on the fabric, it is helpful to have a center line drawn vertically and horizontally on the pattern, and similar lines basted onto your fabric so that you can center your design accurately if you need to. For this little design, I’m transferring it onto a piece of white muslin and I just estimated the center.
To hold the pattern in place, you can pin it to the fabric, or you can weight the corners with something. If you’re transferring your design on fabric that has already been mounted in a frame, strong magnets work well to hold the paper in place. Since this piece is so small, I just used my fingers. I don’t advise using tape, because you want to be able to lift the pattern straight up off the fabric, without fiddling too much with it. The point is, you want to secure the pattern so it doesn’t shift, but it shouldn’t be so secure that you can’t easily lift it off.
The right side of the pattern goes up. This is the side that’s smooth (the back side will be rough, from the pricking of the pattern).
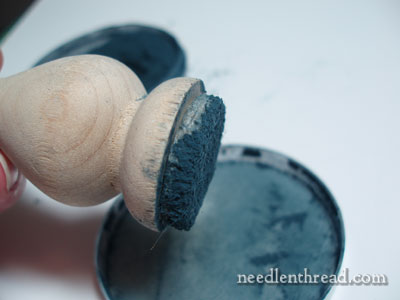
Now for the fun part. Place the felt in the pounce powder so that it is coated with powder.
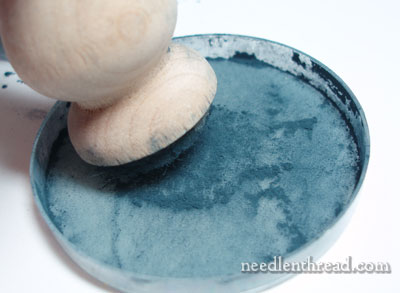
I use the lid of the pounce container to lightly tap off some of the powder. You don’t need to use tons of the stuff – just a light coating.
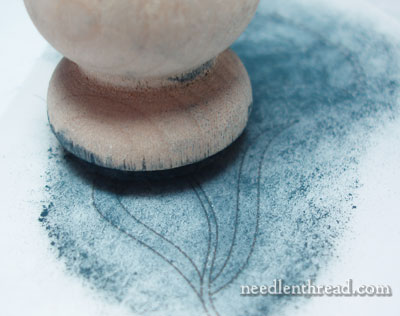
Now, rub the felt over the pattern, or you can lightly “pounce” it, with small taps over the whole pattern. Don’t go wild here, banging the felt all over the pattern – it’s better to go lightly than to overdo it.
I overdid it on the left part of the flower there – that’s where my initial contact was made with the paper. Now, doesn’t that just look grandly messy? It’s not as bad as it looks!
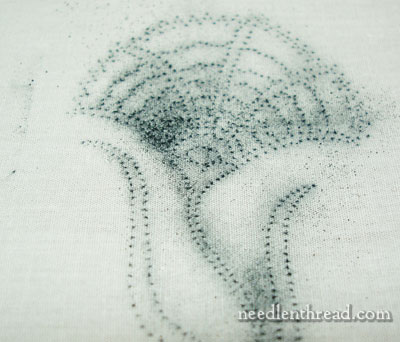
At this point, you can blow on the surface of the fabric and remove some of that excess powder. I like to do that outside, though, or over the trash can, so I leave it just like this and go ahead and trace in the design.
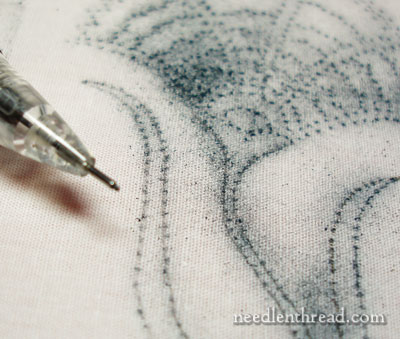
Using a mechanical pencil (or you could use a micron art pen, if you want your lines to be permanent and very visible – and if you intend to cover them completely with the embroidery!), draw over the dots.
If you’re working a large design and it will be mounted for a long time on a slate frame or stretch bars, you’ll want some real permanence to the design. You don’t want the pencil marks to rub away, for example – and you definitely don’t want to use one of those disappearing or water-soluble pens for something like this. On any long-term, larger project that I’m not going to wash, instead of using a pencil, I use watercolor paint and a tiny brush to draw the lines in. You can see the results of this on the Agnus Dei project.
Then, when you’re finished drawing over the dots, it’s time to get rid of the excess pounce. If you’ve mounted your work in a frame before transferring the pattern, it’s really super-easy to get rid of the pounce. Just click the back of your stretched fabric a few times with your finger, and it will all bounce off. If you don’t have a dedicated space for this messy work, you might step outside to do that! I transferred the above design on the fabric not mounted in the frame, so I just stepped outside and gave the fabric a few good shakes. The powder was gone. If there’s any residue, you can use a clean soft brush and gently brush the residue away. Don’t use your hands to smudge it away. If you don’t have a brush, you can even use a crumpled paper towel to lightly brush it off.
All in all, though, the pounce powder blows or flicks away quite easily. A good hard shake or two with loose fabric should do it, or a good flick on the back of mounted fabric will make it disappear.
Now, you may (rightly) be asking – why all the fuss, when you could just trace the design on a light box or a sunny window?
The biggest differences between transferring with prick and pounce and transferring by tracing – whether using a light box, a window, or carbon transfer – are two. The first: you don’t have to guess at all. Often, when tracing via light box or sunny window, especially in very detailed areas of the design, you can’t always see the design lines clearly and you end up having to guess where tiny lines go. The second: you don’t have to deal with pattern or fabric shifting, which often happens in tracing if you’re not careful about the set-up (and sometimes, even if you are). With prick and pounce – especially when your work is already mounted on the frame and you’ve pinned the pattern onto the fabric – there’s no worry about any shifting going on. It is a sure-fire way to transfer a design, even the most intricate design, accurately every time.
So that’s my little design transfer using the prick and pounce method. The focus of the little flower, by the way, is an exploration of satin stitch. We’ll look at that later on!
Any tips or comments on prick-and-pounce design transfer? Have your say below!
In Indian embroidery done on saris or shawls, one often repeats the pattern all over the cloth. There, they usually use this prick and pounce method, with a paste of kerosene and charcoal powder . A tutorial can be found here.
http://sadalas.blogspot.com/2009/03/how-to-transfer-design.html
[ I do not think one would do this on an expensive piece of cloth. ]
Mineral spirits can be used for stain removal on surprisingly delicate fabric. I’ve gotten a nasty sewing machine oil mess out of bright, light silk fabric using mineral spirits followed by rubbing alcohol. I wouldn’t be surprised if kerosene is actually used on more delicate fabrics… It might help lift out the residual pigment after the embroidery is complete.
I haven’t used that for years the early 70’s to be exact… it is like walking down memory lane being with you. thank you
Hi,
Thank you so much for this article. I needed something like this badly because this is the part where I usually mess up and for this reason I am careful not to choose designs with delicate details. But now with this trick maybe I can.
Regards,
Anju
Thank you for sharing this new information about embroidery…. I just had a few doubts… Firstly, Is it permanent? If yes, what if the powder accidently falls in any other area (other than the design) can we get rid of it? Secondly, If this is done on a bigger area, will it look neat ?
Thank you for the detailed explanations. May I add a third reason to use this method? If you have a thick, or very dark fabric, you’ll be very happy to have this way of transferring the pattern onto the fabric.
I just bought a full set of “prick and pounce” with 3 colours (dark, medium, light) at http://www.sarahhomfray.com/ , Sarah is a tutor at the Royal School of Needlework.
Hi, All – Thanks for your added tips and resources!
To answer a few questions:
Valerie – Yes, the design can be reused – like I said above, it’s best to use a heavier vellum-type tracing paper, rather than a light tissue-type tracing paper, if you want the pattern to last. It’s an excellent way to make multiple transfers of the same design.
Eileene – I don’t think a transfer wheel would work. Detailed areas would be problematic, and I don’t think the wheel will give you small enough holes.
Madheeha – No, it’s not permanent. It brushes right off. After using the powder to make the dots, you have to either draw or paint in the design by following the dots. This part is permanent (unless you use something that will wash out to draw with) but the powder itself just brushes away.
Resmi – thanks for the tips on the addition of kerosine. It’s not really necessary for this technique, because you draw your lines in, following the dots. And since the powder doesn’t remain, this method works great on all kinds of fabrics. I’ve used it on silks, velvets, you name it.
Heather – Yep, it’s the same stuff as the cuttlefish bone sold for birds. It can be broken into small pieces then run through the blender to make it fine enough. You can also use a mortar and pestle, but that takes decidedly more time and effort, and you really have to work it to get it finely powdered.
Anne – thanks for the additional UK resource!
~MC
For those DIYers – Cuttlebone is sold in any pet store, in the bird section.
It seems as if the pattern could be reused, then, without having to re-prick it, just pounce on the next piece of fabric. Is that correct? If so, then this seems like it might be a particularly efficient way to transfer a repeated design.
I’ve used the pricking method in cake decorating to transfer a design onto fondant for tracing in piped icing. Of course the pouncing isn’t necessary there, but it’s always fun to see how certain techniques cross the boundaries between various crafts! 🙂
Great idea. I wondered if the little transfer wheel we used to use to mark darts would work for larger prints? Do ya think it would make the holes too large? Inquiring minds need to know. hehehe Eileene
I never thought to do that on vellum that great for multiple use. Do you save them?
I use prick and pounce quite frequently, especially on dark fabrics. I made my own little pounce ball out of some cotton moleskin, and I used some old Lush Talc I had, which had lost its scent. It worked fine!
That’s neat, I’ve never heard of that before!
Thanks for sharing!
Never used vellum, I use parchment paper i.e. from the kitchenwares section, and I do save some. Not enough. I’ll have to try the vellum method but vellum is VERY expensive.
mary, what a delightful read! i have wondered about the prick and ponce method having read instructions on how to do it numerous times. as always you took the mystery out of it and have made it my next method to try. thank you so much.
I use an old, no-longer-sharp, machine needle to do the piercing. I save my larger-size needles in old pharmacy containers for the purpose. I sometimes raise the pressure foot tension (not the thread tension) so as to get “footmarks” or “toothmarks” on the bottom of the paper so it doesn’t slide across smooth fabric when I’m doing the pouncing. This of course only works on one copy at a time but if I’m working on satin or other “slicks” I always try to get the bottom of the paper pattern roughened up a bit.
Papers can be stacked and all pierced at one time if multiple copies are needed (I do this for use in class when I am handing out same design to each student). And it’s lots easier on my now-old thumb joints than doing it by hand.
Realized after I sent the last post that I didn’t make clear the fact that I use the machine with old needle in it to make the holes. Just a matter of following the line with stitch length set as desired for pouncing.
Hi, All – Thanks very much for your insights!
Susan – the sewing machine method sounds like a good idea! I may have to try this!
Zuzu – The paper I’m talking about isn’t “real” lambskin or calfskin vellum. It’s just the “vellum” they sell at art stores, in the art paper section, for pen-and-ink tracing, drafting, etc. It’s a heavier, smooth tracing paper. I usually buy it in either tablet or loose packages, and I haven’t found it to be too expensive. Cooking parchment would surely work just as well.
Deborah – yes, I save them in a zip lock bags that I slide into a file folder.
Katie – yes, it works fine on fine linen. It works on any fabric, really. I’ve used it mostly on linen (fine and medium weight) and never had a problem.
Kimiko – I’ve tried chalk dust but have never been satisfied with the results. Also, instead of “bouncing” try rubbing lightly, so that the paper doesn’t lift off the fabric in between bounces.
Thanks again for your comments!
~MC
Thanks so much for this post… Just one question though, how well does this work on fine linen? I will be doing some handkerchiefs for my best friends wedding and using a light box or a window for transfer just won’t work especially since I’m using Legacy linen and it’s expensive (don’t want to be messing up on that!). Love your website by the way, I visit almost everyday and always find wonderful new things!
Thank you for covering this method of design transfer so clearly. I recently went to a class that covered various methods of design transfer, including this method although the teacher used a fabric wad with a piece of kid’s chalk crushed up inside for the powder.
Something I found in my testing of this method during that class, was that I got more chalk through from the wrong side of the paper to get a decent image of holes, but I was pouncing with a bag of powdered chalk, not the felt roll or pouncer you have. It does mean I had to reverse my image first. I will try using your method of using a rolled felt to see what happens in comparison.
I did prick out my next project last week, since it will be going on a dark red/black changeable silk taffeta. I knew from previous experience that it is difficult to get a pattern onto a dark fabric, so this seemed to be a very good way to transfer the complicated design. I am waiting for another slate frame piece before I can begin the actual transfer, so this was good timing.
I printed my design onto cardstock paper, which I then pounced with a quilter’s pin with the big glass head. The pin fit my fingers ok, but I want to get a pricker handle the next time I prick a project. I found that Lacis in Berkeley, CA (USA) carries a number of pricker tools, from cheap to very nice.
http://www.lacis.com/catalog/ (search their catalog for “pricker”)
Thanks again for sharing this historic and accurate method.
Just read your prick and pounce. It was great been years since I used that technique and you are right on target it is very percise Learned about the technique in a class conducted by Eva Lunz I will never forget It was a gold work initial lovely I was working on it when a friend came for tea I was too long in the kitchen left my work under the magnifier and the sun was in the right place through one of the new skylights. Suddenly my friend and I smelled something burning Rushed into room only to see flames dancing three inches high off of my near finished monogram. Never thought it could happen to me…Will try this technique again and use my magnify glass cover.
Thank you for the great explanation. A simmilar (almost same) method is used to trace patterns on walls, for painting designs that require a freehand look but aren’t. To open up the little holes in the paper we used to sand the back of the pattern slightly. Just lghtly rub one or two times over it with sand paper (some holes tend to just close up again, just prick them again, sand again).
I am surely not the only one who remembers my mother using ground cinnamon for pouncing powder. I still have some of her pounced patterns. I have used this method in the past. Happy embroidering.
Thanks so much for this, Mary 🙂 I’ve tried before – with chalk, and ended up with a mess. You have several tips here that I can see will results in a much better transfer!
Great description of the pounce method of transfer! I learned this technique at the Royal School of Needlework, using the ground cuttlefish. The design was then made more permanent by painting over it with water color paint and a small brush (as you had described).
Thank you for sharing!
Parabens pela materia. Agradecemos os diversos comentarios. Registramos que no Brasil, produz-se artesanalmente, rede para dormir com bordado a mão ou a maquina e varandas de chochet. Para a sua confecção repete-se muitas vezes o desenho em todo o pano da rede. E comum o uso de querosene e tinta xadrez (tinta em pó própria para pintura do cimento utilizado no piso das moradias mais simples do nordeste brasileiro. O método de transferência do desenho e eficaz, mas existem relatos de que o uso desta mistura (querosene com tinta xadrez) vem causando problemas de saúde: doencas na visao (glaucoma) e doencas respiratorias. Já buscamos informações de outro produto que possa vir a substituir o querosene, mas não obtivemos respostas satisfatórias, pois consideram o método da transferência (papel furado com o uso da tinta) ultrapassado. Com gratidao, Abigail
G’day Mary, Cuttlefish? Mmmm, so it’s not actually charcoal? We get powdered charcoal for art/drawing purposes at the art supply stores here in Australia. It’s beautiful stuff for artwork but I can’t see it flicking or brushing off fabric. So, dark pounce would be ‘dyed’ powdered cuttlefish? Interesting. Thanks, cheers, Kath.
Hi, Kath – the cuttlefish is for a light powder to use on dark materials. The dark powder is charcoal, for use on light fabrics. ~MC
1. Exactky where whould I find a cork – I haven’t seen one of those in years – and I have been around for quite a few of those.
2. won’t the colored powder stain the fabric?
3. I think it would be more time consuming then just tracing with a light box and less messy.
But thanks anyway
Betty
Hi, Becky –
I use left-over corks from wine bottles, when I need to make little prickers for card-making and so forth. But you can also buy very inexpensive bags of small corks in craft stores. The powders don’t stain the fabric – they brush right off. I don’t go for colored chalks (like regular classroom chalk) but I do know that they make a blue transfer powder that is supposed to work well. Blue is always a good choice when working whitework, as the white absorbs the blue, if there does happen to be residue. But I’ve never had any residue from regular pounce powder. Yes, it is an extra step or two, compared with tracing, but it is the best method for getting an absolutely accurate transfer, without distortion, without missing anything in the tracing process, especially if you’re using heavier fabrics that are more difficult to see through – certain silks, darker fabrics, heavier linens, etc. At first it may seem like a lot of trouble, but it actually goes really quickly, and it’s an especially good method, time-wise, for transferring the same design several times.
~MC
Hi there Mary,
Fabulous read……………I learned the trick of using the sewing machine to make regular holes in my dressmaking( In Kenneth Kings Couture Book) patterns……….to mark seamlines and other markings on the fabric.
Would love to know what you think though. I bought a pounce pad as was suggested and a supply of blue and what powder. However, what did I do wrong…………..I filled the pounce pad as the instructions stated and banged it for 10-15minutes to make sure the pad would be covered………you have to do this for the first use.
I have only done it once and found that the powder started to come off before I had got to all I needed to do.
So, my question is……………….why didn’t the powder “stay” on the fabric??
I have resorted to other methods, but would love the prick and pounce to work for me……..I must be doing a dumb blonde trick somewhere along the way…..LOL
Hi, Marysia – Weeeellllll….. I haven’t used the blue powder you’re talking about. I’ll tell you what I do with the powder I use (the grey is charcoal powder): I work the felt pad into the powder and knock off the excess. I don’t I just pat it in there a couple times, and then tap it lightly in the lid of the container to remove the heavy excess. Then I rub it on the pattern, and then as the powder wears off, I tap it back into the powder, and then tap it lightly in the lid, then resume rubbing it on the pattern. It’s not vigorous at all, in any step. It works every time, so I’m not quite sure what the deal with the blue is. I’ve never heard of working the powder into the felt pad for ten minutes or more the first time you use it. Maybe you’re supposed to do that and I just didn’t know that! But I’ve never done it, and I’ve not had any problems with my prick-and-pounce transfers. It may be something different with the type of powder, too. I can really only speak for this charcoal powder (in the dark) and the cuttlefish powder (the light). Both have worked well for me.
Hope that helps a little bit!
~MC
Thank you Mary for this very informative lesson! I had bought me some of the white pounce product at a quilt and sewing event this past spring despite not getting info about how to use it. I figured Id experiment on my own and learn as I go. Now, thanks to you, I will know what to do!
Thank you again Mary!
Roxanne
Ps. Love reading your daily blog-its as if we are two long time friends keeping in touch!
Mary, Wonderful explanation for pouncing. I will be teaching a class in 2012, and plan to use this method to transfer the pattern (after I practice using it on my own!).
As to Marysia’s problem: I think the “pounce pad” she is talking about is one that I’ve seen used for drafting. The pad is filled with the powder and then pounced on the paper. I think she’s not using a separate pad dipped into powder, but a pad that’s filled with powder. Of course, I may be wrong!
Anyway, thanks for a really GREAT Blog. I’ve learned soooo much.
Cathie
Hi Mary,
Love reading through your blogs everyday. Very Very informative!!! Just wanted to let you know that instead of pounce powder I used washable paints which is non toxic( Tempera washable water Color paint). I also used wax paper instead of the regular tracing paper for the design.If the design is not very clear I fill in with the same paint.
The clean up part was very simple,since it was a washable paint.
Thanks Again!!!
Shobhana
Thanx, Mary for the prick n pounce tute! I have a piece of embossed felt I wanted to stitch one of your letters onto but was stumped about how to transfer the design as it`s too thick to see through for the light method and cannot be ironed for the transfer pencil method as ironing flattens out the embossed design of the felt.
You`ve solved it for me! I`m off to prick and pounce.
Hello,
we use the pounce powder and fix it with a sprayer filled with water and 95degree purified alcool on the fabric. Unfortunately i don’t know if the pounce powder i use is charcoal, so as usual try on a piece of fabric before. But the design stays and then the dots dissapear after washing.
This is all very new to me. I am just a beginner. The ultimate project I would like to work on and which is also a present is a pulpit hanging for my brother in law”s church. The design is a bible verse and I would like to embroider it on velvet. Help please with transferring my design.
ı found your explantaion very clear and helpful. I am intending to do a piece of work on dark burgundy velvet and am hoping your method will work. I am just supposing that after pouncing I would use a pale gouace or watercolour to stabilize the powder. Any alternatives to ground cuttlefish as ı live in Turkey and am not sure that I could get that here?
I was a bit in a hurry when I was starting up my latest project http://www.immortalgeisha.com/ig_bb/viewtopic.php?f=60&t=17858
from Young Yang Chungs Painting with a needle, so I used cinnamon as the pouncing powder, and I used a white watercolour pencil to draw up the design. The cinnamon brushes off relatively easy.
Tania
I was wondering if anyone knows of a machine that does a prick method. The reason I asking is my mother years ago had someone who would take a picture and be able to use this method on onion paper. I wanted to try and find it and I cannot. Has anyone heard of anything like this?
You can use any sewing machine, without thread, for pricking paper. You just have to go slow…
Hi Mary,
I’m about to embroider a bunch of patches on black linen, and this sounds perfect – but what can I use to join up the dots of the pounce?
Thanks!
Hi, Laura – you could use several different things: a fine white tailor’s marking pencil, or one of those ceramic lead pencils (made by Bohin and also Sew Line makes one – they have white leads for them). You could also try a very fine white or light colored gel pen – I’ve heard of some people using those with good results, though I haven’t used them myself. You could also use a very fine paint brush and yellow water color paint. -MC
I’ve only recently discovered your site while I read and watched as many tutorials as I could find about Aari/Maggam and Tambour embroidery. This is information is also very helpful.
I’ve watched some videos where a type of wet clay is used on dark colors to transfer pricked patterns. At least one of these looked like the pattern was made of a type of thin vinyl, reusing it for different color ways.
Thank you again for sound advice delivered with good humour! When I came across water-soluble pens they sounded like an embroiderer’s dream come true – particularly for this embroiderer. Looks like I’m back to watercolour paint or micron pen – I already use prick-and-pounce and a window.
Hi Mary
Another great article…I wonder whether cornflour would be a good alternative to cuttlefish bone powder or talc? it is very fine although I’ve not tried it yet. I think I read somewhere that it was another option for pouncing. What are your thoughts?
Yes, I’ve heard some stitchers using cor starch – it apparently works. I’d be certain of thorough removal, to avoid bugs from the edible corn starch – just in case.
Hello dear Mary……..
Thank you very much for al the información about embroidery and your BEATIFUL web page
I’ve watched an history tv program about restoration of cathedral painting, and this method has been used by renaissance artist to trace their painting line, I’m so grateful this method is also udeful on tracing pattern onto felt, since carbon paper can’t do it.
fantastic
I use activated charcoal. You can buy capsules from the pharmacy, just empty some out into a container. It’s much more reasonable than the traditional stuff and very fine and smooth.
We use this method. But we add liquid to the powder so the liquid runs through the holes. Also we use a prick-machine.
Hi there, I am new at embroidering, I have done about 6 pieces so far. All were done with either iron on patterns or tracing paper (which sometimes – depending on the material – just doesn’t work). I was googling some stuff on where to buy pretty wooden hoops and ran across this. YEAH! I think I can do this and it looks very easy! Thank you for sharing it, I’m going to ‘pounce’ right to it!!
I have really been bitten by the embroidery bug, but having terrible trouble finding patterns that really challenge me. I have bought a number of very good pattern books, and would like to make up my own designs from these to fulfil various scenarios but I just cannot, at the moment find a way of transferring these patterns onto black fabric (my preferred background colour/material). I’ve tried pouncing, and ended up with a terrible mess, and tried transfer papers, which produced indistinct patterns which would be very difficult to embroider over. I shall try you “pouncing method” and perhaps let you know how I get on. The alternative, if this doesn’t work, is to continue to rely of the imagination of other pattern makers and buy my patterns from them; a far less challenging proposition !
Hi, Rob – Another option is to use tissue paper with the design drawn on it, place it over your black fabric, and then use tiny running stitches in an easy-to-see color of sewing thread and stitch over the whole pattern. Then, scratch along your stitched area with the eye of your needle, to break the paper, and then you remove the tissue paper – carefully picking out all the bits after wards – and your design is there, ready to stitch. You can remove the running stitch as you go. In some cases, I know some folks don’t use running stitches. Instead, they use a split stitch or similar stitch that incorporates into their design, and the transfer stitches become part of the design. In any case, I wrote an article on this process, and the comments below the article have a lot of good reading and ideas in them, too: https://needlenthread.wpengine.com/2009/02/transferring-embroidery-pattern-using.html
Mary, may I ask what brand/color of watercolor paint you use when traci g your prick and pounce? Thank you!
Hi, Julie – I use these watercolors. They don’t have to be super fancy, and you don’t need a lot, but they’re good quality and affordable.
Hi Mary, just catching up on some of your emails and this is the first time I have ever heard to use this method for embroidery. It does make since for accurate pattern but to date, I have only used this in quilting. I do have the white and blue pounce. I have always thought this kind was just a chalk, like the kind used in dress making. When you say charcoal, as in charcoal used for Art? If so, all I would need is crushed charcoal pencil?Now I am going back to the main article to learn more, it never ceases to amaze me the things I learn everyday from you. Thanks.
This method is used at the embellishment companies in Paris, but the have a tool that does the pricking. Any idea where that tool is available. I do tambour beading and would be a real time saver.
Hi, MaryAngela – I think you’re talking about the machine they use to do the pricking for the design? I’m not exactly sure what it’s called, but it’s a large machine and what you normally see in the videos is just the hand-held section of it. I think it’s pretty much the same concept as a sewing machine – kind of like the “sewing hand” that Josef Madersperger invented in the early 1800’s – but structured with a flexible tube attached to the machine itself. No idea where to find them, or what they’re called, though. You might look up Alex Askaroff. He is a sewing machine historian and might be able to give you some insight. He has a website, here: http://www.sewalot.com/index.htm and he is on Facebook as well. You might try that route.
For lack of any other alternative I bought activated charcoal capsules from the pharmacy, and mixed with a little baby powder for a dark grey pounce. It worked surprisingly well and doesn’t cost to much, also you only open as many capsules as you need, the rest stay nice and clean and dry in the bottle until you next need them.
Many thanks for your information. My concern in using the Prick and Pounce how do I get this charcoal off a white jeans pants.Is there any advice on how to get the design on without the discoloration .Thanks for your input
You can brush it off, Linnett. You can also “beat” it off, by smacking the cloth a bit. If they are white jeans, I’m assuming they’ll be washed? The pounce powder will come out in the laundry…
I know this might be silly question by but can you use this method on Aida fabric. I wanted to transfer design on Aida count 20. Thanks
I don’t see why it wouldn’t work on Aida cloth.
Can’t we use kerosene or some other liquid to make paste of pouncing powder?
Kerosene is significantly harsher. Alcohol completely dissipated. Kerosene, I think, leaves behind residue and a distinct odor.
If you are going to need to use water color paints to stabilize the design or prevent it from disappearing why not prick the design onto a thin sheet of plastic (or perhaps parchment paper) and then use a brush and water colors to paint on the design through the holes in the plastic?
Well, it’s definitely something worth trying – and I have done this with certain types of ink or transfer medium (bluing mixed with alcohol works pretty well) but with watercolors, I think you might be asking for a bit of a mess! Bleeding onto the fabric, and bleeding between the “stencil” and the fabric would most likely be inevitable.
Thank you for the prick and pounce method explained in so much detail and why to use it
Thank you Mary. Again I am so thankful and astounded at the time you spend educating your readers. Truly I don’t know what I would do without your specialist knowledge and your willingness to pass it on. I love in Australia and in the country so there’s not a lot of shopping that goes on here with regard to needlework, especially things like this. I am about to move closer to my home town and have two adorable nieces to educate regarding stitching so I will be able to show them these wonderful techniques and hopefully they will continue to enjoy stitching as much as I do.
Warmly, Alain Louise
Great article! Thanks for all the detail. A question from this newbie: after pricking holes in the pattern, rather than pouncing with powder, could one “pounce” by dabbing the holes in the pattern with watercolor paint and a fine brush? Pull off the transfer and connect the dots/draw in the lines, similar to the directions for pounce powder? Let it dry before moving. Assume using a pale water color on light colored fabrics and a white water color on dark fabrics, all of which will wash out – wouldn’t that be easier? Faster? Your thoughts?
Thanks
I found Charcoal tooth powder on Amazon for $10.99 CAD. There’s nothing in it but Charcoal from coconuts.
ORGANIKA ACTIVATED CHARCOAL POWDER 40 G
Hello, need help transferring a pattern onto a baby blanket using a pattern from a magazine Just watched U Tube using a powder and I am wondering if you sell a kit with powder, fine point pens, tracing paper. Not sure if freezer paper can be used.I need to make 3 blankets.Thank you Christina. Also do you mail orders.
Hi, Christina, Thanks for your comment! I don’t sell transfer tools, but you can make your own pounce powder using corn starch (for white) or powdered charcoal (for black or gray) (You can find it on Amazon and through art supply stores). I prefer mixing a little charcoal with a little cornstarch to get a gray that’s not as dark as the charcoal. For fine point pens, Micron art pens work well. I probably wouldn’t use freezer paper on blanket type material, because removing it could really disrupt the pile of the blanket.
I use a combination of this method and the gel pens…. I use the pen to prick a hole and mark the fabric. Tiny dots are easy to hide among stitches.
So funny that I was looking for information on Medieval pounce used for transferring designs for illuminated manuscripts, and I find myself back here. You are such a font of knowledge.
🙂 I’m glad you found some information that might be helpful!
That embroidery is certainly very interesting and have done a lot stuff definitely will try