


The art of drawing and the art of hand embroidery cross paths quite often. Designers, for example, draw. They even make it a point to practice drawing and keep sketch journals and so forth. And then there’s the whole question of using drawing pencils and pens for design transfer, right?
But here’s a little tip for you on a drawing supply that can save you quite a bit in your needlework budget.
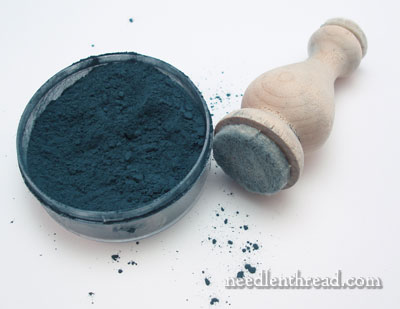
In the photo above, you can see a little round plastic container of pounce powder that I bought at Lacis ages ago. They don’t carry this brand anymore, but when I bought it, I spent around $20 for the white and the grey pounce in this little quantity. There was about 4 tablespoons of powder in the container, new. Lacis carries Spolvero powder now (an Italian dusting powder often used for transferring designs to ceramics or enameled ceramics before they are painted), in blue and in white.
If you live in Canada, ordering Tanja Berlin’s charcoal for pattern pouncing might be a more economic choice. She sells just the charcoal (which she prepares herself) in an 18 gram tub or a 75 gram bag. Both quantities will last through quite a few transfers!
If you live in the UK, ordering pounce from Sarah Homfray is a good choice. She sells a prick & pounce transfer kit as well as pounce powder refills (25 ml quantities in each refill – that’s about 2 US teaspoons, or 6 UK teaspoons), in black, grey, and white.
But what about drawing supplies and hand embroidery? Well, that’s just it. At your local art store, you may be able to find pure charcoal powder among the drawing supplies.
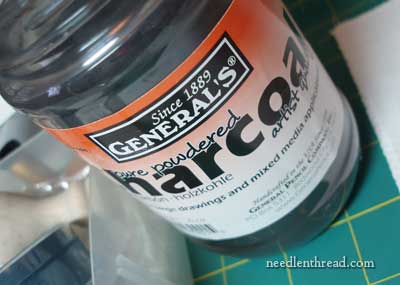
For example, this charcoal powder is an excellent buy. It’s a 6 oz (180-ish grams) jar. You can find General’s Pure Powdered Charcoal online through Blick Art Materials for just over $9 for the jar. They’ve changed the labeling since I bought this jar, but it’s the same stuff.
I’ve been using this jar for a while now and I haven’t even made a dent in it. Unless you do high volumes of embroidery transfers, the quantity will last a life time.
So, the point: when you’re looking for particular tools or supplies that will perform a certain embroidery-related task for you, but you find them pricey or out of reach, think of other art-related or tool-related areas that might require the same type of supplies. Often, you’ll find the same supplies that are packaged and sold for textile arts (needlework, sewing / quilting, etc.), packaged differently and sold for other purposes. And you may find an alternative tool or material that will do exactly the same job just as well, for a smaller investment.
There’s a bit more on this subject coming up. I’ve got a re-packaging doozy for you – a somewhat common material repackaged for the textile market by a very well-known company, with a price difference that’s really phenomenal. Marketers, you see, are geniuses, and packaging is apparently everything!
Enjoy your weekend!
Mary –
I endorse this tip wholeheartedly. I am fortunate to have more nearby art supply stores than needlework stores and rely on them for a host of things.
How do you control your pounce, from whatever source? I am genetically messy and find it all over the room if I’m not careful. So for the best I’ve been able to do is transfer the pounce supply to an empty Mary Kay mineral make-up container (the one with holes in an inside lid) in order to be able to control the amount of pounce that can escape at any one time, and then wear disposable latex gloves to keep my hands clean. The area is still a mess by the time I’m done, though. Is there a non-messy way to use pounce?
Kathryn
I have a very large number of small parts for my jewelry making, and thanks to a friend’s recommendation I found good storage containers at a sporting goods store, their target market being fishermen. Saved some money there!
You are so right about the packaging. Beaders esp. find products available elsewhere that are much cheaper than in your local bead store.
I do have a question though about the use of charcoal for transferring a design. Doesn’t this have the potential of being quite messy? Doesn’t the charcoal have the tendency to get on one’s hands and get smeared to other areas of the fabric.
I must also admit that I, like Kathryn, am genetically messy, so it might be just me.
Karen
Does white pounce show up? After pouncing in white, what do you use to connect the dots, if the fabric, too, is white?
Thanks for your comments, all!
Hi, Laura – on white fabric, you don’t normally use white pounce, but either grey or black. White pounce (used to be made from cuttlebone) is used on dark fabric. To connect the dots with white pounce on dark fabric, I use a fine tipped paint brush and a white paint. I think some folks use white gel pens (or light colored of some sort), but I find them a bit “blotchy” to use – the tips always get clogged, etc.
MC
Has anyone tried the Clover White Marking Pen (Fine) from Tanja Berlin? This looks like something interesting that might work with white pounce. I have white pounce that I picked up from a quilting store, and with any luck, will give it a try tomorrow.
Has anoyone thought about using a cake tester to see if that might work for pricking embroidery designs. It’s quite a bit less than the things for needlework, if it works. Thanks for getting us thinking, Mary.
Hi, Carrie – I haven’t used the Clover pen – I’ll look for it, though, and try it out. I do have another Clover product that I’m going to highlight next week – it’s another one of those “packaging is everything” products!
A cake tester – or at least, the one I have – is too thick for pricking an embroidery pattern. You’ll want something pretty fine. I’d say around the size of a #10 crewel needle…
Let me know how your quilt pounce works! I’ve tried quilter’s pounce once, with poor results, but that was a while ago. The pounce was somewhat chalky, and it didn’t work well with the finer holes in an embroidery design, though I could see it working ok for quilt stencils, which have heavier lines.
MC
I have always used talc instead of white pounce. It works fine!
Hi, Su – I do, too, now – it’s much cheaper to buy pure talc and it works great! ~ MC
Oh, my husband and I call it “cross shopping” and we do it all the time. Our policy is just to always keep our eyes open and be open to see what things we find anywhere might be useful.
The hardware store is a common place for finding things that we can use in unexpected ways, but even just in “other departments” of craft stores. Items that one craft/art thinks of as esoteric (and thus priced highly), are often plain and common in other craft/arts and carry lower prices. A recent example was my telecoping magnet, which I got for a very low price at a hardware place rather than the fancy price in the needlework department….
Mary-
I have never transfered an embroidery design like this before-I always trace, which is not easy. Are you able to share the how and why this method is better?
Thanks!
I do this all the time. I’m amazed at how many crafts use what I call cross-over supplies found in art stores, or art depts.
Needle minders are quite expensive when you consider the cost of the materials. A visit to craft store jewelry depts yielded me several items I could use as needle minders, & they had the magnets as well. I give them as gifts now, because they’re so inexpensive to make, & each one is unique.
Emery powder can be purchased, so I make my own designer emeries, too. Waaaaaaaay less expensive than buying them singly.
Umm.. a US teaspoon and a UK teaspoon are almost exactly the same. The US teaspoon is 4.93 mL and the UK teaspoon is exactly 5 mL (it was metricized long ago).
So 25 mL would be about 5 teaspoons in both the US and the UK. (and Canada, Australia, and New Zealand, for that matter.)
See http://en.wikipedia.org/wiki/Cooking_weights_and_measures
Thanks, Tim!
If you want to freehand your stars use this. [I vacuum the chalk off.]
THIS MAY OR NOT BE HELPFUL ALWAYS TEST ON SCRAP
CHALK
For 25 years I have done freehand embroidery work and this has worked best for me.
I ground up different colors of chalk in my mill grinder to see what worked best [what could be seen and removed]. White chalk [baby power, or corn starch] can be vacuumed off on med and dark fabric no problem.
Other colors can be reduced in color intense with white, the more intense the color the harder it is to remove. I just use white and light blue now, the blue is reduced with white. Blue and white chalk is at hardware stores for snap lines [cheep]. You can also use cinnamon instead of blue powder.
You can use a vanishing power with a black light on any color [in the dark]. It is very good for names.
PAPER
I use canary paper from an art or drafting supply.
I tear off more than I need and trace a design with 5mm mechanical pencil, place on a piece of ¼” foam rubber on a firm surface. Then I use a small needle syringe [for shots] and poke holes into the lines at key points about 1/8th” apart following the design, then I flip it over and sand off the tips with a sanding block or sand paper. I have also used a clear plastic film a permanent marker and sanded the tips, or a small stencil burner.
Then I have a reusable pattern I can use over and over.
APPLYING CHALK
I took a short wide mouth ball jar lid and a nail [or drill] punched a lot of holes in it.
Took a ¼”green scrubber cut it to fit inside rim on top of the lid.
Took a scrap of velour about 3/8” larger than the lid and placed it on top of the scrubber then screwed the hole thing together onto the jar with my chalk in it. You will have to pounce a while till the chalk starts coming through good. Wipe off your pattern before replacing it so you don’t get shadows.
I did this, years before any thing else was on the market, and still use the same ones today.
PATTERN MARKING
Holding your pattern down firm with one hand, slide your chalk jar across your pattern in one direction only, you can repeat as long as you do not let up with your first hand. You can see if you need to slide again as long as the first hand stays in place. If it is wrong, vacuum it off and start over.
On the quilt machine I slide a 24”x48” piece of 1/8” plexus glass under my top fabric for a firm marking area, then, remove for quilting.
LETTERING
I used a projector and enlarged an alphabet to different sizes. Then when I want a name I just trace it and punch it, sand it and stencil. Trace both sides of the lines.
I am fast at this as I have done it for years. If you think this is to long, I don’t type, I peck.
I am just saying…..I hope this helps someone.
Phyllis