


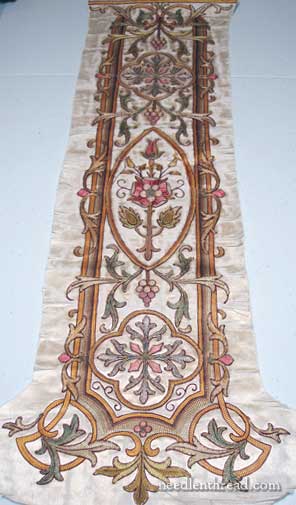
There are some types of embroidery that I’m just drawn to, like the proverbial moth-to-flame scenario. This particular piece of 19th century ecclesiastical embroidery is one of those pieces that twitterpates me.
But horror of horrors! Unlike the gentler, more historically sensitive among us, who would immediately think of how a piece like this should be preserved and minimally and gingerly handled, my first thoughts and actions generally run along more… um… destructive lines.
Before I get to the point of deciding how the piece can be preserved (or if it can), I poke it and prod it, pick things off it, cut things from it, and bend it and examine it, rub over it with charcoal (ok, with paper in between….), and pretty much put it through the wringer. Well, the gentle wringer, but the wringer, nonetheless!
If I horrify you, please pardon me in advance and chalk it up to Learning.
Ultimately, of course, I will contemplate how this piece can be preserved and displayed in my studio. I think it is beautiful.
This piece of embroidery is mid to late 19th century. It’s worked on a silk ground, and it has been cut from the front of a chasuble it once adorned. (I didn’t do the cutting – the panel was a gift from Larissa, who also sent me the goldwork medallion I showed you the other day. She acquired this piece as is.)
The ground fabric is silk, and it is backed with a very fine linen. The stitching is done through both layers. The silk ground is disintegrating in many places, with the weft threads dissolving away.
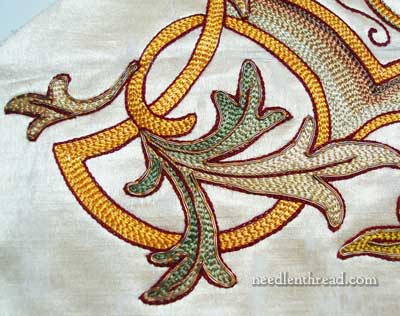
All the silk embroidery is worked in one stitch: the chain stitch. It is, in fact, tambour work.
As you get closer to the embroidery, the tambour work become more apparent. While you can’t see individual chain stitches at this point, you can definitely see the “texture” of the stitches.
Tambour work is a type of embroidery that’s performed with a tiny hook – almost like a latch hook used for making rugs, only teeny tiny. Most tambour work today is seen more in the world of haute couture, or high fashion, where tambour work is used extensively for bead and sequin embroidery. But the basic tambour stitch is really just a chain stitch that’s made with a hook, and the technique was used extensively through the mid-20th century in ecclesiastical embroidery. Why tambour work instead of regular chain stitch? Tambour work is a much quicker way of filling an area with even rows of chain stitches. Worked by a master, tambour work can convey shading and detail, and can do it with a rapidity that can’t be had with a regular needle.
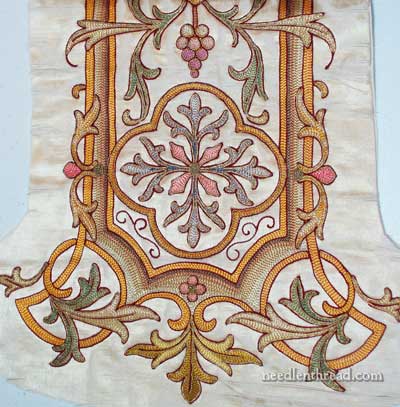
As you get closer to the work, you start to realize that metal threads adorn the whole piece – they are part of the outlines on every element and are used as accents here and there. There are several types of metal thread used on the piece. All of them have oxidized pretty much, so there’s no gleam of gold here. In fact, you don’t notice the metal threads from a distance at all.
But once you do realize they are there, and that they are all over the embroidery, you start to imagine how this must’ve looked when first embroidered! While the silk is still lovely, think of how that gleam of gold would have added another level of life to the piece!
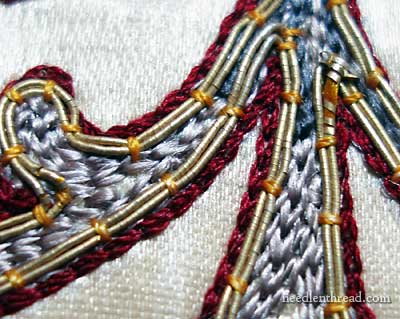
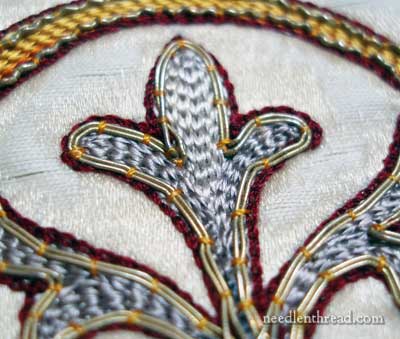
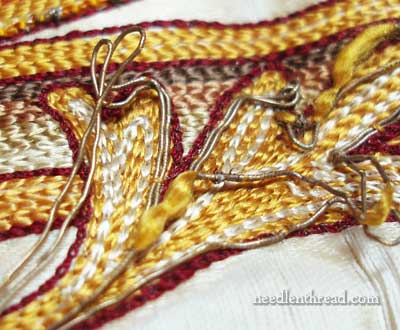
You can see in this photo the wraps on the passing thread. Over on the right, towards the top of the photo, there’s an area where the wraps have separated and the silk core is showing through. You can also see the chain stitches worked as a filling in flat silk, as well as the outline in chain stitch, in the darker maroon silk. This outlining silk has a definite twist to it. The silk used for the filling, though, has little twist to it – it looks like a flat filament silk. It has that soft, beautiful, luxurious sheen that confirms and justifies my love of silk thread!
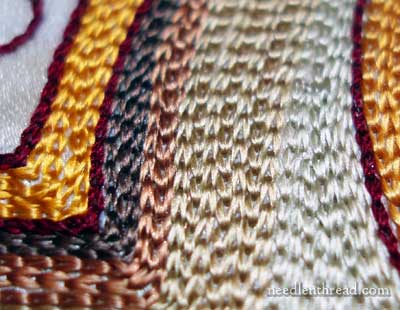
These rows of brownish and neutral colors create the shaded effect around the main outline of the piece. If you look at the first picture in this article, you can see the shaded frame around the embroidery. It makes the central part of the design seem to stand out above the frame.
If you look closely at those rows of chain stitch, you can see that each row alternates direction. So the embroiderer (probably the embroiderers, plural) worked in one direction and then in another, back and forth on each area of the piece.
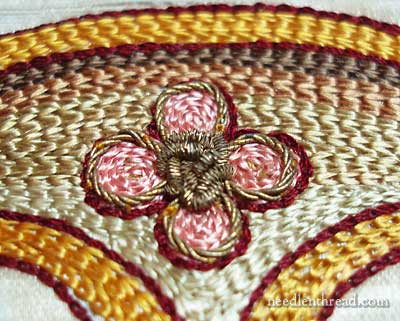
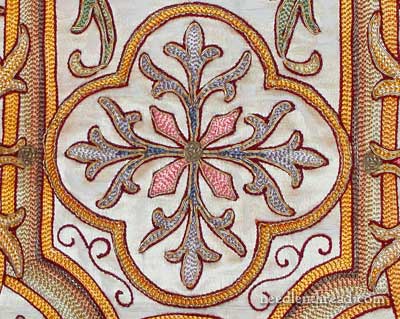
Here’s another example of goldwork threads. This little tiny blossom is outlined with a gold twist, and the center is created with bright check bullion chips, piled up into a kind of rounded knot.
Here’s another similar knot made from the bright check bullion. It isn’t so bright anymore, is it? The same twist outlines the pink cross arms here.
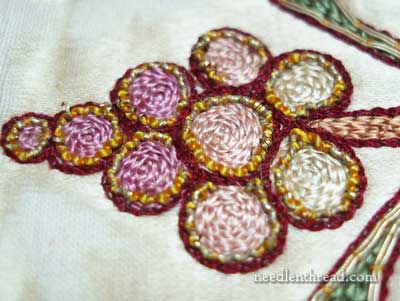
The grapes are outlined with a rococco goldwork thread. This is a rippled, wavy goldwork thread that’s couched on. You can see some goldish-yellow color around the outlines – that’s the silk core of the metal thread, where the metal is missing.
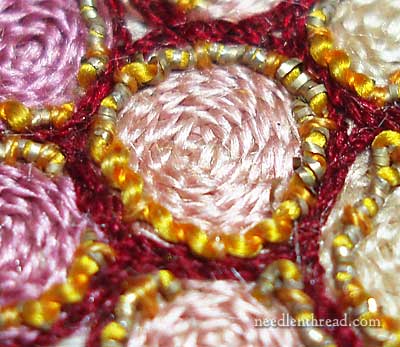
Here, you can see the silk core closer up. It’s amazingly kinked and ripply when the gold is removed from it! I think the core thread is beautiful!
There are, of course, some areas of more serious damage here and there on the whole piece of embroidery. But overall, considering the age of the piece and the fact that it was was obviously worn during the liturgy and used quite a bit (there are certain areas of rubbing on the fabric that correspond with a good bit of use), it’s in pretty good shape.
If you step back just a tiny way from it, the silk embroidery is still sharp and clear, and although the metal threads have oxidized, in most places they are intact, and they don’t really detract from the work, even if they don’t add much to it in their current state.
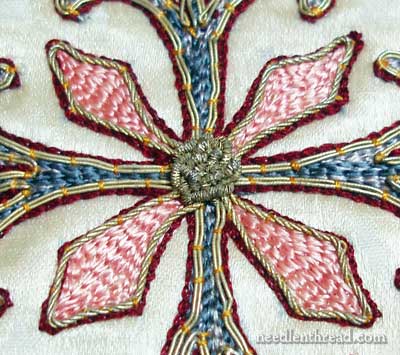
I’d like to show you the central rose design element on the piece, too. It’s in the area that’s sustained the most damage, but it’s still a beautiful piece of work! So, that’s coming up – and then I’ll let you see what else I’ve been doing with the piece and maybe we can discuss some ideas for displaying it.
I hope you enjoyed seeing this beautiful survivor of 19th century needlework, and that it inspires you in your own needlework pursuits!
It’s a lovely piece, thank you for the very clear close-up photos. Looking at the extreme regularity of the stitch size, I suspect that the lines of chain stitch might have been done on a treadle tambouring machine – single needle machines were invented in 1804, and were the first embroidery machines. The work could then have been hand finished with the goldwork and outlining. Even with a machine, it needed a steady hand and a lot of skill to produce such even work.
And we think those embroidery machines are so modern – this is fascinating.
Absolutely beautiful piece Mary. Thank you so much for sharing such wonderful closeups. Looking forward to seeing what you have been doing with the piece and how you will eventually display it.
What a wonderful article, with fabulous pictures! But, since we never have enough embroidery…. I would love to see what a tambour hook looks like and a demo… 🙂
Thanks
I second that! Would like to see a demo on Tambor stitching.
😉
Hi Mary,
This posting couldn’t be more timely for me as I got my tambour set a couple of weeks ago and I am trying to get the hang of working with it! I’m getting more comfortable and experimenting with different materials, but I just can’t seem to figure out how to do sharp corners and do a 180 turn to make consecutive rows. Are you supposed to finish and tie off the end of a row going in one direction then start a new parallel or perpendicular row?
There is very little instructional info out there (at least in English!) so any help would be great!
Thank you,
Laura
Exquisite Mary! Thanks for posting pics of such a lovely gift. Just two comments–a friend in Fiber Forum (EGA) uses chain stitch for many of her works & they are all stitched by hand. At some point I hope she will teach a class at our EGA chapter so I can learn her technique! From a distance, her shading & texture create an almost photographic image. She gets stunning results with cotton thread! As to tambour, the technique is also used to make lace–Lierse Kant, or Lier Lace. The technique is alive & well in Belgium where it has enjoyed a revival with Greet Rome-Verbeylen. She occasionally teaches classes here in the US. Worth a Google to see what can be wrought with a hook!
This just takes my breath away. the shading is lovely and the flow of line in the pattern seems just effortless. Tambour work has such a luxurious density to it. The direction of the chain has its own sheen and pattern that adds to the colors. For a long time now I have wanted to do a sampler piece. Your Hungarian patterns would work well I think. I even have the tiny hooks and a lap frame, but I always end up splitting and tangling the threads. Getting that twist on the hook as you pull it back through the work is the trick I just can’t quite get the hang of. Do you have a video tutorial on this yet that would give a few hints and tricks?
I can see the nuns sittimg there at the end of the days with needles and thread stitching by candle light. I also checked the medallion and both those pieces are absolutly fabulous pieces of history.
Im no expert but I would enclose them both in glass to be able to look at it easily. This would also protect them from further dammage.
so beautiful. I love daydreaming about the embroiderers (would they have been women or still men for an important piece at so late a period – comparatively?) and ppl using it when it was fresh and bright!
Oh Mary, It WAS beautiful and it IS worth conserving and learning from…With the remaining goldwork either repaired or removed where it is too damaged for repair, and then mounted on a backing linen, framed in a raised box and hung in a low light situation is the way I would try to go…You’re right, it really is a twitterpating treasure!
That is a wonderful visual dissection of a most beautiful piece! You are quite the detective, our Mary!! Thank you for continuing to share yourself with us. I LOVE needlework and embroidery……
I really really enjoyed this post – thanks Mary
Wow, that’s interesting. Tambour work. About 6 months ago I got a tambour needle and tried it with beads. It worked but would take awhile to get really good at it for me. I think I didn’t have the right set up and couldn’t keep a good tension. It worked better with just thread, of course, but to do a whole piece like this in tambour is amazing to me. Can’t wait to see what you do with it, Mary.
Wow, what a beautiful embroidery! DH and I are wondering why the gold has tarnished so much. Maybe the alloys mixed with it or cleaning compounds used in the past? Gold usually stays bright unlike silver or copper, etc.
Hi, Cindy – Gold threads aren’t 100% gold. There’s usually an alloy involved – silver, for example – so it’s the silver that tarnishes. MC
Mary, this is absolutely gorgeous! I, too,like to find out how things are put together, but always thought that constructive rather than – “um – destructive”. It’s an amazing piece of embroidery. What a find Larissa made and what a generous and beautiful gift.
I can see that also done as a table runner, without the goldwork.
This is a beautiful piece, Mary. Thank you for sharing it. I really don’t mind the tarnished metal threads. I agree it would have been spectacular when new, but there is something very special about metal thread work showing its age. I just LOVE those flower centres and will definately have to incorporate dots like that to my work at some point.
What a beautiful and exquisite piece! Thank you so much for sharing, especially the close up shots.
Hi Mary,
Thank you so much for sharing a beautiful piece. I hope someday if the thought strikes you, you might consider adding this design to your Ecclesiastical Book II patterns.
The rose looks somewhat similar to your Tudor rose, with the addition of the extra stems, etc. That would be a great design, too.
I wish we could see the opposite end, too. It looks like the same motif was used as is on the bottom, with a slight variation in surrounding details.
Thanks again for sharing.
I’ll be fascinated to see your work on this – I have a 19th century German processional banner that needs work, but I’ve never had the nerve to do anything!
Will you be cleaning this piece? If so, what would you recommend?
Thank you Mary, so me can enjoy this very beautiful old piece of work.That is a great moment of pleasure. And, fortunately, YOU will do great things of it !
In France, me have 2 types of embroidery with this tiny hook : the “point de Beauvais” witch is very old embroidery too (XVIII th)and has a great challenge every two years as a competitve examination “one of the best workers in France”; the other kind of very old embroidery is “broderie de Lunéville” with beads and so on, witch has also its same type of examination. You still can find books in france,written by these persons, and hawks of several size. In Ireland, they have “Limerick lace” (white embroidery over tulle net) witch is “tambour embroidery”. And great traditional works in India, China, etc…
Excuse me for my english that is not good enough to explain more.
Very interesting posts. It makes me wonder how long your Marian Medallion will last. Is it in a less vulnerable position? How is it being cared for? Looking forward to the next post.
This is such an extraordinary piece of embroidery work. I wish that we could see it in its original splendor. As someone new to embroidery I am finding that the history of the craft is so exciting and inspiring. Thank you for sharing the photos and the commentary on this glorious work.
Mary,
While I was doing some destuction of old neck ties this morning I thought of your piece. This piece is in great shape for its age. I would “fix” the few torn stitches and hand applique it with hidden stitches to new silk or linen background fabric in order to preserve the original embroidery stitches. The new background fabric would give it stability and you could then frame it to keep the air and hands from causing further deterioration. No matter what you decide to do with it, it is exquisite and I am so thankful that you shared it with us.
Hi – just a quick question!
How do you tell the difference between tambour work and normal chain stitch? Is it just the regularity of the stitches, or the fact that there is so much of it? Seems to me like it would be very hard to tell whether it is tambour or just an accomplished chain stitcher…
Alyssa
Hi, Alyssa – There’s the regularity of the stitching, but also the way the threads begin and end. -MC