


The knotted pearl stitch used in hand embroidery is one of those fun, rhythmic stitches that works up fairly quickly.
The knotted pearl stitch is a lot like the Palestrina stitch, but it differs in two ways: 1. the direction it is stitches is reversed, and 2. there are two knots created in this stitch, rather than just the one knot created in the Palestrina stitch.
So the knotted pearl stitch ends up just a bit more “knotty” than the Palestrina stitch. Often, you’ll see the knotted pearl stitch called the “reverse Palestrina stitch,” but in fact, it isn’t actually the Palestrina stitch reversed – it has one additional step to it.
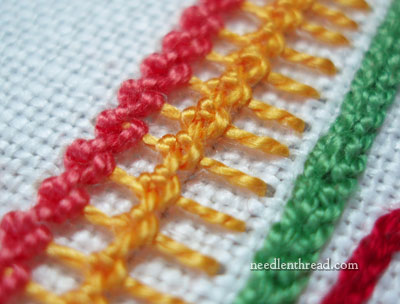
In the photo above, the knotted pearl stitch is the orangish yellow stitch in the center. You see that the knotted pearl stitch creates a band with heavy knots running down its center, and with parallel “arms” sticking out to the sides of the knots.
The arms of this stitch can actually be decreased (or increased) depending on how long you want them. The narrower your band, the shorter the arms.
While the Palestrina stitch is often worked from left to right, the knotted pearl stitch is worked in the reverse direction: right to left. The direction of stitching for either stitch does not really matter that much. The biggest difference in the two stitches is that in the Palestrina stitch, when you pass under your first stitch the first time, you don’t form a knot by passing over the working thread and catching it. In the knotted pearl stitch, you do form this first knot by passing over the working thread. Then you pass over the working thread a second time (whereas, with the Palestrina stitch, you pass over it only once), rounding out the knot.
You can really see the difference between the two stitches by watching both videos – the one below for the knotted pearl stitch, and the Palestrina stitch video. Incidentally, you can add longer arms to the Palestrina stitch as well, by just extending the distance between your stitches and where you form the knot, just like you do with this knotted pearl stitch.
Either way, both stitches create a nice, knotted, textured line.
Here’s the video for the knotted pearl stitch:
Hope you enjoy this new addition to the hand embroidery video collection here on Needle ‘n Thread! There are over 75 embroidery stitch videos featured in the collection, so if you’re looking for a particular stitch, feel free to browse through all the videos!
Do you want more inspiration & information on hand embroidery?
There are all kinds of reasons to sign up for the Needle ‘n Thread daily newsletter! Check them out and sign up today!
If you like what you see on Needle ’n Thread, if you want to be a part of keeping the website thriving (and free of annoying network advertising), why not become a patron on Patreon? Check out my Patreon page here, where I’ll occasionally add special needlework bonuses for patrons.
If you shop on Amazon, you can support Needle ’n Thread without any extra expense to you by visiting my Amazon Recommendations page here, where you’ll find books and sundries for the needleworker available on Amazon.
Merci Marie, vos explications m’aident beaucoup dans mon apprentissage de points de broderie.
Ce point, qui est intitulé point de palestrina inversé dans les revues que je possède, est vraiment très intéressant et vos explications vont beaucoup m’aider à le réaliser. Je ne le comprenais pas bien jusqu’à présent.
Merci encore
Marie Lameignère
Can you make flowers with this stitch? I am making a blanket,
Thank you! Natalie in FL age ten
Hi, Natalie – Yes, you can outline flower petals with it, and work stems with it. It’s a fun stitch! ~MC
Tnx a lot..this is the first time i am able to understand the stitch…was confused reading about it elsewhere..
tnx once again..very clearly explained
i like to pearl stitch learned with this video,& more other stitches to learn,want to meet tutor.thanks
I am an learning embroidery teacher from Pretoria South Africa. Thank you for this tutorial videos. I learn a lot and enjoy thoroughly
Hello,
Your videos are very helpful. I am looking for Moti stitch (It’s Indian name) which kind of similar to knotted pearl stitch. Moti means pearl in English. The stitch is mostly similar to Palestrina (most). Can you post video of it, if you know?
Todo es precioso!
What a delicious site
And your explanations are thorough
I learned to embroidery when I was a school girl
My best friend had 2 aunts who would sit on the porch and embroider
They taught and encouraged us
I have friends today that come to my house every Monday to embroider
Thank you for your wonderful website