


Lately, I’ve gotten a lot of questions about the set-up and materials I use to make embroidery stitch videos for Needle ‘n Thread and to photograph step-by-step instructions. I figured, instead of writing up multiple responses, why not tell everyone?
If you’re not interested in the nitty-gritty of this kind of stuff, I completely understand! But for those of you who are interested, today’s your lucky day – I’m letting you in on some Deep, Dark Secrets here. Shhhhhhhh!
Ok, ok. You’re right. There’s nothing deep or dark about it!
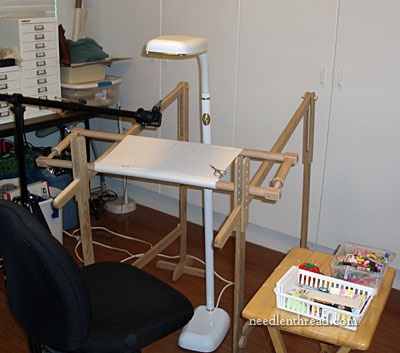
This is my current set-up. This changes from time to time, depending on what I’m working on and what other mess is cluttering up my space. Normally, I have two more lights surrounding the embroidery frame, and sometimes, I even have lights in large light tents set up around the frame. The lighting I use depends on the natural lighting in the workroom, the time of day, and the time of year.
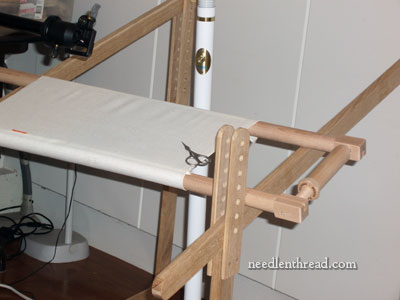
For me, using a large piece of fabric set up on a large frame is the most convenient approach to making embroidery videos and doing step-by-step photos. I use a large Millenium frame, 36″ wide.
One of the advantage of using a large cloth on a large frame is that I can move around on different sections of the cloth and work out a stitch, without having to re-hoop fabric. The nice thing about the Millenium frame in this situation is that it is very easy to loosen up the fabric for some stitches that work better without taut fabric. I can also roll up the fabric as I go, when I need to expose a clear area of fabric. Another advantage: if I need to change out the fabric, I can do it lickety-split with a Millenium frame, rather than the much longer procedure needed to dress a slate frame. So the large Millenium frame serves me really well in this situation.
The fabric is always linen. Sometimes, it’s Round Yarn linen by Legacy, sometimes it’s Strathaven linen, and sometimes it’s Sotema 20L linen.
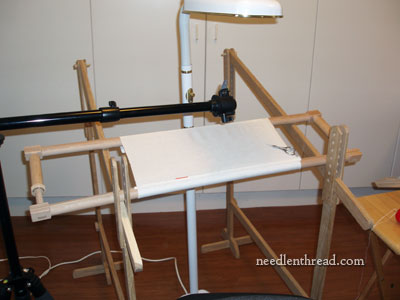
There aren’t too many needlework stands out there (in fact, none that I know of) that can handle a large, independent frame well. The best solution for large frames is a set of trestles. These trestles can be adjusted so that the frame lies perfectly parallel to the floor or at about a 45-degree slant, depending on what I need.
When resting on the trestles, the frame sits a little higher than the regular height of a table, which is great, because it relieves me from having to bend over the embroidery, and at the same time, it is a good height for my tripod. I can also see the work more clearly because I’m closer to it.
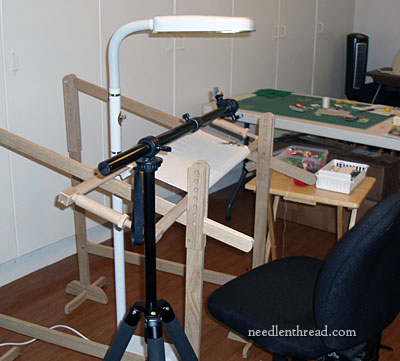
You can see my tripod here. It’s a pretty good tripod – heavy duty, so there’s no jiggling or instability to worry about. It has a horizontal “boom” arm that allows the camera to be situated right over the work, so that the videos show you the stitches being worked just as you would see them, face-to-face with your fabric.
I use a computer desk chair with the trestles, though a regular kitchen chair or a stool (I sometimes use a stool) also works. The advantage of a computer chair is that it’s on wheels, so I don’t have to scoot it back or anything when standing up. It just rolls out of the away. I stand up and sit down quite a bit while making videos or taking pictures, to make sure I’m getting the shots I want. Another point with the computer chair: I can adjust my sitting height if I want. I’m not particularly tall, nor particularly short (5’3″), but sometimes, I like to be either higher or lower in relation to my embroidery.
Next to the whole set-up, you’ll see that small foldable “TV table.” I have two of these that I use all the time for extra table space when I need it. They come in really handy, and they’re great for pulling up to the sides of my trestle set-up.
And beyond the little foldable table is my regular work table, which is spread out with a jolly mess o’ stuff (you’re seeing the tidy end). When I’m working on video or step-by-step photography, I only keep exactly what I’m using right at hand, so that I don’t get muddled with extras while recording video or shooting photos.
For actual photo equipment, I’m afraid I’m not very sophisticated. I have lofty plans of getting my dream DSLR some day, but it’s a slow process to save all those pennies! Right now, I use an Olympus point-and-shoot 8 megapixel camera for step-by-steps I take while stitching (it’s much easier to maneuver, to use quickly, and so forth, than a larger camera, and it has really good macro settings for a point-and-shoot), and for video, I use an Olympus micro four-thirds camera (their E-PL line). It’s somewhere between the point-and-shoot and my dream DSLR. I also keep two batteries for both cameras – one is always on the charger – and two memory cards on hand. There’s nothing worse than being in the middle of a session and either running out of juice in the camera or space on the card!
For editing, I use Adobe Photoshop for photos and iMovie and Final Cut Pro (depending on what I’m doing) for video.
If you’re looking for ways to improve your set-up for doing how-to videos or taking progress or instructional photos, I hope this information gives you some ideas. Or, if you’re trying to figure out how to handle larger frames, thinking about what types of chairs to use, or anything like that, maybe there’s something useful here for you, too!
And now, off to the workroom! Have any questions? Feel free to ask them below!
Thank you for sharing your studio setup and photo details!
Thanks for sharing your set up. I’m envious of your free space since I share a house with a husband and dogs that roam freely.
My question is about lighting. What current lights (on stands) could you recommend? Also, would you explain what you mean by tents?
Thanks. Love the morning emails!
For lights for stitching (and for photographs, too) I use full spectrum lights from Blue Max. They’re great! What I like about them is that they are very bright when all the way, but they can also be dimmed. They’re somewhat pricey, but they are worth it!
By light tents, I mean the diffusion tents that are used over photography studio lights. Not good for stitching, but good for photography.
Great article! I am intrigued with your trestle setup. Did you devise these? I am so tired of trying to hold my frame/hoop and the trestle looks like it would fit by my chair that I stitch in. I have two adjustable frames that are too much tightening and loosening to get to the back of the fabric. The trestle looks like something I could work with so much easier!
Hi, Debbie –
I’ll have a little bit more up about the trestles at the end of this week or beginning of next. They are something I had built for me, but in doing so, I had a few extras built that will be available on the website (I’ll explain more about that a bit later). They aren’t for use with a recliner or anything like that – just a regular chair or stool.
~MC
Please tell us more about the trestles – where did you get them, do they come in sizes, etc.? Thanks, Janet.
Hi, Janet –
I’ll be writing a bit more about the trestles at the end of this week or beginning of next. I had them developed, and I’ll tell the whole story a little bit later.
They don’t come in sizes – they’re for large frames only, but the frame size you decide to use can vary, as long as its wide enough to rest on the trestles with enough space for you to sit between them.
More later!
MC
My trestles were ordered from the Royal School of Needlework in the United Kingdom. So anyone living here in the UK can order them easily. I have opted to buy the 20″ Millenium frame because I have to rest it on the trestles I had made. The smallest frame people at the RSN rest on their trestles, to be comfortable, is 18″ wide, but I was told I could use a smaller frame and attach wooden slats to it so I can sit between the trestles.I think that these trestles are advertised on their website at present. I chose mine to be in mahogany painted white, but you can buy them in pine slightly cheaper.
Naaa, no questions at this time! Just a lot of gratitude for your excellent information and the joy you bring to my mornings – just before I head out to do outdoor work in the garden. Needlework time is definitely not in the picture right now….
Hi, Hanny! But hey – gardening is good!! 🙂
I am with Janet Noble. I want to know about the trestles and where I can get them.
Hi, Mary!
I’ll have a bit more information up on the trestles by the end of this week or beginning of next, as well as information for purchasing…
MC
Yes, please tell us where to get those trestles!
More a bit later this week or beginning of next…! Promise! MC
Fascinating – thank you. I too want to know where to get the trestles. Susan
Hi, Susan – I’ll have a bit more up on the trestles soon! ~MC
Where may trestles like yours be purchased? I’ve tried looking for them but have only found partially satisfying substitutes. Thank you.
Hi, Joan – I had them made, but in the process, had some extras made, too. I’ll have a bit more up on those a little later this week, or beginning of next, with all the details… MC
Yep with the others, looking for more information about the trestle set up. I sit in a recliner, and hard to get a stand to work right, thinking a trestle might be the ticket. Are you still in love with the Millenium Frame and is there a supplier here in the US?
Hi, Laurie –
Yes, still rave reviews for the Millenium frame. They’re wonderful, and I’m using at least one. Sometimes, I have two set up. I only have two sets of the side things, or I’d probably have more set up at a time! No, no US supplier – they come directly from Needle Needs in the UK.
The trestles are something I had developed. They’re for use with a regular chair, stool, or whatnot. They wouldn’t really work with a recliner, unless you had a very high recliner. I haven’t really checked them with a recliner, but I don’t think they’d be quite what you’re looking for, if you work exclusively in a recliner. They also assume that you’re working on a large enough from to span the distance between the two trestles (which varies, according to your frame width) and leave you space to sit between them. They are the “side supports” for large frames.
MC
Thank you, Mary, for all your inspiration. After reading today’s blog, I re-read your review of the Millennium frame. Afterwards, I must have blacked out for several minutes. When I came to I discovered that somehow I had purchased a Millennium Complete Workstation with an additional set of 24″ bars….
LOL! Don’t you just hate it when you black out like that?!! I hope you enjoy the frames!
Mary, thanks for another great article! The trestles look like a wonderful way to work. Would you share with us where you found them? Thanks!
Eeek! Sorry to repeat a question you have already received and answered!
One last request … maybe you can provide a maker for the trestles if they are willing to take orders from others. Just a thought!
Thanks, Laura! That’s an idea! ~MC
Hi Mary,
Thanks for sharing your video/stitching details. I too want to know about the trestles!
Thanks so much for the info on the cameras -it shows you don’t need to spend a fortune to get amazing results if you know what you’re doing.
Also very interesting to get a peek into your workroom!
Your blog has inspired me to get back into embroidery after a few years and explore some new techniques and stitches. Thank you so much.
Those trestles are awesome, and I can’t wait to read the details soon. You may have designed a needlework item that few of us knew we were lacking.
Thanks for the details on your setup!
Thank you for sharing your set up and process. How I envy you having the space to create this little haven!
I appreciate your hard work.Everything you do is very helpful.
Thank you. Keep up the good work.
I read your post 2008 about your Needlework system 4 floor stand. Are you still happy with that model? How does it compare to K’s Creation metal floor model or the Lowery metal stand? I do small to med projects and want a simple design that will hold q snap frames.
Thank you
Hi, Nancy – I prefer the nws4 stand to both of those. I haven’t used mine in a while, as it is presently being borrowed by a student working on a goldwork project. But when I have it, I do use it for smaller projects. -MC
Love the set-up and the behind the scenes glimpse into your studio. But, what I would like to know is where your trestles came from and if I am going to have to sell my first born grandchild to get them.
I should have read the earlier comments before posting my questions about the trestles. SCRRY!
I’m envious! In May I ordered and paid for both large and small millenium frames, and I STILL haven’t received them despite two e-mails of inquiry this summer. Your setup looks wonderful. I surely hope my frames come soon.
Where did you get the trestles you use to hold your frame?
Thank you for this info, Mary. I have a Millenium frame but nothing for it to sit on and as someone else said it is rather too difficult to hold, so I am looking forward to the post on the trestles too. My husband, a fine woodworker will make whatever I need but a little design input will be great. I sit at the end of our sofa mostly which isn’t quite a chair or stool but definitely isn’t a recliner either. Roll on to next week.
Hi Mary:
If you were going to buy the Millenium frame now and could only the basic set and perhaps one more set of bars, which would you get. the larger ones, thinking it still would hold smaller projects? Trying to plan ahead, I am. Thanks for all your help.
Hi, Laurie – I’d probably get the 20″ bars and the smaller side things, especially if you work mostly medium sized projects – not really small, not really big. It’s a good universal starter size.
~MC
Thanks Mary that is a big help.
Thanks Mary, was just wonderful to sit next to you, in you working domain.
can’t thank you enuf Mary, you’ve taught me to embroider and now i’m winning prizes at university – further i got into the Honours program on the strength of my work (which is not very good yet but the concepts are)
thanks a million
Joy
Australia
Where did you get those trestles?
Hi, Elizabeth – I had those made. I sold some here on the website at one time, but there was a glitch in manufacturing, so I couldn’t continue selling them. If you’re looking for trestles, try contacting Lucy Barter through the San Francisco School of Needlework & Design, here: http://www.sfneedleworkanddesign.org