


Yesterday, we removed some stitches on a misshapen element on my silk embroidery project. Today, we’ll put them back in!
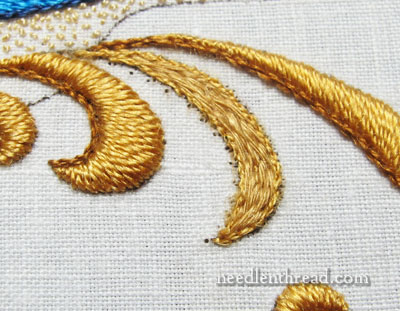
This is where we left off, with the original satin stitch layer and outline of stem stitch on the inside of the curve removed.
My goal in fixing this element was just to fatten up the outside curve a tiny bit.
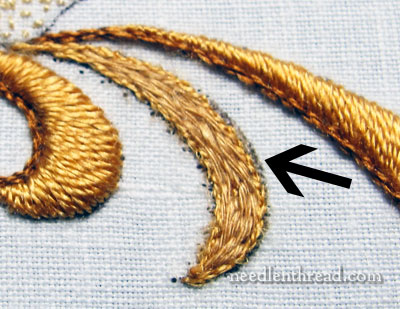
To fatten up the curve area, I needed to extend the element a little bit on the lower part of it. I don’t want a dramatic curve here. Although the elements to each side have a decided curl to them – they sweep all the way around, practically – this particular element in the design is not really “curled.” But it still needs a little more curve to it than it has, just to keep it from looking quite so straight and stubby. So, using a tiny pen (and a very steady hand!), I touched in an edge on the right lower two-thirds of the element, around to the tip.
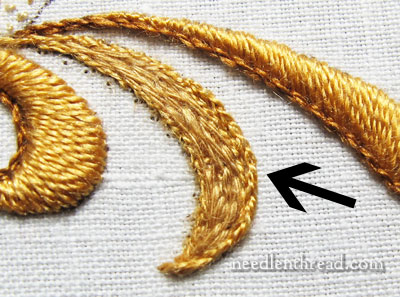
Using one strand of Soie d’Alger, I extended the padding by split stitching over that dark line. Now, it’s just a matter of satin stitching again.
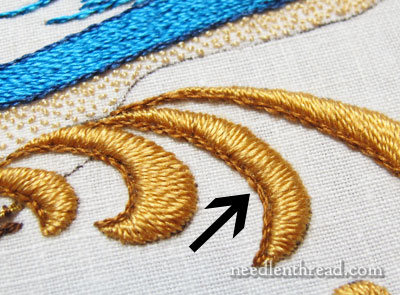
Satin stitch on this type of element is sometimes tricky, because you want the satin stitch to work around the curve of the element, but not so much that you’re dealing with dramatically different angles. If the angles change too dramatically from top to tip in such a small space, things can get bulky and tight looking.
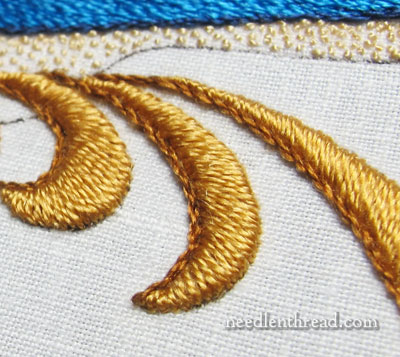
So, there it is, the new satin stitch, with the stem stitch outline on the inside of the curve. I like it much better.
As a reminder, here’s the original:
And here’s the fix again:
Better? I was much happier with it, once finished.
The moral of the story: don’t be afraid to fix things that bug you on your needlework projects. Before you do, it helps to step away for a while, clear the head, and then tackle the fix. Don’t put it off too long and let it build up into something supposedly insurmountable, though! How often do we run into snags on a project and then avoid getting back to it, because we’ve turned what’s probably a small fix into a huge mountain of a problem? I have a tendency to do that, so I generally force myself to tackle the fix, and I usually do it in these two stages: take out the problem and step away (overnight, for example), and then go back in to fix it the next day, with a fresh perspective.
What about you? How do you approach a fix on your needlework projects? Of course, you might be among the fortunate who never make noticeable mistakes! But if you’re not, do you work by a specific plan of attack? Do mistakes slow you down or halt you completely on a project? How do you talk yourself past the road block? Input, advice, comments, suggestions, mistake anecdotes? Do tell! Leave a comment below and we can all commiserate and congratulate together!
Hi Mary, it looks perfect. Such beautiful work you do. When I have to take an area, I put it aside for awhile and come back and look at it. Sometimes, but not often, it turns out that the area doesn’t look so bad after all. Athough, this rare, I usually take out and redo the area. Thanks for this learning lesson.
That is a lot better Mary. I like to fix my mistakes when I notice them. I recently was crocheting a baby blanket and made a mistake on my counting on a flower that had petal clusters and leaf clusters. My frien said she couldn’t tell the difference but I could and it bugged the heck out of me. So I unraveled about twenty rows and redid it and am now satisfied with it. I have a cross stitch project where I did one entire side of a background in one color thread and the other side in a newer thread of the same color but different dye lots. I am now gearing myself up to rip out the one side that doesn’t match the new thread and restitch. Funny I don’t really mind redoing this as long as I am not working on a deadline.
The fix is a significant change-well worth the effort. Kudos!
I agree, Mary. If there is something that is the least bit imperfect to me I need to fix it as well or it’s the only thing I’ll see every time I look at it. Can’t wait to see the whole project completed! These ‘ticklers’ are suspenseful!
Have a Merry Christmas!
Please tell me the name of the scissors in yesterday’s post. Also where I can purchase them. Thank you for all the information you provide!,
Natalie
Hi, Natalie – you can find them here: http://www.anitalittlestitches.com/premax.html
They’re about half way down the page. Oooohhh…. And cute little candy cane scissors there, too – just saw those for the first time!
Mistakes.
Ah, how I *loath* them.
I’m forever making a mistake here and there.
I don’t think I’ve ever gotten through a project without making one.
And once I notice one, I start to uncover more and more.
Perhaps I’m a little too critical of my own work.
When I pick up on an error, especially after I’ve worked so hard, I have to put my stretcher bars and project out of sight right away before I enter either embroidery destruction mode, and unleash the dreaded seam ripper (D:), or Millennium frame destruction mode, and bring out the hammer.
Sometimes I give up on a project all together and start something new the next day, rather than trying to fix the mistake.
I have a project bag that I bought exclusively for unfinished embroidery.
And of course it’s full to bursting!
I’ll get to them all one day, I swear!
Yeah, I think it’s fair to say I have a bit of a temper when it comes to mistakes in embroidery ^__^
Can’t I be more like you, Mary, please?
I read your blog every single day and drool over your creations.
You’re wonderful and just full of inspiration :3
JoJo
x
So you just HAD to ask about not fixing little problems right then and there!!! Cleaning up (long overdue) in my workroom I just came across a sweater I was knitting for my daughter, left unfinished because of an incorrectly twisted braid a few rows below. Well, the girl turns 52 next week…… maybe I can pick out the mistake and finish the sweater for her granddaughter’s birthday coming up in a few weeks…….
Yeah, anything that’s worth doing at all is worth doing well – THE FIRST TIME AROUND!!!
A couple of stitching groups that I belong to have had UFO contests in the past few years. One of the most common reason something was put aside, was a mistake that needed to be repaired.
My motto is don’t bury those projects so deep that you never get around to finishing them. I’ve just had a terrible time with Joseph’s head dress on another Nativity, but this morning after several pick outs, he’s dressed 🙂 Pat in SNJ
Mistakes stop me cold! Until I fix that sucker, my eyes are constantly draw to it and I just have to fix it or I cannot proceed.
Wow – nice fix, Mary. I was surprised at how little the actual curve needed to be made more…. curvy. It was just a little bit, really. But it made a difference, and I do like the “after” look. Thanks for sharing!
I do agree with you Mary that the curve of a leaf in padded satin stitch is very tricky to do. If I get the curve or the smoothness of the stitch wrong I immediately undo it and attempt to put it right. I think sometimes it is best to leave it till another day as sheer tiredness can cause mistakes. I must admit that having had such a long career in embroidery it doesn’t happen too often with me but as I say above tiredness doesn’t help and it is best to put it down.
Oh yes, much nicer. The angle of the satin stitches is much better and the chubby factor is just right. 🙂
Did you notice the shorter 2 curves angle one way (like an S twist in floss) compared to the longer curve that angles the other way (like a Z twist)? How does that look when you stand back? Does the light hit it differently?
That is such a great improvement, Mary. Well worth making the effort, even though the actual change is so small.(I’m really itching to see the whole piece that you’re taunting us with little glimpses of!) I hope you are looking at it and feeling really pleased with yourself!
I used to be terrible for not fixing mistakes and just hoping no one would notice. Or making a rushed, clumsy bodge-job of fixing them. Or giving up on a piece completely. After fifty years of stitching, I have finally, FINALLY! developed the patience to fix the bad bits properly before going any further. And I now have a degree of pride in my work that makes me unhappy with leaving little things that bug me. Even so, some ‘happy accidents’ have come about when I’ve found a way to incorporate a mistake into a slight change of design. So sometimes I put my thinking cap on first, before I reach for my scissors. But when a bit is Just Plain Wrong, then out it has to come.
Hi Mary,
That does look so much better now, I can see why you were unhappy with the lack of curve before. I think it is almost always worth correcting the flaws that bother you, because otherwise that’s what your going to see every time you look at it and who wants that with a piece you’re going to spend a long time living with? Mind you, my Nana had a saying: ‘would a blind man on a galloping horse notice it?’ so on very rare occasions I recall this and decide I can live with a more minor mistake. Either way, my soul feels good!
Most of my mistakes happen when I’m trying to finish that last little bit just before I go to bed, so reminding myself just to ‘save it for another evening’ would help me a lot. (I really should listen to myself more) 🙂 If I’m following a detailed pattern and I discover I’ve made a mistake, I find it’s best to unpick there and then. If I leave it till later I’m likely to procrastinate and then struggle to remember where I went wrong. So, I usually make myself undo the mistake (while having a little grumble) and then I go to bed, leaving the rest for another day.
I enjoyed your article and reading the other comments. Thanks, Mary.
Kathryn
When (note, not if!) I make a mistake, I usually wait for some undetermined period of time, and try to decide if I can adjust to it’s presence or not, though usually, this takes me longer to do than to just fix it and get it over with.
Thank you so much for posting this…it came just when I needed ‘permission’ to take my scissors and perform some minor surgery on a spot that was not quite right. Also, I’m dying to see what this full image is on your mystery project…it looks like it’s going to be a stunner!
Dear Mary
Thanks for your article initially I didn’t think there was anything wrong with the original element but once you had made it wider it does look better. Yes mistakes definitely slow me down it took me an hour yesterday to fix a knot at the back which I restitched 3 times ahhhhh! but I thought of you and how you tackle mistakes and took a deep breath and fixed it 3 times. But I learnt to keep looking at the back as I stitch although it is slower to do this it does save time in the long run. On my Agnes Dei I will have to unstitch the outside goldwork where it has become loose and restitch it, I could leave it as people say it doesn’t notice but I notice it and it BUGS me so I will bite the bullet and change it and I will tackle it patiently she says with a controlled smile!!!!!!!
Thanks for your articles and showing us how to fix things and finding solutions.
Regards Anita Simmance
you did the right thing!
well spotted, well corrected, well done!
Not fixed would have nagged you FOREVER!
It does me…getting it done sooner than later is curative than leaving it to fester in the mind. I know I get to dislike the whole darn piece. So, sooner than later is better.
Regards to all for this Festive Season.
Ma
Hi Mary…your site is amazing.I have been stitching for soooo long but have found so many things to learn and enjoy . Picture steps are great. It’s not easy to do surgery on many hours of work but the results speak for themselves…the patient has been restored to health…and even more beautiful…and the doctor is pleased with her efforts and resting happily. The family of followers have enjoyed seeing the operation with all its gruesome details and agree the results are fantastic. Looking forward to seeing the WHOLE patient.
MERRY CHRISTMAS TO ALL.
I don’t know, Mary. They both look perfect to me. Maybe if I ever get to your level of stitching I’ll notice stuff like that (LOL)
Beautiful! Thanks again, Mary!
You are such a talented lady! Your work is magnificent. When I discover my mistake or error in what ever I am working on, I do try my best to fix it and correct the problem asap. I really hate it when it happens in knitting and discover the mistake several inches above it.
Oh, yes what a difference you made! I have worked on a project and noticed a mistake that was made earlier in my stitching. That mistake will draw my eye everytime I look at the piece. If I don’t correct it, I will not enjoy continuing the stitching. I have heard that you should have a small mistake in every piece you stitch…it is a way of showing we are not perfect, only God is.
Deb
Well Mary, I have learned to obey my instincts and remove the stitches right away. And there are occasions when I do that several times, and now I just accept it as part of the process:) I have learned though, I have to remove the offending stitches first, and then I do step away, usually overnight. Things are always better with a fresh start! Have a lovely weekend! Lisette
Thank you for showing the before and after. Great improvement and great example!
Hello Mary,
I realized many years ago, when I don’t like something to unpick while it is annoying me and then come back whether the same day or usually the next and continue on stitching. That way the frustration and disappointment dissipates and one can enjoy the journey again.
I look forward to reading your blog daily and have shared it with other embroiderers here in Australia.
Thank you for promoting embroidery.
Oh Hanny with a Y you are a kindred spirit!!
But I am making a valiant effort to do it now as my dear old father used to say to me.
Thanks Mary for all your encouragement,your posts are always to the point and keep us all well motivated. Have a lovely Christmas with all your family in the cool while we try to keep cool in the 37 degree heat-over 100 in farenheit very best wishes Chris M
Wonderful fix! It is always amazing, no matter what form of needlework, how a tiny readjustment of a line can make or break a project. The other thing that appears to have changed was the direction in which you put the stitches. Nicely done.
I’m on my third take of the Nimbus on an Agnus Dei project. First time – gold threads were too big an bulky, especially after plunging. Second time tried to turn threads without plunging – no good. This time much better. and it might work….except I saw another example that used a gold silk….hm…should I finish the third time, or rip and try the fourth option? It might take another trip to the Monastery to see the original design again in order to make a decision. 🙂
hola mary,,que buen tema,,creo un bordado se medita,se ve desde lejos y cerca..si algo no esta en su lugar ,bien vale la pena ,arreglar,siempre se gana tu bordado queda bien ,y aprendes…cuidado con las herramientas a no triturar la tela,me gusta hablar de bordado
un abrazo
What is the thread count of the linen you are working on. It looks so nice and tight.
Hi, Mary – that’s Legacy’s ecclesiastical linen. It’s nice stuff! – MC
hi there Mary, hope that christmas was kind and that the new year has begun with health and happiness. Just aquery, i have finished embroidering a nine patch blanket inwool cashmere and doctor flannel they are of the same weight do you know the best way to join the patches so that there are no great lumpy seams i admit started this project for fun and didn’t think about the consequences of putting it all together. thanks marg
I really like your work mam.
You don’t stab straight down when satin stitching, do you? Are you angling up under the outline! I wish you would do a video of that.
Best,
Rebecca
I ‘found’ a very old piece of embroidery satin stitched and many threads were coming out. Thank you so much for this wonderful tutorial on how to repair
satin stitch! Patty