


Last week, we looked at this high-relief embroidered goldwork lily, taking a preliminary look at how it was made by making some observations about it before taking it apart.
Today, let’s take it apart and look inside!
Taking apart a piece of old goldwork embroidery like this is not exactly a walk in the park. It doesn’t come apart with ease – it takes a bit of work, and it’s actually somewhat dirty work! Years of dusty accumulation and stiffening of threads make the deconstruction a little challenging.
First step, to cut the couching threads on the back of the piece.
Once the threads on the back are cut, it’s easier to bend the whole slip so that we can see between the petals on the lily. You can see the couching threads here, just at the base of the gold.
The couching threads pass from side to side across the back of the petal. Coming up into the fabric, they go over the gold passing thread (which is worked in pairs) and back down into the fabric, to pass to the other side of the petal. The gold passing thread is pinched and folded so that it turns back to cross over the top of the petal form, and on the other side of the petal form, the couching the thread comes up, grabs the pair of gold passing threads and goes back down into the fabric and crosses to the other side of the back.
The gold, then, is only on the top of the petal form, and crossing back and forth on the back of the fabric behind the petal is the couching thread.
So that’s essentially how the technique works. The petal form is not wrapped with gold. And the gold does not pass into the fabric. Instead, it is folded back and forth across the top and sides of the petal form, and couched on each side, where the gold is folded to make its return journey.
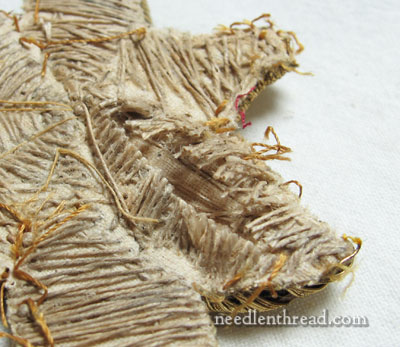
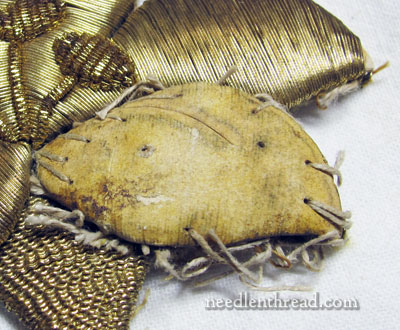
Once the couching threads are cut and picked out with tweezers, the gold thread can be folded back to reveal the petal form.
You can see that the petal form is sewn down onto the fabric, with threads passing into the pierced form. It is likely that the form is pierced (perhaps with a stiletto or a long needle – some kind of sharp, straight piercing tool) before it is sewn on.
The form you see showing above is as hard as wood at this point. You can tap on it and it sounds like you’re tapping on a hard surface, like thin wood.
So, is it wood? We shall see!
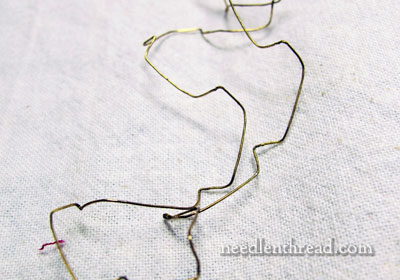
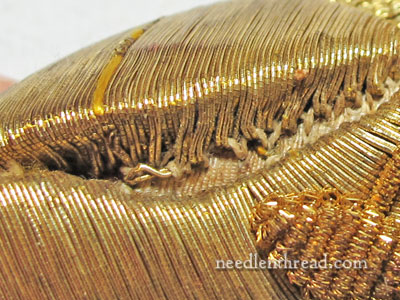
First, let’s take off some of the gold thread. Because the gold is worked in pairs, it comes off like one long pair of threads. It looks and feels very wiry, as if it just one solid piece of gold wire.
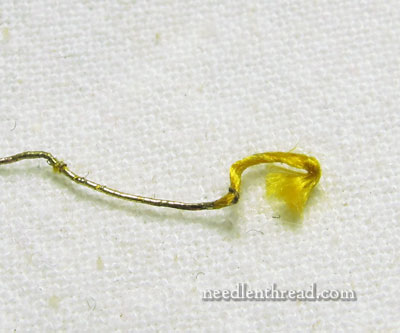
However, pick apart the end, and it is clear that it’s not solid wire. It consists of a silk core wrapped with gold wire. By gold wire, I mean gold and alloy.
Now we have all the gold thread removed from one petal. Time to take the form off and take a good look at it. It will reveal some secrets that debunk some previous ideas I had about the whole vestment embroidery.
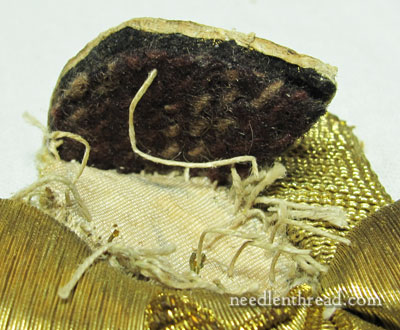
First, we’ll lift the form. Aha! Something here looks very familiar. Remember the grapes we took apart earlier in this series, and the padding beneath them? It’s the same padding.
This dark brown speckled stuff is a felted wool of some sort. It’s thick and a bit scratchy, kind of like a carpet felt though not as rough. It reminds me more of a boiled felt that was woven first and then boiled. I really need to pick it apart under a magnifying glass to get a better idea. In any case, it’s felt of some sort.
The top of the form (the hard, smooth surface that feels hard as wood) is glued to the felt.
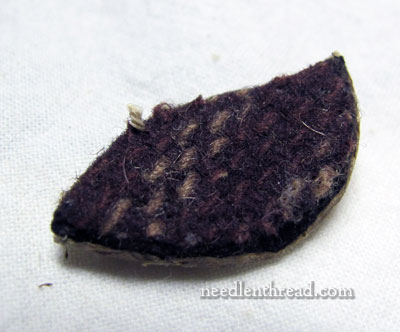
And here is the felt, peeled from the hard form.
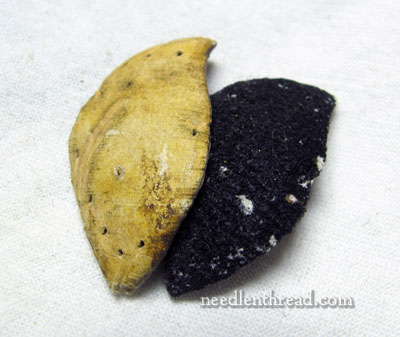
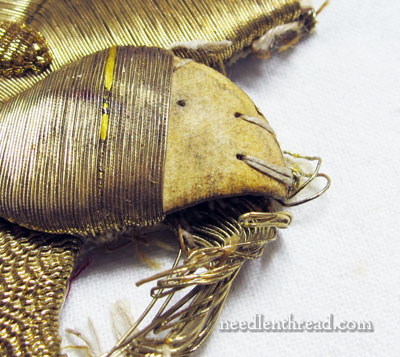
And here is the hard form and the felt. Notice the rounded, smooth edges of the hard form, and how it bends to form the shape of the petal. Was it actually made this way? Well…. a little more exploration with clarify this, I think.
Notice, too, the pierced holes for tacking the form onto the ground fabric.
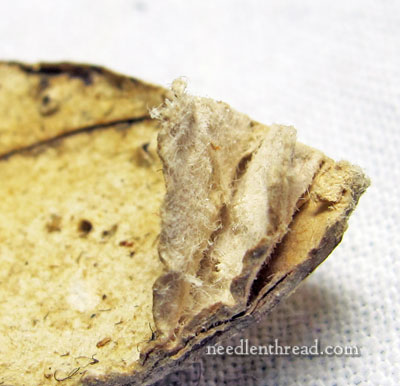
When turned over and examined closely, it becomes evident that the form is not wood at all. It is, in fact, paper. Card of some sort – thick, compressed paper card.
The years (and the pressure from the gold thread) have made the outer layer very hard, but the inside layers peel apart almost like a soft compressed cardboard. The pressure from the gold couched threads hugged the paper and felt into the curved and rounded petal shape we see here.
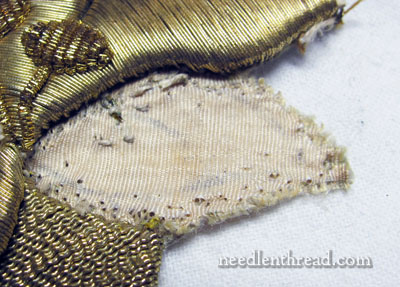
Now that the petal is removed, we see yet another familiar sight – the original ground fabric, which is the same ground fabric on which the grapes were worked. Even the pattern markings are the same. And it is backed with the same linen.
So, what have we learned?
1. The gold thread used to work this high relief goldwork is stiff and wiry, but it is not wire-proper. It is a wrapped gold passing thread. So far, the closest equivalent that I’ve found to this particular wire from this particular piece is Benton & Johnson’s 2% smooth gold passing thread, in size 4.
2. The form was created by adhering a rather thick, pressed paper card to a layer of thick (approximately 1/8″ thick) felt.
3. The gold thread does not pass into the fabric or behind the form, but rather is couched on each side of the form.
4. The couching threads are heavy duty threads and the gold thread is couched in pairs.
5. The piece was created simultaneous to, or in the same place as, and most likely with the same hands or group of hands as, the grapes, because the materials all the way down to the ground fabric are the same. It is likely that the grapes and the lily were made for the same vestment (I didn’t think they were, because, as design elements, they seem a bit incongruous). Whether or not this particular vestment that we’re looking at is the one they were made for is not clear yet. They could have been salvaged from another vestment and applied to ours.
Maybe further explorations will tell us some more!
Questions? Comments? Observations? Is there anything you want to know about this particular piece of goldwork (the lily), that you want me to explore further? Have your say below!
Deconstructing Goldwork is a short series here on Needle ‘n Thread. If you are interested in reading the backstory to this piece, you can find all the articles in the series so far listed in this index.
Hello Mary!
Oh, how interesting! I was looking forward to this part.
Now, a couple of questions.
First I will quote you.
“The years (and the pressure from the gold thread) have made the outer layer very hard, but the inside layers peel apart almost like a soft compressed cardboard. The pressure from the gold couched threads hugged the paper and felt into the curved and rounded petal shape we see here”.
Does that mean that originally this piece of cardboard was not so stiff? Was it softer as on the backside now? And was it cut out with the curve? Or this curve of the petal can be achieved during couching? If the card is not too stiff and you pull the couching thread harder, you bend the card a bit to form the curve? Or is it better to cut out the card with all the curves you want in the first place?
And the other question is: what type of card and felt would you recommend to use nowadays? The idea of taking felt and card is appealing. Because you do not have to take a very thick card and then try to cut it with some special tools (because scissors won’t cut thick card), and then smooth the edges, you can achieve the thickness by adding felt under the card.
I am afraid I asked too many questions, sorry.
But the subject is absolutely fascinating!
Oh, one more! Do you think that you have to pull the couching thread pretty hard and it should be rather thick to hold the gold threads? So that they sit tight across the card.
Larissa
Hi, Larissa – I think the original card was not stiff and hard, like a board. It had some level of flexibility to it. The piece was cut to the shape of the petal (according the line drawing for the pattern, and then, because the pressure from the sides where it was couched pulled the paper and felt padding down towards the surface of the fabric, that’s where the “curve” on the petal form came about. I agree, you can use a thinner card if you are using thicker felt. The card will give you the sharp edges that felt wouldn’t give and yet the felt will give the piece the height you want. I would use a good dense wool felt and for card, I think you can get away with any heavier artist’s card. I’ve been trying several things over felt – thick card used for pen and ink drawing, thick pressed watercolor paper, mat board on it’s own without felt (it’s too thick and stiff, I think, but it does work – though it’s a bear to cut precisely). Yes, the couching threads are pulled very snuggly, to hold the gold in place, which is another reason a good, sturdy thread should be used (well waxed!). You don’t want the thread so thick that it spaces the gold threads too much on the side, but a good strong thread is a must! ~MC
The amount of time and work that went into these vestments boggles my mind! Pat in SNJ
Mine, Too!!!! 🙂
I sit on the edge of my chair waiting for your next installment of this series. It is so interesting to see and it’s helping me to create my own first work of this type.
An interesting note on the history of this style of goldwork. During the 15th and 16th centuries animal skin parchment was used instead of the cardboard you saw in this piece.
So very cool, thank you once again
Kate
Hi Mary,
Great piece! Great information! Thank you.
My one question is: if the gold passing thread is couched in pairs, where are the raw ends? How are they held in place? I am most likely missing something that is obvious, and I am a bit confused.
Thank you again for the amazing information you give from deconstruction!
Happy Family Day from Canada!
Danielle
Hi, Danielle – The gold is worked off the spool, so there are only two spots where it would be plunged to the back, at the beginning of the work and at the end, when the petal is covered completely. It’s only two thin threads of gold, plunged to the back and sewn over to hold them. ~MC
Thanks Mary!
I knew I was missing something fundamental! Couching the back of the piece would save a considerable amount of gold thread also; all the layers, all the work; amazing!
Danielle
Dear Mary
Dirty work this deconstruction but interesting, imagine the sewing involved in this piece, stitching underneath all that padding. Paper padding seemed to be popular in antique goldwork. they must have had tough fingers or very long thick needles to get thought that padding. A lot of gold seems to be used just in this piece which I should imagine was quite expensive and not easily accessible in those days.
Regards Anita Simmance
I continue to hope you will discuss the application of the goldwork to the vestment so that there is no sagging, ripping, etc., of the vestment once the heavy bulky gold slips are applied. I know you have a long way of deconstruction to go, but a hint? Pretty please?
Mary did a beautiful medallion last year then, as she was giving it to the seamstress, decided to appliqué herself, here. https://needlenthread.wpengine.com/2012/05/appliquing-hand-embroidery.html
When the seamstress asked if she could put it on with a zipper foot! Yikes. Good tips.
Mary
the technique and the under card/paper layer look exactly like the goldwork- zlatovez-we found in Slovenia/northern Croatia( Slavonia)
Bette
Are you using an old pair of scissors to deconstruct so as not to ruin good scissors?
Oh my. This is just as good as any episode of “Bones” and almost as gruesome. I wonder why they chose dark felt for padding and why they covered it with paper. Then again, 100 years from now someone may pick apart our stitching and wonder why we did things our way.
Bring on the next scary chapter in this series.
I am amazed and thankful that you are taking this apart and sharing your discovery. I had never given much thought to how the padding was done to get the textured relief in these antique embroideries. I have been using these ideas as I try new ways of embroidering and quilting. In today’s world I would probably use the “card” from the back of a tablet or the card used to wrap bias tape into the package. This would also be similar to the card that was used in the 1920’s 30’s to make quilting templates that I have from my grandma.
I’m only guessing, but by the layers it looks a little like picture frame matboard. Whatever type of paper board they used, it was obviously thick enough to hold a shape and not fold up too easily when they stitched, but still would need careful stitching so that it didn’t pull the board out of shape with the tension of the stitches. Would couching the thread keep the padding from bending more so that using a satin stitch or would it have been couched purely to save the gold thread for the top and not “wasting” it on the backside?
I am putting this together with the brooches from a day or two ago. Any suggestions on how to make forms today for things like the lily petals or the brooch leaves?
Hi, Mary – if you read the article and some of the comments, you’ll see the discussion of using felt and paper or card for the forms…. – MC
Amazing, Mary. Do you happen to know when this piece was made? I was thinking how hard one would have to work the thread to get it to bend the cardboard around the mold. It looks really thick in the picture. I bet they did some shaping with their hands before laying the gold on top. Hard to tell how moisture played a part, too, I would imagine. This is fascinating stuff! Kind of like being an embroidery Archaeologist, lol.
hi Mary, Was the petal gold wrapped while in the hand then applied to the ground ? How do you think they made the holes for attaching to the ground fabric without disturbing the goldwork ?
ji
Hi, Jacquelin, if they did this the same way I have, you first apply the padding in layers on top of the design and ground fabric, hence the big holes. You know it will be covered up and you don’t have too sew through it again, then you couch the gold over the padding.
So, they would cut the felt smaller than the lily petals, stitch that down (I don’t know if they did that step) then the card bigger, just the design size. Then, you would shape and stitch down the card, positioning, then couch the gold on top.
I think that’s what they did. Mary, is that right? Anne
Am loving this! Sew very interesting! Thank you for shaing this with us. 🙂
In my treasured copy of the DMC ‘Encyclopedia of Needlework’ (p197 in my 1926 edition), there’s a description of just this form of cardboard work (without any felt in this case). Silver leaves are “done over cardboard shapes which the embroiderer can prepare for herself” The board is described as ‘white cardboard’ (yellow for gold work)’or stout cartridge paper’. Waxing the couching thread for extra strength is also mentioned. (Here, it is DMC’s cotton lace thread ‘Alsa’, although I would suspect that linen thread would be even better for the task.)
Fantastic. Thank you Mary. Have you ever seen this method of couching gold passing thread this way before? I mean, by bending it over on itself and then taking it back over the work? It seems so logical but it’s the first I’ve seen it.
Yes. It’s on a ton of older ecclesiastical work. A few goldwork books mention it, but rarely is there any deep instruction on it. – MC
That’s a pity because this method would save on gold thread while avoiding the problem of taking the thread through such a thick padding more often. It could even help the embroiderer get into a good rhythm. The lily does look so smooth. I wonder if it’s because of this technique?
My guess is that the woven wool on the underside of the petal is the actual fabric from the original piece. I think it was cut out intact, and the white silk base was put on the new piece of damask. Could it be?
Hi, Laura – I’m not exactly sure what you mean. Do you mean that the wool was the original ground fabric? If so, no. For one thing, the wool is cut to fit the various forms, and mounted on another fabric that has the design marked out on it. For another, ecclesiastical accoutrements like this are not made out of wool felt or any such “rough” material. -MC
When I hear “couching” I think of passing thread over another thread or material on the front of the work, not back and forth on the back side. Is this example a goldwork-specific use of the term couching? Or does it go by another name in other types of needlework?
Hi, Gail –
True – that’s how couching is mostly done, and that’s normally what I think of, too.
Couching, though, is any stitch taken over a laid thread (or wire or ribbon or what-have-you) to hold it onto the fabric, and essentially, that’s what’s happening here – the stitch is going over the laid thread (it is laid on top, it doesn’t pass through the fabric) to hold it down, and then the laid thread is turned back next to itself. So the holding stitch there is still a couching stitch. The term “couching” comes from the notion of the thread that is laid down, rather than from the stitch that’s holding it down.
~MC
I am just catching up on your Blogs (a bad thing about going out of town!!). This is SUPER!!! I am loving the deconstruction and your logical approach and detective work. Regarding the shaped card, I was wondering if these could have been “pre-made”. I am thinking of some monogram shapes I found (of a much more current vintage), but they were cut out shapes of soft cardboard, but appeared to be sort of “embossed” before they were cut out — so the edges sort of naturally sloped at the edges (so you wouldn’t have to pull as hard on the gold threads to “pull down” the edges). And I know they used to have different irons to “shape” artificial flowers out of silk, so maybe the cardboard was treated thusly before being applied to the embroidery????
Thank you for carefully deconstructing this embroidery and sharing your discoveries with us. I appreciate your careful documentation and descriptions, and the thoroughness, curiosity, and open-mindedness with which you are conducting the investigation. I look forward to reading more installments.
TRES INTERESANTE SUPER
Your article, Inside the Leaf in Deconstructing Goldwork is absolutly the Rosetta stone of gold embroidery. Nothing was mentioned in the Royal School of Needlework about this technique. I always assumed that it was done like a satin stitch and wondered how you would get the thread through the fabric without damaging the thread and of course the would be the expense of unsean gold thread.
Yes, another amazing project. I have an antique vestment that needs the goldwork removed and re-applied. Have you an idea of the best way? I was thinking of cutting around the pieces and sewing on to the new fabric and then doing an outline stitch in the same colour as the fabric?
Lastly, can you tell me is the goldwork with the wire-type thread applied with a needle or folded across by hand? Is there any reason why the type of goldwork done on this lily cannot be replicated with a softer metallic embroidery thread and rather than folded over the couching thread, brought over back and forth by needle?
Many thanks!
Helen
Dear Mary,
I really like your website:) I would like to try some Slovak traditional goldwork over a card or leather. I would like to ask you where could I find a similar thread (flexible and durable) as is used on your goldwork lily petals? There is a lot of goldwork information available on internet but I could find very little information about goldwork over card (especially the names of modern threads that are suitable for this particular kind of embroidery). Thank you very much in advance!
Maria, Slovakia:)
Okay, now I’m getting into this whole series of posts and commenting on them 6 years after the fact. I have found a new rabbit hole to fall down!
When you say “ground” do you mean the original vestment was made of the white silk faille and the embroidery done directly onto it? Because if so, you could consider the angle at which each piece is placed on the grain of the faille, and get some idea of the original placement of the elements. But I’m not sure that’s what you mean—if the ground fabric was just what they used to hold the pieces in place to embroider, then cut them out and placed them on something else and appliquéd in place, then it would be meaningless.