


Last week, we took a look at this remnant of an old vestment adorned with goldwork embroidery, and then we began taking apart a bunch of grapes on the piece to see how it was constructed and to get a better look at the materials used.
Today, we’re going to finish taking this goldwork element apart and look closely at the foundation on which it was worked.
Lots of questions came up in the comment sections on both of the previous articles (Part I and Part II), and I did my best to answer them there. If you have questions, you might want to take a look at the previous discussions to see if they’ve already been answered.
There were several excellent suggestions, too, about how the grape domes were made and how they could be made again today, so if you’re curious about the materials involved in this element, feel free to peruse the comments on the first two articles, or to ask your own question below.
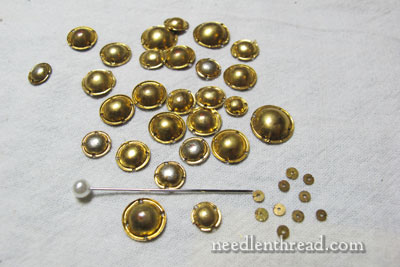
The photo above shows the collection of little goldwork “domes” and the few spangles that were removed from the bunch of grapes. The domes are made from what looks to be copper or some sort of copper alloy, plated with gold. I don’t have any expert metal analysis of that, so I could be wrong, but that’s what it looks like.
Most of the little domes are salvageable.
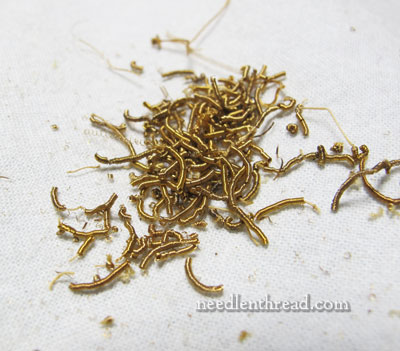
Here’s the left over purl cut from the piece. It is not salvageable.
You’d be surprised how dirty a job it is to take this stuff apart! The purls are pretty dingy, and of course, they are mangled from the removal process.
Now let’s take a close look at the foundation upon which the grape bunch was built. With this type of high-relief goldwork, the foundation is almost as important as the golden embellishment on top of it!
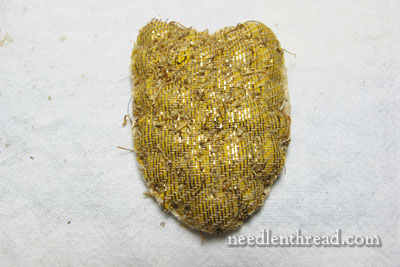
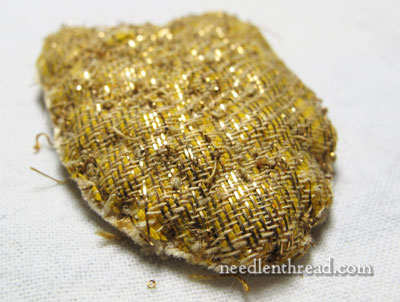
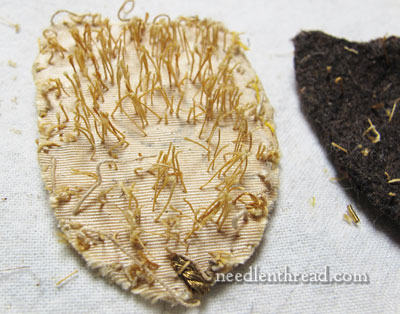
Here, you can see the intact foundation of the bunch of grapes. It looks like a shield or a patch, doesn’t it? The outside layer of fabric is a rather “open” herringbone-like weave of bright yellow shot with gold paper-like strips.
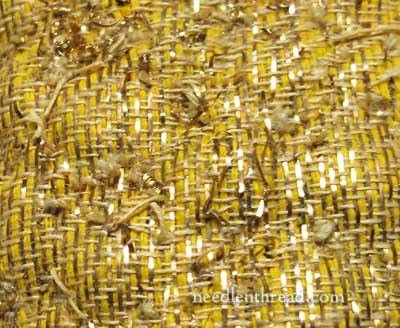
You can see it up close here.
Some questions arose about this fabric. It’s not really typical “cloth of gold” – in my experience, cloth of gold is practically solid weaving with gold threads, and the threads are wire-like, not paper-like strips.
I also don’t think that the yellow fabric here was the original ground fabric for the vestment. It is much too rough for liturgical use whenever this piece was made. I believe it was chosen for the background because it serves as a “mask” behind the goldwork, in case bits remained uncovered with embroidery and metal – the same reason that we often use yellow or gold-colored felt beneath goldwork today.
To give you some perspective on the thickness of the piece, here’s a side shot. The whole piece, with the goldwork on it, was about half an inch thick.
How would you like embroidering through that?
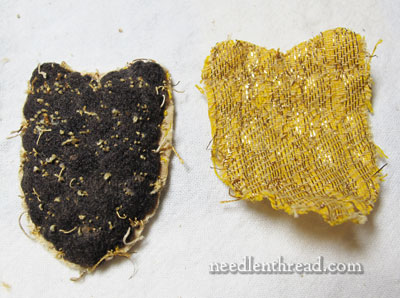
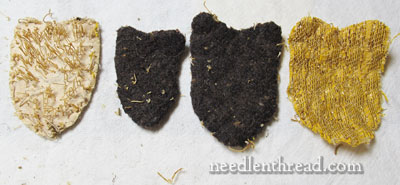
When we take the yellow layer off, we get a layer of dark brown felt. The little speckles all over that are the couching threads from the goldwork.
This layer of felt is just slightly smaller than the yellow fabric, and it is fairly thick and somewhat soft – not soft and fluffy, but softer than regular thick wool felt today.
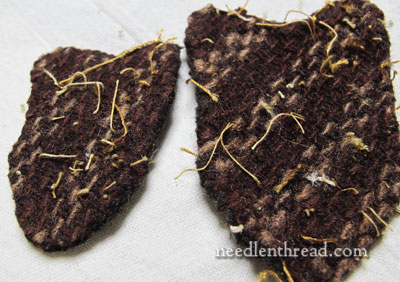
This is what the back of the felt looks like. You can see that it is woven felt.
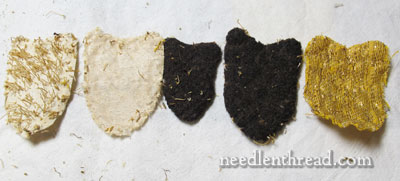
When we remove the top layer of felt, a new, smaller layer of felt is revealed. It is sewn onto the lighter fabric that is the size and shape of the original design.
This is how the goldwork element was built up to be thicker in the center than on the edges – first, a smaller layer of felt is sewn onto the ground fabric, and then a larger layer of felt is sewn on top of it, so that the padding mounds up in the center. This is the same way we do this time of raised work today.
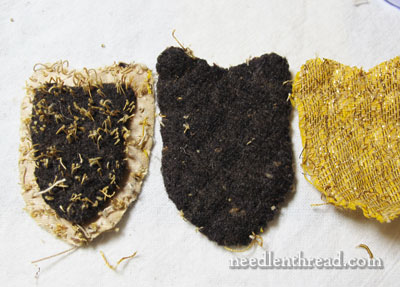
Now, if we remove the smaller layer of felt, we can see the pale ground fabric. Let’s look at that up close.
This is a relatively thin silk fabric, too fine to support the heavy weight of this kind of goldwork alone.
And so, if we peel off the layer of silk, another layer of fabric is revealed.

Backing the silk is a layer of linen, to help it support the heavy goldwork. Not unusual – this is exactly what we do today.
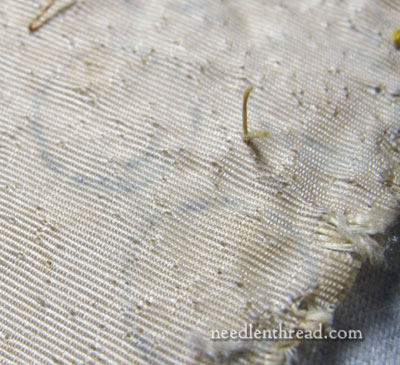
If you look at the silk layer up close, by the way, you can see the imprint of the original embroidery pattern. Those dark circles there are the grapes. Makes you wonder, doesn’t it? By the time the felt is applied to the fabric, it’s not as though the embroiderer could see the grape design.
And this is yet another point that makes me speculate that the goldwork elements in this whole piece we’re looking at (on the red fabric background) were actually salvaged from another vestment (or vestments) and applied to this piece. But more on that later.
Since my plan is to take apart each element on this piece and show it to you, I’ll be organizing an index for these articles so that you can easily find the articles and use them for reference if you wish. The next time we visit the subject, we’ll look at the lily up close.
As usual, if you have any questions or comments, do feel free to leave them below!
This is a fascinating series Mary – it’s so interesting to see how things were made back in the day and marvel at how difficult it must have been to stitch.
Thanks for these closeups and comments. The deconstruction of the grapes is fascinating!
Truly amazing how “ugly” the underneath is but so essential in how the top ends up looking. My only question is why the silk? It seems like all the other pieces was to help build up the element on it’s linen foundation. Silk sounds expensive and thin just to be covered up unless it served a purpose I met. Thanks for sharing!
Brilliant detection work Mary and unbelievably fascinating as you peel back the layers. I can’t wait for more.
Mary. I was given a small piece of sari material with gold work on it I took the small gold work apart and got to do a little gold work on a needle book using the left overs. My first gold work. I used the leftover pearl you say is not salvagable. If you are a very beginner or someone like me with the will but not the money to play with gold work that purl would be a gift. It was going to be tossed out so I felt free to do with it as I pleased. I get so many complements. If you are going to toss out the pearl I would be glad to pay postage.
Dear Mary
I love those domes. Wow what a lot of padding! imagine sewing through all those layers of yellow fabric, felt, silk and linen. Their fingers must have ached. Really fascinating though I wonder if the other elements of the design are the same, can’t wait to find out and thanks for making an index of your experiments for us to refer to.
Regards Anita Simmance
I am hooked on this series, Mary. Seeing how the piece was made is really interesting. I also like that you take a lot of pictures so we can really see what’s going on.
About the circles on the silk, could it be that the grapes were originally attached directly on the silk on another vestment and that some kind of oxidation left those circular marks? And then when they did the one you’re taking apart, they used those marks as a guide to know where to put the felt and build it up?
Hi, Myriam – I think the grapes were part of a different design on another vestment, and I would guess that when the design was laid out on the original vestment, the whole design (including the individual grapes) was inked in or transferred. In the embroidery process, the foundation would have been built up on top of the whole cluster, and then the goldwork grapes would’ve been fitted onto the cluster in the most sensible way, to fill up the cluster. That’s my guess, anyway. Mostly, I’m guessing based on how I would do it, and how I’ve seen it done on other vestments. ~MC
Mary, you ask how we would like to have sewn through that thickness of padding. One of my early pieces of Goldwork was a Bee on Honeycomb. I padded the Bee with 13 layers of felt and embroidered it with French Knots but then found that to get a needle through it I had to use a pair of pliers to pull it through. Never again! In future I would use soft toy padding with a covering of thin fabric of some kind.
Dear Mary,
What a tremendous inspiration and delight you are! I am very excited to read what you have to share with us each day. It has brought back to mind about my mother. She did metal embroidery for a living (about 65-70) years ago.. She worked on church vestments as well as Masonic Fez’s. I had not really thought about it until I started following you on this wonderful journey so this is a double pleasure for me. Thank you for you great pool of knowledge, your superb photography and your willingness to share allowing us to also learn.
Sincerely,
Kathy
Hello mary,
Thanx for the lovely journey of investigation you took us through, It was very informative and wonderfully enjoyable. Do you plan to redo the grapes again with changes?
Hi, Mary – I may use the goldwork “domes” for grapes (or something else – who knows?) a little ways down the road! We’ll see. Some could use re-coating, and a couple of them are broken. But most are still usable – we’ll see what materializes! ~MC
Mary, This is fascinating. Thanks for writing about, and showing us, this type of deconstruction project.
Your detective work is fascinating. I hate to take someone else’s stuff apart. I can imagine the weight of these vestiments, and to wear them for such lengthy ceremonies, amazing! Are they still made the way the one you are undoing?
Mary,
Your deconstruction efforts remind me of reading about a passtime of the 18th(?) century which was I think called “drizzling”. Ladies and even gentlemen of leisure would pick the metallic decoration out of worn garments and other textiles and sell it for “pin money”. Now if I could only remember where I read that.
Meg, not only did they do “drizzling” at public gatherings but the ladies had special needlework tools to undo the metal decorations. It was not only worn garments that were attacked but you could go out to a ball dressed in finery decorated with gold or silver and come back with it all gone during the evening.
Fascinating. I learned something new again. I did a search and found this from MEN, WOMEN, AND MINXES: “The ladies sat round a table with their embroidery frames, or heaps of gold fringes to “drizzle” or unravel; and the gentlemen sat behind and joined in the conversation.”
Any idea on the age of the piece? I’m really enjoying this series, thanks for taking the time.
Thanks for sharing this project – it is fascinating for all of us!
I have a few thoughts about the supporting materials – the yellow shiny fabric is probably Lurex or poly-film synthetic metallic shot through an even weave. I believe the white ribbed silk that covers the linen is grosgrain. And the patterned wool is a pure woven wool scrap, not a felt, since felt is not woven. It is hard to date but this info may help.
Hi, Laura – thanks for the insights. The yellow fabric is not lurex. It isn’t shiny, except for the gold strips, and it burns like a natural fiber. The gold strips that pass through it are like the gold paper-like wraps on Japanese gold. The wool is felted. It is woven first, and then felted. On one side, you can see the weave, on the other side, you can’t. But you can barely pull the fibers apart enough to see that they are felted together – kind of like a boiled wool. The silk has more luster to it than a normal grosgrain – it’s a taffeta weave silk, with that corded appearance of grosgrain.
Yes, the white fabric can be any type of ribbed, any of them in silk, all hard to age. A magnifier would tell you if the weave is even or offset to determine that better. So glad I’m just a spectator fan!
This is so old it feels a little silly to comment on, not sure if anyone will ever even see, but:
Both the yellow fabric and the “felt” are types of twill weave. The yellow appears to have a warp of some lighter yellow/cream-colored yarn, and weft with alternate threads of the gold (which I agree looks like Lurex, but presumably predates it by a good while!) and pairs of the bright yellow (linen?) threads acting as one. That is, the two linen threads lie side by side and follow one path, so the weaving is done as one pass of linen, one of gold, etc. I assume this is the weft mostly because warp threads are subject to a lot of abrasion and tension, and I don’t think the gold stuff would stand up to either. Oh, and it’s not really a “shot” fabric, even if it appears “shot through with gold” in idiomatic English. Shot fabrics are generally silk, generally plain-weave rather than twill (IME anyway), and have warp all one color and weft all the other, giving depth and movement to the color; think of the silk version of something like chambray.
The “felt” isn’t felt, it’s something like kersey, which is a type of coarse wool usually used as coating (and possibly cut from an actual old coat!). It has been fulled, which is to fabric as felting is to loose fiber, but it has also been brushed and sheared on one face and not the other, creating that dense nap that obscures the weave structure. Oh, and boiled wool is just a gimmicky term for extensively fulled fabric—there’s one mechanism for getting wool to shrink and become denser and softer, and it is that when you subject wool to a combination of moisture, heat, and friction, the scales on the fibers start climbing the scales on neighboring fibers. They’re one-way climbers, like a cat that can’t spit anything out because its rough tongue keeps pulling things in. Whether that process is called fulling, felting, or boiling depends on a lot of factors, but it’s all the same thing really!
The silk looks to me like faille. That’s what you usually call the “grosgrain” texture when it’s fabric, not ribbon.
I’m new to your “blog” (far beyond most I’ve ever seen for truly captivating content). Your knowledge, dedication, commitment and the amount of work you’ve put into this project (and I’m sure many others) put me in absolute awe. I’m so glad I found you on Pinterest.
Thanks, Judi! I’m glad you’re enjoying it! Don’t you just love Pinterest?! 🙂
Your newsletter downloaded late-afternoon yesterday,I am in Derbyshire. My husband and I were discussing how you could reproduce those metal “caps”. Presumably a die and soft copper would work, but expensive using gold leaf to cover. Finding a die woould be a possible problem at that size. As to the difficulty of pulling threads through such thicknesses you should try some of the Ruskin lace when you go through the same hole anything up to 20 times! A pair of strong small pliers are a normal part of the tool set.
I don’t think you would need a die to make these caps from thin gauge copper. A dapping block and hammer would probably work but making it ‘gold’ would be more problematic and expensive.
Hi, Mary, looking at the photos I thought the wool might be woven and felted or boiled. Felted would be softer to embroider through, even with 2 layers, wouldn’t it? Interesting that the fabric has paper strips. The cloth of gold I have has lured. In Lucy MacKrille’s books she says she could not get the cog fabric from Japan after WWII, so maybe this predates that. Probably. Interesting all around. The piece I’m doing I drew the design on the linen ground, then pad on top. It’s pretty obvious where to put the design after that. Do you think that’s what they did? Wonder if the silk and linen are slips or the. Same fabric as the original chasuble.
Hi, Anne – yes, I think that’s the way it went – the design first, then the padding on top of it. That’s how I do it, too. I think the silk and linen are the ground from the original piece, and the piece was cut up to salvage parts, and it ended up on this chasuble. That’s my guess. As far as boiled vs. felted, boiled wool would actually be easier to go through than regular felt. This stuff is probably felted by boiling, as the felting is not as “firm” as it would be, if it had been seriously felted and pressed into “harder” felt. It’s got loft and it’s got that “stuck-togetherness” that we see in the wool fibers in felt, but the fibers themselves are not so firmly attached as we find in regular felt. The best way I can describe it: think in terms of a “boiled wool jacket.” It’s knitted and then boiled. And though it is dense, it’s not as hard or dense as regular wool felt. But it is still thick, and it has a good loft to it. But it also “molds” a bit because it’s more flexible than regular felt – hence the “puffs” in the padding where the individual grapes were sewn on. I’m guessing the padding was from a piece of salvaged clothing of some sort. While we use wool felt that we buy directly for the purpose of padding, back in the day, they often used stuff they had on hand, that they salvaged for use in embroidery. And I’m thinking this wool was probably salvaged clothing of some sort…
Mary.
Under something like this, carpet felt is usually used. Here is the US, it is hard to find, so I use industrial felt. Contact Tom Shoan at Sutherland Felt – I have no personal connection with him or email him, [email protected], for details. If you aren’t familiar with industrial felt, this comes in several grades and densities 1/16 – 2 inches or to a custom size. It is purchased by the yard. I use either Ecofelt or an F-10 or F-11 grade. Ecofelt is 100% tan wool with no post processing applied – it is right off the back of the sheep, washed, then needle punched and pressed to thickness. The others contain strands of hair, etc. like carpet felt. I prefer the EcoFelt because a sharp needle goes through 2 inches well and it can be champered easily with a good pair of scissors. I wouldn’t recommend it if you are plunging thicker gold threads.
G’day Mary,
My curiosity got the better of me and I had a peep at this post just now. I’m sorry I was such a silly before, or at least for writing it all out there and then. I found this ‘insides’ one ok, at least after you started pulling the padding apart. The 3 of the padded part intact is a bit iffy but the soldier’s little tin hats are just plain cute in that first photo. It’s just when I even think of the other now I still get shivery. It was strange. I’m used to handling old things. Love rummaging in Op Shops and when we had a country antiques store I’d enjoy nothing better than going through elderly peoples decrepit items that could tell some tantalising tid bits. Most were loyally silent but that encouraged the imagination no end. A military button sewn under the lapel of a coat. A sprig of crushed pine needles in a pocket. A moth eaten pin cushion with 3 decorative old, old pins very firmly stuck in it. They got loving care and came very close to talking.
Yes, so these old fabrics you’ve revealed here are intriguing and the lovely thing is you get them talking. Thank you.
Hopefully ‘it’ was just the grapes as I do want to follow it all through.
Cheers, Kath
Absolutely fascinating, Mary. Thank you very much.
I love your work and information that you share.
Thank you.
It is amazing of what was done with the materials that were available.
Katie
Es muy amable, decostruir esta hemosa pieza solo para compartirla con sus seguidores,gracias seguire atenta a su descubrimiento.
Is there any more to this series on goldwork deconstruction, Mary? It’s fascinating!
Hi, Kathy – you can find all the articles listed here: https://needlenthread.wpengine.com/2013/02/deconstructing-goldwork-project-index.html
Good Early Morning to Mary Corbet and Embroiderers, This piece on deconstructing gold embroidery is exquisitely written and photographed. The work reminds me when in 1977 I traveled to Rome, Italy for a mere 500 dollars to visit the Vatican during August. That period several of the Catholic Popes embalmed were presented in an exhibit and the vestments the dead were laid to rest in.
This type of instruction by Ms. Corbet is worth so much to the amateur who loves art, sewing and embroidery that exhibits the passed textiles and costumes of the famous royal and religious wear.