


Today’s Stitch Fun episode is in answer to a request from a reader, who wanted some further explanation on a stitch combination found in Mary Elizabeth Wilkinson’s book, Embroidery Stitches, which is available for free download on Internet Archives.
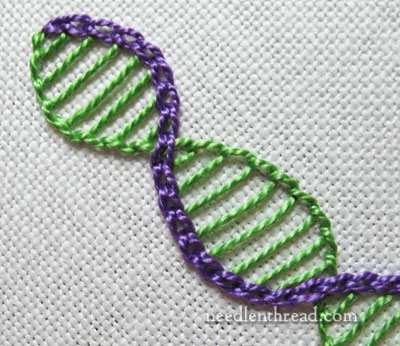
The combination involves buttonhole stitch and chain stitch worked in opposing waves so that the result looks very much like a double helix.

I’ve worked the sample here in two colors so that it’s easier to see the contrast in the two stitches. The result here is a bit chunky, since it’s worked with #5 perle cotton, but you could definitely work the combination with lighter threads for a lacy effect, and with the same color threads so that the contrast between the two edges relies more on texture than on color.
I began by drawing opposing waves on my fabric, which look essentially like this:
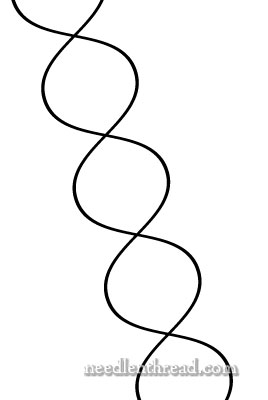
…except that mine weren’t quite as neat or quite as even!
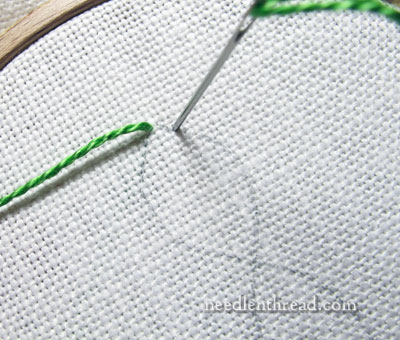
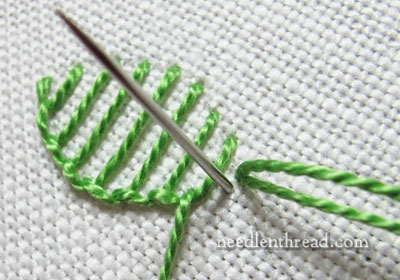
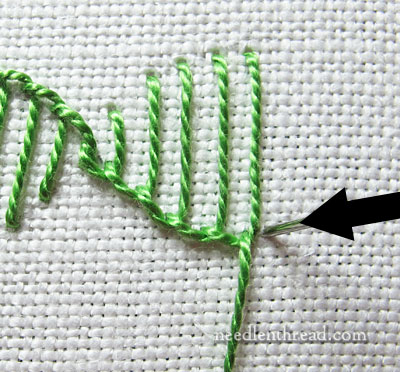
I brought my needle up in the fabric at the topmost intersection of the waves, and took the needle down into the fabric as far away as I wanted my buttonhole stitches spaced, in the top (or right in the photo) line.
When working the buttonhole stitch, the stitch always begins on the line on which you want the “rope” to form, and the needle always comes up in that line (where the rope forms). It always goes down into the fabric where you want the end of the “spokes” of the buttonhole stitches to be.
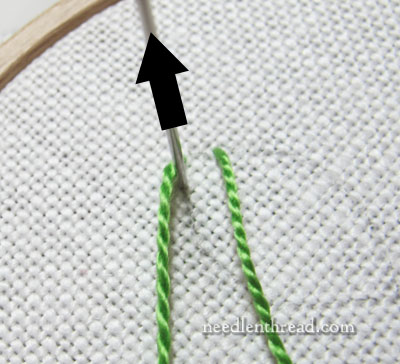
Next step, bring the needle up on the lower line, where the rope is supposed to form, keeping the working thread below the needle. This is just the regular method of making regular buttonhole stitch.
Remember, the needle comes up on the line where the rope is forming, and it always comes up above the working thread.
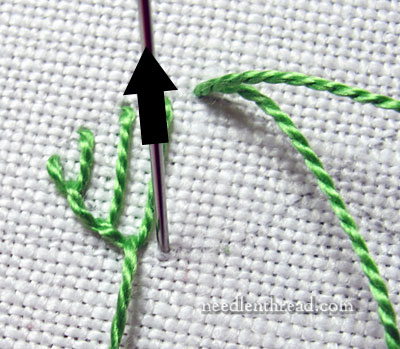
As you move in towards the next intersection on the waved lines, the last buttonhole stitch will be quite short.
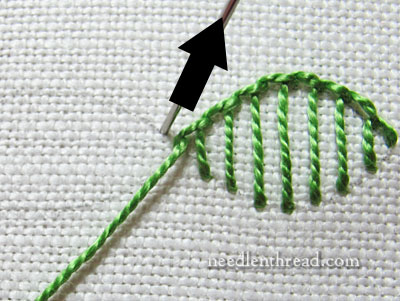
Once that last stitch is taken to fill the first wave area, it’s helpful to turn the hoop so that line where the “rope” of the buttonhole stitch is going to form is the lower of the two lines.
When you’ve passed the intersection, with your hoop turned so that the rope line is the lower line on the waved lines, begin the buttonhole stitch again, to fill up the next section.
You can turn your work in whatever direction is most comfortable for you when working the buttonhole stitch. If you stab the stitch rather than sew it (that is, taking your needle and thread all the way to the back of the fabric and then bringing them all the way to the front of the fabric, rather than “scooping” the fabric), it won’t matter too much.
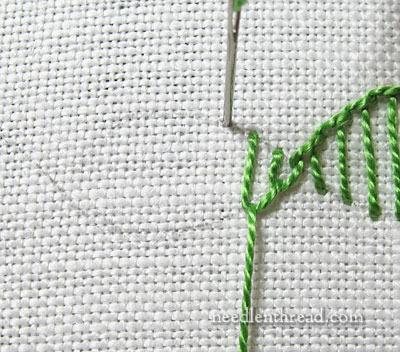
Once that section is filled, turn the hoop again so that the “rope” line ends up the lower of the two lines and continue filling with buttonhole stitch.
When you get to your last buttonhole stitch, anchor it by taking a little stitch over the last buttonhole stitch.
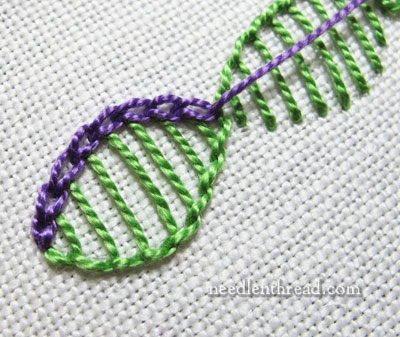
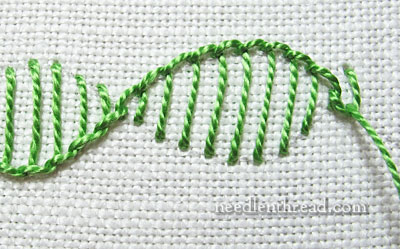
And now, it’s just a matter of working the chain stitch along the opposing wave formed by the “spokes” of the buttonhole stitch.
Stitch right over each intersection as you come to it.
And that’s it! You can vary the shape of the waves, vary the threads and colors, combine thread types, work with the same thread and colors, change the spacing on the buttonhole stitches – lots of ways to work some variety into the stitch combination.
And the whole time, you’ll have visions of biology class floating in your head!
Stitch Fun is a series of embroidery stitch tutorials here on Needle ‘n Thread, where we explore various less-common stitches or fun stitch combinations – just for the fun of it! If you’d like to peruse the other tutorials in the series, you’ll find a whole slew of them listed under the Stitch Fun Index in the Tips & Techniques section. If you’ve come across any stitch combinations or obscure or difficult stitches that you’d like to see worked out in this series, feel free to drop me a line with a photo or diagram with any questions you might have!
Oh I love it. I have always been partial to the blanket/buttonhole stitches. Tonight after work I will be playing with this one.
Mary,
This is very pretty and a great idea. I’m working up a pre–printed tablecloth design that incorporates this shape in the centre and the instructions propose just chain stitching both sides but this makes an interesting alternative – definitely going to give this a try. Also thanks for the link to the original resource – so much is available online that sometimes you just cant see the wood for the trees.
I so agree! I’m looking at on-line embroidery resources for the research element of my Masters, the current title is “Finding the needle in the digital haystack”. There is a lot of ‘junk’ out there!
Love it – love it – love it!!!
Wow – Nice! I LOVE this stitch! Thank you for the pics of this winding buttonhole stitch. I have a definite project in mind for this stitch. Thank you Mary!
Mary, Your photos and explanation are terrific! This really clears up the mystery of this stitch!
Mary – thank you very much for the historic reference! The Wilkinson book is GREAT! What a wonderful reference.
-janet
WOW! Thanks Mary for making this so clear, (no more wonkeys!) You’re the best!
Dear Mary
Thanks for another great Stitch fun techinique. It’s so interesting what can be done with different stitches and designs I just love this series as it’s fun and interesting. I love buttonhole stitch it’s so versatile and looks so pretty. thanks Mary for your the lovely photos and for your contribution in showing us different techniques in embroidery.
Regards Anita Simmance
That’s a clever combination of stitches. I’d like to see the buttonhole stitch edge whipped with the purple thread – it would set it off rather neatly, I think.
Thank you for the book link, too.
Not quite “DNA stitch” (only 1 helix, and the purple chain stays on top) but I get what you’re on about! I was looking at that book last night, and it certainly coves some unusual stitches I’ve not seen elsewhere.
Hmmm…. will have to ‘have a play’ and see if I can get a ‘more biologically accurate’ variation – perhaps by swopping over the chain and ‘spoke’ colours at the twists?
well… I think you could create the DNA double helix by putting an opposing set of buttonhole stitch in a different color – and alternate which is on top… just a thought… when I get off the computer I will try it. – janet
Mary this is so much fun. Thank you for stimulating me into trying new combinations.
Cheers
RobynK
New Zealand
Hi Mary,
I enjoyed adding this combination of sts to my
crazy quilt. I have posted a photo on stitchinfingers. Thanks for the great instuctions.
Wow. Didn’t even realise books like that were freely available. Thanks for the link. Do you know of any sites that collect together a list of links to other legitimately freely available embroidery books?
Hi, Zeb – try Antique Pattern Library – it’s the best source. There are other sites, too, like Project Gutenberg, Internet Archives, Digital Archives for Weaving and Related Topics (hosted by University of Arizona), etc. – MC
it is wonderful and new this idea for me
Thank you for to sharing it too
hugs regina