


Just a brief update on the Mission Rose embroidery project – enough of an update to change perspectives on proportions.
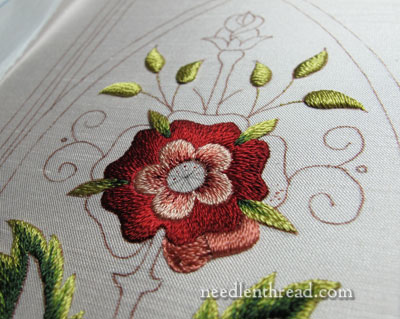
See, the embroidery on the rose so far has been a little deceptive. The long & short stitch shaded center and inner petals, now that they’re finished, give the rose a rather compact look. The central flower that’s supposed to be the focal point seems like it’s rather small and lost in the middle of those big leaves down below and that the looming bud above.
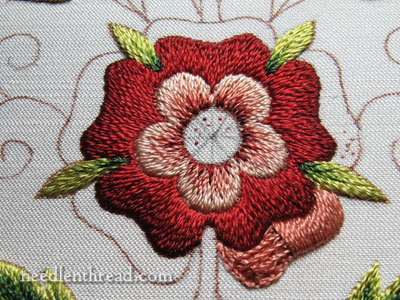
But now that the outer petal “turn overs” are underway, the perspective changes a bit. For example, the lower shaded leaves seemed to dwarf the rose before, but now, we can see that they won’t look quite as large when the whole rose is complete.
The outer “turn overs” on the petals are just about as wide as the shaded red petals worked previously.
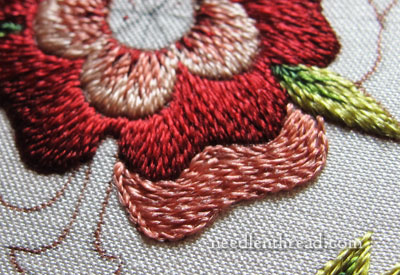
In the photo above, I’ve completed the first layer of padding for this area. This part of the rose isn’t going to be shaded – the turn-overs are satin stitched. The height I can achieve with padding will help to add some shadow to the satin stitch to give it a sense of shading.
This is the same approach I took to the small leaves above the rose which are also worked in padded satin stitch, and I think a repeat of the technique on the rose helps tie things together.
So, this first layer is simply a split stitch outline worked just on the inside edge of the design line, and then, inside the outlined area, longer split stitches are worked to fill the shape.
After finishing the split stitch layer of filling, I whipped over the split stitch with another thread, to give some “lift” the center of the area. I didn’t pick up any fabric or pass through the fabric while doing this, but rather worked a kind of figure-8 whip stitch over the whole area. Finally, I worked a few long straight stitches across the area to kind of even everything out and add even a tad more lift.
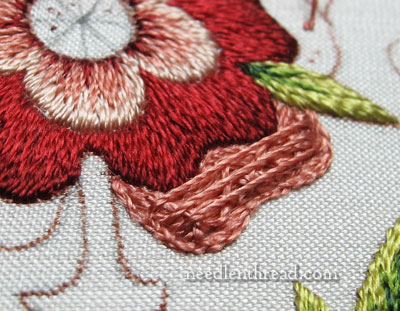
And then the satin stitch is worked over all the layers.
Right now the rose looks unbalanced, to say the least. But you can definitely see that this padded satin stitching is going to enlarge the whole flower quite a bit.
It even starts to put things into perspective with that looming bud up there. The bud’s large, yes – but it won’t look quite as large once the whole rose is complete.
So, that’s where I’m going next – finishing the satin stitch around the outside of the rose.
Questions, comments, suggestions? Feel free to have your say below!
If you’d like to read the backstory and follow along with the Mission Rose project, feel free to check out the Mission Rose Project Index, where you’ll find all the articles relating to this project listed in chronological order.
Thank you for showing us this! I enjoyed reading how you got the height on the padded satin stitch and then seeing how it looks stitched. I can’t wait to see the whole rose now!
For a fraction of a second I though you were going to leave it with just the first padding layer. It’s beautiful though! I can’t wait to see that bud, it’s my favorite part!
Your work is just out of this world. It is so perfect. Your choice of thread and colors always seem to be right on.
Thanks for sharing.
You just absolutely amaze me. Love today’s rose outer petal and do think it’s gonna’ look beautiful. Congratulations!
Beautiful, your colour choices and style are making this a real winner and without the goldwork it makes it look so stunning to those of us who are not able to get the supplies.
Linda
Hi, Mary,
The Rose is coming along beautifully. I know you are a perfectionist, so I’m going to toss a fly into your lovely ointment, but….I can see the bottom long stitch put in for padding under the satin stitches. Maybe it’s because we’re so focused on the area or digital photography or light playing tricks, I don’t know. Perhaps if the bottom length of padding stitch were more round with the shape of the petal rather than straight it wouldn’t “stand out” under the satin? Your humble and loving correspondent,
Denise
Hi, Denise – it must be the light. Do you mean it looks bumpy? Or…? The satin stitch isn’t finished in the photo above – only have of the leaf is satin stitched, so the padding stitches do show on the left side. Soie de Paris is a very flat, soft thread, not round and firm, so those padding stitches don’t make an individual “bump” under the satin stitching – they just sort of mold onto the other padding stitches. I think you might be talking about that last photo there – in which case, yes, it’s the light, and I think your eye is just continuing the long stitch from the left half of the leaf into that shine on the satin stitching. If you look at the second to the last photo, it might allay the sensation? I think when the whole petal is covered, you won’t see that…. MC
You are a genius with needle and thread. I’ve immensely enjoyed these daily notes regarding your splendid works. The Mission Rose is beautiful, beautiful, beautiful. I was very happy to learn about the padding of the outer petals and how you stitched the outer turn-over. Your lessons are invaluable. Thanks so much for you and your website. Carolyn
Ah, the joys of digital photography, lighting, silk and its sheen, and perception. It’s beautiful and from now on, Maestra, I will defer to your skills and reality!
Well, I can see why it looks that way, that’s for sure! But I’m pretty sure it’s just the lighting. I fact, I double checked, just to be sure and examined the piece meticulously. You’re right – it would have been a fly in the ointment… I would have picked it out! 🙂
Dear Mary
Thanks for the update on the Mission Rose it’s looking so lovely, I love how you have lifted the outside rose, I would not have thought to add padding to the split stitch but it’s great how you have lifted the area and I can’t wait to see all the outside petals completed. I must remeber this when I next want to lift my satin stitch thanks for the information.
Regards Anita Simmance
It looks really great !
Exquisite technique to bring the texture of the rose into dimension. So very pretty. Your explination is, as always, so clear.
Thank You so much for your sharing spirit.
super que jolie travaille magnifique
Mary, I am working along with you as my threads came in the post and I am excited about doing this, but I am doing it on Dupion Silk and my stitches dont seem to be as neat as yours……do you have any tips about stitching the silk.. It still looks good though.
The tutoring you give is the best thank you thank you
Hi, Lois – I’m working it on silk dupioni as well. Without actually seeing your work, it would be difficult to give you specific tips for improvement. Often, though, one problem that people don’t realize they have is the need of better lighting and perhaps even magnification for this type of work. I’ve seen stitchers stitching along, seeing the fabric fill up with the color, but not really seeing with precision the placement of their stitches, the angle of stitching, the density of the stitching, and so forth, so when they finally do look closely or get their work in better lighting (or on a camera! cameras tend to show much more than the naked eye, especially with close up photos!), they notice spaces between stitches, jagged edges, and what not. So sometimes, it’s just a matter of really seeing what you’re doing as your doing it. Other than that, which is very general advice, I’m not sure what to tell you. If you want to email me a photo, you’re welcome to, and I’ll see if there’s anything I can suggest.
~MC