


Today’s tip on separating (also called stripping) embroidery floss is handy especially for beginners, because stripping your floss first makes a huge difference in the look of your stitches, whether you’re doing surface embroidery, cross stitch, or any other kind of stitching.
Any type of divisible thread for embroidery benefits from stripping or separating before stitching with it. Stripping floss is simply separating the individual strands from the larger bunch of strands. With regular DMC embroidery floss, for example, there are six strands in one “bunch” or main thread as it comes off the skein, and each of those six strands can be removed singly from the bunch. Usually, you remove the number of strands you’re going to stitch with one at a time, and then you put them back together again when you thread the needle.
The advantage of this exercise? It untwists the individual strands from each other, so that you get fuller and more consistent stitch coverage from your thread.
Here’s how I separate my floss. I know others do it differently, so this is just one way that’s always worked for me without any hitch.
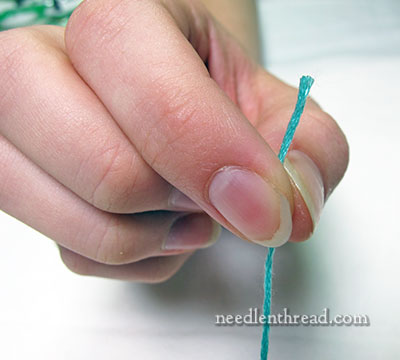
First, you cut the length of thread you’re going to use from the skein.
Then, you grip the thread between your finger and thumb, leaving a little bit above your gripping point. I always think of this part as holding the little piece of thread right at the neck, leaving a little head of thread protruding.
At this point, if need be, pat the little piece of protruding thread right at the top of the head. This will separate the threads clearly from each other.
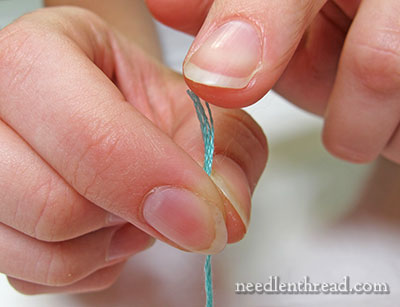
Grab one strand from the bunch. Even if you’re planning on stitching with two or three strands, just grab one at a time. Otherwise, you may knot up your thread, and it’s a lot easier to do this whole stripping thing two or three times than it is to fiddle around, trying to remove a knot.
Without letting go of the neck, pull the one strand straight out. You don’t have to pull it super slowly, but don’t yank it out, either. Just pull it out.
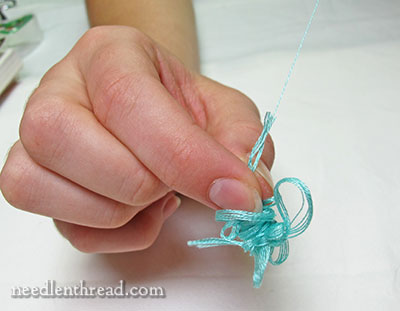
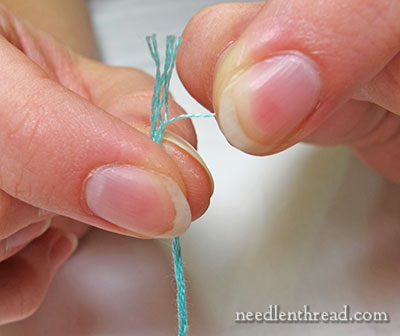
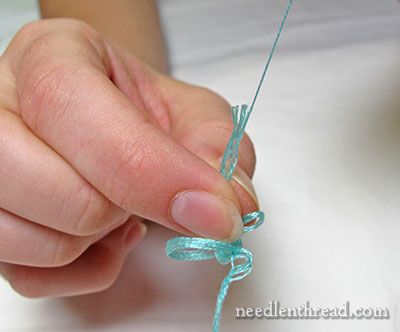
As you pull, you’ll notice that the rest of the thread bunches up below the gripped neck. This might look alarming, as if you’re going to end up with a huge knot of thread there….
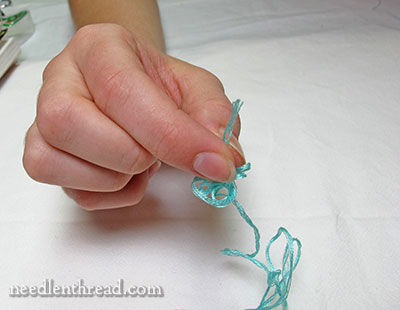
…but, in fact, as soon as the one strand comes out, the bunch will fall out.
Now you’re ready to remove the next strand.
Of course, in photos, with accompanying text, this might all seem like a really long and complicated process, but once you get used to doing this, it only takes a second or two to separate out the number of strands you need.

And here we are, ready to separate the next strand….

As you separate each strand, lay them out right next to each other on a surface (or hold them in your hand). You can see that the threads are no longer twisted around each other. When you thread up your needle with whatever number of strands you want to use and start stitching, those threads will tend to lay next to each other, rather than twist around each other, as long as you don’t allow the thread to twist up as you stitch.
You can keep the thread from twisting up by letting your needle and thread dangle freely towards the floor now and then. The thread will untwist itself while it’s hanging there.
And that is how you strip or separate embroidery floss. Once you’re used to doing it, you don’t really even think about it anymore, and it takes practically no time to do it.
But it does make a huge difference in the look of your stitches, so it’s definitely worth doing!
It’s hard to believe that in seven-plus years of writing articles on Needle ‘n Thread, I’ve never covered this basic embroidery tip. The reason I’m bringing it up now is that I came into contact last week with a strange embroidery tool that had me completely baffled and somewhat amused. I didn’t want to discuss the tool until I had discussed this very easy way of separating embroidery floss. Later on, I’ll show you the tool!
Any personal tips on stripping floss that you’d like to add? Feel free to have your say below!
If you’re looking for other tips and techniques for hand embroidery, feel free to visit the Tips & Techniques page here on Needle ‘n Thread, where you’ll find all kinds of embroidery hints categorized and listed.
Mary, Thanks for the tip on seperating floss.
What tips do you have for keeping hand dyed threads from becoming tangled? I always seem to get a tangled mess when I cut the thread I need. Thank you.
I have never done this, but will try it next time. Thanks for sharing 🙂
Thank you for this article. I’ve been doing embroidery since I was a child and was never taught this! I usually pull 2 or 3 at a time. When I’ve pulled individual strands, I felt my stitches looked different than the others, and now I know why! Those would look correct while my regular work always looked twisted! Arrrrghhhh! I’m 60 yrs old and just learning this! Well, I’m self-taught so that’s my excuse! Don’t assume we all know the basics and keep the excellent instruction coming. I love your photos too!
I’m with Jackie! I’ve been embroidering since I was a child — and I’m 64 now — and did not know this. Thank you!
Me too Jackie, if it’s any comfort to know you’re not alone!
Yes! Same with me — feel silly not to have known this! Thank you so much for all the things I am finally learning from your website and newsletters!
Thanks for this tip. I’m an intermediate level stitcher, I suppose, and never knew this. It is these small but key things that I expect will kick up the level of my finished products.
Can you tell us the best way to identify which end to pull from the DMC hank — and therefor how to tell which direction to sew with the thread. I “love the thread” and can feel the difference between going with the nap or going against the nap. But is there a way to skip this step?
🙂
https://needlenthread.wpengine.com/2012/12/pull-skeins-embroidery-floss.html
Monday, December 3, 2012 is where you can find it.
Happy flossing!
Ok, nap is one of those questions I think I will address in a different blog post, since so many people are mentioning it. It’s a controversial question, but I’ll stick my neck out and give my thoughts on it, with some supporting evidence…. MC
Sadly, II have no tips on stripping, but a question that you remined me of of using stripped thread. When I need an even number of threads, I usually double the length of my cut thread and thread both ends through the eye of my needle. Then I don’t need knots or back stitches to staart because the loop on the back of the fabric can be causght up. But does it effect the stitch? I guess I should experiment. I haven’t had a problem, but I often wonder why my cross stitches aren’t as pretty as other’s and I am beginning to suspect this habit of being the culprit.
I used this method as well, but stopped after reading Jane Greenoff’s The New Cross Stitcher’s bible. The metod of looping back through the end means the threads to lay in opposing direction, whereas going back to the annoying little knot method the threads are laying in the same direction, which does allow a neater looking stitch.
I use this method also. A friend who was taught embroidery in Germany before WWII told me it was the best way to start a thread. Her work always looked perfect. Using this method I have received a number of ribbons at needlework competitions, so I am not sure it is the culprit.
When I am working on a project that requires a lot of stranded floss I do many “bundles” at once. I strip the threads and lay them in groups across the backs of upholstered furniture. When I use up the entire skein or run out of furniture space, I bundle the groups together with a slip knot. It keeps the stitching momentum going. Not advisable for homes with cats.
Perhaps you would like to mention that when separating threads, it is important to lay them down or group them with the twist going in the same direction (do not reverse). In this way the twist is consistent for the grouping and less likely to tangle.
Hi, Rosalyn –
Thanks for your comment.
Just to clarify for folks reading here, who might panic when they read this and think they’ve been doing something wrong with their thread…. You can’t actually reverse the twist on thread by turning the thread one way or another. S twist is always s twist, no matter what way it comes off the skein, and z twist is always z twist no matter what way it comes off the skein or spool.
You might be talking, though, about the theory that the “nap” of cotton thread runs up or down the twist depending on which way the thread is coming off the skein. I’ll discuss nap later on, but in a nutshell, it really makes no difference with cotton embroidery threads…
Mary: One thing that you did not mention and I learned many years ago is that one needs to thread the needle with the same end that was pulled out with which you started the pulling process. Do you do this or is it necessary?
I have done it for years and have never had my thread look slightly different in the color shading. Thanks for all that you give in your teaching lessons.
Best Wishes for Best Stitching
Jane
Hi, Jane – as mentioned above, I’ll tackle the subject of nap a little way down the road. But in a nutshell, no, it makes no difference with cotton embroidery threads….
Do you still strip if you are using all 6 strands??
That is a great question! I’d love to know too!
That depends. If you’re shooting for smooth, full coverage with the floss, I would. If you are using the thread as if it’s just one string, for stitches like backstitch, it probably isn’t necessary. In any case, though, I generally do, though I rarely stitch with all six strands at once…
I do not have any tips about separating strands, but when I was given my first (and only) embroidery lesson in the 4th grade they gave me one about comfortable length of floss. We were using yarn, yes, the knitting/crocheting stuff that they sell in tissue-box sized rolls and rice sack canvas, so separating floss strands was not taught. Anyhow, she said use a length of floss that is (more or less, does not have to be precise) the length of tour lower arm. You know, between your hand and elbow, she never explained why, but I do know now, and still find it to be a comfortable length.
Thanks, Mary! Here I’ve been stitching for decades and had no idea that your tip would really make a difference. Now I can see that it does!
I have learned so much from you and the emails you send over the years. Thanks so much!
Dear Mary
What a great tip when I first started needlework I watched a video on youtube about how to strip thread you separated one thread from the bunch of six and put them between you fingers held by your middle finger and thumb and put your finger from the other hand between the single thread and skein and pulled gently to separate. I must try your way as it looks a much cleaner and twist free way of separating the strands. Thanks for the tip.
Regards Anita Simmance
I found Margo’s comment very interesting, and mostly because of how the thread is anchored without having to back stitch or do thread splitting.
However, (and Mary please correct me if I’m wrong!) it seems as though one thread might be going against the grain using this method. I’m still going to try it though, and see if there are any obvious problems….what an ingenious idea!
I would add just one comment to your wonderful instructions. In my experience the bunch doesn’t always fall completely out. If you try to remove another strand without first “unbunching” then it is very likely you will have a tangle. But if you always stroke out the bunch back to a straight thread you will have no problems!
When I’ve had thread that didn’t unbunch, I’ve stroked the bunch out and then pulled the next thread from the opposite end and that eliminated the failure to unbunch problem.
A great big thank-you for this tip. I have always divided my embroidery floss into three, as I was told in my first ever class, and have frequently wasted floss by becoming infuriated at the knotting and tossing it. I am so glad I recently joined your site and was in time for this very important beginner’s tip. And hey! great manicure!
I know that hand sewing and quilting threads have a nap to them and are easier to use when the end that comes off the spool is threaded through the needle eye and the other end is the knotted end. Is that also true of DMC embroidery floss? If not, then all is well. If so, how can I tell which end to thread?
Don’t worry about it! I will discuss nap down the road a bit, but when it comes to cotton threads, it really doesn’t make any difference.
I’ve been pulling my floss for years but the tip about tapping the end of the 6 strands to separate is wonderful. Usually I pick at the strands hoping to grab just one. Tapping them first makes it so much easier.
Mary,
I read an article you wrote some time ago that mentioned this method for separating thread so I began to use it. It works great! So much easier than the way I was separating the thread.
Thank you for sharing this ever-so helpful tips.
Kind Regards,
Linda Hayes-Trent
I would like to add a couple of comments to your excellent tips. The older skeins of DMC had a tiny picture of two hand showing which end to start pulling from. For DMC, it is the end with the wider paper strip. For embroidery on fabric, I have found a comfortable length to be two pulls on the skein. Pull once until the loop springs free and then pull once more. I then pull about one inch more, and cut off the loop. This leaves a straight thread on one end and a loop on the other end. When you come back, to this strand to separate more threads, you will know that the straight end is the end you put in your needle. If you are stitching on canvas, a shorter length might be more appropriate.
I hate to admit that after many years of needlework I never noticed that one of the paper strips on DMC was wider than the other. I’ve noticed that they were different but just checked and they are definitely different in width. Thank you for this very helpful suggestion.
Alice, this is what I do too! It’s easy to remember that the straight end (which was pulled out first) goes in the needle because it is easier than trying to thread the curved end!
Hi Mary,
I had always thought of this as a way to keep the thread from getting tangled and it looks more intelligent then sitting with the six strands wedged between your knees and using both hands to pull in opposite directions to get two or three threads separated at the same time. To gain fuller and more consistent coverage by stripping them one at a time takes the embroidery from craft to art, it is so much more beautiful.
So I experimented with thread direction also when I took a class from Trish Burr. I wanted to complete a whole project the way she suggested. Stripping one thread at a time right from the skein without cutting it off first so that you always have your thread going in the same direction. I was sure I would see no difference by paying attention to nap. I was equally sure I would have a mess of thread tangled about on my skeins. I was surprised at how smooth my needle painting turned out. And delighted that I could just tuck the uncut strands back into the skein and cover them with the number slip. In needle painting with cotton threads it made a difference with most other stitches I am pretty sure it doesn’t matter.
I always enjoy your articles and learn so much and am reminded of what to teach my girls.
I separate the floss then use Thread Heaven for each strand. I really like the way it stitches & lays after doing this. You may have discussed Thread Heaven in your newsletters before I subscribed to it. Are you for Thread Heaven or would you rather not use it?
Well, whadda ya know?? I’ve never been taught or told this before. I’ve been separating my threads two or three at a time for….. well let’s just say I’ve been embroidering since I was a teenager! Thanks, Mary!
Wonderful reminder for all of us. And a sister stitcher recommended alternating the strands for an even fuller look for cross stitch. In other words, when one removes that first strand from the skein, lay it down with the “top” edge pointing in one direction. Lay the second strand with its “top” edge next to the “bottom” edge of the first strand. Then thread the two strands as usual.
Is there a reason you don’t use 6 strands at once????? I do this frequently…I can’t afford to buy threads through the internet, and Michaels and Joann Fabric don’t have a big selections of perle 5 or other good quality threads..
Hi, Angelica – well, I usually don’t use all six strands at once, because I rarely do embroidery that requires that heavy of a line. But if you do, then by all means, use all six. If I needed to use all six, I would – i just don’t very often. I also use perle cottons and such, but they aren’t divisible, so they don’t really fall into this category. MC
One other thing I do, and people always make fun of me, I have a slightly damp sponge or cotton pad (the kind you use to remove make-up) and I run the thread through that to completely straighten it. I do this before I thread the needle. Just wrap the pad around the thread and run it the length of it. I usually stitch with about 18″ of thread.
This is particularly important for me if the thread has been wound around those floss cards.
I think it just makes the thread behave better.
You are not alone,Cindy.
I do more needlepoint than embroidery, and learned early-on that the silk flosses behave better and the stitches lok better when the thread is dampened. I don’t use as much cotton floss, but will check them out.
For those who haven’t done this before – remember to let the thread dry before stitching. You don’t want to soak the strands. You are simply dampening them.
I never see anyone mention the method I have used for the last 40 years to store and strip my thread. When I have a new skein of DMC, I wrap it lengthwise around the edge of a magazine. I then cut it in one place, and thread the bunch onto a small bone or plastic ring. I slide the paper wrap with the number on it up one side of the length of the thread. (I cut those smaller since they are quite long now.) Then I divide the threads into three groups and braid them. My thread is already cut to a comfortable length for stitching. I separate out a thread at the top of the braiding and pull. It comes out easily. I do the same for the other threads that I need.
I do a similar thing for hand-dyed threads. They are usually looped on a hole in the card identifying the color, so I take that off, cut the thread at a point on the ring of thread, and put them back through the hole to braid them.
I keep my braided thread on large rings arranged by color or number. I never have to deal with stray lengths of thread that have had a few strands removed. I love this method of storing my thread and it makes stitching so much easier for me. I have always wondered why this is not a method that is ever mentioned on stitching blogs. I learned it from a LNS in the early 70’s.
Thanks for this tip Joan. I have always braided my crewel wool like this, but never thought about doing it with cottons. I’ll have to give it a try. 🙂
Nothing to add – I “strip” my floss exactly the same way! Glad to know I am ‘doing it right’!
I had no idea that you were supposed to separate the strands individually before sewing with them!
Mary,
I use this technique too! It works great!
I have added another step to remove the twists and bends found in threads that have been twisted into tight skeins.
I have a little travel plastic soap dish that I bought at the local pharmacy and a little natural cosmetic sponge dampened with water. I take each strand and run it through the damp sponge to make each thread perfectly straight before rejoining them for stitching. This works especially well for cross stitching and satin stitches with 2 or more threads where it is important that the threads lay flat and
parallel to each other. The stitches lie flat and even.
Great tutorial, Mary, & your nails look great, too! Tell us your hand care tricks some time.
As for stripping, my only suggestion is to add “Hold the main thread bunch in 2 places, about 1 inch apart.” My reason: I have had the main bunch tangle enough times that I have to spend precious minutes de-tangling. Holding in 2 spots, using ring finger against my thumb-pad as a second “gate” for the strand to come through has proven snarl-proof. Perhaps my snarls happen with other threads (Splendor comes to mind), as I use floss rarely in my needlepointing.
As long as I’ve been stitching I never knew there was an easy and correct way to do this. Thanks for yet more great information. Deonia in Florida
This is something I learned about from the old newsgroup rec.crafts.textiles.needlework Anybody else remember that group?
Some of the comments made me recall some “vigorous” comments on threads and whether or not it has a grain, floss licking – yea or nay, mayo or miracle whip, among others. Vigorous, but mostly in good humour!
Wow, the group is still active….and there’s a thread about new DMC colors in October. I may need to remember to stop in on occasion.
I always run my thread (the group from the skein) through my fingers first. Then I pull from the end that is in my hand when the thread felt the smoothest. I don’t know that I’ve always cut off from the “front” of the skein. Sometimes, the other end works best.
Thank you for this. I do something also, to help prevent fraying of the current length of thread. I hold both cut ends (6 ply floss) in my fingers,with about 1/2 inch sticking above my hand. I tap on the cut ends a few times; the threads on one end will split open more and that should be the “bottom”. The other end is the smooth end (the “top”)and I thread my needle with that end so the smooth direction goes through the fabric. Much less wastage. I’m sure there’s a term for this but I don’t know it.
When I was just starting to do cross stitch, I went to a local store for supplies. A former student of mine was the checkout clerk. She looked at all of the floss I was buying and proceeded to ask if I “stripped and stroked”. From my expression she could tell that I had no clue what she was talking about. She quickly explained the process — and that it was not X-rated. I’ve been stripping and stroking ever since.
I also use your method. I do have a couple of questions that perhaps you could address.
If I have a design that I want to stitch with no instructions as to the # of strands to use, in general, what do you suggest?
Also, I store my thread on those little cards, but lately I’ve been wondering if that causes too much fold lines? How do you suggest storing just basic thread so as DMC embroidery thread?
Thanks for your great site!
Hugs,
Gina
Hi, Gina – I keep my thread in the skein for as long as possible. When it gets to the point where I can’t, I’ll often cut it in stitchable lengths and thread it through the tab with the color number on it, and tie it in a very loose slip knot. I really don’t like the plastic cards made for winding thread on, because I don’t like having kinks in my thread and having to go through an extra step to straighten them out. As for number of strands, it really depends on the type of stitching. If it’s line stitching, I generally use two or three, depending on how thick I want the line. If it’s needlepainting or satin stitch filling, I use one thread. Hope that helps! – MC
This is the way I’ve always stripped thread. I’ve seen people hold it in their teeth and all sorts of things. This way is so simple, I can’t imagine doing it any other way.
Sometimes I use a piece of dampened wool felt to ‘grab’ onto the neck of the floss when separating the floss strands. This helps straighten out any wrinkles from having floss wrapped around a floss holder. If the felt is a white or cream color, it also helps you to see if a particular color of floss will bleed onto your fabric if any color is left behind on the felt after separating the strands.
Thank you, Mary, for such a valuable lesson. I am another “oldie” that would grap 2 strands out with the awaiting tangle. Another question – I wanted to travel with the separated strands – what would be the neatest way? I have the bobbins and plastic boxes for the 6 strands, but thought I might want to separate the 2’s ahead of time. They are so vulnerable to tangles when separated. Thank you, as always, for your generosity with time and talent.
I do this and it works like a charm. Wish I had known about it when I first started embroidering – it would have saved a ton of frustration.
I still find that threads tangle when I just use my fingers… so I place the thread between my legs and use both hands to pull the thread apart. Gold thread is also sticky and needs a very gentle touch when separating.
This is the way I’ve always done it. Nice to know I’m doing something right!!
I have been using the same technique for separating floss for years. It never fails. I always like to see different techniques (or the same as in this case) showcased. Many times one can learn a better or easier way of doing things. Thanks for sharing, Mary!
I guess I’m the 41st to comment, and I apologize if what I’m going to say has been said.
If when you tap on the end of the bundle, and it doesn’t expand into separate threads easily, turn the whole strand over, and tap on the other end. One end usually blooms better than the other, in my experience…
If you are talking about a thread seperator that is a clothes pin looking clip that you clip onto one end of the length of floss, it is the greatest thing since sliced bread. You never have a tangle. You can get one thread or seperate all six strands without bunching your length. The cutest ones that I have seen are from a company called Puffin & Company http://www.puffinco.com
If you have not seen their gadgets, go to their website.
I started out doing it this way, cutting to length and putting it on rings that is, but very quickly became disenchanted when my collection grew and they all became entangled. Now I use those cardboard floss thingies. Mostly the fact that the threads have been wound on those is not a problem, but if it is I have my trusty electric hair curling wand next to me so I turn it on, and run the thread (and especially silk ribbon) through it. The heat straightens out any kinks and makes life very easy. Another tip for those who use the cardboard winders, this one from Sharon Boggon: cut some drinking straws to the same length as the bit of cardboard the thread or ribbon goes around, slit the straw lengthwise and pop a piece onto each side of the card, then wind away. This keeps the thread or ribbon from creasing as it goes around the card.
I can’t remember where or when I first learnt about stripping out single threads but but I have been doing it for some years.
One nifty thing that goes along with this is keep a damp paper towel or washcloth nearby. Then when you separate your threads, run them across the damp towel. Allow them to dry before using. This works best with fibers that are not over-dyed.
Will this technique work with metallic floss too? I am having the hardest time trying to separate the metallic floss. thanks, Sherri
Thank you! I needed to hear and see this very basic tip. I’m going to use some DMC on a wool project I’m doing and this was a great reminder for me since i haven’t worked with this thread in a long time.
I didn’t read all the comments, but one thing I miss in your article: after pulling out one strand I always let it hang freely to ‘unturn’ before I pull out the next strand. It gives a more even result, and the strands tangle less when used.
Just a note: the last time I embroidered I finally realized why sometimes this works beautifully for me and sometimes doesn’t. Without really paying attention I was holding the single thread and attempting to pull away the other 5! It does tangle if you do that. Horribly. Somewhere in there I realized my mistake and have remembered since to pull OFF single threads, leaving the bulk of the strands behind. It may be that someone else might absently do the same thing so I thought I’d mention it.
I had been taught the “Y” method. Base thread in the left hand, thread to be pulled in the right, mouth at the bottom for pulling tension.
This works much better and only had 1 minor snarl in multiple pulls of thread, I am converted.
Thank you.
Thank you for this basic but essential skill. I learn more from your daily email than i do in the rest of the whole electronic day. Thank you
Thanks for the afvice I have put it to use and it works so well. Now I will have no more tangles.
I agree that stripping is one of the most important steps to ensuring a pleasant stitching experience. I also stroke (or “love” the thread, as Natalie Chanin recommends) the thread or group of thread before I begin stitching. This is simply holding one end of the thread between thumb and forefinger of my left hand, and running the thumb and forefinger of my right hand along the length of the thread until it feels smooth and relaxed.
Several years ago, one of my teachers told me that if the strands do not pull from the end easily, to switch ends. It should pull without tangling from one end better than the other. I’m sure it has to do with the twist of the thread, but I do find if I get tangles from one end, the other seems to work better and I or at least starting over allows me to fix the problem without creating knots.
I’ve always pulled the number of strands required by my patterns, but I am going to try one strand at a time to see how much fuller this makes my projects. Thanks, Mary.
I want the opposite, I want them to wrap around, hehe.
I am smocking a dress and it doesn’t look very good with they lay next to one another, I want them to look like one thick thread.
Any ideas? Just twirling it doesn’t really work.
What a wonderful tip
Pulling strands of embroidery thread apart
Saved me so much time
Thank you
Mary,
as usual, great information, another item that I have been taught when I ply or strip the fiber -is that it also enhances the sheen of the fibers while it teaches the fibers to behave. I actually run the fibers thru my fingernails several times, for both silk and cotton, although some brands of silk are not as hearty for this process.
Your teachings are so well written, clear and concise.
Thank you,
D
How many threats do you normally use to embroidery with? Does it depend on the look that you’re trying to achieve?
I should have watched my typing I meant to say thread. It is too early in the morning. I love your website.
Hi, Rita – Yes, it depends on the look you want, the technique you’re using, the size and scale of the design, and so forth… It varies, with surface embroidery. ~MC
I really hope this posts because I can’t find anywhere else for it. My tackle box walked. I know who gave it a kick in the butt but it doesn’t help the matter. Since I had to start my thread stash over again this time I decided to do it right and get Annie’s thingabobs. They arrived today. Problem? I know I have to put the floss on these things and I can’t think for the life of me, how long to cut my strands. Having eye trouble today. Also, I want to put the threads into a braid instead of single loop. I just think it looks neater.
I usually cut my threads around 18″ long, if that helps…
Hi Mary,
This article isn’t in the Tips & Tricks section, but definitely should be! 🙂
It’s brilliant!
x Michelle 🙂
I thought you were crazy to suggest all this work, I mean really? However, you are so right. It makes such a difference! It’s very worth the time!
Thanks for all the advice and inspiration!
I am still seeing little strands after I think I have just one how can I be shore please help me I have been embroidering since I was a child but I never separated the strands before.
Each individual strand (separated from the six) is made up of two plies. These are not separated. If you separate them, they will fray when you stitch with them. The six individual strands are easy to see – just tap on the end of the cut floss, and they’ll kind of stand out from each other. But once you get them separated, don’t divide them further.
What timing? I’m self taught and have had questions about this (spent yesterday evening searching) and you have just answered my question. Thank you!
I’ve been doing embroidery for years, for pleasure, and it’s always good to revisit the beginning. My sister recently told me about your site and I’m hooked. Wonderful instructions, pictures, and simply spoken. You ARE a wonderful instructor.
Suzanne
Thanks, Suzanne! I’m glad you enjoy Needle ‘n Thread!
Thank you so much! I’ve only just started embroidery in the last few weeks after helping my 8 year old daughter to get started. I found the Y method a dreadful failure and so even when it was successful only bothered taking say 1 thread off to leave 5 rather than splitting the other 5 even though I knew you were supposed to. I also threw the 1 away as couldn’t face splitting another length. Now it all works and I have a split length of 5 on my needle and 5 ready prepared lengths, 1 of which is a freeby from what would have been my discarded 5 pulls! Question – when pulling all of them 1 after the other do you bother straightening the remaining ones out before pulling the next. I ask because miy remaining bunch doesn’t fall straight, just not knotted. I’m pulling them straight after say 2 pulls because I’ve developed a phobia of knotting and wasting. Do I need to?
Hi, Paul – I kind of straighten them as I pull. I hold the length of thread between my fingers as shown, but the rest of the length is inside my hand. If I close my hand slightly on it as I’m pulling the one out, the whole strand stays pretty straight.
Been doing embroidery for YEARS and never heard this tip until recently! Thank you for posting it’s importance! 🙂
I’ve been separating my floss in this manner for nearly 20 years. When I started reading embroidery blogs I was kind of shocked that so many of these blogs were advising beginners to pull and unravel the strands. I was beginning to think that stripping was a lost technique. When a university friend taught me this little trick it changed everything for me. I used to dread the tedious task of separating my floss. Thank you for posting this. I think you are going to make a lot of people very happy.
Well!after all these 60 years of embroidering, I have learnt something new, I have always struggled with getting the threads separated. Thank you Mary.
In all my years of embroidering, I have never heard of taking one strand at a time. I have noticed with this particular project, the thread does tangle up a lot. I will have to try this method..Thank you
I have done countless cross-stitch designs, mostly for friends and family. One day I was asked by a lady if I could finish a cross-stitch for her because rheumatism had finally put an end to this type of work. As I stitched I noticed how her stitches looked so much better than mine and I couldn’t figure out why. I asked her and she told me this method of separating the threads. I have paid out a fortune for kits and not one of them told me this was the way to separate the threads. As always your information is brilliant. I have a Celtic Mermaid by Theresa Wentzler, who always uses combination of threads. With this one you start with 84 threads that eventually turn into 126 combinations. Haven’t been brave enough to go there. I will now.
So, keeping the nap of each individual strand in mind when putting them back together is still important, right???
Thanks ~ Barefootstitcher
Hi, Linda – you might want to read this article on grain or nap with embroidery floss: https://needlenthread.wpengine.com/2015/08/thread-talk-the-debate-i-dont-want-to-have.html
Whether I am separating a single colour of floss from a hank of threads in a kit or separating a strand from a 6 strand length I always use the same method.
I fold the length of floss in half and then “grab” one of the threads with a needle. It is much less fiddly than trying to grab one end and I only have to pull half the length.
This has to be the easiest (and cleanest) way to strip threads. WOW! I read the article before trying and I was thinking “Pat the thread?”. I thought you truly lost you mind…BUT! It WORKS and the threads lay down so nicely with NO twisting.
Thanks Mary!
Really, I had no idea about this. I’ve been embroidering for fifty years now (really- I’m fifty-seven and start stitching when I was seven!) and no where have I encountered this idea.
Thank you again for such a valuable lesson!
Even the least expensive, J. P. Coats, has tiny > on its labels, indicating in which direction the “pull” end can be found and should be pulled. I usually crochet but do occasionally use embroidery thread to apply beads, buttons or for quilting, when I want a change of scenery, and I thought to find out if there was an easier way to unwind the threads.
Thanks for your VERY informative posts! And I’m glad I could add my 2¢!
Happy stitching, everyone!
Thank You Thank You Thank You! I did my first project yesterday and when I pulled the strands ,it got all tangled at some point and I was worried how am I going to use it in the future? It was a mess. You saved me! Thank You!
Thank you so much!! It’s silly how hard this has been for me because my floss is attached to an organizer paper that came with the cross stitch kit I bought and this makes so much sense to save me from the knotted messes that my skeins were becoming! You are a crafting here for posting this!
I’m working with Splendor strandable 12-ply silk thread and am unsure whether I should separate down to 12 stands before embroidering. When I have separated all 12 stands, some stands seem quite fragile and have begun to come apart while working with it. For this reason I’ve been only separating into the three main twists. These groups of four stands are quite twisted, though.
Just what I was looking for. It’s the silly little things that like you said you don’t even think about that had this 57-year-old newbie intimidated. Now, is there anything we need to know about storing all that thread? Thanks again.
I get befuddled about how to keep my cut, separated pieces of floss organized. True confession – they usually end up in a messy pile and get thrown away. The idea of tossing silk floss pieces freaks me out! This seems like a stupid question, but somebody else must have had this issue. Can you help with this?
Thanks!
Hi, Eddi – I either will use small plastic ziplocks (you can find them in different sizes in craft stores, or you can by the half size sandwich ones), or, I wrap the cut strand back around the skein.
Just wanted to leave a comment thanking you for this!! I am a newbie at cross stitch – I didn’t look up any how tos and for separating out my first thread, I pulled it out but held on to the other thread (hard to explain) — it did NOT work – it was so frustrating and the whole thread got all tangly in a spinny mess. I was dreading doing that for every single one of my colours, but thought there must be a better way – I was skeptical at this method but it worked SO WELL!! 😀
I appreciate this instruction, and will follow this method the next time I thread my needle. I also would like to know how to determine which end of the skein of DMC to pull on when I begin to pull out a length of six strands. Almost every time I pick an end to pull, and begin to pull on it, knots form within the skein and I end up with a tangle.
Hi, Sheila – I wrote an article on the subject here: https://needlenthread.wpengine.com/2015/09/how-to-use-a-pull-skein-embroidery-floss.html
In all my years of “novice” embroidery, I have NEVER had anyone tell me to individually pull the threads and then put them back…..I just pulled 1 or 2 at a time or 3 at a time and started working……this may be the answer to the problem….”why doesn’t my work look as pretty and smooth”……THANK you for the tip! Going right home to try it now.
Is there an easy way to separate the entire skein of floss, I want to crochet with it but do not wish for lots of knots.
Thanks, Shelly
Not really, Shelly – you have to pull each thread out separately or they will tangle.
Thank you for the tip. I was taught to do needle point as a child and was told to seperate the amount of thread I would use in one bunch and then thread the needle. No one ever told me to lay them out seperately to make it easier. Wow what a help. Thankyou for this.
Years and years ago to save time (I thought), I would pull 2 strands at a time. Horrible mistake. I would end up taking hours to untangle the knots I had created. I sure did not save time, but I did learn patience!
All these years fighting thread and the solution is so easy. Thank you so much.
My grandmother taught me to embroider when I was 5 or 6 years old(about 65 years ago) with very simple fun projects. I loved needle and thread, which led me to quilting in my 30’s. I’ve now been going back to embroidery and love reading your words and your tutorials have helped me to improve my stitching. Today as I read separating your floss I was blown away I have never known that trick. I can see what a difference it will make in coverage, thank you so much for going back to the basics
Thank you for this.
How many strands is the “usual” for embroidery?
Hi, Deb – there is no “usual” for embroidery. It really depends on the technique or the type of embroidery you’re doing. If you’re working line stitches over outlines on things like tea towels and the like, then two or three strands would be the normal approach. But other than, it’s really not possible to say “it is normal to use two strands when working embroidery,” because surface embroidery encompasses so many techniques!
Thanks for the tutorial, but this step is so much work! Particularly as a quick stitcher will use floss so rapidly and have to do this separation all over again before long. I’m baffled why supply companies can’t just sell thinner thread…?
Great tips. I think the only thing I could add is that I generally cut a length that goes from the ends of my fingers to my elbow. Longer than that and there is knotting and stripping.
Best advice on unraveling floss. I’m going to start using your method. Thanks
Hello Mary, Thank you for your wonderful website and videos. I’m just getting back to embroidery after many, many years and am trying to master the long short stitches to make shaded flowers. I am using the book by Trish Burr. A collection of flowers. In it she gives a detailed list of the specific colors for each flower pattern in DMC threads. I ordered the colors from Embroidery.com and they sent me some of the same colors but most were not the numbers I ordered. Is this a normal practice.? I mean substituting colors that are close? Or have numbers changed over time? The website showed very detailed charts with many colors I’m not sure what I’m asking. But I would like to find threads that would are in shades close eniugh to make the shading look natural. Do you have any suggestions? Alfreda
Hi, Alfreda – The DMC color numbers that Trish gives should be precisely the color numbers you need to order. DMC hasn’t changed their color numbering system. If the place sent you colors other than what you ordered, I’d return them and have them refund you (including shipping). There is no excuse for a shop substituting colors without informing you first and giving you an option. And then I wouldn’t order from them again.
This is such a great tip for me to know since I’ve just started out not to long ago. Thank you. Love all you write about I read here daily!
Dear Mary,
I just cut my DMC floss to a good size length, thinking on folding in half to use 2 strands. I am finding my stitches are fuzzy. I was thinking, by doing this I am using thread going both directions, could this be the cause?
If I were to use the floss as it was pulled from the scans, which end should be threaded threw the needle so I would be not going against the grain? This is hard to explain..Now that I have them cut, is there a way to tell which end is which?
Thank you, Randi
You might consider that your floss is too long? The direction of the floss does not matter, according to the manufacturer (and experience). My guess is that you might be working with pieces that are simply too long. 15-18″ is a decent length for floss and as soon as you see wear on the thread, you should switch, even if the whole length isn’t used. You could also consider your needle – perhaps it is too small? The smaller the needle, the more friction on the thread as it passes through the fabric. You should be able to thread the eye easily, and there should not be any noticeable or difficult resistance to pull the needle through the fabric completely. You don’t want a large hole that shows around the floss, but you don’t want such a small hole that the floss is undergoing a lot of friction to pass through the fabric.
Hola, me parecio muy interesante y facil separar el hilo .primera vez que emcuento esta página muy interesante.
saludos
Are you still active?
Active on the blog? Active with embroidery? I’m still here. If you go to my home page http://www.needlenthread.com you’ll see the latest article. This article you’re posting on is a little old, but I still receive any comments that come in on it, and usually will answer them.
I have embroidered and needlepointed for many years.
This tip for separating embroidery floss has changed my life!
Thank you so much!
Its intresting that as you seperate the threads, keep them all the same direction as they were originally. With the end you freshly cut when you are removing it fron a bobbin, or the the end pulled from the skein. The threads have a directionality. Your stitching wil look super exact if all the threads themself go the same way.
Hi, Susan – I’ve discussed the topic of thread directionality here: https://needlenthread.wpengine.com/2015/08/thread-talk-the-debate-i-dont-want-to-have.html The manufacturers deny the notion, and science is against it as well.
Glad I came across this post. It seems so simple once you know or have been shown but until then, it isn’t!
Hi Mary.
I’ve been having a great time going through the information on your site, and I’ve learned tons of things…even about stitches I thought I knew well. I just tried this stripping tip for the first time. It worked perfectly every time, with an inexpensive line of floss that gets a lot of negative reviews for problems/knots when separating. I had no knots, no tangled-up disasters, no “colorful euphemisms” (okay, so they’re cuss words….no cuss words), no nothing. It was fast, easy and trouble free. Thanks for all the amazing information you’ve made available here and thanks for this amazing time, material and aggravation saving tip!
Any ideas for doing this with just one hand? I lost the use of my left arm 10 years back and I’d love to be able to ambioder again but stripping the silk is the only thing I can’t manage without a tangled mess!
Hi, Lydia – Ok, that was a challenge! This is what I did, and it worked. Take your length of floss and pick up one end with your working hand. Hold it so that you have your finger and thumb free, and just about an inch or so is sticking up from your hand, with the rest of the length hanging below your hand. Manipulate the end by tapping it and getting the individual strands to separate, and once you have them separated and can single out one strand, put that one strand between your lips. Holding the rest of the thread loosely in your hand and the one strand between your finger and thumb, slowly draw down the one thread. It’s the only thread you’ll actually be holding onto with any serious intent. The other bulk of the thread will bunch up inside your hand or below your finger and thumb, but the single strand will remain between your lips, pulled out straight with your finger and thumb moving along it. When you reach the end, drop the bundle, take the one strand and lay it aside, and then repeat the procedure to remove the next strand. It was definitely awkward at first. By the time I separated four strands, it became less awkward (though it was difficult for me to keep my left hand from habitually flying up to interfere), and I found that I could do it faster and faster with each strand, so I’m guessing that once you get used to it, it’ll be easier for you. Try it! Let me know how you get on!
I AM TOTALLY NEW AT ANY OF THIS BUT NOW AT ALMOST SEVENTY I WANT TO MAKE MY THREE GREAT GRAND CHIL A BABY COVER SO I BOUGHT A KIT THINKING IT WAS A BEGINNGERS KIT , BUT NO INSTRRUCTION SO I AM STARTING HERE, I CANT AFFORD TO TAKE CLASSESS AS I STIL WORK AS A NURSE AND LIVE IN THE COUNTRY
HOW DO I KNOW HOW MANY STRANDS I WILL SEW WITH AT A TIME
Hi, Wanda – it depends on how thick you want your line of embroidery. Usually, 2-3 strands are used, so I would start with 2 or 3 strands to see if they will achieve the results you want.
Just started to learn this, left handed…makes some of the things I watch start the opposite direction. Just read how to separate the floss. Thanks
Thank you for this explanation. I have a lot of thread that’s already wound onto plastic cards. When I pull it off to use it, it’s already got little hairs and fuzz on it. I’ve tried smoothing it with Thread Magic but it doesn’t seem to help much. Do you have any advice on how to smooth thread that has already been improperly pulled from the skein?
I know I’m late to this post and even later to the stitching/embroidery game! BUT I hope somebody’s still here to help me out.. I’m not sure if this is a stupid question, but here goes:
This is my first ever time doing this, teaching myself (with plenty of internet help) when starting this “project” or even just practicing stitching, do you always start by splitting the thread? Or is it just preference for the look?
I’m having a hard time figuring out where to even begin! Overwhelmed!
Also I noticed you said something about putting it back together… I think I’m confused! Lol any help would be GREATLY appreciated!
Normally, when stitching with regular DMC floss (which is also called “stranded cotton” because one “string” coming off the skein is made up of 6 separate strands twisted together), not all six strands are used at one time (unless you’re stitching something very chunky looking). So, to remove the number of strands you need or want to use, you “strip” them from the main string one at a time, to avoid the string tangling up. Then, once you have the number you want to stitch with – say, two or three strands – you smooth those strands together and thread them into the needle. This method will guarantee a more even and consistent coverage with your stitching. Your stitching will, in short, look better.
So that’s how DMC floss is normally used.
Hope that helps clarify!
I am doing an embroidery that calls for 6 strands of thread. I am using Satin Floss. How many strands should I use to equal 6 strands of ordinary thread.
Thank you. Patricia
Hi, Patricia – Thanks for your comment. I don’t know about that, as I don’t have any to compare it with, I’m afraid. If it’s stranded like cotton, probably just use the whole piece.
Thank you for this!! I got a beginner’s embroidery kit on Amazon, and all it came with instruction-wise was which colour threads to use, and how to do the stitches. It’s been taking me FOREVER to split my floss because I had no idea how, and it would just get all tangled. Thanks for saving me time and frustrations 🙂
Glad it helped!!!
I know this post is several years old, but I need to say THANK YOU! I never imagined how easy it was to pull apart floss!
I cannot wait to try this. I’m an absolute beginner (just started yesterday) and I separated almost a full skein’s worth by UNTWISTING them! So silly. Thanks for sharing this!
Do stitchers ever strip a single thread into two?
Single threads have a ply, don’t they?
The single strands are made of two plies, but if you break those down and strip them to one, they lose a lot of their strength. You’d have to use very short lengths, and even then, I think the thread would shred very quickly.
You just saved me!!! I was separating all wrong and getting so frustrated with how my thread was looking. THANK YOU!!!
I’ve been doing it this way for several years after being taught by a teacher at a retreat. It really made my life better! I’m glad you are teaching this method.
Fabulously clear instructions & photos. Thank you.
I just tried it – perfect!!!
After all these years of mmm mess
Thank you SO much for this tip. I am fairly new to embroidery and every site for beginners has never mentioned this, they just say separate, which has not been an easy task….until now. I will be checking your website and all your tips and advice etc. I tried a kit and found I enjoyed needlework and at the age of 76 ! Now I am excited to learn and embroider.
A grateful newbie
Janie
Hello from Australia,
Can you help and advise me how to use what i have been given from my teachers work room. That is Pearsall’s Stout Floss. It is in many colours and on wooden reels.
The reason i am asking is that is does not split like other stranded threads. In fact i would say it is not stranded, but made of many fibers
and there is no twist in it when compared to other threads.
I am at a loss how to use it. I must also mention my teacher did only Ecclesiastical Embroidery, so i think he must have used to for that or some special projects.
I do hop you are able to enlighten me, please.
Sincerely Ross
Hi, Ross, The Pearsall’s you mention is flat filament silk. You can read about flat silk here: https://www.needlenthread.com/2017/03/silk-hand-embroidery-thread-101-flat-silk.html The particular thread you’re talking about from Pearsall’s was used for fishing fly-tying as well as ecclesiastical work, in various applications including figure embroidery. Stout was one of their heavier weights of thread, I believe. The company is defunct, so you can’t really replace the stock. If you start a project with it and you run out, you may get stuck! So I’d keep it for small projects or just for reference.
Oh my! I am a beginner and just did my first project and was so annoyed at separating just two strands. It was a breeze using this tip. I am grateful I found these tips because I really have no clue about stitching with embroidery floss. I learned a lot just from the comments, too. Thank you, all!
Thanks for sharing, big help, no more knots
I can’t believe it took me this long to look up the easiest way to do this. Thank you!
Thank you so much for posting this. What a difference it makes (especially for a complete beginner)!
I am new, thanks for the tip on separating! I am looking for stitch examples, and how to. I would like to follow you!
As someone who just started their first embroidery hoop last night, it wasn’t even made clear that I needed to separate the strands. I just used the thread as a whole (and the would have been very helpful to know!!) I tried a practice stitch on the side and knotted a whole length, so good to know all isn’t lost :’)