


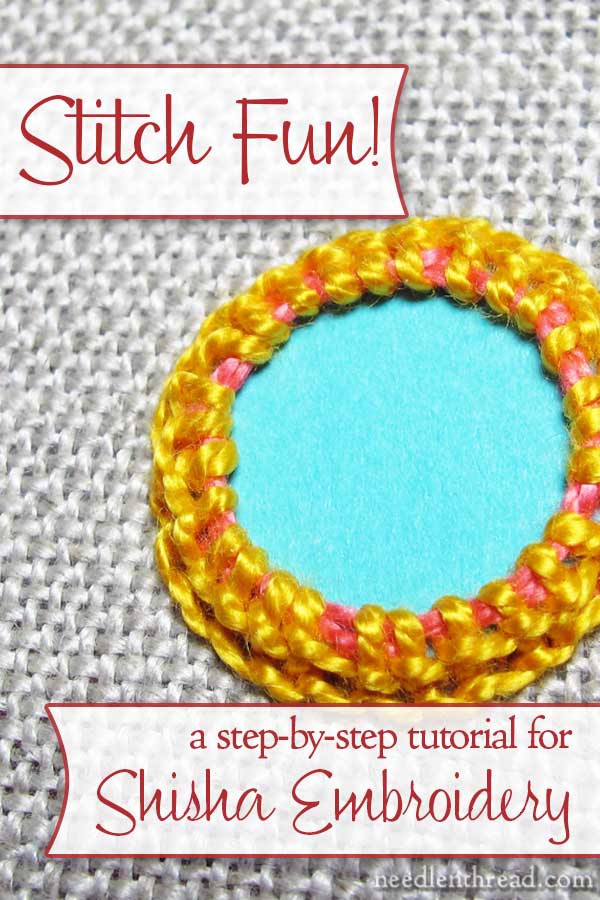
Shisha – embroidery with mirrors – can be worked different ways.
The most common shisha stitch found in most stitch dictionaries is a combination buttonhole and chain stitch worked over a grid of holding threads that anchor the small mirrors to fabric. Today, we’re going to look at the basic stitch, and then later on, we’ll look at some variations.
This is a very detailed tutorial, with lots of pictures. I find that most people who want to know how to work the stitch have a hard time following stitch diagrams for it, so I tried to fill out the tutorial as completely as possible with photos.
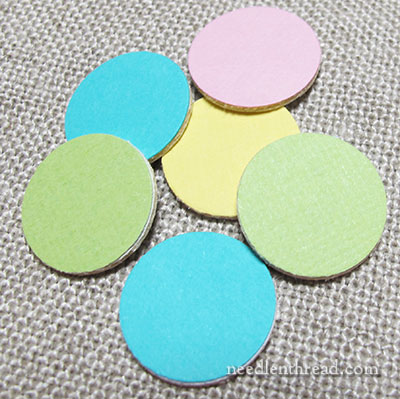
To state the obvious: these are not mirrors. Mirrors can be problematic when taking photos, so I opted instead to use small 3/4″ discs that I cut from mat board. Then I glued colored paper on top. This may sound a bit labor intensive, but I have a 3/4″ heavy duty hole punch, so it was a quick and easy solution.
The reason I am using mat board instead of plain cardstock or paper is that I wanted the disks to be close to the thickness of shisha mirrors.
For thread, I’m using perle cotton #5, but you can use any kind of embroidery thread for this, as long as it is strong enough to withstand the edges of the mirrors. (This is why it’s a good idea to buff the very edges of the mirrors with a honing stone or pumice stone, to smooth them up – you don’t want them cutting the thread!)
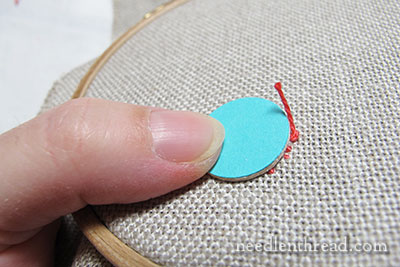
You’ll need to be able to hold your mirror or disk in place with your non-dominant (non-stitching) hand while you work the foundation stitches. Since I’m using a hoop, it’s pretty easy to hold the disk in place with the thumb on my left hand while I stitch.
To start my thread for the foundation stitches, I used a waste knot right next to the disk and then took several small backstitches towards my starting point, right at the very edge of the disk. Then I snipped the waste knot.

For this variation on the foundation stitches, I’m following Erica Wilson’s directions. Later on, we’ll look at different methods of working foundations, some of which are actually quite a bit easier and take up less thread.
So, bring your needle and thread to the front at A. This is left of center, at the top of the disk. It doesn’t really matter where you start, but I’ll try to keep the same orientation of the disk through the tutorial.
When making the foundation stitches, make sure you start and end them as close to the disk as possible, and that you pull them snug when you start the next foundation stitch. Since the foundation stitches are what hold the mirror in place, it’s really important that they are good and snug, and that they aren’t too close to the edge.
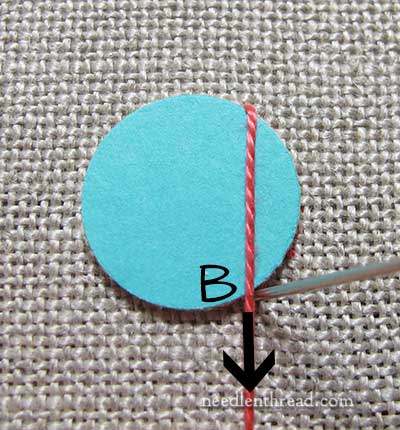
To find the location of B, which is directly below A, it’s helpful to pull the thread towards you so that it forms a straight vertical line down the side of the disk. Where the working thread crosses over the lower edge of the disk, insert your needle and pull through.
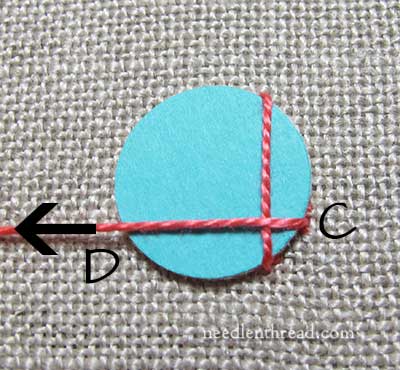
Now bring your needle up at C, which is on the lower right side of the disk, and pull the thread so that stitch A-B is good and snug. Take the working thread across to D and take the needle and thread through the fabric.
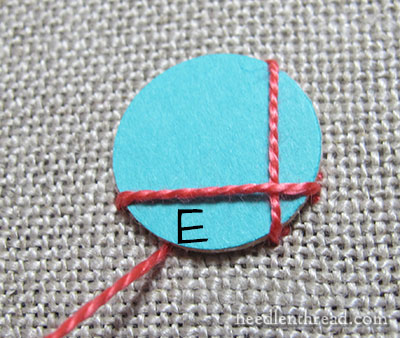
Now, jump down to the lower right of D, and bring the needle up at E. Pull the working thread through, and pull it tightly to make sure the stitch C-D is snug.
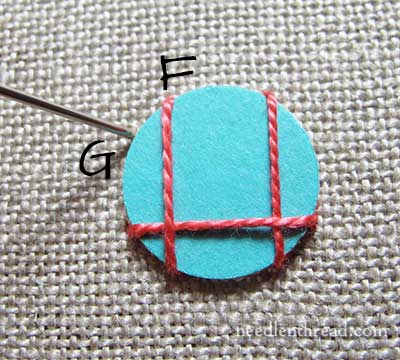
Now take a straight stitch up to F, which is directly across from A (the place the foundation originally started). Then jump to G, which is to the lower left of F, and bring the needle and thread to the front of the fabric, pulling tightly to tighten up the previous stitch.
Take a straight stitch from G to H, and you now have a four line “grid” over the front of the disk.
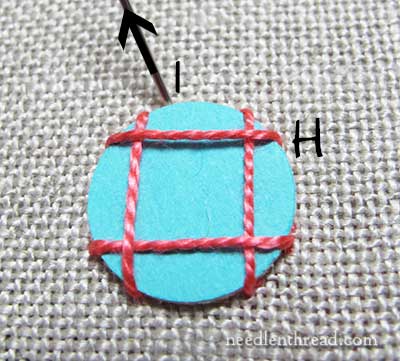
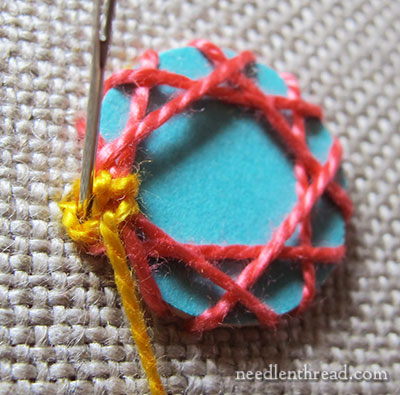
Bring the needle up at I, which is to the left of center at the top of the disk. From this point on, you will be working another layer of foundation stitches in exactly the same movement as the first layer, only it will be off-set with the first layer (the second layer forms a “diamond” over the square first layer).
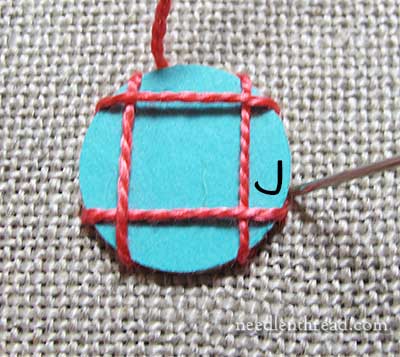
From I, take the needle over and down at J.
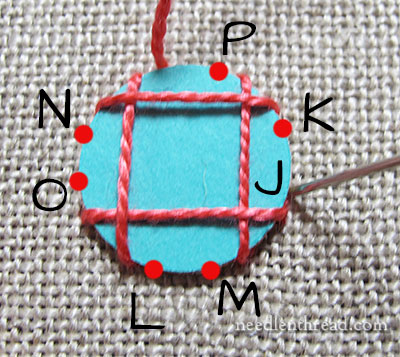
To cut the long story short, here’s the rest of it. The red dots indicate where stitches begin and end. Once you go down at J, come up at K. Go down at L. Come up at M, down at N, up at O, and finally down at P.
Each time you start a new long stitch, make sure you pull the working thread tightly, to snug up the previous stitch.
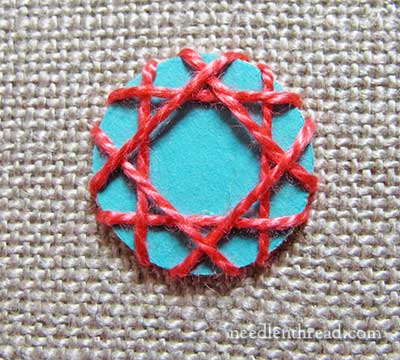
This is the finished foundation. And now it’s time to decorate it with the traditional shisha stitch.
At this point, it would be a good idea, if you can, to switch to a blunt tapestry needle. The blunt tip will slip easily over the mirror and it won’t snag the foundation stitches.
Usually, with shisha, the foundation stitches and the decorative stitch worked over it are the same color. This helps keep the whole finished look of the frame around the mirror nice and neat.
In this tutorial, though, I’m going to work the decorative buttonhole / chain combo with another color, so that you can see it more clearly.
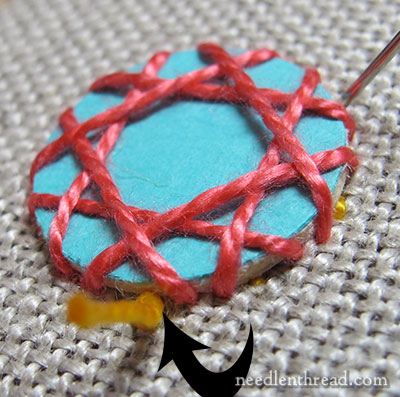
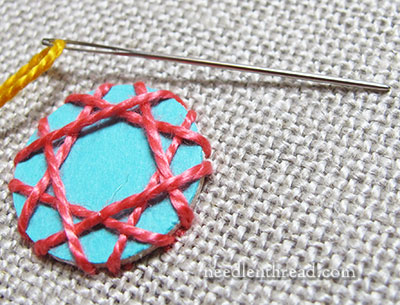
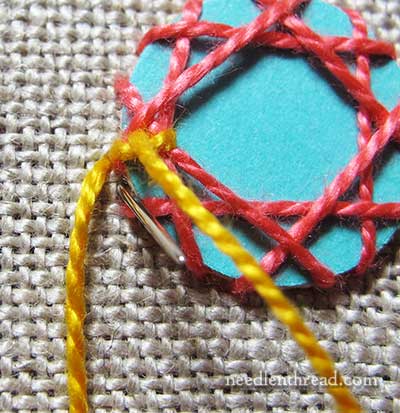
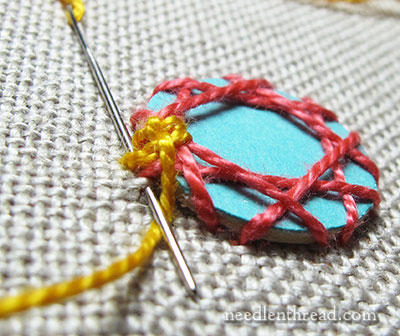
I began the second thread the same was I began the foundation thread, with a waste knot and tiny backstitches just along the edge of the disk. The arrow points to the waste knot in the photo above, and you can see one of the tiny yellow backstitches just on the right edge of the disk.
After taking three or four tiny backstitches towards your starting point, clip the waste knot.

I’m beginning on the left side of the disk, and I’ll be stitching counter-clockwise around it.
Bring the needle and thread to the front of the fabric, right next to the edge of the disk.
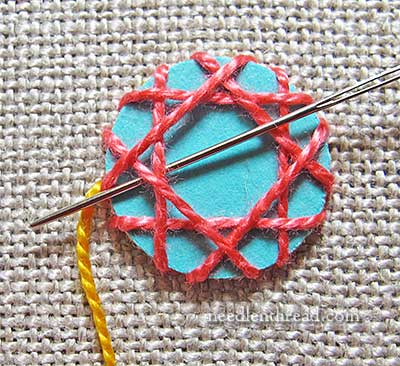
Take the needle under the foundation threads.
Sometimes, you’ll pass under two foundation threads, and sometimes, as you work towards the “corner” of the foundations, you might pass under three – it just depends on where your stitches fall.
So, take the needle under the foundation threads, and over the working thread, as if you are working a buttonhole stitch over the foundation threads.
Pull the working thread through, and pull it relatively tight. The foundation threads will pull a bit towards the side. If they’re pulling over the side of the disk (or past the side of the disk) your foundation threads are not tight enough and will need to be re-worked.
Once you’ve pulled the buttonhole stitch tight, take the needle down into the fabric right up next to the disk, and right in front of where the working thread first emerged from the fabric. You can go down in the same hole, or you can go down right in front of the hole. You just want to be in that immediate area, and right up next to the edge of the disk.
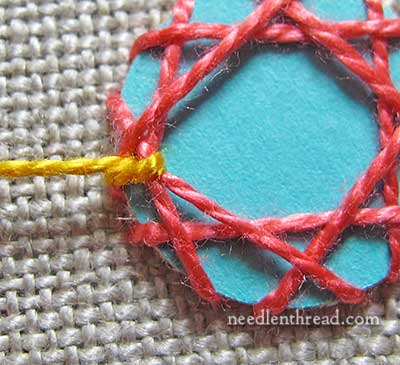
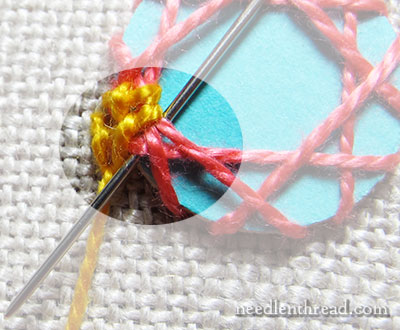
Pull the working thread, but not all the way through. Leave a loop of the working thread on the front of the fabric, and bring your needle back up inside the loop, a short stitch length away, just as if you are working a chain stitch with the “stab” method. (Because you are!)
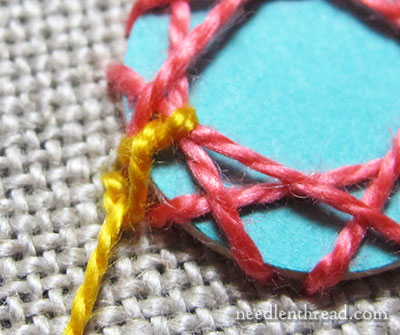
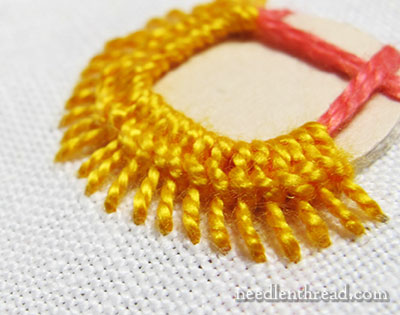
Pull the needle and thread through to the front, and forward, as you would with a chain stitch. From the top, this is what the stitch will look like.
And this is what it will look like from the side.
And that’s the complete stitch! Once you work through the stitch a couple times, you’ll develop a rhythm, and you’ll find that it is actually rather simple.
Now, it’s back to the buttonhole part of the stitch. Take the needle under the foundation stitches, and over the working thread and pull through snugly.
For the chain stitch part of the stitch, go down into the previously worked chain stitch.
If you want to sew the stitch rather than stab it, you can now scoop up a tiny bit of fabric for the next chain stitch, and, making sure the needle is over the working thread (just as it would be for a chain stitch), pull through.
Then, it’s back to the buttonhole part over the foundation threads, and then the chain stitch, always going down into the previous chain stitch.
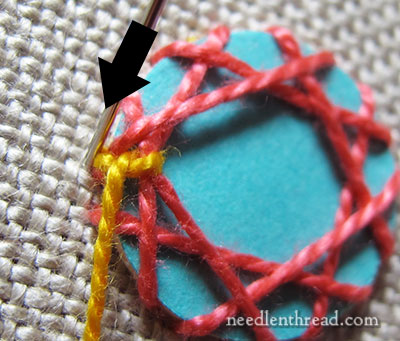
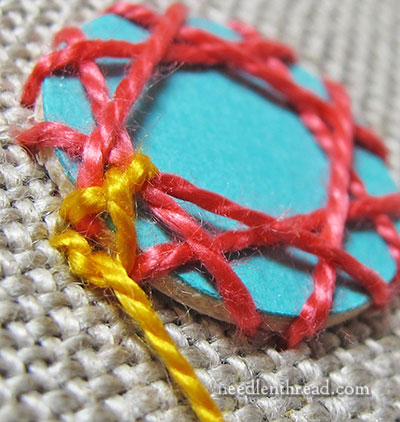
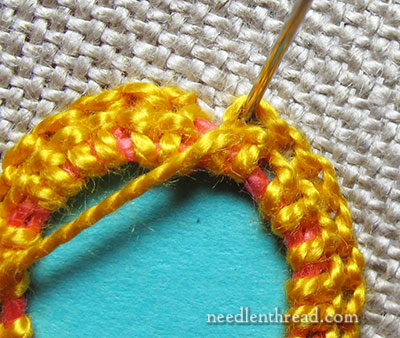
In the photo above, I’ve come to the “corner” of the foundation stitches. You can see that, for the buttonhole part of the stitch, I’m now passing under three foundation stitches instead of two.
Judge that as you come to it – where it makes sense to go under all the foundation stitches, go under them. If it will mess up your spacing to do so, then just go under two.
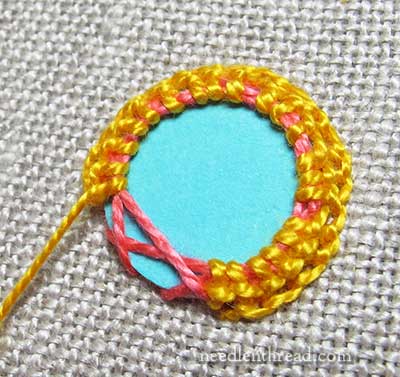
Here, I’ve moved almost all the way around the circle. You can see the foundation stitches through the decorative stitch. This is why it looks better to use the same color for the foundation!
Some threads (for example, several or all strands of stranded cotton) spread much better than perle cotton, and fill up the spaces better. Experiment with different threads to see what you like!
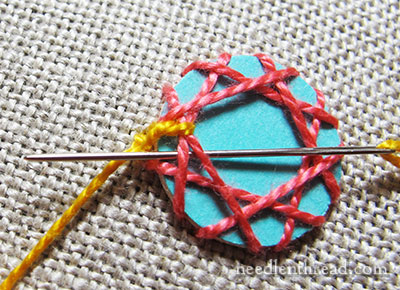
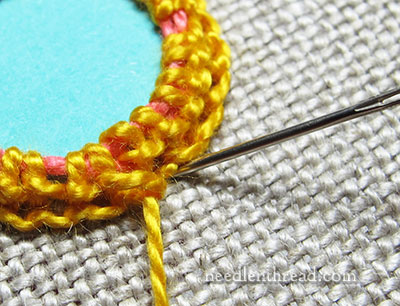
As you work around the disk and near your starting point, start thinking ahead so that you can gauge the spacing of your stitches at the end.
Here, I’m getting ready to take the last chain stitch. My needle is going down into the previous chain stitch. You can see that there is just enough space on the fabric for one more chain stitch.
To anchor the last chain stitch, take the working thread over the loop and tuck the needle underneath the edge of the first chain stitch.
Pull through and anchor the thread in the stitches on the back of the work.
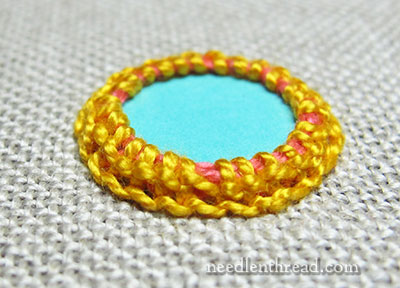
Here it is!
If you work with a smaller disk and use three or four strands of cotton (or even all six, depending on how thick you want your decorative edge), you can work the stitches much closer together and get a very solid covering over the foundation stitches.
Nest time we look at shisha, we’ll try a different foundation and a different decorative stitch! It’s a fun one!
You can find more Stitch Fun tutorials right here on Needle ‘n Thread, listed in the Stitch Fun Index. I’m always open to suggestions, too, so if you have any requests for specific stitches or combinations, feel free to drop me a line!
I hope mine comes out as beautiful as yours. I was looking for something different to embellish a needle book I am making. This will work beautifully. Thanks so much for sharing.
Obrigada! Há muito estava querendo este passo a passo. Ficou perfeito!
Fantastic tutorial! I had an awful time trying to get the hang of this a while back – I might revisit it now I know I can turn to your tutorial for help!
That is so interesting! I’ve always wondered how that was done. Boy, that’s a lot of work. Thanks for sharing Mary.
Thanks for the detailed tutorial, Mary. That demystifies the shisha stitch quite a bit. But I must say this stitch still intimidates me! Maybe the next method will seem more approachable.
Dear Mary
What a great informative detailed tutorial I can imagine a shisha mirror on one of the little things that would look great. I have some shisha mirrors I must try them this out, The covering over the foundation stitches is lovely and I really like the different covering in the last photo can’t wait for that tutorial. Thanks so much for showing how to embroider with shisha mirrors.
Regards Anita Simmance
You clever girl! Another terrific tutorial! I’ve wondered how this was done & here it is. I like the pink peeking through, though I know you did contrasting so we could see the technique better. You make everything look achievable by even all-thumbs me.
Thanks so much for this wonderful tutorial! I’ve always liked the idea of shisha but am one of those people who have found the stitch diagrams very confusing 🙂 I think the mat board circles are a great idea too, not only for photos, but for beginners like myself to practice with!
Like any form of embroidery, it takes me a bit of practice to feel satisfied with my technique, but I am fond enough of Shisha to keep at it. I have a lovely book by Jean Simpson, “Shisha Mirror Embroider,” that has been quite helpful and inspiring, despite being published in the late 70’s!
Thank you Mary. I can’t tell you how many times I have tried to do this, making a horrible mess each time. You make it look so easy … I wonder if it really will be, for me at least.
I developed my own method of attaching shisha (and lots of other things too). You take a washer of suitable diameter: it needs to be slightly larger on the outside diameter and slightly smaller on the inside so that it covers the edge of the shisha. Then you work buttonhole stitch around just the washer, and then I usually place the covered washer over the shisha and chain stitch it to the base. There are other stitches you can use for this last bit, and you can also add to the chain stitches to create a larger motif. But it’s dead easy, even though not exactly kosher!
I love this! I have never tried anything like this but with your great tutorial I will definitely try it out!
Bonjour,
ce tutoriel est magique!!!!les explications sont très claires, je vais essayer de le faire dans la semaine.
Merciiiiiiiiiiiii
Amitié
Bernadette
Fantastic tutorial. You should publish a book. I am looking forward to the next session. Thank you!
Hey could you please make videos of all the shisha stitches….I messed up at some stages….
Thank you for these clear pictures, very helpful to refresh my memory occasionally! I do have one question – looking at your pictures I was trying to work out how they were different from what I usually do, and I found it’s because I work clockwise, so my stitches are the mirror image of yours. Do you know whether one direction is more usual/traditional than another?
Hello, I have just come across your site and just wanted to say that it is fantastic! The tutorial on mirror work is very clear and something I have been looking for for such a long time – exactly what I needed. I look forward to exploring and learning other techniques that you demonstrate. Thank you very very much!
Thank you so much for this tutorial. I’ve wanted to do shisha mirror work for a while and, because you’ve taken us through it so steadily, I feel I know what I’m doing and can branch out into my own projects. Great stuff!!!
Thank you so much. Your tutorial is the only one that I understood . My stitch is not quite like yours, as I twisted the chain to go with the rest of the embroidery but I like it. And I got my rhythm. So happy.