


Last week, as part of the Stitch Fun series, we looked at the traditional shisha stitch used in mirror embroidery.
Today, I’d like to show you a fun variation of shisha. It produces a completely different look when attaching mirrors (or anything else you might want to use in place of mirrors) to ground fabric.
This various has a kind of “hairy” look to it, but I like it a lot! It’s fun, it’s a little different, it’s easy once you get the hang of it, and as you start working it, it opens up other possibilities for shisha embroidery.

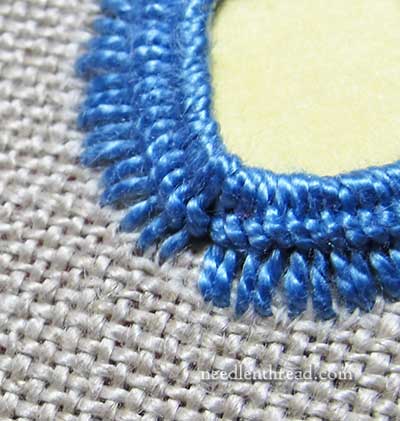
Here’s the finished example of this shisha stitch variation. Notice that the opening that exposes the mirror is somewhat square, thanks to the different foundation stitch technique that we’re going to use for this stitch.
With this sample, I worked the stitches very close together, but you can fan them out, work them farther apart, or play with varying lengths of the little hairy stitches around the mirror, all of which will produce a different look to the stitch.
I’ve seen this variation in a couple stitch dictionaries, but in every case, the instructions fail to mention one very important point, which I’ll highlight below. Because this important point is missing in the instructions (and the stitch diagrams) this particular shisha variation can seem confusing. But it’s not! It’s really easy, once you get the rhythm down.
So hold on to your hat – this is another long, detailed tutorial, but well worth reading through if you’re interested in this type of embroidery!
Before starting out, you might consider drawing an outline around your shisha mirror, like the chalk outline in the photo above. It can be drawn about 1/4″ – 3/8″ away from the mirror. This will help you gauge the length of your stitches until you get used to eyeballing the stitch length. It isn’t entirely necessary to use an outline – and in fact, with the fabric I’m using, the outline just made it more difficult – but you can draw one, if you want to.
We’re starting with the foundation stitches that hold the mirror to the fabric. As mentioned in last week’s tutorial, the foundation stitches should be nice and snug so that the mirror cannot slip out of them.
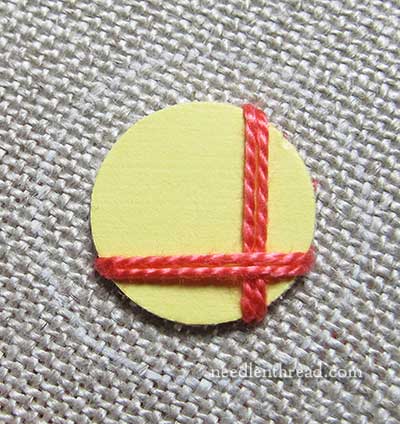
Begin with a long straight stitch just right of center at the top of your mirror, and take the stitch over the mirror and down into the fabric at the lower left of center, directly below.
Bring the needle and thread to the fabric at the top again, just to the left of this first straight stitch, right next to it…
…and end the stitch just to the left of the end of the first stitch, so that you have two long straight stitches just off to the right side of the mirror. Pull the stitches snug.
Bring the needle to the front on the lower right side of the mirror, just around the “corner” from the end of the two first stitches…
…and in the same manner, work two straight stitches across the base of the mirror, as shown.
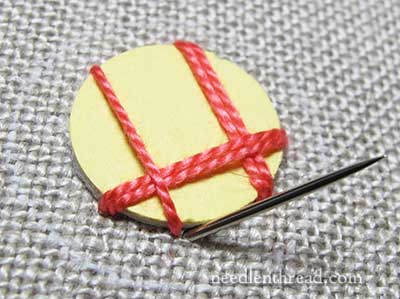
Now, move to the lower right of this lower left corner, and work two long straight stitches up the left side of the mirror in the same manner.
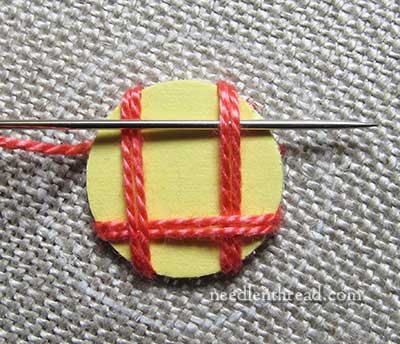
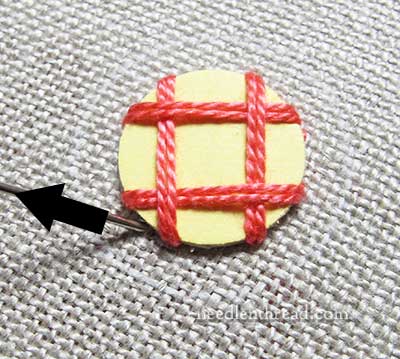
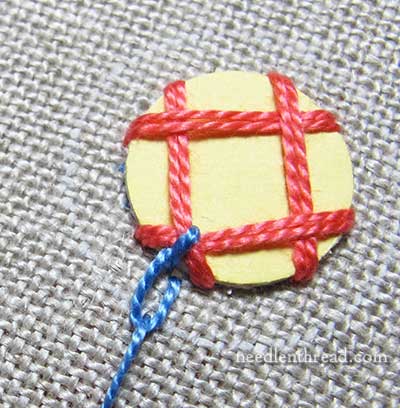
Across the top, you’ll now work two more long straight stitches, to complete the square. Notice that, with this final pair of straight stitches, I’m taking the needle underneath the first pair of straight stitches before ending the stitch.
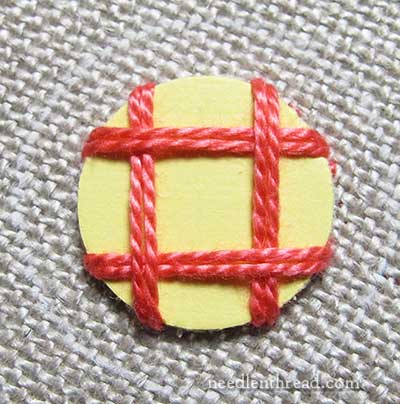
This creates a square interlocking grid over the mirror.
And that’s the foundation! Easy, eh? You can use this foundation for regular shisha stitch as well. It generally produces a squared opening that exposes the mirror, rather than a round opening like the one produced by the foundation stitches we looked at last week.
Now, let’s move on to the shisha variation!
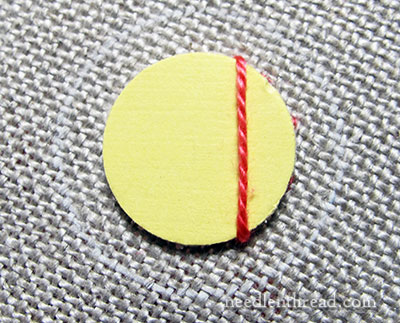
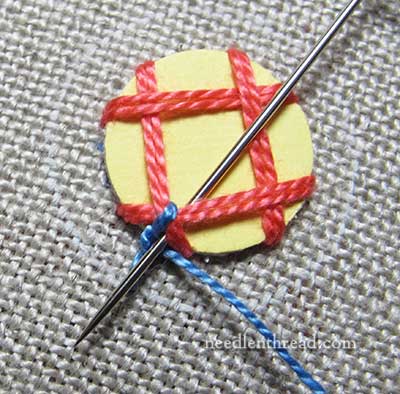
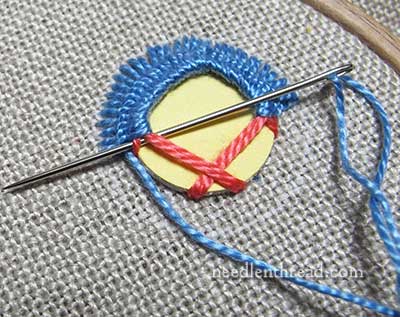
Bring the needle out on the lower left, in the “corner” created by the foundation stitches. We’ll work around the disk counter-clockwise.
For this tutorial, I’m using a different color of thread for the decorative stitching. Normally, with shisha embroidery, the foundation stitches and the decorative stitches are the same color. This way, you can easily see the different stitches.
You can change your needle at this point to a tapestry needle if you wish. I didn’t, because the fabric I’m working on is better handled with a crewel needle that has a sharp tip.
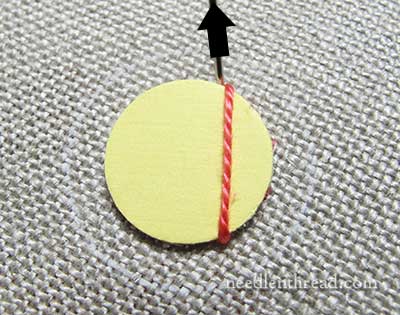
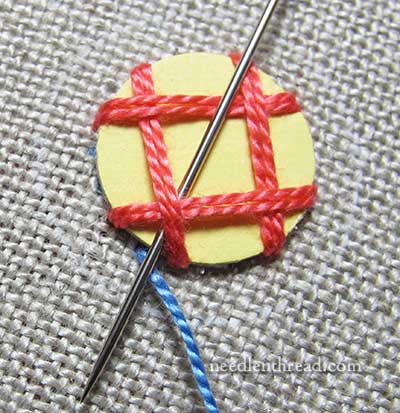
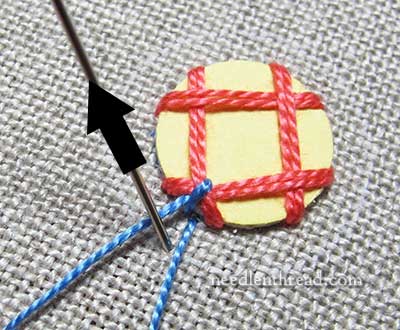
For the first movement of the stitch, with your working thread on the front of the fabric, take the needle underneath the corner foundation stitches and over the working thread (as shown in the photo above)…

…and pull through. Pull the stitch snugly. Essentially, you’ve just wrapped the thread around the foundation stitches, so that the wrap is to the right of the working thread. You haven’t gone through the fabric at this point at all.
You’ll notice that pulling through with a bit of pressure pulls the foundation a little out of whack. That’s quite all right – we’re going to pull through snugly with each stitch. As long as the foundation threads were worked nice and tight, they shouldn’t slip off the edge of the mirror. If they do…eeek. You’ll need to go back and re-work the foundation stitches!
Now, for the second part of the stitch.
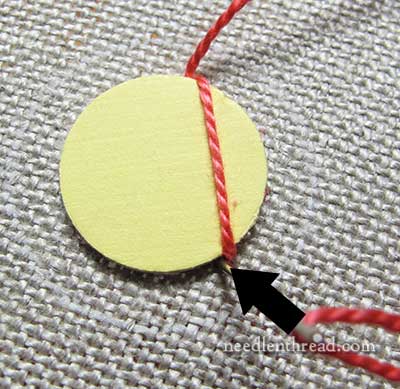
Take the needle down into the fabric just to the right side of the first stitch, where your thread first emerged from the fabric.
Pull the needle through to the back and most of the working thread, but leave a loop on the front of the fabric.
See the loop? We’re going to come up inside the loop of the working thread, just as if we are making a daisy stitch – only we’re not!
This is where the chalk guideline can come in handy.
Bring the needle up inside the loop of the working thread, and pull the thread all the way through.
See? It’s almost as if we’re getting ready to stitch a daisy stitch (only we’re not!).
This is the point where the stitch dictionaries fall short. They show this stitch being taken, but they don’t illustrate what is supposed to happen next, which is pretty important.
With a normal daisy stitch (or detached chain stitch), you pull the working thread forward (as in the photo above) to make that petal shape.
For this stitch, we’re not going to do that.
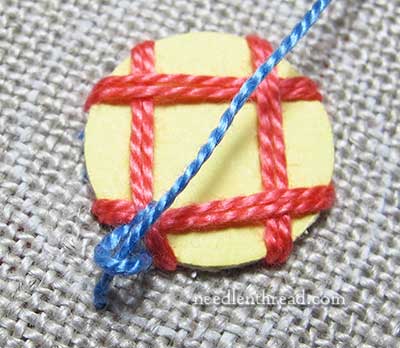
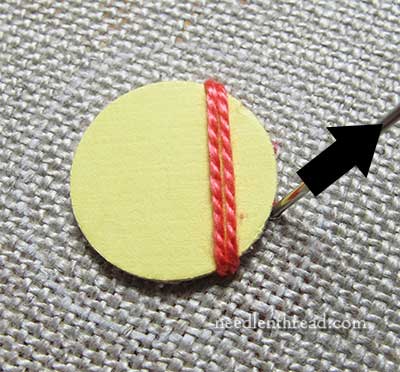
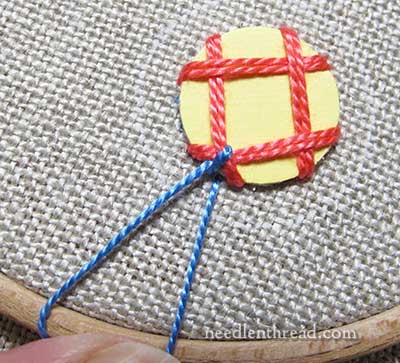
Instead, we’re going to pull the thread back across the mirror, and keep pulling, until that loop formed by the half-detached-chain-stitch-thingy we just worked tightens down over the thread.
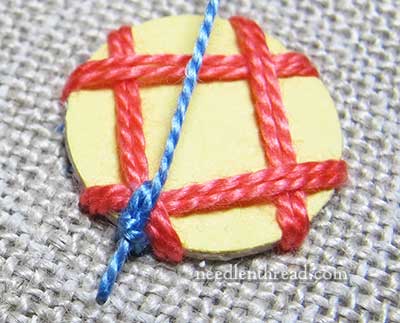
As you pull the working thread over the mirror, the loop tightens right around the working thread, right at the edge of the mirror, which is where we want it.
And that is the second part of the stitch movement for this technique.
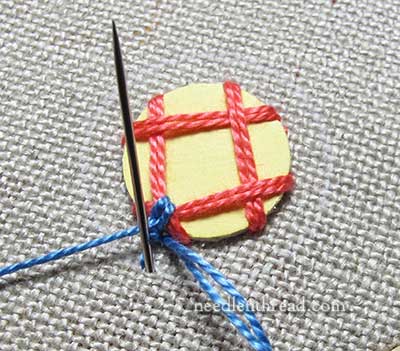
Now we’ll return to the first movement of the stitch, taking the needle under the foundation threads and out over the working thread and pulling through snugly.
Then we head down into the fabric right next to the last stitch, and pull through, leaving a loop of the working thread on the front of the fabric.
Then we come up inside that loop of working thread…
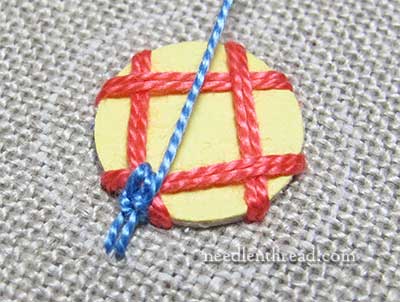
…and pull the working thread back over the top of the mirror, until the loop tightens around the working thread.
That’s all there is to it!
As you work your way around the mirror, you’ll have to fan the outside of the stitches out a bit, so that they work around the outer curve.
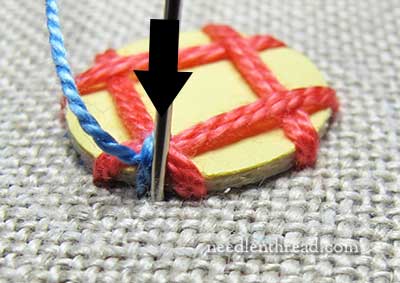
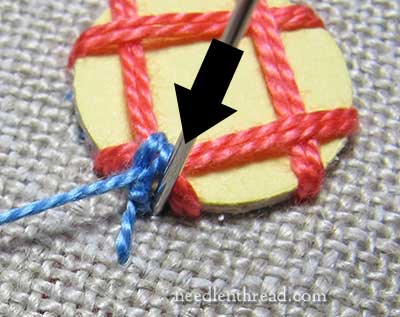
Also, when you pass under the foundation threads, there will be times when you pass under all four of them (in the corner), or just under two of them (up the sides), and sometimes, you might end up passing under three of them, as you move out of the corner area.
In the photo above, I’m passing under three of the foundation stitches – I’ve come up between two parallel stitches right there in the corner.

As you approach the beginning of the decorative stitches and the end of your stitching, try to gauge how the final stitches will fit in the corner.
Finish at the end of the second movement of the stitch – the “not quite daisy stitch” movement. Just take the thread down into the fabric after pulling the loop tight.
If you end up with a small gap after you’ve done your last stitch, don’t worry! Just make a small straight stitch to fill the gap, coming up on the outside edge of the decorative stitching, and ending the stitch underneath the stitches close to the edge. “Tuck” the stray straight stitch in that way, and no one will every notice it!
There’s the finished last corner, where I tucked an extra straight stitch in to fill the gap.
That’s it! Go try it!!
Incidentally, you can see this same stitch worked a little more open with metallic floss at this end of this review of Cosmo Sparkling Thread.
I’ve been fumbling around with other variations and decoration techniques for shisha stitches, and I’ll share those with you down the road.
I hope you get a chance to work this one – it’s heaps of fun!
For more Stitch Fun tutorials, visit the Stitch Fun Index, where you’ll find links to all kinds of fun stitch tutorials.
Dear Mary
This is such a lovely stitch and so versatile your tutorial is very informative and detailed. If you follow your instructions you can’t go wrong, you make it look so easy and the Shisha looks amazing, thanks for showing us in great detail how to Shisha. I hope you have a great weekend and happy Shisha (it sounds like a dance so lets dance!).
Regards Anita Simmance
Thanks a lot for this variation of shisha stitch. I’ve just tried it, and it’s much easier than the other one. I love it!
Must try it this way!
I love it! Thank you for this posting! I’m just trying to squeeze in some time to try this out! Also, your Plait Stitch which I purchased from your book store here and plan to use for monograms! So many projects – so little time for us needleworkers, right?
Thanks for this tutorial Mary – I am keeping my eye out for some mirrors so I can give it a go. I seem to be seeing mirrors all over the web at the moment! I just saw some on folkcostume.blogspot.com on a Croatian sheepskin vest, held down by appliqued rings of leather rather than embroidery – really beautiful.
I can’t begin to tell you how I have battled with this over the years, which is mostly why I devised the ‘cheat’s shisha’ using the washers. And now I find it probably wasn’t all my fault at all! Thank you and hallelujah, Mary!
That sounds interesting! Mary, can you show this method, too? I’m guessing here, but it sounds like that could add a deep well to look into. And would it be good for just circling a design motif on a flat fabric?
I was simply amazing to see how beautifully you explained it, and the result is just stunning.
Thank you,
Rubina
Instead of drawing a circle on the fabric you can draw it on a piece of adhesive paper, cut a ring (half an inch?) and stickit in place. After all embroidery is done you remove it.
If you use a solid color that contrast with your fabric ité very easy to see it