


Last time we looked at the Secret Garden Hummingbirds, I was musing over how to embroider the feathers extending from the body right below the wing and above the tail.
When I’m in one of these Un-Stitch-To-Fix situations, if I don’t force myself to face it right away, it can become a Monumental Problem – something I loathe more and more to face, so much so that I keep putting it off. And the putting off of an embroidery project in these circumstances can lead to serious consequences, like shelving a project “for Later” – and then Later never comes.
Tell me I’m not the only one who’s experienced this! In fact, I’d bet that many of UFO’s (un-finished objects) out there in the embroidery world are primarily the result of one of two situations: 1. boredom with the project, or 2. a mistake that needed fixing and couldn’t be faced.
So I figure it’s always best to face stitching hurdles as soon as possible. Once a stitching mistake is made that keeps me from going farther on the project, I correct it right away – at the first possible moment I have to address it. I usually find that these situations that require un-stitching and re-stitching are not that big of a deal, if I just get to it.
So I got to it.
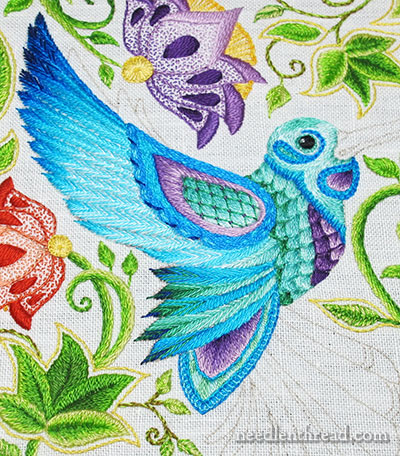
As a reminder, here’s where I left off:
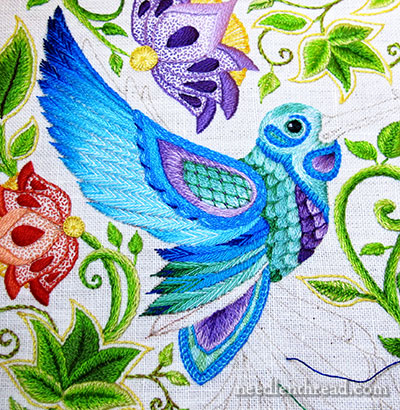
For those who offered feedback on the embroidered feathers in question (thank you very much – I read each of your comments and added them to my ponderings!), most of you agreed with my dissatisfaction especially with the two feathers right below the upper wing – the dark blue one tucked right under the upper wing and the blue one right below that.
I didn’t really have much of a problem with the other three large feathers. I know some of you don’t like the combination of the blues and the greens, but before I made any decision on a different approach, I wanted to finish that lower, un-embroidered feather to get a better picture.
So first I embroidered the last feather. Then, I picked out the stitching on the two top feathers of the area, and that brought me to this point:
Now, to tackle those two top feathers.
I started with the larger of the two, so that the small one could be stitched on top of the large one.
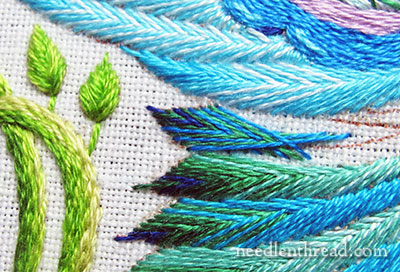
I’m still using the combination of blues and greens at the tip, in fishbone stitch. If you’re not familiar with fishbone stitch, feel free to check out my fishbone stitch video tutorial – you’ll see it’s an easy stitch, great for leaves, feathers, and the like.
You can see how long the stitches are here, to get the right angle going into the feather.
To ease the colors into each other, I started with the dark blue, and then alternated greens and blues, gradually changing to lighter shades as I moved down the feather.
Stepping back a little from the work, here’s the finished large feather in place with just the small tuck-in left to be stitched.
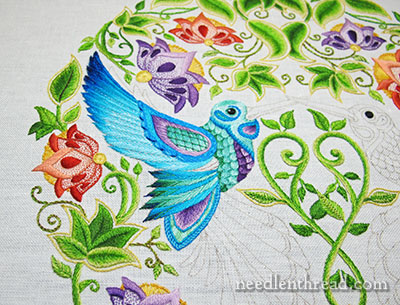
Relying on your good sense and feedback, I decided to work this last little feather in a combination of the lightest threads.
I used the lightest blue-white (747) and the lightest green (964), alternating down the feather from the tip, and then gradually worked in a slightly darker turquoise-green (959) towards the body.
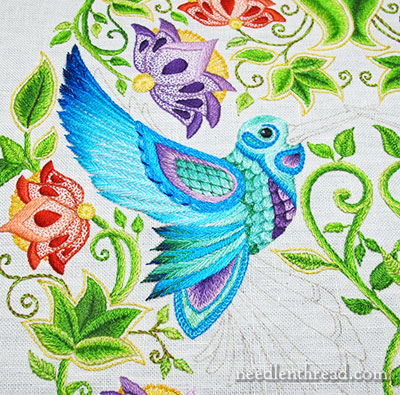
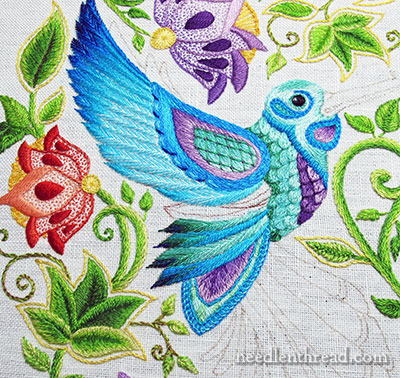
Overall, there it is. What do you think – do you like it better than the first attempt?
I do. I’m ok with it, but I’m going to play with an idea in there still. I’d like some definition on that lowest feather, to see if I can “lift” it over the tail. But I’ll save that for later! I really want to get on with the tail feathers…
As usual, questions, comments, suggestions? Have your say below!
If you’d like to follow along with the Secret Garden Hummingbirds project, you can find all the articles relating to this project arranged in chronological order in the Secret Garden Project Index.
Good morning Mrs. Corbet,
I love it, the darker tips are nicely incorporated with the rest of the wings – it looks natural (as natural can be for a stylized bird!).
Regards,
Jackie
I have also embroidered bird feathers. When I step back and look at them the stitching seems fine but I know something is missing. Maybe all this needs is a simple outline stitch between the upper wing and the lower feathers. Just that small bit of thread and texture can show the definition between the two parts of the bird. Love your choice of colors and stitches. You are an inspiration to all of us.
Love it. I really like the gradation of colors in this version. I think it blends really well with the other feathers and the stylized body/tail feather bit.
All that lowest feather needs to “lift” it over the tail is an edging of a very dark blue. This is so beautiful!
By using the light blues on the small feather it now appears to be part of the body not the lower area. My institnct is to use the daker greens and blues to delineate it.
Good Morning, Mrs. Corbet! Just when I think you can’t possibly get more amazing you blow my mind! I love the greens and blues, I love the light turquoise fix, I love the flow, I LOVE THIS!
Seriously, you are such an inspiration and an extraordinary teacher, but most of all, you are blessed with a God-given gift! Never doubt that you are anything less than a true artist in every sense! And thanks, for helping us get inspired to become artists too!
Now, let me also hasten to assure you that all my UFO’s have been primarily due to boredom, or in a rare case a catastrophic fabric fail! It happens to the very best. Da Vinci barely finished anything because he got bored. It just goes to show you are among the “Greats” 😀 Have a FABULOUS day!
Brilliantly colorful. Your techniques are flawless as usual, Mary.
Yes, I see what you mean. This second version is certainly more in keeping with the colour scheme of the bird.=)
Funny you should mention those two reasons why projects descend into UFO status. Those are two of the five I described in my old article on finishing up UFOs:
http://sew-in-love.blogspot.co.uk/2011/04/from-ufo-to-wip-to-happy-dance-how.html
That UFO-beater post was very thought-provoking, thanks! It applies just as much to quilting (my main crafty addiction) as it does to embroidery, I think.
(Also, congrats on your recent show successes! I’d stumbled on your site a while ago and remembered the Tudor Lady as a WIP – great to see her finished in all her glory now! Sorry I’m not posting on your site directly, Blogger hates me and won’t let me log in with my WordPress account, stupid thing. <_<)
Love it! That was the perfect fix. Can’t wait to see what you do next.
Yes, it does look better than the first time. My God, I wish I could sew like you. Can’t wait to see this finished.
Dear Mary
I really like what you have done with the different blends of blue and green, even I though I liked the original darker blues, I really like the lighter blues and greens these blend in much better with the overall design and your stitching is beautiful, I know I have already stated but I do like the Fishbone stitch. Thanks for sharing your un-stitch-to-fix which I am about to experience on my present project a monogrammed pillow, I’m going to have to unstitch the inserted surrounding lace as it not secure enough which seems monumental but like you once you begin the to unstitch to fix then it’s not such a monumental a task.
Regards Anita Simmance
Stunning, Mary! It always worries me when you say you are going to muck around with your work when it looks fine to me, but I must say you know what you’re doing!
Looks pretty perfect to me, really beautiful. I don’t know where you get your patience from
Mary’s mojo has got the “wing flow” (no pun intended) back. Love this. You know it’s right when you stand back and your mind says, “Yes!”. Isn’t it nice when a problem is solved? I love mole hills better than mountains!
Hugs from Utah, Bev
I LOVE GREEN AND BLUE TOGETHER BUT TO ME THE GREEN ON THE TIPS LOOKS LIKE A AFTERTHOUGHT. I WOULD BLEND SOME IN CLOSER TO THE GREEN SCALLOPS.NOT TO MUCH THOUGH. SOME TIMES IT HELPS ME TO SKETCH THE COLORS ON PAPER FIRST. . I LOVE YOUR SITE. IT IS THE FIRST THING I CLICK ON WHEN I OPEN MY E-MAIL. YOUR WAY OF DOING A BOUILLION IS GREAT. I WISH I HAD YOUR TALENT. THANKS FOR SHARING.
Mary, at first I didn’t agree with the removing of the dark blue feathers; however, after scrolling down and seeing the removed dark blue threads and replaced with lighter colored threads…..AGREE. Beautiful! Your work is phenomenal!
Dear Mary, I think the placement of your feathers is the problem..not the stitching. I don’t know where you got the drawing of the hummingbird, but I think those bottom feathers do not belong there. Just my thoughts…
I do like the newest version even better than the one before. Overall, the colors feel so good. Can’t wait to see what else you’re going to do with it. Everything feels so balanced and beautiful. Love the blue greens, especially combined with just enough purple to bring it together with the vines/flowers.
I really like the changes you made to the wing feathers. I like everything you’ve done to the bird except (please forgive me) the color patch under the throat. I love the way you stitched the purple, but I think the blue stitching around it is a jarring note. Even though you’ve chosen exotic colors for the bird and are not trying to make it look like a regular hummingbird, that blue stitching is just too much unnatural contrast to me.
I really like the redone large feather. I think the small one is too light and there is not enough distinction between it and the wing. I would have used more of the green to tie it to the scallops and the feathers below. But in general your shading is spectacular and had been such a learning experience for me. Thank you.
Darcy
Excellent alternation! It looks really good, Mary. I see what you are pondering with that light small feather at the bottom of the top wing. How weird would a bit of the dark blue (as on the outer tips of the top feathers) work? too stark a contrast? a bit more of separation seems called for. Good Luck! Can’t wait to see what you do!!
Love the way it looks now…..as the shoulder of the rest of the wing, much like I have seen birds in the wild stretching or grooming .
I think Darcy does have a point about making more distinction between the upper little feather and the wing. I think that is why I initially liked the first version better. But I do think the second version is more in keeping with the other colors in the bird. With the wing on top of and above the little upper feather, it seems it should be darker because of the shadow it is in.
I am in awe! Have no criticism, because you are so far ahead of me in technique!!
It’s gorgeous!!!
Mary, I think it is absolutely exquisite work!!!!
I don’t usually comment on your ideas but I must admit, I think all your embroidery of the hummingbird project is beautiful, the adjustments to the tail feathers look fantastic. I always look forward to seeing how you improve your ideas when you are not happy with the embroidery you have done, the results are always stunning. Thank you for your lovely and easy instructions.
I love the changes! Though maybe a little more definition between the upper wing and lower wing would help.
^_^
This looks lovely Mary; it’s a subtle change from the first attempt but it makes a real difference. I can imagine some definition on the lowest feather, that perhaps mirrors the topmost edge feathers, could look nice. It looks much more balanced though, now that you’ve made the change.
I really like what you’ve done with the wing feathers. Bringing in the greens on the lower group really ties them into the body and upper wing, helping to look like all the parts belong to the same bird. At first I couldn’t imagine how your color choices would combine to make a unified finished product, but you are much more adventurous with color than I. It certainly shows here and I admire your version of a hummingbird more each time I see a newly completed section. Still reserving judgement on the paleness of the head until I see what you are going to do with the beak. You rock, Ginni
I like this second attempt with the feathers better than the first one. I think you should let it stay.
UFOs can also be a result of SOS. You know, the one working the project becomes overly optimistic, and next thing you know, they’re completely overwhelmed by the whole thing, and then the project becomes a UFO.
Sarah
I like it much better! The colors flow naturally. I couldn’t imagine it ever looking “right” but you accomplished it very well.
Love how the wing looks now!
As to the question posed – mostly I have UFOs because I have too many projects going at once and cannot decide which to work on, as well as extremely limited time to work.
I like it much better! I assume you plan to highlight it with some matlic thread?
Glad to see that even pros have to unstitch!
Love it!
Simply stunning!
Definitely better!
From watching my humming birds, I sense that the feathers appear darker nearer the body.
Boredom often keeps me from finishing projects. Presently am trying to focus on “homework” for a class, over the little design I’d like to work. So tough, when your bullion stem stitch yesterday would be perfect for the rope cartouche around the little ship I so much want to be stitching!
oh yes… those feathers definitely ok. In fact they’re much better! It’s all very nice; but there’s a part of me that wants to see spectacular. I can’t quite nail down what’s niggling at me – but you did ask! Now for that tail…hmmmmm – looking forward to seeing your solution.
Oh, and UFO’s? You hit the source of that problem spot on! Thanks for articulating it so well – you’ve got me going through my stuff again after a far too long hiatus! Thank you!
This is a wonderful result. I like the big feathers and the dark tips. However I still feel the smallest feather could be improved. Green is correct but it is too pale here. Medium at the tip to emerald at the base giving a bit more prominence to the body would look luxe. This feather is so funny it can easily swing either way towards the wing or the back. So to look correct it needs elements of both, with a meld to body. With it being a more definitive green it will finally resolve the edge issue of the wing. Even that next up wing feather could use a touch of darker blue towards the body. But I’d hold off on that if the darker green on the dinkie feather works. Overall this is looking so magical. I can hardly wait to see the full impact when the tail comes to life!
I don’t often comment (or read, for that matter) the posts about this project because of my phobia. I am trying really hard to overcome it and to some extent succeeded, in that I can now read your posts without having a major panic attack.
Anyway, as far as this goes, I like this treatment better than what you had there. I reckon I would leave it well alone and move on to something else – more flowers or something like that. Please.
Hello mary ma’am, the secret garden project is really so very good. I wish I will do something of the like and gift it
Hi Mary, have been following g you for awhile from “Downunder” and your work is just beautiful. I think I like this version best, though if any of mine looked that good I wouldn’t care what colour it was.
I have bought the art book. Did you enlarge the drawing or is it as is in the book?
As to UFOs , sometimes. Do get bored but mostly I get all excited and inspired and start too many things at once and never get back to some of them!
Kindest regards
Roma
Hi, Roma – it’s the same size as the one in the book.
Hello Mary, I have followed the progress of the humming bird with interest and must say I am very impressed. Look forward to seeing the defined lower feather. I know you have unpicked and re-stitched thge top two feathers but just wondered if you had considered making the top feather a little and shading in a dark blue to emphasise that it would be in the shadow of the top wing feathers.
Can’t wait to see how the colours will be for the second bird.
All the best
Michael
Oh, YES. The shading works, the color works, the color combinations and shading works…… I like it. It isn’t how I would have done the feathers, but I think what you did stays true to your vision for your little guy. I really love it Mary. You “fixed” the problem areas. Well done!
How beautiful! Wondering how you plan to display it?
I think this is a frame-able piece, when all is said and done. It could be a pillow top or something, but I’ll probably just frame it.
Hello Mary,
I so enjoy watching the progression of this delightful piece! Your workmanship is fabulous!
Many thanks for sharing it with us.
Tricia
I like the fix. Much better flow. I hope to start this project soon. Love you ideas. Thanks for the expert advise,
D
I liked your comment with UFO’s. I finished a sampler that had been sitting around for 12 years. A motif was more than half complete so that is where I started only to realize upon reaching the end of the row that I was off count and knew that is why I had put it down. Guilty of #2-a mistake that needed fixing and couldn’t be faced.
The color changes made a dramatic difference. You continue to inspire and encourage. Thanks!
All I can say is WOW !!! FANTASTIC!!! BEAUTIFUL!!!
Hi Mary, I love this piece and came across some remarkable photos of humming birds which you may enjoy http://www.boredpanda.com/hummingbird-bird-photography/
Many regards, Helen
Hi I personally think that the last feather that you have worked is to light and should have a bit of the lighter and darker mauve worked in it as well
regards carol
Dear Mary,
It is so refreshing to see an expert have the same issues as many of us at home do! But perhaps having a slightly bigger audience seeing the before and after shots! It is inspirating to have this opportunity to see how you work and what colours you have chosen. I am in love with your birdie and love most of his/her colours. I love how you change the colours throughtout your work and are not afraid of blending colours also thus giving the look a balance theme.
You have now inspired me to pull out my recent project “Bearded Irises” hand drawn by me but yet to start actually putting colour to the fabric. I am terrified to take the first step. So I have decided to start with the leaves. Perhaps as I progress I could send you a picture with the view that you too could offer some wonderful and not so wonderful comments. I would greatly value your input into my project. Providing I have your consent. Best wishes with your birdie Julie Beard.