


What do you get when you cross bullion knots with stem stitches?
Right. There’s no punch line!
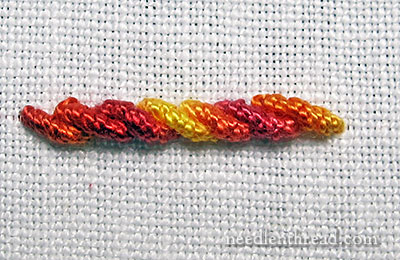
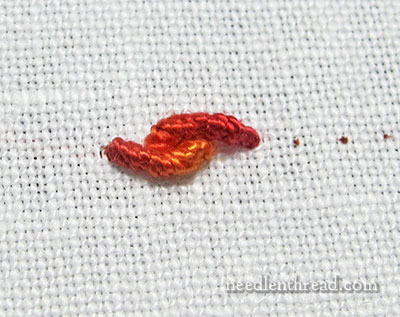
It’s kind of obvious – you get a stem stitch line made with bullion knots.
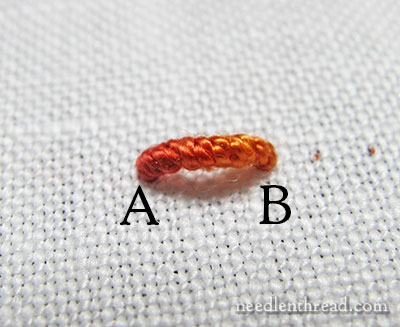
It looks like this:
It’s been a long time since I’ve written a Stitch Fun tutorial for Needle ‘n Thread – I miss Stitch Fun! So I’ll be rolling out quite a few Stitch Fun tutorials over the next several months. I have a whole list of stitches, composites, combinations that are lots of fun to add to your embroidery projects. And, of course, if you have any specific requests, I’m always open to suggestions!
Today, we’re going to look at the bullion stem stitch, which is simply stem stitch worked with bullion knots, or bullion knots arranged like stem stitch.
The Bullion Knot
If you’re not familiar with working the bullion knot, it might help to take a look at my bullion knot video tutorial, which will show you the by-far-easiest way to make bullion knots, especially if you’re working in a hoop or on a frame.
Materials Used in this Tutorial
For today’s Stitch Fun feature, I’m working on Alba Maxima, which is a beautiful linen with a close weave, with about 40 threads per inch (though it’s not an even weave). It’s a perfect fabric for general surface embroidery when you want an excellent ground fabric. For thread, I’m using a #8 over-dyed perle cotton from Colour Complements, and a #5 milliner needle.
How To Work the Bullion Stem Stitch
Here’s how to work the bullion stem stitch:
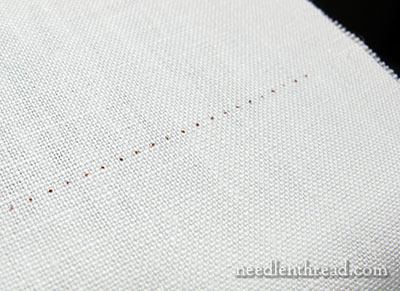
To make matters easy while practicing this stitch, you might mark out a dotted line on your fabric. My dots here are 1/8″ apart. The actual stitch will be 1/4″ long, so for each bullion I make, I’m skipping one dot.
I won’t go through the specifics on how to make a bullion knot here – the bullion knot video will show you that – but we’ll look at the major movements of it, anyway.
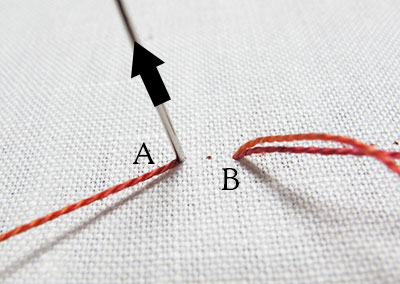
First, I brought my thread up to the surface at A and pulled all the way through.
Then, skipping one dot on the fabric, I took my needle down at B, but I left the majority of the thread on the surface of the fabric (I didn’t pull through).
Then, with the majority of thread still on the surface of the fabric, I brought the needle back to the front at A again, in the same hole.
Now we’re ready to take the working thread (which is still on the front of the fabric) and wrap it around the needle to create the bullion stitch.
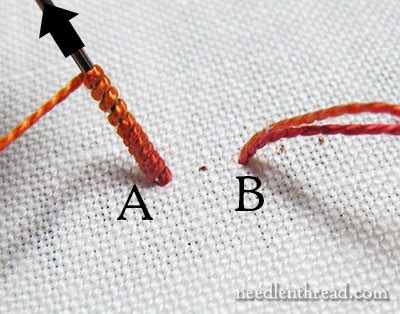
And there are the wraps!
For the bullion stem stitch, I like to wrap the thread around the needle enough times to cover the space between A and B, and then add one more wrap, so that the knot has a little bit of lift and movement.
Remember to hold the wraps on the needle when you pull the needle through them!
For this exercise, using #8 perle cotton and covering 1/4″, there are 11 wraps on the needle.
And there’s the knot. Notice how it sits up off the fabric a little bit. That’s a good thing for this stitch.
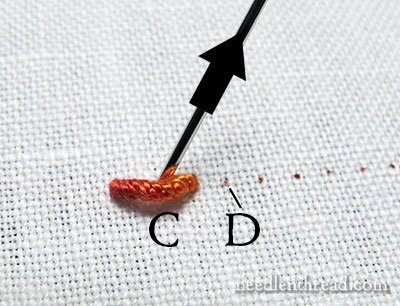
For the next stitch, the needle comes up at C, which is the dot between A and B (at the midpoint in the first bullion we just made), and the end of the stitch is the next dot down the line, which I have affectionately named D.
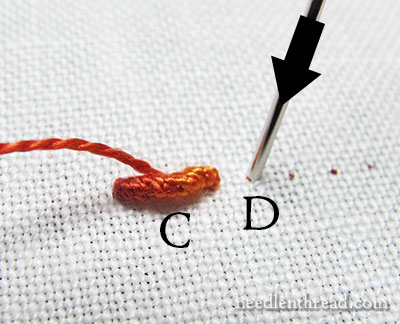
We’ll do the same thing for this stitch that we did for the first stitch: Up at C, down at D without pulling the working thread through…
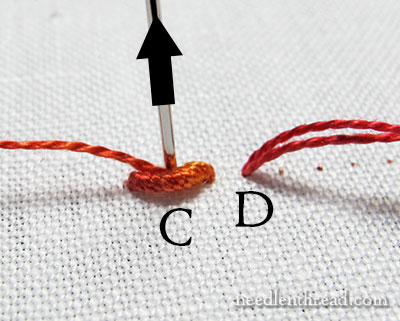
…then back up at C, where we will make the wraps on the needle and then, holding onto the wraps as we pull the needle through, we’ll finish the stitch.
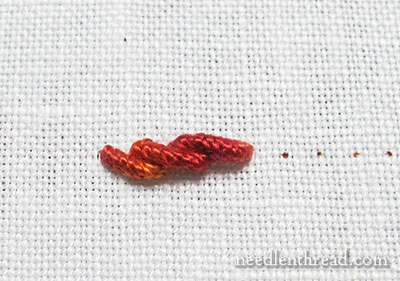
It will look like this:
Bizarre. Weird. Not very attractive.
No worries! When we get stitch #3 into place, all will come together as planned!
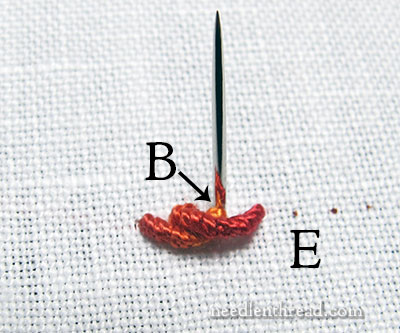
To begin stitch #3, bring the needle up at B, which you probably recall is where the first bullion stitch ended. And feel free to share the same hole!
The end of stitch #3 will be at E, which is the next dot down the line past the end of stitch #2.
You can see that stitch #3 put stitches #1 and #2 in their place. All looks well.
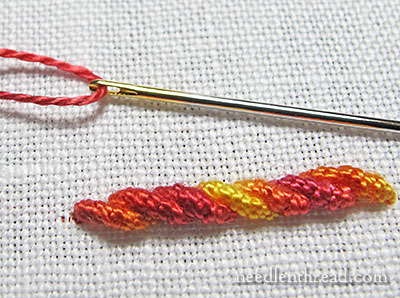
And so it continues! Just work your way down the line, making these overlapping bullions, which will morph into a very nice, ropey, dimensional line.
The bullion stem stitch can be used in all kinds of surface embroidery – anywhere you want a chunky line of stem stitch that has quite a bit of body to it.
It would make terrific stems for dimensional flowers, but it would also make a beautiful, rope-like edging or heavy outlines.
The key to working any bullion-related stitch easily? The milliner needle!
The eye of the milliner needle is more rounded than most needle eyes, and its shaft is straight, from the eye down. That lack of eye-bulge makes it very easy to pass a milliner needle through the bullion wraps. Also, the needle is long, which makes it easy to work plenty of wraps around the needle.
So, go for it! Try the bullion stem stitch – I think you’ll like it!
And if you have any Stitch Fun suggestions, feel free to leave them below!
You can find plenty of other hand embroidery stitch tutorials here on Needle ‘n Thread. You’ll find how-to videos for over 75 embroidery stitches, plus over 60 Stitch Fun tutorials that explore more obscure stitches, combinations, composites, and little tips and techniques to make stitching certain stitches easier. You can also find an alphabetical index of embroidery stitches available here.
Mary, once again. Fabulous.
This is so pretty. I’m now going to have to use this somewhere in the quilt I’m working on.
Thank you so much for these amazing stitches.
Eva McCormack
Hi there Mary,
Lovely idea and something I will incorporate on my next smocking project………can you tell me, the thread you used was it multi coloured, or have you used different colours for each bullion worked??
Would be fantastic to learn how you would personally develop this on a piece of work……I am more a sewer than an embroiderer, but have learned since smocking and am keen to more bullions on my work as I love them.
Thanks for sharing this fabulous idea, a departure from the classic bullion rose!!
Hi, Marysia! I used an over dyed thread here, so the change of colors is actually part of the thread. -MC
That combination is really fun — and I would never have thought of it.
I do have a Stitch Fun request. How would you make a peony or rose out of buttonhole bullion stitch? The Canevas Folies monogram kit I purchased (after seeing the kits here) specifies this stitch, and I couldn’t come up with a decent specimen to fit the small circle indicated for it. I used a different combination of stitches, but I would love to know what was meant.
By the way, I loved the kit and am hooked on the Canevas Folies line. Thanks for featuring it!
G’day Mary,
Very appealing and nifty, I like it.
Thank, Cheers, Kath.
Interestingly, I had never considered using bullions in this way – what a great idea Mary! Lovely texture and I can see this as a lovely crazy quilt seam treatment. Thank you for the tutorial and for mentioning me 🙂
What a beautiful stitch. Hope to use it on my crazy quilt block.
I would love to learn more woven stitches like https://needlenthread.wpengine.com/2013/09/stitch-fun-rose-leaf-stitch.html
Very clever stitch. Love the novelty of it.
Thanks, Mary, you are one of the great serendipities of searching the Internet!
Bev
Mary, I’ve been hooked on Needle n’ Thread since the first day I was lucky enough to stumble on it a few years ago. Thank you for your generosity in sharing your time and your vast knowledge of needle art. Would you tell us again where we could buy good quality ground fabric if we don’t have a resource locally? Was it Hedgehog Handworks? Thank you for being the treasure that you are to so many of us.
Hi, Kathy – Thanks! I’m glad you enjoy Needle ‘n Thread. Yes, Hedgehog Handworks carries the linens I use. Here’s the link: http://www.hedgehoghandworks.com/catalog/fibers_LinenFabric.php
Good Morning, Mrs. Corbet! I must admit that the 3D knot stitches aren’t favorites of mine. I don’t know if it’s all due to my Cerebral Palsy, or not, but I find any time I have to wrap thread around the needle things go haywire, and I can’t control the stitch at all. That’s why I make “Faux knots.”
I’d love to learn these techniques, but I haven’t found a way to adapt a method that works for my disabilities, (I hate that word) still, I’d like to see stitches that are used in Asian embroideries. Those always look so different to me. Have a great day!
You know, I really like this! It’s different and fun. I love the dimension of it. And it’s kind of wonky, but wonky is ok sometimes, right?
You’re a wonder, Mrs. Corbet. Thanks for sharing this with us!
Sarah 😀
What a great stitch. I can hardly wait to try it.
Sue
Thank you for reminding me how versatile the bullion stitch can be. I’ve had a basket staring at me for a few weeks because I couldn’t decide on a stitch for the brim. This will do great on a smaller scale.
Dear Mary
I do like stitch fun and this bullion/stem stitch and the colour of the over dyed thread you have chosen is beautiful. I must try this and use it as it would make a lovely boarder line. I have just been on Etsy and had a look at Colour Complements and they have a lovely range of over dyed thread I will have to invest in this thread next time I want a colourful outline. I looked at other Etsy thread sites and there is a beautiful Japanese gold from TheHauserGallery similar to the Japanese gold you used on the Medallion project, I was very tempted to buy some but I will have to think on that. Thanks so much for the tips and techniques on the stitch fun bullion/stem stitch, more please.
Regards Anita Simmance
Hello mary ma’am, the bullion stem stitch is really superb.just a while ago going through your website I saw your give aways of the needle id cards. They are so good. I really wish I could have them since I am just a beginner and I live in South India.in chennai,I have no proper access to shops regarding needles and threads. I would really love to have a small gift from you.i go through your website everyday.i wish i too will get a small gift from you. Thank you. I’m a new subscriber on your website
Mary, tried to find “milliner” needles at a quilt shop the other day, no success. However, just clicked on your ad at end of blog. They have them, but what sizes should I get? You mentioned #5 today, but since you get so many of only one size in a package, is there somewhere you can buy an assortment package? You also mentiong them in the French Knot tutorial, but not size. I am brand new to using any kind of decorative stitches in my multi media work. Am using your site to learn. Wonderful tutorials!!!
Thanks, Diana
Hi, Diana – I usually buy mine in combinations packets. You can also look for “straw” needles – they’re the same thing. In fact, at the local quilt shop here, I’ve found them in tubes, under “straw” needles, so you might have more luck with that.
Mary, I have been inspired by your instructional videos that I discovered on Pinterest. So I have begun to teach myself how to embroider. The project that I am working on is to embroider names of people on the band of a pillow slip. I was doing some drawing in the Zentangles style and am trying to combine doodling in embroidery to fill in the block letters that are about 6 inches tall. I outline the letters and then fill them in with designs. I find most stitches are linear and would appreciate some ideas for interesting fill in designs.
Thanks for sharing your passion.
Susan
Good morning Mary ~ I had to smile when I opened your newsletter today. I just finished the design I will be teaching at the Brazilian Dimensional Embroidery International Guild seminar next year. It has the bullion stem stitch in the design. I think it is a lovely stitch, so happy to see you showing it in your fun with stitches.
Sharon Shetley
Mary, I LOVE this stitch!
It is so simple, but also effective and elegant. I know just where it will be perfect for a piece of embroidery that I am currently working.
Now I am off to again review your prior stitch fun subjects.
Found you today!! So wonderful to have such great instructions! Thank you very much! It’s going to be tons of fun reading and trying all the different stitches!! 🙂
How fun this looks! Once I got the hang of it, bullion is one of my favorite stitches and with this you get to play with a lot of them. Cool!
No suggestions–just wanted to say–I love the look of that combination of stitches. Thank you for sharing it.
This looks a lot like Brazilion or dimensional embroidery which I love the finished look. Hopefully you will expand on these stitches in future articles. Thank you so much fot showing us so many variations of your work.
Thank you so much Mary. This looks beautiful and your tutorials are so easy to understand. That for me is a great big bonus. Bless you
Looks amazing!
I like this stitch combination – it will be perfect to use in crazy quilting applications, for sure.
Nice to see so many dimensional stitches coming back after so many years of the counted cross stitch craze. Mind you, I love ccs, too, bit I really miss seeing the gorgeous Brazilian embroidery threads on display at needlecraft shops. I have my own stash at home that I keep on a tie hanger in my craft closet, just so I can take it out and admire those gorgeous textures and colors!
Sometimes I think you and I would be great mates in a different place – I love your quirky sense of humour, eg, above, ‘…the dot, which I have affectionately named D.’ I am still laughing.
And it is such a pretty stitch. I will have to find an excuse, uh sorry, design, where I can use it.
My favourite leaf, which I use for roses, is bullion stitches laid side by side, similar to a satin stitch leaf. Very labour intensive, but I love the texture it gives.
I’m also wondering if there is such a thing as a detached bullion stitch….sort of like a drizzle stitch, but made with a bullion. I thought something like that would be quite nice for standing pistils.
What size milliner needle is advisable for four ply floss?