


I’ve spent the last week pondering how to get a highly detailed but very small hand embroidery design onto a piece of linen, with the least amount of grief possible.
The Least Amount of Grief Possible is the operative phrase.
For me, the transfer process of any embroidery design is always a bit of a hurdle. I don’t mind doing it, as long as I know it’s going to be successful. And once I’m doing it, even if I’m unsure, I’m ok.
It’s just that whole Gearing Up to do something I’m unsure of, that gets me. It looms. It swells into a mighty mountain. I turn in twenty different directions just to avoid looking at it.
Which is all rather silly, isn’t it? It’s not as if I haven’t transferred embroidery designs to fabric before! But, when it’s a project I want to be extra-careful about; when it’s a project that presents some logistical difficulties; when it’s a project for someone else… there’s always a little fear.
(True confessions here…)
So, this is the situation: I was asked to embroider a prayer book cover for a little girl making her First Communion next month.
I couldn’t say no. After all, it’s for my niece. And she adores me… well, she adores me, the way a six year old does when she wants something. Know what I mean?
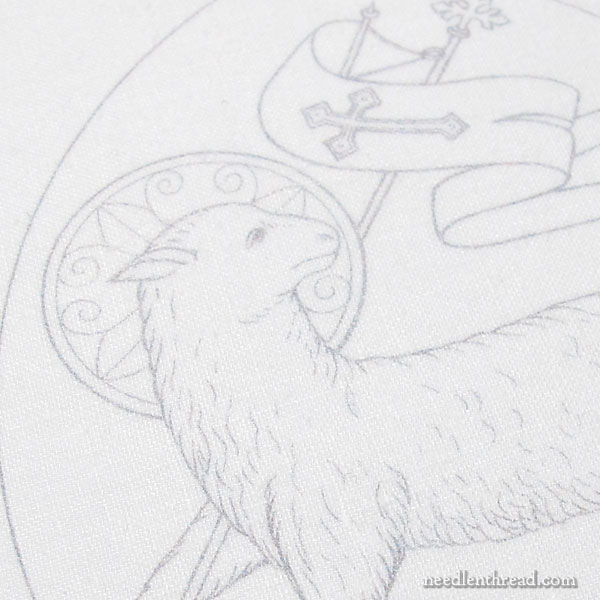
This is what she wants on her prayer book cover:
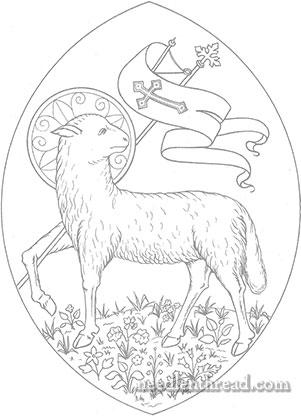
Now, the design above would not be so difficult to transfer at at it’s regular size, which is rather large. But reduce the design to about 4.5″ tall, and you can see how that much detail might be a bit of a bear to transfer.
I thought about just making a simple tracing of the main lines of the design, and then sketching in details where needed.
I thought about just winging it on the details. But that’s a bit risky.
I thought about telling my niece to take a hike.
But then I decided that was risky, too.
I thought about persuading her to something much simpler, like this cross and flowers design that I embroidered for her older sister’s prayer book cover years and years ago.
But, deep down, I really like the design, too, and, deep down, I’m kind of excited about embroidering such a small design with such minute details in it. I think it’ll be fun!
And deep down, I really do want to embroider a picture I know she likes.
And so, I pondered.
What to do, what to do…
And then I measured the book – front cover, spine, back cover – and I calculated seam allowances. Then I sketched up a model and made a paper version to test my finishing ideas.
This is when I made an interesting discovery. I discovered that the whole design, including the expanse of the cover and seam allowances, fit within the boundary of a regular piece of letter-sized paper.
And that was an interesting discovery, because when something can fit on a regular piece of letter-sized paper, there’s always the possibility that the handy-dandy home printer can be employed.

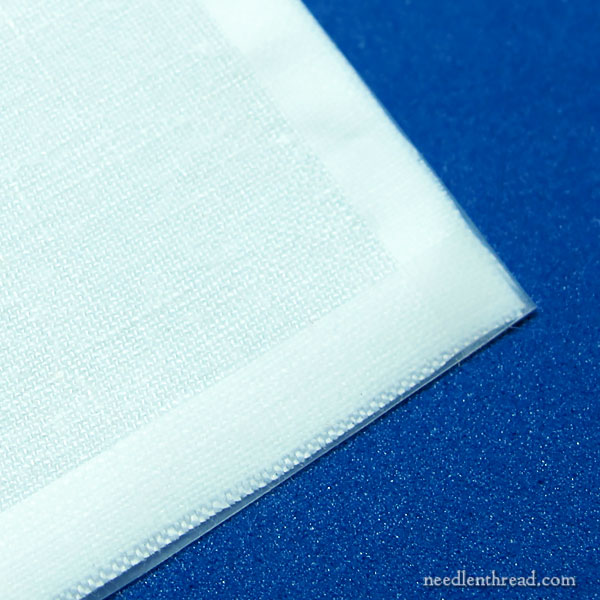
First thing I did was dig out a letter-sized sheet of freezer paper.
I foraged about for a large scrap of white ecclesiastical linen. Why specifically ecclesiastical linen? It has nothing at all whatsoever to do with the subject matter of the embroidery. Instead, it’s the fact that it’s a closely woven, fine linen in a fairly good weight, but “thin” – not a heavy, thick linen.
This point seemed important to me at the time, since I was planning to feed it through my printer. But more on that in a bit…
I ironed the linen first to make sure it was perfectly flat and wrinkle-free. I placed the sheet of freezer paper, shiny side down, on top of it. Then I ironed the freezer paper with a hot iron, to adhere it to the linen.
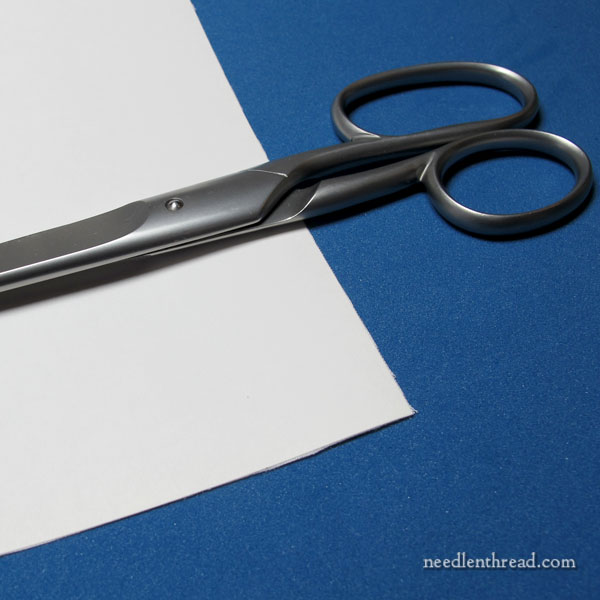
Next up, I trimmed the excess linen from the freezer paper.
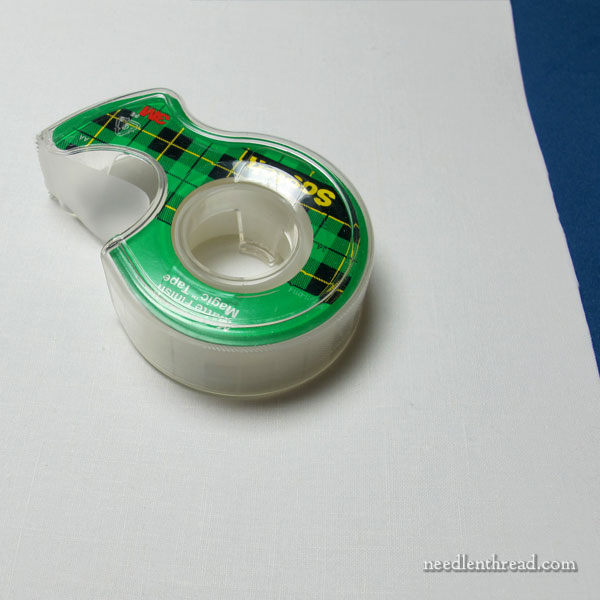
Then, some Scotch tape. I wanted a tape that would adhere, was not too thick, and would still release easily enough when I was finished.
I taped the edges of the freezer paper and linen, folding the tape over the edges to make sure they were fuzz and fiber free – no straggly linen threads or anything hanging about.
At that point, my fabric was ready.
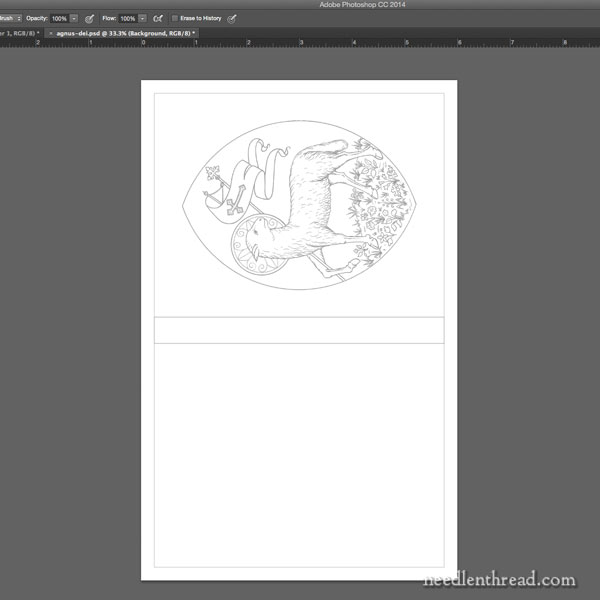
From there, I went into Photoshop and set up the design, reducing it to fit within the size of the book cover.
I ran a few test prints to make sure I was satisfied with the placement of the design.
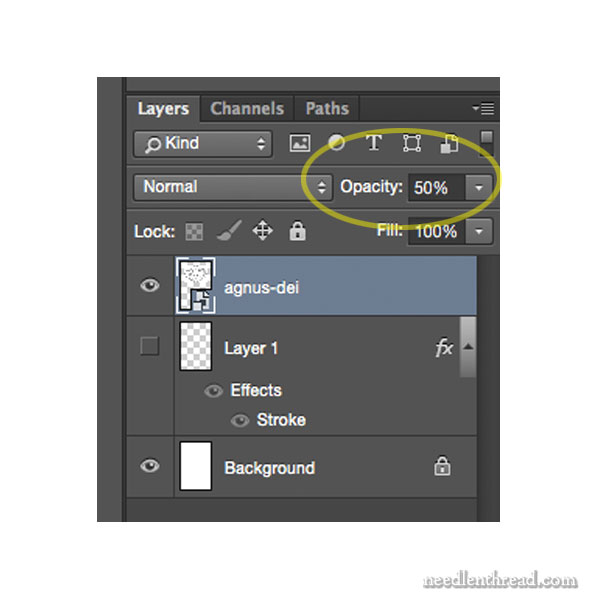
Then I reduced the opacity on the layer to 50%, so that the lines would not print black, but light grey.
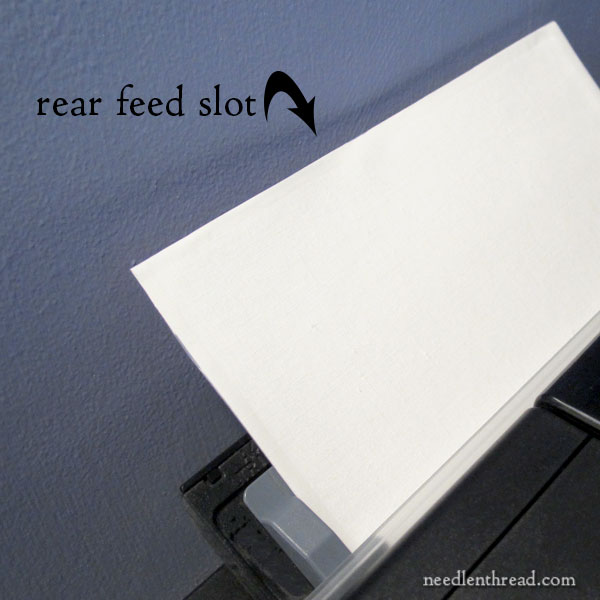
I loaded the linen on the paper face up in the rear feed tray on my printer.
I waited.
The printer warmed up a bit, pulled the paper in a little, tasted it…
and spat it back out.
At this point, I did what every self-respecting luddite would do: I smacked the printer.
Then I loaded the linen back into the rear feed slot.
The printer pulled it in a bit, performed another taste test, and decided it was good!
I patted the printer kindly.
(It really is a good printer!)
And in a split second, out came my linen, still on the freezer paper, in excellent shape, with a perfectly printed, pale gray design on it.
Oh, Happy Day!
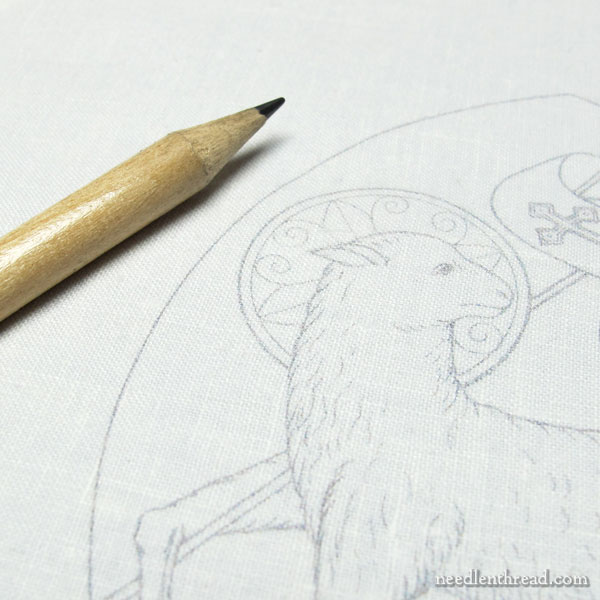
To put the size of the design in perspective, here it is next to the tip of a regular pencil.
Next steps: I removed the tape along the edges, carefully peeled the freezer paper away, and voilá! The design on the linen, ready to stitch!
It really came out perfect! I ironed the fabric face down from the back, just in case the ink needed setting.
I’ll be stitching the design with DMC cotton. This is for a kid, after all! And I know how dirty the white linen cover will get, despite every precaution. It will need to be washable.
I’m not ready to mount the linen on a frame and start the stitching just yet, though. After the pleasant results of this little experiment with this particular linen, I’ve decided to try it again on a heavier linen – Alba Maxima linen, which is a medium weight fabric.
That’s my plan for first thing this morning, and then, if it comes out well, I’ll be ready to start stitching.
And if it ruins my printer, you’ll hear me howling!
I use Scotchguard to protect fiberwork such as bags and placemats from spills, grime, and so on. It’s not visible on the textiles, it doesn’t have any particular feel, and it does help the fabric resist the assault of use. After washing the items, I reapply. It’s not impervious–so it only helps resist spills and dirt, doesn’t stop the issues, but usually that help is all you need. Maybe it would help your niece’s piece to stay white during the years she will use it.
Some time ago, I believe there was an environmental issue with the Scotchguard formulation. I thought it had disappeared from the market, but it’s been back for several years, and still works well.
Great post, Mary. Love how you worked it out. Glad it did work and I wouldn’t be pushing it, LOL! Anyway, wouldn’t the thinner linen be easier once it comes to making it into the book cover?
Hi, Debbie – in fact, it would. But I think I’ll have to back the finer linen with cotton, anyway, just to give the whole piece a little more durability. If not that, then I’ll have to make an interfacing type insert, so that the real book cover doesn’t show through the linen.
I just did a very similar technique (without the tape – I live dangerously!) and it worked really well. It was a retirement gift for a coworker and I had the whole office sign the design and I was able to embroidered each person’s unique signature into the work.
I had never tried anything like this before but now I know how easy it can be, I will definitely try it again!
His wonderfully simple design transfers can be using the freezer paper/ printer method you described Mary. It seems freezer paper is a uniquely American product as I have not come across it here in Botswana nor in South Africa. Is there any alternative?
I think perhaps it might be called butcher paper?
No, not really, butchers paper is different here in Australia. On line purchase of precut a4 sheets seems to be the best option.
Freezer paper does seem to be uniquely Americn. Don’t use freezer go between!
Ps Mary I am under the impression that the printer needs to be inkjet or bubble jet NOT laser? Is that correct. Some printers will definitely not take the extra thickness.
I used ink jet. There are other precautions, too – I’ll discuss those next week when I show you the second round of printer attempts. The ink is certainly not color fast unless you use a fixitive, and they can be problematic.
That has come out really well – but fancy putting fabric through the printer, brave lady! By the way, this will probably show me up as useless at home economics but what is Freezer Paper? Why/how does it iron on to things? It sounded rather magical the way you described it 🙂
Hmmm…I wonder if it is butcher paper other places? It’s got kind of a wax paper like surface on one side, so that’s the part that adheres to the fabric when ironed. Here in the States, it’s sold in printer sized sheets in craft stores, because you can print on it, and then iron it onto things like fabric, and cut along the printer lines.
Could it be waxed paper?
No, not wax on both sides. Otherwise, it would not iron onto the fabric this way and peel off. I looked it up – freezer paper is called “grease proof paper” in the UK.
Ilke, it’s not normal UK freezer paper, which is waxy but doesn’t have the sticky plastic coating. Try searching online for quilter’s freezer paper — I found some for what I guess is a reasonable price (£7.25 for 30 sheets). It also is useable for “all-in-one printers”, whatever those might be, as well as laser jets.
Mary was that an inkjet or a laser printer?
It’s an inkjet! Should have mentioned that – sorry!
I think with laser jet printers, the heat may cause it to smoke – and you know what they say about smoke!
I’m with you when it comes to anticipating transferring fiddly designs. (One time, I even cleaned a bathroom, which at least was a useful displacement activity.) What a genius solution this is! I’ve never copied a design onto linen using a printer so I don’t know if it makes a difference, but is your printer an inkjet or laser printer?
It’s an inkjet! I wouldn’t necessarily use the process for any kind of major project. I don’t know what the effects of the ink are on the fabric over time. But for this project, I think it will be fine. If anyone else knows about how inkjet ink stands up over time, or has any input on the type of ink it is and what’s in it, I’d love to hear!
How clever! I admit I wouldn’t have thought of this solution but now I’m sitting here eyeing my printer… it’s persnickety about photo paper so I wonder how it would deal with fabric. It’s worth a try though! I have seen commercially available sheets that are made to run through a printer and peel off the back, both cotton and silk if that is useful to anyone. I saw them at JoAnn’s in the aisle with the tshirts and transfer paper.
Hi, Beth – I’ve tried those sheets, a while ago, for a colored picture someone wanted printed on silk. I tried both the cotton and the silk. I don’t like them so much – the fabric is rather flimsy. I think it’s also treated with some kind of setting agent, so I think it depends on what your plans are for the fabric. But for some projects, I think they’d be usable. If you try your printer and it jams….uh…. don’t blame me! 🙂 I’d be careful if it’s already persnickety.
Well done – that has come out very clear and clean. I shall have to experiment for myself.
Is your printer an ink jet or a laser printer?
Inkjet!
Question: Does the computer ink run and seep into unwanted places when pieces that used this transfer method are washed? It’s always a fear of mine that when I wash the embroidered piece that I spent so much time to make the threads or transfer lines will run. . .
And do you need to have a specific kind of printer?
Sarah
It’s an inkjet printer. I ironed it to set the ink, and it seems to have worked – the ink does run if it is spritzed. I haven’t tried soaking it. But this is another reason to use a very faint line. I think if that light grey did bleed, it would rinse all the way out eventually and not be noticeable. I don’t know about archival properties of this kind of ink, so I wouldn’t use this on something I want to be archivally sound, but for this project, it works.
Mary, you’ve found the quilters and appliquers trick…lol….a lot of quilters use freezer paper (it also comes in rolls in the aisle where wax paper, aluminum foil, and stuff like that is.) On the roll it’s 18 inches wide and I don’t remember how many feet but I would imagine it’s cheaper to buy it that way than in the precut sheets. I print on fabric all the time.
If you go to my website http://www.cibsplace.com/Gallery.html and look for Gabrielle’s ornament you’ll see an example.
there are also companies that make fabric especially for printers. And yes use ONLY an inkjet. The laser printers use a lot of heat and you could accidently adhere something that would totally destroy the printer. Anyway, the company I use is June Tailor, Inc. http://store.junetailor.com/store/c-1-inkjet-printer-fabrics-and-transfers.aspx they make many many different kinds of printable fabric. some of it is supposed to be washable.
I have also used Sticky Fabri Solvy and that works well too. But for really detailed printing, the fabric on freezer paper is best. I don’t know anything about photo shop but to print a very fine grey line go into the printer properties and select “draft”. this will give you that very fine grey line.
As ever, thanks so much for all you impart to us.
Dear Mary
What a lovely design to embroider I’m sure you will enjoy the project and an appropriate pattern for a Holy Communion especially your sweet 6yr old niece. The transfer method above is great just think no lightbox no prick and pounce just put through the printer as you say success, great. Just a question could you print the pattern onto fabric without photoshop or which photo shop app have you got. Oh by the way you can buy freezer paper in the UK at Amazon cost is £5.76 for 50 sq ft/ 4.64 m sq 12.1 m x 381 mm Plastic Coated Freezer Paper. Thanks for the instructions on how to transfer patterns using the printer. I hope it works on Alba Maxima fabric good luck. I’m thinking of joining you on this project can’t wait for your choice of colour threads and stitches.
Regards Anita Simmance
Hi, Anita –
I think in any photo editing software, you can adjust the opacity of the image. I use Adobe Photoshop CC – it’s probably not worth investing in it (it’s actually cloud based and a monthly subscription) if this is the only way you’d use it. But I’m pretty sure there are other (free) photo editing apps that will let you change the opacity.
Dear Mary
Thanks for the reply I will look at my printer and see yes I looked it up and there are free photoshop but not sure how good I will browse and see. Good luck with the transfer.
Regards Anita Simmance
Well, in short … Don’t use the heavier linen! :-/
Oh no! what a shame I hope you didn’t hit it.
Regards Anita Simmance
Wellllll…..no. I didn’t! I thought about it. But it really was stretching it a bit, to try to fit that particular fabric through. I have some other ideas brewingt, though, for the future. But in the meantime, I don’t think I’ll put my printer through that again, not if I expect it to keep working well for regular office use. 🙂
I have the VERRY BASIC photo editor that came with the software package.
However, on my all-in-one printer, I can print the design on regular paper, then copy the design to the freezer/linen sheet, using the Lighter/Darker adjustment on the printer. I can run test sheets to see if the copy comes out light enough.
I’ve run freezer paper through my laser printer with no problem too. With and without fabric attached.
There is another product called Transfer-Eze. You run it through your printer and it photocopies your design onto a kind of film that you peel away from the paper backing and stick to the front of your fabric.
I’ve used it with patterns that are hard to transfer and with projects where tracing isn’t possible. Works well with dark fabric and I forgot to mention it the other day when that was the topic.
You soak the piece in cold water when you’re done and the film just melts away.
Cindy
Hi, Cindy – I’ve used Transfer Eze, too – and Solvy’s version, called Sticky Fabri-Solvy. Both work well for their intended purposes. On this type of embroidery on linen, though, I probably wouldn’t use it, because the stitching will be pretty dense (lots of coverage), but I want it flat. With the Transfer Eze, there’s always a little give in the thread after using it. I love it for cotton and for flour sack towels and the like, but I’m not so keen on it for this type of project.
Hahaha – Luddite!
🙂 Couldn’t resist!
Hi Mary! Congratulations! There is nothing wrong with taking the easy way out, lol.
I’m a artist/knitter who switched to embroidery for a wedding book commission and to find another movement for my hands––and fell in LOVE. Here’s another neat way to transfer complex designs to ground fabrics. Avery makes an adhesive label paper that is 8-1/2″ x 11″. Press your ground fabric to it, and run it through the printer. There is no residue on the back side (I used organza).
Inkjet printers are wonderful. I have even used single knit jersey. I love the stability the adhesive label gives me. Make sure to clip a tiny corner to make peeling easy.
I’m purchasing a new printer soon that will handle card stock, so I can print on heavier ground fabrics.
I, too, have used the full sheet label stock on a laser printer and it worked fabulously!
Hi Mary, I am a quilter and I enjoy reading your blog because you share so much information I always learn something new. I must direct you to the Inklingo web site. Linda Franz created a system that prints on fabric using an inkjet printer to print on the wrong side of fabric to mark quilting lines. Just thought you might be interested.
Thanks for all you do to encourage others in their needle pursuits.
Awesome, thank you. And thanks to all the people with added comments!! This technique will only work on small designs that can fit on 8 1/2 X 11. I wonder if commercial printing/copying stores such as Kinkos or FedEx could do a larger design. I guess they use laser, not inkjet printers.
Has anyone tried sending tracing paper through the printer using the same technique with butcher paper?
Do you mean, with fabric sticking to the tracing paper? How would you adhere it? It really has to be “melted” somehow to the whole surface, not just on the edges, or you risk the fabric bubbling and wrinkling as it goes through. But if you mean just putting regular tracing paper through the printer, yes, I do that all the time. It works fine on mine.
I recently transferred 48 photos to Southern Belle Cotton Broadcloth (has no nibs) to use in crazy quilt blocks for two of my granddaughters. I used Bubble Jet 2000. After printing use Bubble Jet Rinse to rinse out excess ink. Regular detergent will run the ink. They came out beautifully, the blocks are assembled & I’m embroidering on them now.
This is a great tutorial, thanks for sharing! The opacity trick is brilliant.
Hi Mary,
I know you must have sang, “Halleluja” when it worked! My heart was beginning to beat fast in anticipation of what the printer would do. You are a good story writer! I really enjoy your posts. I follow you on Facebook and have posted several of your projects on my page “Susie’s Folk Fiber.” I ordered the ebook of Christian symbols and themed pictures and am looking forward to getting it printed off. Thanks for your joy and enthusiasm for creating beautiful work and sharing your knowledge with the often unknown “us” out here in cyberland. It is something so many of admire. God Bless.
Thanks, Susan! I’m glad you enjoy Needle ‘n Thread!
Well, not to ruin the suspense for the next printer tale, but I did manage to botch it a bit this morning! Ah well…..!
Dear Mary, I have been using printable fabric sheets for many of my embroidery projects. You buy them ready for printing on an inkjet printer. The fabric is 100% cotton with a 200 thread count. I bought mine when I visited the States on a few occasions. There a two companies C Jenkins ( http://www.cjenkinscompany.com/) http://electricquilt.com/online-shop/category/inkjet-fabric-sheets/ and you can also get it at Jo-Ann’s. All three have on line shops.
You can also print your image in full colour and embroider over it. You need not embroider the whole image, only the main and outstanding parts. An image printed on fabric is of course used by Di van Niekerk on her numerous embroidery pieces and that is where I learned this technique.
Kind regards. Elza Bester Cape Town.
I’ve printed on fabric for other sewing and crafty things–my favorite pin cushion is a vintage sewing advertisement that I printed on quilting cotton and sewed up–but never thought of it for transferring an embroidery design. Clever lady!!
I’ve done this on muslin. Another thing you can do, if your fabric is too heavy for the printer, is print your design on wash away stabilizer. I managed to do a couple of one inch portraits with this method.
AMAZING!
God bless your ingenuity.
There are many things I enjoyed about this article, but identifying with “At this point, I did what every self-respecting luddite would do: I smacked the printer.” was brilliant!
I love your attitude towards giving things a go, especially as you are not afraid to let everyone know when things don’t go quite to plan.
It is very motivating and inspiring to read your posts.
Thanks again Mary!
🙂 Thanks, Melissa!
Bless You. That certainly put a smile on my face with my first coffee of the day. Lurking somewhere I have a small roll of freezer paper which will be the object of my Easter Friday treasure hunt today instead of for hot cross buns or Easter Eggs. I’m looking forward to trying it out.
if you would like to try printing on a larger piece of cloth, HP makes wide format printers that handle up to 19 x 13 inches. Jenkins makes 12 x 15 inch sheets of freezer paper that is a little heavier than paper on a roll.
Hi Mary,
I have enjoyed reading your articles and learned quite a few tips and techniques from you.
Even as I was about to give up my attempt to print on fabric attached to freezer paper, due to the paper not being fed into the printer, I read this article of yours and it was a Hurray moment for me. I put a piece of tape along the edge that goes in to the printer and….. the image was printed on the fabric 🙂 You saved my day. Thanks Mary for being so generous in sharing your knowledge and experiences.
I took a quilting class from an award winning teacher who transferred all her quilting designs from a computer to her fabric that she used for applique, and overall hand quilting. She used only cyan blue ink as she found it was the only color that would always wash out easily from the cotton quilting fabric. Just thought I’d pass this along, I have not personally tried it.
I just saw this on Pattern Review website, and thought of all the time you’ve recommended Micron pens for pattern transfers….
http://sewing.patternreview.com/SewingDiscussions/topic/91538
Has Pigma changed the formula and now it is no longer permanent even after ironing? Has anyone had issue with recently purchased Micro pens washing out?
Hi, Gail – I usually iron mine after using it. But I don’t always wash the pieces I use the micron pens on, either. I usually use them on things that I don’t iron. Anyway, I talked to the folks at Sakura a while back, when I wrote about their pens. They are permanent on paper, and they are made for paper, but they don’t guarantee them to be permanent on fabric. I find that if the fabric is pre-washed and all the sizing is removed, and then if you use the fine pens (.20mm) and iron the linen after using, they don’t run. I hope that helps!
PS – the only colors I’ve used are black, brown, and sepia.
Mary.
I know how you feel about freezer paper and your printer. I found out about it many, many years ago when I did patchwork and hand quilting. It is wonderful when you can set the ink to a lesser percentage. I have used it on a variety or fabrics and all worked perfectly. (a couple of try outs of course) I have made up A3 as well but as my home printer is only for A4 I take it to work or a printer shop which costs me a $1.50. That was for a Jacobean work. So if anyone tries it I think they will find it great. A3 is great for making cushions. If you use a medium weight canvas remember to change paper type(thickness) on the printer otherwise you can get a jam.
EASTER:- We don’t have choc rabbits. I am trying to encourage my grandsons that in Australia rabbits are vermin the same as wild domestic cats. They have caused untold damage to our farming land and the cats to the fauna.
Our Bilbies, which look a bit like a rabbit (Google it)and, are native here have been just about decimated by the feral cats. Bilbies are best. We still have Easter eggs as I have chickens. I make a new nest with fresh straw in the hens’ house after letting the chooks out. I put a few different sizes of eggs in and when the boys arrive I take them out to see if there are special eggs. Well that goes down well. One Easter my plan failed. The boys and I went to the hen house to collect the eggs Ohhh, alas my old broody Henrietta was well nested on the Easter eggs. Needless to say some of the eggs were flat and all were very soft. The fridge for 1/2 an hour was a big help. The Bilbies were consumed instead although it took a bit of doing as the boys being older didn’t like eating the Bilbies as the feral cats do that. Get out of that one Ma.
“Well my dears these Bilbies are not real but are left as presents for you by the real Bilbies because you help them and it is to say thank you.”
One has to think quickly on many occasions. Thankfully strong tea was available.
I hope you and all the group spent a lovely time together with your families.
Blessings
Thanks Mary
Hi we have Heritage temporary spray glue in South Africa which is useful when using a printer to put a design on to A4 size paper through the printer.
I simply starched my linen and put it through a laser printer. It worked fine. I set the ink to light grey and it printed well. the lines faded after some test washings and I would hope that they might eventually disappear.
I have also found a paper that does allow you to print onto it and then iron off the design onto linen as per traditional embroidery transfers.
What type of printer did your use? (ink jet? laser?)
what brand? model?
Gostaria de saber como conseguir os riscos (gráficos) desses motivos religiosos.
I will try this aside have been using the Woner Under with the object printer on copy paper, but Wonder Under is so hard to get off the material I embroider on.
Dear Mary,
Thanks so much for all the information in your web. For me, it is an embroidery encyclopedia 🙂
I would like to ask if you know how to print the image on fabric larger than A4 size like those in kit set? Please advise.
Thank you once again for your good work.
Teresa
I suppose you’d have to have a larger printer, if you’re planning on printing directly on the fabric? But I think that can end up getting pretty pricy!
Thank you.