


I love lattice fillings!
For those of you who have worked my Lattice Jumble Sampler, this might not surprise you.
Today, we’re going to talk about lattice filling stitches and I’m going to share a couple tips to help you achieve evenly spaced, straight lattice stitches without marking up your fabric.
There’s just something about large (or small) areas on embroidery that are filled with lattice stitches. They can be subtle; they can be bold. They can be colorful; they can be monochrome. They can be wildly patterned; they can be simple. There are so many possibilities that lattice fillings offer the embroiderer!
What I like best about lattice fillings, which are commonly seen in traditional crewel work and Jacobean style embroideries, is that they’re a magnificent way to fill a large space with pattern and color.
They also work great as a grid to hold down long areas of surface satin stitch.
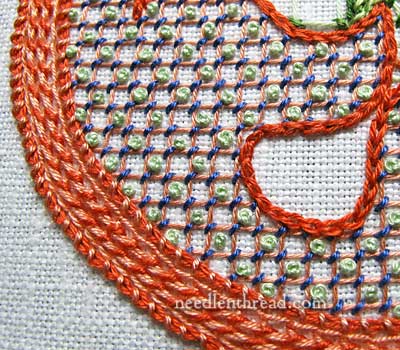
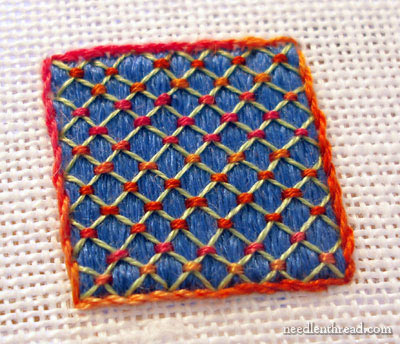
If you look at my Very Old how-to video for lattice work, in the sample (pictured above), the background behind the lattice is filled with smooth surface satin stitch. The lattice provides a framework to hold those stitches in place, while at the same time visually enhancing the filled area.
The Problem with Lattice Fillings
But lattice fillings, especially those worked over other stitching, can present a problem for the embroiderer: how can I assure an even spacing and straight lines on lattice stitches, if I can’t mark the fabric?
This is a question that’s come up several times, and last week, I had the perfect opportunity to take some photos to show you two methods that can help you space straight lattice stitches, when you can’t mark your fabric.
In fact, these methods will help you eliminate marking the lattice lines on your fabric first, even if you can mark your fabric – and that’s a good thing, because designs markings on fabric don’t always come off!
Two Methods to Ensure Straight, Even Lattice Fillings
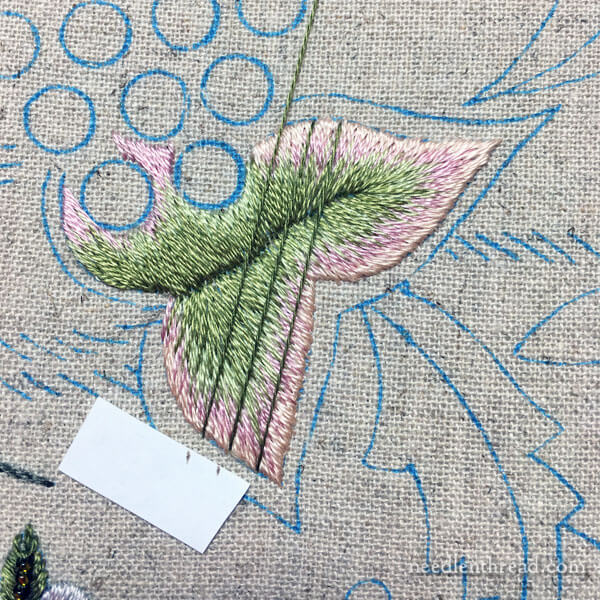
I was working through a portion of Late Harvest last week. This particular section involves a lattice grid stitched over a leaf that’s filled with long & short stitch. (I’ll write more about this leaf and my thought processes while I worked through it later, when I give you a project update on Late Harvest.)
For now, we’ll chat about two methods that you can use for getting the lattice part right.
The First Stitch
The first stitch is important! Always start your first long lattice stitch somewhere in the middle of the area you’re going to cover, where it can stretch over the whole design space uninterrupted.
This will set the direction of the subsequent long lattice stitches – every stitch you make after the first one should be made so that it lines up parallel to that first stitch.
Subsequent Stitches
After your first stitch is in, it’s just a matter of spacing the long lattice stitches evenly and making sure that they’re all parallel to each other.
One thing you can do to help with spacing is use a small scrap of paper that you’ve marked. You can see a little scrap of paper there on the fabric, where I’ve marked the spacing between the first two lattice stitches.
Now, I can use that little piece of paper to help me determine the spacing between subsequent lattice stitch. I just line up one mark with the previous stitch, and start the next stitch where the second mark is.
To ensure the stitches lie parallel, I stretch the working thread over to the other edge, under tension. I make sure the thread is parallel. Where it crosses over the far edge is where I need to end the stitch. So I just eyeball the parallel-ness of the thread compared to the previous stitch and, to end the stitch, I insert my needle where the thread passes over the edge of the design.
This technique works best on design elements that have straight edges. On design elements (like the leaf) that involve curvy edges, it’s not as easy to line up the spacing, because the little scrap of paper doesn’t bend with the curve (and if it did, the spacing would change).
But in a pinch, this works as a decent way to gauge the distance between your stitches fairly accurately.
A Better Method
But a method that works even better – and that works really well on elements with curved edges – is a longer scrap of paper with a straight edge.
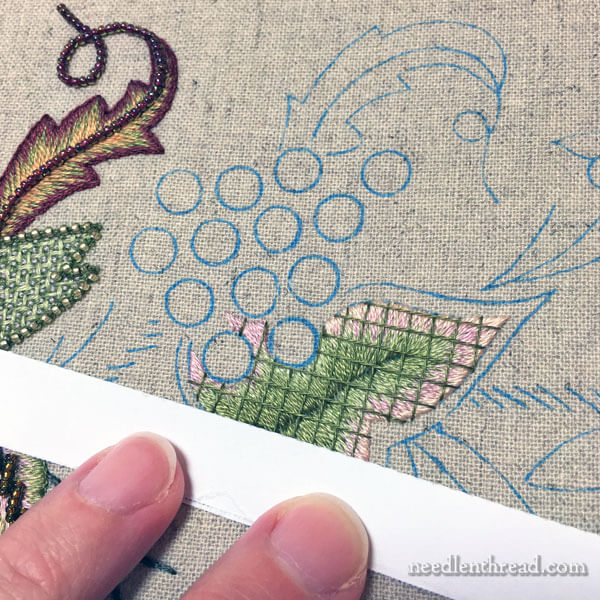
And yes, you can use a ruler. I generally just grab something with a straight edge that’s close by – in this case, it was a scrap of paper.
Once you put your first long stitch in, you line up the straight edge of your thing (whatever it is) next to your first stitch, eyeballing the spacing to make sure you like it and making sure the straight edge is parallel to the stitch.
Then, you bring your needle up on one edge of the design, right where the straight-edged thing crosses over the design edge, and you take your needle down to complete the long stitch on the opposite edge of the design, where the straight-edged thing crosses over it.
This is a terrific method for guaranteeing straight, evenly spaced lattice lines, but it requires you to eyeball the spacing using the placement of the straight edge. That’s fine! You’d be surprised how reliable your little eyeballs are, when it comes to recognizing even (or uneven) spacing.
This method costs nothing, takes very little effort, and helps produce really nice, even results with lattice lines.
It’s also a great method to use when your lattice filled area is interrupted by unfilled areas. It helps keep the continuity of the stitches across the whole lattice filling, even if there are unfilled areas inside the lattice filled areas.
So, there you have two very simple ways to help you create evenly spaced, straight lattice fillings. Nothing to it!
More on Lattice Fillings
If you’d like to read more about lattice fillings on Needle ‘n Thread, you’ll find quite a few tutorials and articles for various types of lattice fillings in the Stitch Fun! series, here.
And if you want to work up your own lattice filling sampler, you might enjoy my Lattice Jumble Sampler Guide. It’s fun. It’s colorful. It’s kind of weird. But it’s very instructive!
Happy Monday!
That is brilliant and so simple! I’m about to begin a piece of crewel work and I really want to include lots of lovely lattice stitches, but mine always end up wonky. I’m sure this will help.
Templates are wonderful extra tools for stitchers.
I find that the blank side of a business card ideal for stitch spacing and will even put in the marks for 3 or 4 lines/or stitches. When all the marks and stitches line up, I know that I am on the right spot. Amazing how the eye sees unevenness so well but has a harder job with achieving exact evenness. Thanks for sharing Mary.
All the best Ann B.
Clever!
Hi Mary, Love the tips thank you! I recently tried some lattice work and on the first try the lines were wonky, so I spent quite a while unpicking, then measuring and marking… These tips will be great for next time!! Best wishes
Dear Mary
I have your Lattice Jumble Sampler it’s a great ebook lots of instructions and tips. My lattice lines are mostly always wonky although I love Lattice designs and stitches and the two methods above look great for the perfect lattice design, so simple and no expense and a full proof way of keeping your lines straight. I like the unusual lattice design over the leaf above very nice. Thanks Mary for the tips and tutorial above on the lattice stitch, this will definitely come in handy next time I incorporate the lattice stitch in my embroidery projects.
Regards Anita Simmance
😀
Suddenly, I feel like I’m brilliant!!
Because this is what I do! With a clear, gridded, quilter’s ruler, I line up subsequent stitches after the initial stitch. No marking. No wonky lines.
In a pinch, I’ve also used Tiger Tape.
I think I would print a grid on a tear-away that you can see through, place that over the section to be covered and stitch through it. Then rip off the paper at the stitched outer point of the grid and slide the inner part out.
Has anyone ever done that? I generally think faster than I stitch but I wonder if my ideas are really practical. LOL
Diane
I have used a similar method for spacing stitches when crazy quilting. I have printed out a variety of sheets of graph paper. These sheets have varying numbers of boxes per inch. I cut a strip of paper from the sheet with the spacing I want and use it to space my stitches. It works great, doesn’t cost anything and I keep the sheets of paper in my sewing box.
Excellent! I had this problem 2 days ago, filling in a pomegranate middle. It came out nice, but this will make it MUCH easier.
Ah — this method works if you have what you are stitching in a frame. If you have a hoop — it is much harder to hold a straight edge against where your stitching will go.
I am not particular with exactness in my stitching. Which works well with me, but could be a handicap. I loved your lattice work sampler. I am also contemplating using lattice on the frame for a monogram I’m currently working on. Thanks, Mary!
P.S. And how that lattice is going to look over that leaf is VERY intriguing to me! Can’t wait to see the finished product.
Why won’t it work with a hoop? Just because of not having hands free or is there some other difficulty I haven’t thought of?
I have the kind of hoop with a bit you sit on (I know there is a name for it but I can’t remember), so I still have both hands free for stitching, and I’m hoping this method will work for me!
I mostly embroider with a hoop and haven’t had any problems with this method at all.
If eyeballing isn’t precise enough for you, look into getting an “8ths graph” transparent ruler (although I suspect the clear quilter’s ruler is probably marked similarly). It’s transparent and has a quarter inch grid marked along the entire ruler. Then you can line up the long stitch with one of the lines in the middle of ruler and make the new stitch along the edge of the ruler.
I keep a teensy (6 in long 1/2 in wide) in my stitching box.. 🙂 My dad gave it to me, he used to be a manual draftsman and no longer needed it when they moved drafting to computers. 🙂
Hi Mary,
I have found a little, square quilting ruler I have invaluable for any thing like lattice fillings. It is about 6 inch square and is gridded and also has some diagonal lines on it, and being see through, has migrated from my quilting supplies to my needlework bag.
Excellent tips, as always Mary. I really enjoy reading your blog and I learn so much from it. Thank you.
This tip got me thinking – how about using an L shaped scrap of paper? Then you could use the bottom “horizontal” part as you describe in your second method, and the “vertical” part could be marked with the distance between the stitches as in your first method. Place the L against the last stitch, push your needle through the fabric at the edge of the leaf (or whatever) where the mark on the vertical is, then slide the L up and use the horizontal to guide the straightness of the stitch.
Would that work? Does my explanation actually make sense? Trying to write it has added even more to my respect for you and your oh-so-clear explanations!
With very best wishes
Gail
Hi, Mary. Boy! Am I glad to read your tips for working Late Harvest! I, too, have been a little slowed down by certain elements being worked “backwards”. I think I will give myself a little more artistic license to work in whatever manner feels right and with which I won’t have to retrain my brain. I stopped at the little flower with the bead, though, and the stumpwork leaves. I was concerned the more raised elements would get too much wear and tear before the piece is finished and I just couldn’t do it! Your piece about the stumpwork leaves really answered a lot of questions I had. I have been hoping you would get back into Late Harvest. Thank you!
Hello,
I am a beginner at beading…I am making my daughters wedding veil and want to embroider the edging with some very simple beading. I’m wondering if you know of how i can keep a pattern to evenly space around the edge through tulle material. I know it will be tedious work and doesn’t need to be perfect since it is just on the edge of the veil. . Any ideas?